Mini Wreath Ornament
© June Gilbank 2013
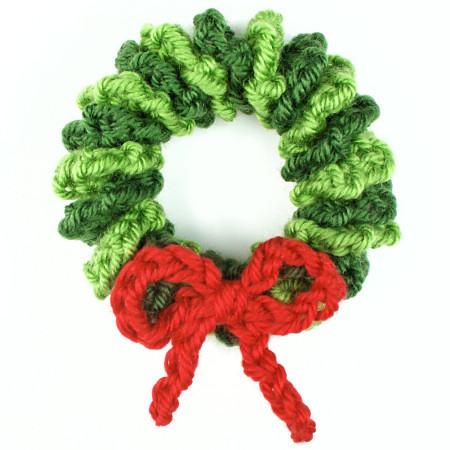
This sweet little pattern lets you make surprisingly realistic leafy miniature wreaths – at only 3″ across, they’d be perfect as Christmas Tree ornaments or seasonal decorations. A Mini Wreath works up in no time and comes together like magic with almost no sewing required – you won’t be able to stop at making one! Make them in leafy greens, or any pair of colours to match your holiday decor.
This pattern is Donationware – the pattern is available for free, but if you like it please consider sending me a donation to show your appreciation:

Send me a donation and receive the easy-to-print PDF version of the pattern as a thank you! It includes some additional assembly photos that you’ll only find in the PDF version.
Donations of any size are much appreciated. Just add the amount you wish to donate, and, once you have checked out and paid, your pattern will instantly be available to download from your PlanetJune account.
The complete pattern and instructions are available below, regardless of whether or not you choose to pay for them 🙂
This is a PlanetJune original crochet pattern. Feel free to use items made from this pattern however you wish, but I’d appreciate credit as the pattern designer. Please do not reproduce the pattern anywhere else; instead post a link to www.planetjune.com/wreath
Not ready to make it yet? Add it to your Ravelry queue:
Terminology
| ch | chain |
| sc | single crochet (double crochet for UK/Aus) |
| sl st | slip stitch |
| st | stitch |
You will need…
- H US/5mm crochet hook
- Small quantity of worsted weight yarn in one or two shades of green, and red (or colours as desired!)
- Yarn needle to weave in ends
Size
Approx 3″ (8cm) diameter. (Your gauge and yarn choice will affect the finished size slightly.)
Gauge
Gauge is unimportant for this pattern. I like to crochet the wreath with a larger hook than I’d use for amigurumi – the looser stitches prevent the wreath from becoming too rigid. Use the recommended hook size on your yarn’s ball band as a starting point.
Notes
As the foundation chain won’t be visible, you can crochet into whichever loops you find easiest. (You’ll probably find that working into the top loop of the chain is fastest!)
Colour Code
| A | dark green (or any colour of your choice) |
| B | medium green (or any colour of your choice) |
| C | bright red (or any colour of your choice) |
Leaf Spiral (make 2)
With A, ch 36, sc in 2nd ch from hook,
*ch 2, (sc, ch 2, sc) in next st, ch 2, sc in next st;
repeat from * until last ch.
As you crochet, your work will automatically curl up into a ruffled spiral. Fasten off, leaving a long yarn end, and set aside.
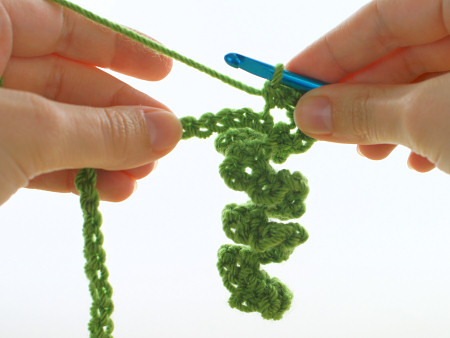
Repeat with B to make the 2nd spiral.
Lay the two spirals next to each other with the yarn tails at the same end. Hold this end of both spirals together and begin to twist the two spirals around each other.
Note: If you hold one spiral still and twist the other around it, you may end up with one stretched more than the other, and the bottom ends wouldn’t match up as one would be longer than the other. To prevent this and keep them even, it’s best to lift A over B, then lift B over A, and keep alternating in this way to interlace them all the way along.
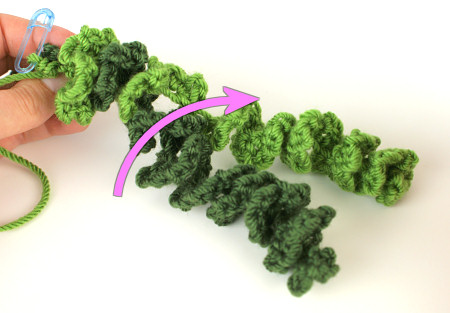
Continue twisting the spirals together all the way along their length, until they are joined into one long ruffled cylinder.
Bring the ends of the cylinder together to form a ring shape. Using a yarn needle and the long yarn end from each yarn, stitch the ends of each spiral together. Don’t worry if it’s not 100% invisible – the bow will cover it!
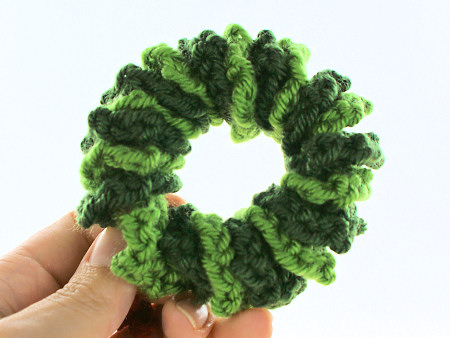
Weave in all yarn ends by passing them along the centre of the wreath spiral, where they won’t be seen.
Bow
With C, ch 36. Fasten off, leaving a long yarn end.
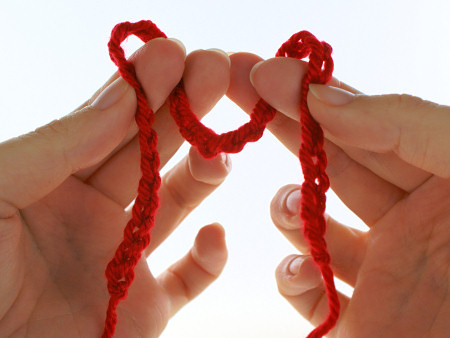
Form ‘rabbit ears’ with the chain around your forefingers:
…and tie in a loose bow:
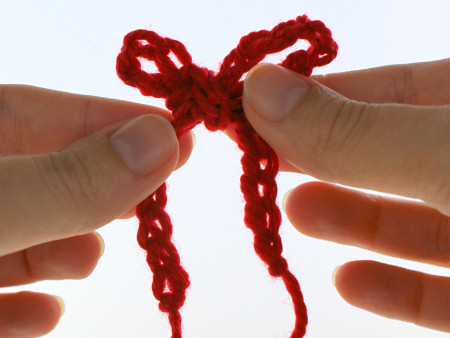
Tweak the loops and ends so the loops are nice and round and everything looks fairly even – it doesn’t have to be perfect! – then pull carefully to tighten the knot.
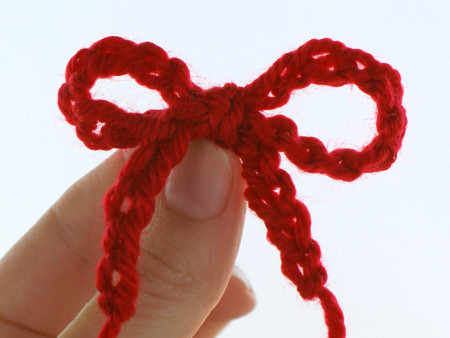
Flip the bow over so you’re looking at the backs of the chains. Using a yarn needle, weave each yarn end up through the back bumps of the chain to the knot. Trim the starting yarn end.
To secure the bow (so it won’t come undone if someone pulls on the ends), use the long yarn end and wiggle the yarn needle all the way through the knot from the back to the front, then make a second stitch to the back again.
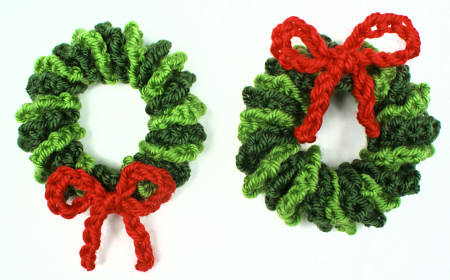
Decide whether you’d like the bow at the top or bottom of the wreath, and position the wreath so the join will be hidden beneath the bow. Stitch the bow in place, then weave in the remaining yarn end.
Options
- Stitch or glue small beads or sequins onto the wreath to represent holly berries or miniature baubles.
- For a faster wreath, omit the crocheted bow and instead tie a bow from a short length of ribbon.

I hope you enjoy this pattern. Please leave me a comment below if you do, and consider leaving me a donation. Thanks!


Helen said
Hi June
Purchased yr Posy Blossoms patt. & thought this was a great addition to add to my items for my Random Acts of Crochet Kindness group (FB). I igive my items to my Personal Support Workers (PSW’s) to hand out to their patients as well as a volunteer who calls (to see if I am ok) who works at a nursing home so will sent a care pkg there as well – will also ask my neighbour to distributer to a nearby park – we craft (crochet, knit, etc.) items, pkg them with a little poem & leave them around for ppl to find & hope it puts a smile on their faces & makes their day a little easier so tk u for this adorable pattern. Since I cannot get out much b/c of my severe arthritis I give them to certain ppl to distribute 4 me. Again, tk u for sharing yr wonderful patterns. God bless!
alina said
Hello june, i love this pattern!
Abigail said
Hey June. Thank you for this lovely pattern. DO you think you could give some more detail on the assembly? I’m having trouble with that. Thanks and Merry Christmas!
June said
Hi Abigail, if you’d like to make a donation for this pattern, you’ll receive the easy-to-print PDF version of the pattern, which includes some additional assembly photos that you may find helpful. If you need further assistance after making your donation, my customers can always get free pattern support from me by email!
Bobbi said
Thanks would appreciate newsletters
Pat said
Like your xma s wreath and xma s mug would like to share with my sister but your site won t let you share by email as I can only do not everyone is on Facebook Twitter etc thanks please email me if you could send me to share by email nice stuff
June said
Pat, you can email the link to any page on my website – in this case, just send your sister a link to www.planetjune.com/wreath and she’ll be able to see it 🙂
Nancy said
Hi June
I just made the mini-wreath pin using pale pink and sparkly white yarn. And a pink yarn bow made it lovely!! Your instructions are crystal clear. Thank you& a Merry Christmas! Nancy
DottieGB2 said
It is Sunday, June 5, 2016. I am getting started on Christmas things to make. I came across this marvelous wreath. I’v made a number of different wreaths over the years but YOURS is very unique and different. I plan to make tons of these! Thanks for the pattern!!!!!!!!!!!!!
Crochet & Knitting said
Love the pattern. I’ve also made a few with 3 colors.
Thank you.
Romila said
Hi, I make about 30 small ornaments of the same type every year to put in my Christmas cards (usually Hardanger) next year I think it might be these wreaths! Thank you for the pattern :o)
Shell said
I love this pattern, but I can’t fig. out where to stitch the ends of each spiral together. Can you post pic.s of how you did that?
June said
There’s really nothing to see: just form the twisted spiral into a ring shape, and then stitch the two ends of the light green spiral together with the light green yarn end, and the two ends of the dark green spiral together with the dark green yarn end. As I say, you don’t need to worry about being too neat and precise, as the bow will cover the join anyway!
MARIA DEL SOCORRO HIDALGO CORNELIO. said
PRECIOSA CORONA QUE DON TAN MARAVILLOSO EL PODER REALIZAR, BENDITA SEAS DIOS TE PREMIA CON TANTA CREATIVIDAD. SALUDOS.
Evanda Anderson said
Wish I had the imagination and talent you have. Thank you for your inspiration.
Julie Cassidy said
Thank you gorgeous wreath xxxx
S.G. said
What a great, fast idea!!! So cute!!! I stumbled apon your website, by accident & loved everything I saw. Now, I found you again, on Pinterest! How nice! Love your stuff, love your comments & patience with newbies! Long may your creativity reign!
Pam said
What a neat idea! I’m going to have to try it for Christmas this year! 🙂
MJ said
I made this pattern with variegated green yarn, and instead of making two separate spirals, I just chained two at the end of the first spiral, then started the second spiral from that chain two. Then I twisted them together, and put the bow on the chain two space, after sewing the ends together to make the circlet/wreath.
Thank you for a great little project!
Mama Squirrel said
I really, really like this pattern–yes, getting them twisted together is a bit tricky, but the effect is worth it, and it’s a great scrap-yarn pattern. I made about six small wreaths, and had a couple of stray spirals left that I used as package ties. I’ve linked from my blog (link in signature).
Angie Lu said
This pattern is so fun, quick and adorable! I just whipped up two of these for my daughter to give to her teachers at school tomorrow. I was caught off guard, not expecting them to celebrate christmas, (you know how schools have been about holidays as of lately) but they had a christmas party in her class today and sent her home with such a cute little bag of gifts that I had to find something for them and this wreath is perfect! I added another red chain to the top that I joined into a loop for hanging, added a “handmade” charm to them and put them in organza bags. I love it, thanks so much and Merry Christmas.
Nancy Jackovich said
Hi June, I learned RSC reverse single crochet last yr with your tutorial.
Thank you! As I could not understand the technique. I’ve used it for edges of chemo caps for my cousin, and for Christmas gifts this year.
Thank you. I wish I had looked at your site a bit earlier for your
Christmas wreaths and other projects.
Nancy
maggie manchen said
i love this wreath..I put a small pin on the back..and pinned it to my coat 🙂
Tamara - Moogly said
So cute and clever! I featured your pattern this morning on Moogly: www.mooglyblog.com/free-crochet-ornaments/ Thanks for sharing it!
Susana O said
I wish I could afford to leave a donation, it was wonderful of you to share this pattern even when we can’t. I am learning to crochet and my mother is sharing her hooks and yarn with me (forced early retirement is tightening up the budget). I was looking for easy and fast patters to make as thank you holiday gifts. I was so happy to find this and glad I could figure it out. Thanks again!
VickiPS said
Great little pattern: thank you so much, June!
Sabine said
Thank you very much, June. It’s a nice Little pattern for x-mas.
Sabine
Toni Lord said
Again you have saved the day! I needed a small Christmas project to do while visiting w/family over Thanksgiving Holiday…this is soooo perfect! Thanks a million for your talent generous nature!
gramma2seven
Sabrina said
*ch 2, (sc, ch 2, sc) in next st, ch 2, sc in next st????
I’m new to crochet and patterns so this all confuses me…i\I tried following but i could only do half the line
June said
Don’t worry, Sabrina, crochet patterns can be confusing at first! To read a pattern, you have to break it down into smaller pieces, separated by the commas. So let’s split it into pieces, and look at each piece (between two commas) separately:
Then you’ll go back to the * and repeat all those steps until you’ve worked into the entire foundation chain.
I hope that makes more sense now!
Nybellune said
Oh I love this mini-wreath ! Thanks a lot for the pattern !
susan fitzgerald said
Love it !!! I’m unable to leave you money though.
n jagt said
Hi ! thanks for the cute pattern of the mini wreath. I’m just wondering why your little wreath seems to have about double the amount “twirls” compared to mine. I wonder why that is? Mine seems so much shorter than yours. Thank you for your consideration!
June said
1. You may have made a mistake in reading the pattern (see my reply to Sabrina if you think that may be the case).
2. If you’ve followed the pattern as written, the difference is probably related to your gauge and how tightly you make your starting chain. A looser starting chain and/or a tighter gauge in the rest of the pattern would reduce the amount each spiral twists by. If yours isn’t twisted enough for your liking, you can try twisting the wreath more, just before you sew the ends together, to increase the number of twists 🙂
Nicole said
*small tip* I have made these before I made candy canes this way. When you are joining the two spirals you can wrap them around a pipe cleaner to keep shape before you join them.
Amanda said
As always you have beautiful tutorials! This is an awesome technique! I look forward to trying this!
ivete said
Parabens pelo lindoo…. trabalhoooo. vou fazer varias guirlandas para decorar minha casa.
Billie Dale said
So easy to make. I’m just having trouble swirling them together.
Annette Laursen said
That is a wonderful little wreath. I just feel I have to try and make one right now 🙂
Thank you for sharing
Becky Dirlam said
Very Sweet. I know that I will make a few, just not sure how I will use them yet. Thank You so much for sharing
Rosana C.Silveira Rabite said
Hi,
How are you? I loved your work..and I hope receive others moddels from facebook or at email me.
I do arts like it..and I admire that type of works…
Thanks for that moment…
God bless you…
Rosana
Rhondda Mol said
I love it 🙂 Thank you for this – just in time for the holidays too!
Shared 🙂 Rhondda
Ronda said
I am just starting out so I hope I can do these! I want to learn everything about crochet.
Judy Carlson said
Cute! It is always a delight to wake up and see there is a new PlanetJune pattern!
Doug said
That is soo cool! Doubly so because of the simplicity underneath it all.
It’s now on my ‘go-bag’ project list for crocheting the car and other odd moments.
I can also see it being used as decoration on holiday gift packages.
Thank you for sharing!