Happy Rainbows crochet pattern
© June Gilbank 2020
Use these cheerful crocheted rainbows to brighten anyone’s day with a splash of colour and a message of hope and unity! Tape them to your window, hang them on the wall, or stitch them to a crocheted blanket or cushion as a colourful applique.
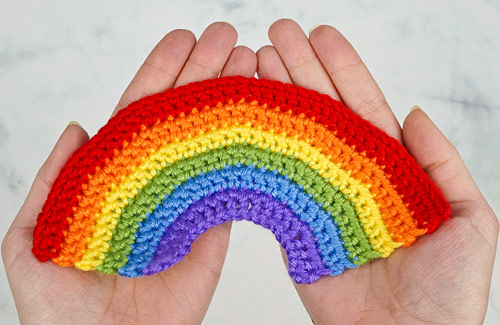
This Happy Rainbows pattern is Donationware – the pattern is available for free, but if you like it please consider sending me a donation to show your appreciation:
Send me a donation and receive the easy-to-print PDF version of the pattern as a thank you! It includes some additional info that you’ll only find in the PDF version:
– Bonus pattern for matching flat-bottomed rainbows (pictured below)
– Additional progress photos (including left-handed photos)
Donations of any size are much appreciated. Just add the amount you wish to donate, and, once you have checked out and paid, your pattern will instantly be available to download from your PlanetJune account.

The complete pattern and instructions for the arc-shaped rainbow are available below, regardless of whether or not you choose to pay for them 🙂
This is a PlanetJune original crochet pattern. Feel free to use items made from this pattern however you wish, but I’d appreciate credit as the pattern designer. Please do not reproduce the pattern anywhere else; instead post a link to www.planetjune.com/rainbows
Not ready to make it yet? Add it to your Ravelry queue:
Terminology
| ch | chain |
| fsc | foundation single crochet (optional) Note: See ‘Special Stitch’, below, for instructions |
| sc | single crochet (double crochet for UK/Aus) |
| sl st | slip stitch |
| st | stitch |
You will need…
- E US/3.5mm crochet hook (small rainbow) or H US/5mm crochet hook (large rainbow)
- Small quantity of worsted weight yarn in rainbow colours (red, orange, yellow, green, blue, purple)
- Yarn needle to weave in ends
Size
Small Rainbow: about 7″ (18cm) wide by 3.5″ (9cm) high
Large Rainbow: about 10″ (25.5cm) wide by 5″ (13cm) high
(Your gauge and yarn choice will affect the finished size slightly.)
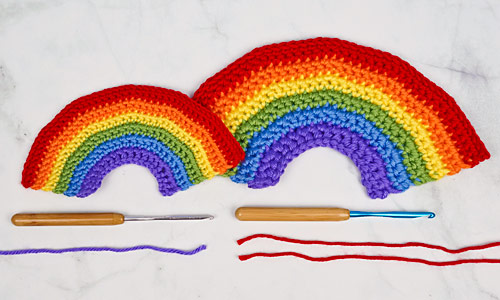
This pattern is designed to be worked with easily-available worsted weight yarn. The only difference between the large and small rainbows is the hook size and the number of strands of yarn:
- For a smaller rainbow, use one strand of yarn and the smaller hook.
- For a larger rainbow, hold two strands of yarn together and use the larger hook.
Try using any other weight of yarn with a correspondingly-sized hook to give a different sized rainbow.
Gauge
Gauge is unimportant for this pattern, but if you want to make the rainbow as a wall or window decoration, you’ll want a reasonably firm fabric, so use a hook a couple of sizes smaller than that recommended on the ball band of your yarn. For an applique, you can use a larger hook (e.g. the size recommended on the ball band) to produce a floppier fabric, if you prefer.
Special Stitch: Foundation single crochet (fsc)
This technique creates both the foundation chain and a row of single crochet stitches in one row. It makes a stretchy foundation, and is far easier to work into than a chain. This technique is optional for this pattern – I also include alternate beginner-friendly instructions in the pattern!
- First fsc stitch: ch 2, insert hook into second chain from hook and draw up a loop, yarn over and draw through one loop on hook (this forms the chain), yarn over and draw through 2 loops on hook (this forms the single crochet). (1 fsc completed)
- Each subsequent fsc stitch is worked under the 2 loops that form the chain at the bottom of the previous stitch. Insert hook under both loops of the chain, draw up a loop, yarn over and draw through one loop on hook (this forms the chain), yarn over and draw through 2 loops on hook (this forms the single crochet).
Tips for all Rainbows
- Always change colour in the last loop of the stitch before the colour change: www.planetjune.com/colour
- If you’re using the chain start instead of the fsc start, work all stitches of row 1 into the back bumps of the chains for the neatest finish (see www.planetjune.com/backbumps for instructions).
- The rainbow is worked from the inner (purple) edge outwards, with two rows of crochet forming each band of colour.
- To minimize end weaving, I prefer to work over the yarn ends each time I change colour. This will leave you with only two ends to weave in once you’ve finished your rainbow! See my instructions on how to do this neatly (Minimize Finishing, below).
- If you only have five colours available instead of six, you can still make a recognizable rainbow:
- Arrange the colours you do have in order (the rainbow is crocheted from the inner edge outwards, so the colour order is purple, blue, green, yellow, orange, red).
- Work rows 1-10 of the pattern, changing colour after every two rows, and omitting rows 11-12.
Minimize Finishing
To minimize end weaving, you can work over the yarn ends each time you change colour. This will leave you with only two ends to weave in once you’ve finished your rainbow!
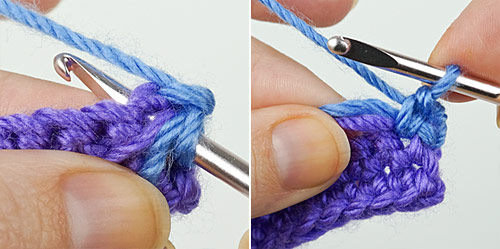
At the end of each even-numbered row, draw through the last loop of the last stitch with the new colour. Begin the new row with the ch 1, turn (below, left). Hold both the yarn tails in front of your work and pass your hook under the yarn ends before beginning the first stitch of the next row (below, right).
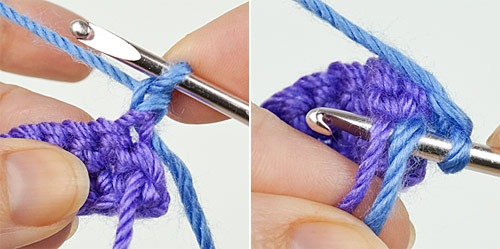
Insert your hook into the first stitch (below, left), yarn over and draw up a loop back through the stitch and under the yarn ends, then complete the first stitch of the new row. The yarn ends should be encased in the stitch (below, right). Gently tug each yarn end in turn to draw in any slack until the stitches at the end of the row look neat.
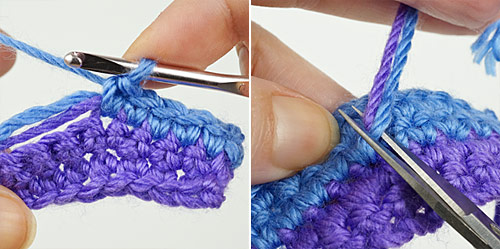
Holding the yarn ends along the top of your work, crochet the next 4-5 stitches of the row, working over the yarn ends (below, left). Drop the yarn ends to the back and continue crocheting. Trim the remaining yarn tails flush with the surface of the work (below, right).
Crochet Instructions
With purple:
Row 1: fsc 18 (or ch 19, sc in 2nd chain from hook and in each remaining chain). (18 st).
Row 2: ch 1, turn, sc in next 2 st, (2 sc in next st, sc in next 5 st) twice, 2 sc in next st, sc in next 3 st. (21 st)
With blue:
Row 3: ch 1, turn, sc in next 7 st, 2 sc in next st, sc in next 5 st, 2 sc in next st, sc in next 7 st. (23 st)
Row 4: ch 1, turn, sc in next 3 st, (2 sc in next st, sc in next 7 st) twice, 2 sc in next st, sc in next 3 st. (26 st)
With green:
Row 5: ch 1, turn, sc in next 8 st, (2 sc in next st, sc in next 8 st) twice. (28 st)
Row 6: ch 1, turn, sc in next 4 st, 2 sc in next st, sc in next 9 st, 2 sc in next st, sc in next 8 st, 2 sc in next st,
sc in next 4 st. (31 st)
With yellow:
Row 7: ch 1, turn, sc in next 10 st, 2 sc in next st, sc in next 9 st, 2 sc in next st, sc in next 10 st. (33 st)
Row 8: ch 1, turn, sc in next 5 st, (2 sc in next st, sc in next 10 st) twice, 2 sc in next st, sc in next 5 st. (36 st)
With orange:
Row 9: ch 1, turn, sc in next 11 st, 2 sc in next st, sc in next 12 st, 2 sc in next st, sc in next 11 st. (38 st)
Row 10: ch 1, turn, sc in next 6 st, 2 sc in next st, sc in next 12 st, 2 sc in next st, sc in next 11 st, 2 sc in next st,
sc in next 6 st. (41 st)
With red:
Row 11: ch 1, turn, sc in next 13 st, (2 sc in next st, sc in next 13 st) twice. (43 st)
Row 12: ch 1, turn, sc in next 7 st, (2 sc in next st, sc in next 13 st) twice, 2 sc in next st, sc in next 7 st. (46 st)
Fasten off and weave in all remaining yarn ends.
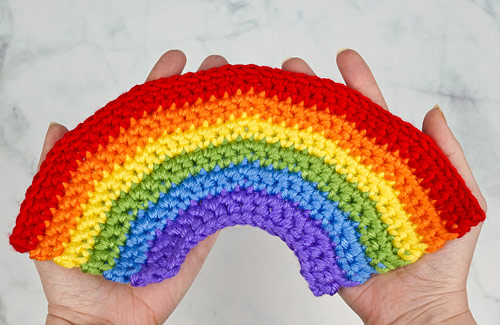
I hope you enjoy this pattern. Please leave me a comment below if you do, and consider leaving me a donation. Thanks!
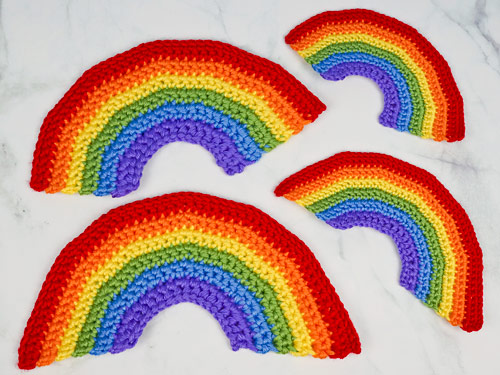
Top: arc-shaped rainbows; Bottom: flat-bottomed rainbows (only available in PDF version)


Faby said
Thanks for sharing, I loved this pattern.
Lily said
Thanks so much for this cheerful pattern! I crochetted a carebear for a baby I nanny for and I really like the way it looks on on the atuffed animal’s tummy :blush:
June said
Oh, that’s a lovely idea!
Anne Iv said
HI. I used your pattern to make a rainbow. I added a 7th row (as Id bought 7 colours, but it worked well and I’m very pleased. I struggles with the special foundation stitch but decided that the inside of the rainbow didnt need to be too flexible, so just used the 19 chains and an additional row.
I found the pattern easy to use and was delighted with the result.
Thank you