Crochet Phone Stand crochet pattern
© June Gilbank 2021
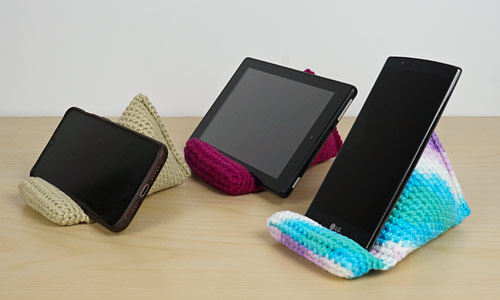
Quick and easy to crochet, this one-piece, no-sew phone stand makes a handy addition to any desk or bedside table. With only yarn and a little stuffing, you can make a stand that’s sturdy enough to support any phone or a small tablet.
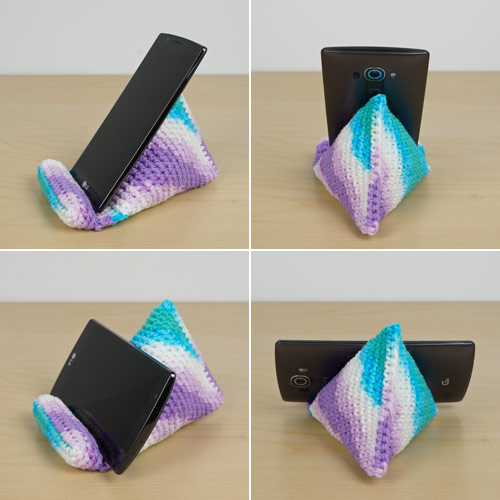
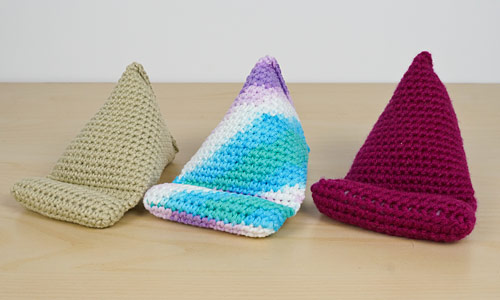
This pattern is a blank canvas for any yarn choice: get colourful with a variegated yarn, go for a subtle neutral shade, choose your favourite colour, or match your room decor.
This pattern is Donationware – the Crochet Phone Stand pattern is available for free, but if you like it please consider sending me a donation to show your appreciation:

Send me a donation and receive the easy-to-print PDF version of the pattern as a thank you! It includes some additional info that you’ll only find in the PDF version:
– Tips for stuffing
– Additional photos (including left-handed photos)
– Instructions for resizing the pattern to fit a larger tablet or other device
Donations of any size are much appreciated. Just add the amount you wish to donate, and, once you have checked out and paid, your pattern will instantly be available to download from your PlanetJune account.
The complete pattern and instructions are available below, regardless of whether or not you choose to pay for them 🙂 But please consider donating, so you’ll receive the bonuses too!
Crochet Phone Stand is a free PlanetJune original crochet pattern. Feel free to use items made from this pattern however you wish, but I’d appreciate credit as the pattern designer. Please do not reproduce the pattern anywhere else; instead post a link to www.planetjune.com/phonestand
Not ready to make it yet? Add it to your Ravelry queue: 
Terminology
| ch | chain |
| hdc | half double crochet (half treble crochet for UK/Aus) |
| sc | single crochet (double crochet for UK/Aus) |
| sl st | slip stitch |
| st | stitch |
You will need…
- E US/3.5mm crochet hook
- Approx 60 yds (55m) worsted weight yarn. You can use any worsted weight yarn for this pattern, but I recommend cotton for a neat smooth finish.
- Yarn needle to weave in ends
- Stitch marker
Size
Approx 4″ (10cm) wide, 4″ (10cm) tall, and 6″ (15cm) deep
Gauge
Gauge is unimportant for this pattern, provided the pieces are crocheted sufficiently tightly that they will not gape visibly when stuffed and the fabric produced is fairly firm.
Tip: Cotton yarns can be splitty. If your yarn splits frustratingly, try using a slightly larger hook.
Notes
- Do not join at the end of each round; rounds are worked in continuous spirals.
- Use a stitch marker to mark the beginning of each round. Move the marker up as you start each new round.
- All stitches worked into chains in this pattern should be worked into the back bumps of the chains (see www.planetjune.com/backbumps for instructions).
Pattern
Section A: Stuffed Front Lip (worked in continuous rounds)
Ch 17.
Rnd 1: sc in second chain from hook, sc in next 14 chains, 3 sc in last chain. Rotate piece so you can work into the other side of the starting chain: sc in next 15 chains, 3 sc in last chain. (36 st)
Rnds 2-5: sc in each st around. (36 st)
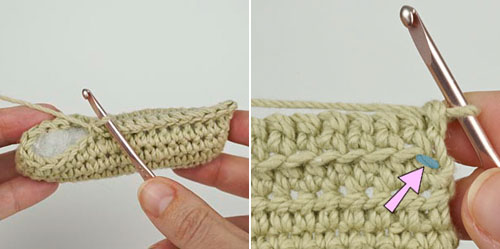
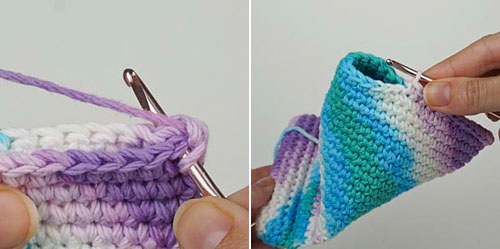
Turn your work right-side out (so the side that faces you as you crochet is on the outside of the piece). Flatten the piece so the starting chain is along the bottom and your hook is at one corner (see photo, below, left).
Do not fasten off. Continue to Section B.
Section B: Flat Base (worked in rows)
In the following row, you’ll crochet through both layers of the flattened piece, starting with the next stitch and the stitch just worked (below, right).
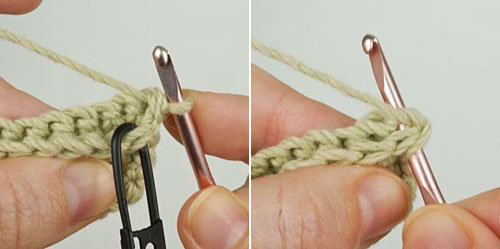
Row 1: sc in each st across, pausing when you have a few stitches left so you can add stuffing along the length of the tube you’re forming (below, left), then continuing crocheting to close up the remaining hole. (18 st)
Rows 2-3: ch 1 (does not count as a st, here and throughout), turn, hdc in next 18 st. (18 st)
Row 4: ch 1, turn, sc in front loops only of next 18 st, turn, sc in unworked back loops of the same 18 st*.
*Note: The first unworked back loop may be unclear, but it’s there if you look carefully – it’s just a bit lower down than the rest (the first unworked back loop is highlighted in photo, below, right).
The stitches of Row 4 will splay out to the front and back (below, left). Pinching the front and back up towards each other (below, right) makes it easier to see how your crochet will continue upwards as you resume working in the round in Section C.
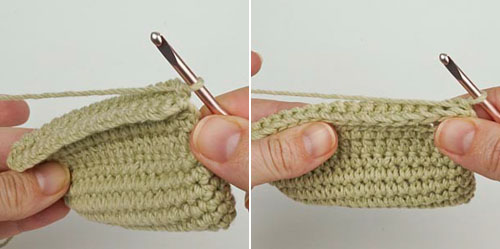
Do not fasten off. Continue to Section C.
Section C: Stuffed Back Support (worked in continuous rounds)
Rnd 1: skipping the ch 1, sc in each st around. (36 st)
Rnds 2-18: sc in each st around. (36 st)
Follow the assembly instructions:
Step 1: Flatten the piece parallel to the bottom edge and grab one top corner with the fingertips of each hand (below, left).
Step 2: Bring your fingers together so the previous corners meet in the middle (below, right).
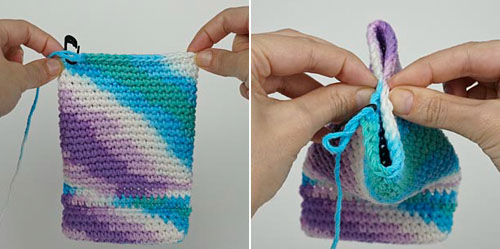
Step 3: Turn the piece sideways and then flatten the top edge of the crochet out to the edges, to form new corners perpendicular to the original ones (below, left).
Step 4: Resume crocheting: sc in each st across until your hook reaches the next corner (marked by arrow, below, right).
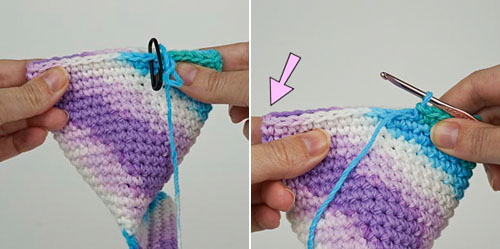
Step 5: Turn your work. Crocheting through both layers of the flattened piece, begin to sc in each st across (below, left), pausing when you have a few stitches left so you can add stuffing (below, right).
Step 6: Stuff the piece very lightly (you only need just enough stuffing to let the piece hold its shape), making sure you push a little stuffing into each of the four corners, then continue crocheting to close up the remaining hole.
Step 7: Fasten off and weave in the yarn end.
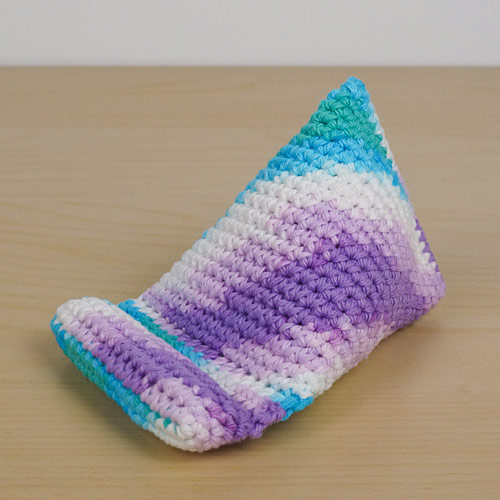

I hope you enjoy this Crochet Phone Stand pattern.
Please leave me a comment below if you do, and consider leaving me a donation.
Thanks!


Cindi Dye said
Hi June! This pattern was such a fun project! Thank you for making it. I made one for my hubby. He gives it two thumbs up!
Much love and peace-
Cindi 🙂
Brenda Karl said
Thanks for sharing this patern! I usually designe my own paterns,that require counting & various stiches, but I came across this patern after a few morning of ripping out what I had crocheted the night before when I was apperently half sleep, and figured I should work on something simpler at night.
I made one for my husband’s new phone, but I have used it to hold my phone while making craft demo videos, so I reckon I will be making one for myself also.
Vicky said
Hello June,
The pattern for a crochet phone stand is just what I’m looking for however I want to make it to hold my iPad. Have you a pattern for this?
Many thanks.
June said
Hi Vicky! Yes, the PDF version of this pattern (available for any size donation) includes instructions for resizing the pattern to fit a larger tablet or other device 🙂