Fuzzy Hedgehog crochet pattern
© June Gilbank 2021
Fuzzy Hedgehog is a simple and adorable pattern that makes the most of a novelty textured yarn such as eyelash or fur! From realistic shades to bright and colourful options, there are no wrong choices to make – any novelty yarn looks good as hedgehog spines.
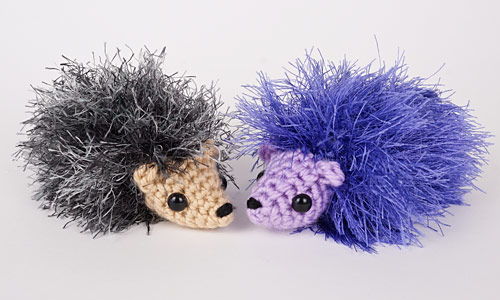
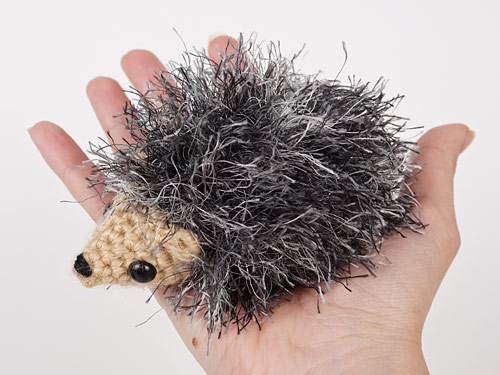
With just two pieces to stitch together, you’ll be able to whip up the sweetest little hedgehog buddy in no time, sized to fit perfectly in the palm of your hand.
This pattern is Donationware – the pattern is available for free, but if you like it please consider sending me a donation to show your appreciation:
Send me a donation and receive the easy-to-print PDF version of the pattern as a thank you! It includes additional photos, and my bonus ‘About Fuzzy Patterns’ PDF, which compiles all my tips on working with fuzzy yarns.
Donations of any size are much appreciated. Just add the amount you wish to donate, and, once you have checked out and paid, your pattern will instantly be available to download from your PlanetJune account.
The complete pattern and instructions for the hedgehog are available below, regardless of whether or not you choose to pay for them 🙂
This is a PlanetJune original crochet pattern. Feel free to use items made from this pattern however you wish, but I’d appreciate credit as the pattern designer. Please do not reproduce the pattern anywhere else; instead post a link to www.planetjune.com/hedgehog
Not ready to make it yet? Add it to your Ravelry queue:
Terminology
| ch | chain |
| dc | double crochet (treble crochet for UK/Aus) |
| sc | single crochet (double crochet for UK/Aus) |
| sc2tog | single crochet decrease (double crochet decrease for UK/Aus) (insert hook into stitch and draw up a loop, insert hook into next stitch and draw up a loop, yarn over and draw through all 3 loops on hook) |
| sl st | slip stitch |
| st | stitch |
Notes
- Do not join at the end of each round; rounds are worked in continuous spirals.
- Use a stitch marker to mark the beginning of each round. Move the marker up as start each new round.
- Working with fuzzy (eyelash or novelty) yarn can be a challenge until you get the hang of it. See my advice here.
You will need…
- E US/3.5mm and H US/5mm crochet hooks
- Small quantity of eyelash yarn
- Small quantity of worsted weight yarn
- Short length of black yarn to embroider nose
- Polyester fibrefill stuffing
- 2 eyes, approx 8mm diameter
- Yarn needle to weave in ends
- Stitch marker
Size
Approx 4.5″ (11.5cm) long. (Your gauge and yarn choice will affect the finished size slightly.)
Gauge
Gauge is unimportant for this pattern. For a very fluffy or eyelash-type yarn, the most important factor is that you use a hook large enough to catch the yarn without difficulty. For the regular smooth yarn, check that the pieces are crocheted sufficiently tightly that they will not gape visibly when stuffed.
Head
worked from nose to neck
With worsted weight yarn and E hook, make a magic ring, ch 1.
Rnd 1: 4 sc in magic ring. (4 st)
Rnd 2: 2 sc in next 2 st, sc in next 2 st. (6 st)
Rnd 3: (sc in next st, 2 sc in next st) three times. (9 st)
Rnd 4: sc in next 2 st, 2 sc in next st., sc in next st, 2 sc in next st, sc in next 3 st, 2 sc in next st. (12 st)
Rnd 5: sc in each st around. (12 st)
Rnd 6: (sc in next 2 st, 2 sc in next st) four times. (16 st)
Note: In the next round (Rnd 7), you’ll form the ears as you go, by crocheting a short chain and working back into it. Complete the sc following each ear, then mark the stitch you have just completed (shown by asterisk: *) by slipping a stitch marker or a scrap of contrasting yarn through the stitch before you continue.
Rnd 7: sc in next st, ch 2, (dc, ch 1, sl st) in 2nd chain from hook, sc in next st*, sc in next 10 st,
ch 2, (dc, ch 1, sl st) in 2nd chain from hook, sc in next st*, sc in next 3 st. (16 st, plus ears)
Rnd 8: sc, skip ear by folding it forward (see photos below) and sc in the next st (the marked stitch), sc in next 10 st, skip ear by folding it forward and sc in the next st (the marked stitch), sl st in next st. (14 st, plus 2 unworked)

Fold the ear forward and out of the way so you can crochet into the marked stitch.
Fasten off, leaving a short yarn end.

The finished head, from the front (left) and back (right).
Body
worked from back to front
Note: All stitches are worked in back loops only.
With eyelash yarn and H hook, ch 2.
Rnd 1: 6 sc in 2nd chain from hook. (6 st)
Rnd 2: 2 sc in each st around. (12 st)
Rnd 3: (2 sc in next st, sc in next st) six times. (18 st)
Rnds 4-11: sc in each st around. (18 st)
Rnd 12: (sc2tog, sc in next st) six times. (12 st). Make sure the fluffiest side of the body is turned to the outside, then stuff the body through the hole.
Rnd 13: sc2tog six times. (6 st)
Fasten off, leaving a 16″ (40cm) long yarn end.
Assembly
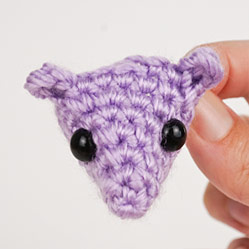
If you’re using animal (safety) eyes, insert them now and attach the backs, using the ears as a guide to which side of the head is the top. The eyes should be positioned on either side of the head, 2 rounds in front of each ear.
Stuff the head, making sure you push some stuffing down past the eyes and into the nose.
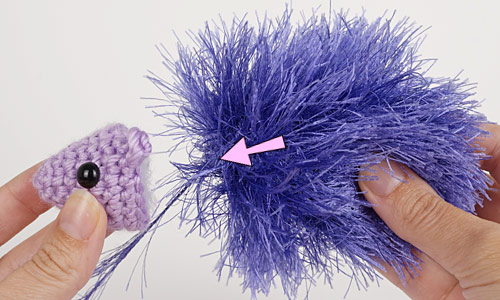
Using a yarn needle and the long yarn end from the body, stitch the head to the body, all around the open edge of the head.
Tip: Make sure with each stitch into the body that you insert the needle under an actual stitch, and not just into the lashes.
Finishing
Fluff out any clumps of lashes that are trapped by the stitches by raking over the body a few times with the yarn needle. Repeat this process more carefully around the edges of the head to release the lashes from the joining stitches and blend the join, then trim down any lashes from around the face that cover the eyes or look untidy.
If you didn’t attach the eyes earlier, attach the eyes now. They should be positioned on either side of the head, 2 rounds in front of each ear.
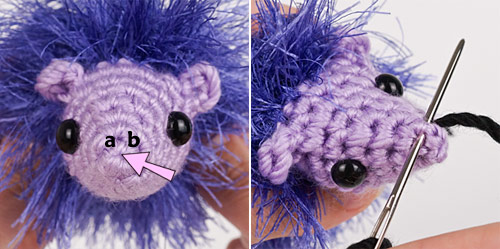
Thread a yarn needle with a length of black yarn for the nose. Make a single horizontal stitch across the top of the muzzle, one round above the centre of the magic ring, and centred between the eyes (a–b, below left). Pull the stitch taut. Re-stitch over the same stitch a couple of times (below, right) until you’re happy with the appearance.
Tip: To keep the stitches secure and hide the ends neatly, see my tutorial at www.planetjune.com/stitching

I hope you enjoy this pattern. Please leave me a comment below if you do, and consider leaving me a donation. Thanks!


Mary said
Love your easy to follow patterns
Ioanna said
We had to get a small cheap Christmas present for another kid at school for children to exchange gifts. I had no time to go for anything, I happened to have eyelash yarn and I decided to make this. It is extremely easy, fast and kids loved it! I’m gonna make some more as some kids asked for it! Thanks so much!!!
Virginia said
i wasnt going to make these but i found eyelash yarn for $1.00 each . so these are next in line .