Carnations flower crochet pattern
© June Gilbank 2017
Beautiful, realistic, and so easy, you can crochet a pretty one-piece carnation in minutes – and I bet you won’t be able to stop at one!
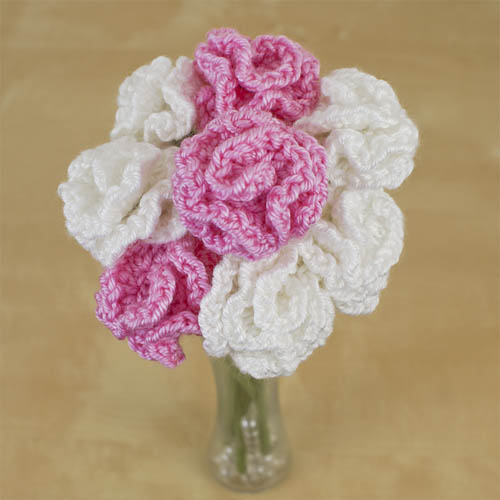
Here are some ideas for use:
- Use the optional stem instructions to create a bouquet or vase of carnations
- Stitch a pin to the back of a carnation to make a pretty brooch or buttonhole
- Accessorize a bag by sewing on a couple of carnations
- Sew or glue one or more carnations to a hair clip or plastic hairband
This Carnations pattern is Donationware – the pattern is available for free, but if you like it please consider sending me a donation to show your appreciation:
Send me a donation and receive the easy-to-print PDF version of the pattern as a thank you! It includes some additional info that you’ll only find in the PDF version:
– Additional assembly photos
– A special technique for fastening off the yarn neatly at the base of the stem
Donations of any size are much appreciated. Just add the amount you wish to donate, and, once you have checked out and paid, your pattern will instantly be available to download from your PlanetJune account.
The complete pattern and instructions are available below, regardless of whether or not you choose to pay for them 🙂
This is a PlanetJune original crochet pattern. Feel free to use items made from this pattern however you wish, but I’d appreciate credit as the pattern designer. Please do not reproduce the pattern anywhere else; instead post a link to www.planetjune.com/carnations
Not ready to make it yet? Add it to your Ravelry queue:
Terminology
| ch | chain |
| dc | double crochet (treble crochet for UK/Aus) |
| hdc | half double crochet (half treble crochet for UK/Aus) |
| sc | single crochet (double crochet for UK/Aus) |
| sl st | slip stitch |
| st | stitch |
You will need…
- A suitably sized crochet hook*
- Small amount of yarn* in a floral colour (e.g. white, pink, red, purple, yellow, orange, cream) plus green for the calyx and optional stem
- Yarn needle
- Optional: bamboo skewer, pipe cleaner, or floral wire for the stem
* Hook and yarn sizes: This pattern will work with any size yarn, provided you choose a suitable hook size for your yarn. For a lifesize carnation, I recommend worsted or DK weight yarn.
For my carnations, I used a light worsted weight yarn (Bernat Satin) and a size H (5mm) hook, which produced a 2.25″ (5.5cm) diameter flower. (Your gauge and yarn choice will affect the finished size slightly.)
Gauge
Gauge is unimportant for this pattern, but if your hook is too small you may find the final row difficult to complete, so try moving up to a larger hook to make the fabric of the flower less stiff. Use the recommended hook size on your yarn’s ball band as a starting point.
Crochet Instructions
Terminology Note: The green part at the base of the flower is called the calyx.
Colour Changing: Always change colour in the last loop of the stitch before the colour change: www.planetjune.com/colour
With green, ch 7.
Row 1: dc in fourth chain from hook (first 3 chains count as a st), 2 dc in each remaining chain. (8 st)
With petal colour:
Row 2: ch 3, turn, 2 dc in first st (at base of chain), 3 dc in each remaining st. (24 st)
Row 3: ch 1, turn, sc in first st, ch 1, (hdc, ch 1) three times in each st across to turning chain, rotate work to crochet down side of turning chain, (sc, ch 1, sc, ch 1, sl st) around turning chain.
Fasten off and cut yarn, leaving a long end of each colour for stitching the carnation together.

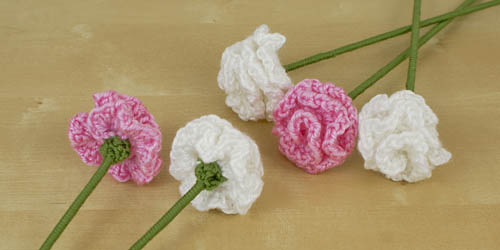
After you finish crocheting, your carnation should look like this (except the petals won’t lie straight like this – I’m holding it flat for the photo!)
Starting at the opposite end of your work to all the yarn ends, roll the end of the petals tightly (below, left). When you reach the start of the green calyx, roll the carnation so the green stitches are rolled as tightly as possible and the edge between the calyx and petals stays aligned as you go (below, right). Ignore the wide edge of the petals as you roll the flower; just concentrate on keeping the green end tightly rolled and the tops of the green stitches lined up with each other, and let the petals splay out however they want to.
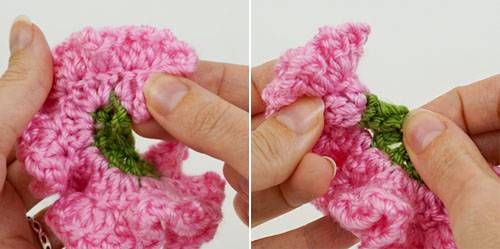
When the whole flower has been rolled up, the green calyx will form a tightly-rolled clump of stitches at the base of the flower. Holding the flower tightly by the calyx so it can’t unroll, thread the long petal-coloured yarn end onto a yarn needle and use it to anchor the end of the final petal in place by stitching it to the petal beneath it, just above the green stitches (below, left). Pass the needle through the centre of the flower to the other side, just above the green stitches, to keep all the layers together.
Thread the long green yarn end onto the yarn needle and pass the needle through all the layers of the calyx from one side to the other (below, right). Rotate the calyx and pass the needle back through in a different direction. Repeat several times until the stitches of the calyx feel like they’re all locked together.
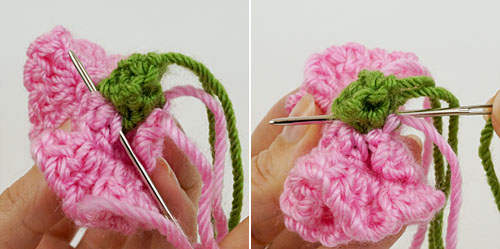
Fasten off securely and weave in all the ends.
Optional: Stem
I used yarn-covered bamboo skewers to make my carnation stems. If you prefer, you may omit the stem altogether, or wrap yarn around, or crochet over, floral wire or pipe cleaners to make a stem (see my Basic Rose pattern for details).
To make a yarn-wrapped skewer stem:
- With the end of the yarn, leave a short yarn tail and tie a single knot tightly around the skewer, about 2cm (3/4″) from the top (below, left).
- Lay the short yarn tail against the skewer, pointing down, and begin to wrap the yarn around both the skewer and the yarn tail (below, right).
- Continue wrapping the yarn all the way to the bottom of the skewer. Once the yarn is well-anchored to the skewer, and the tail is covered, you may find it faster to rotate the skewer so the yarn is wrapped onto it, pausing to push the turns of yarn together if you notice any gaps between them.
- Knot the yarn around the bottom end of the skewer, and secure the knot in place with glue before cutting the yarn.

Assembly
Twist the pointed tip of the skewer into the bottom of the carnation’s calyx (below), until the exposed tip of the skewer is completely hidden.
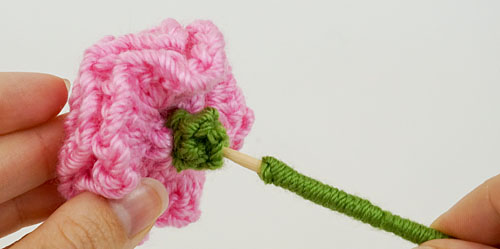
To keep the flower head from falling off, pull the skewer out most of the way again, apply some white glue to the skewer, push it back into the calyx, and hold it in place for a minute until the glue dries.

I hope you enjoy this pattern. Please leave me a comment below if you do, and consider leaving me a donation. Thanks!
PS: More Carnations!
Do you love carnations and enjoy papercrafting – or would like to try it for the first time?
See my Tissue Paper Carnations tutorial for more beautiful and easy carnations you can make!


Judy Clapp said
Hi June,
I’m making a gnome for a January birthday. She like pansies and her birthday flower is carnation and snowdrops. The snowdrops were to tiny for my hands. I thank you for having an easy pattern for a carnation. It turned out nice and looks good on the gnome’s shoe. I can’t wait to see the other flower patterns you have. Thank you again. Judy
June said
Thanks Judy, I’m so glad you enjoyed it! You can find all my other flower and plant crochet patterns at www.planetjune.com/plants 😊
Brittany Poe said
My mom loves carnations. Your pattern is amazingly easy to follow and easy to turn out a dozen! I’m so excited to see how much she will love them! Thank you so much!
Shannon Therrien said
I’ve seen several patterns for carnations and yours is the easiest to follow and the results are very adorable. I made some for a mother’s day bouquet and my mom is asking for more already.
Lynne said
I used cotton double knit rather than acrylic and used a 1.5 mm hook .. and it’s made the most adorable small carnation! I have added a thick wire stem, and I am going to put into a small crochet plant pot as a gift for a friend ❤️
June said
Aww, that sounds beautiful! I’m glad you enjoyed my pattern 🙂
Rita Massey said
Hi there, I am struggling with the pattern because I don’t understand where the Turning chain.
I was just about to ask that and then I read the pattern again. LOL thank you for this pattern, it’s beautiful.
Tina M Harshbarger said
I have been looking for a carnation pattern that’s easy for me to read and easy to understand thank you.
Sally said
amazing pattern really pleased with the results, thank you!!
Beverly Robinson said
I really like this pattern.But I can
Gin said
Lovely pattern with great instructions – thanks!
Claudia Blocker said
Hi June
I love the look of your carnations. They are the most real looking of others I have seen.
I am trying to find a pattern for different flowers and buds…my questions are, do you have more flower/bud patterns and I need them to be small enough for a Barbie doll to hold. I use size 10 crochet thread.
I look forward to hearing from you.
Claudia
June said
Claudia, I have several more flower patterns at www.planetjune.com/free – in particular, the Posy Blossoms are tiny to start with, and the Basic Rose can be made very small with thread too. (From memory, I think those are the smallest ones, but I may have others – I have a lot of designs!)
Maria Frid said
Dear June,
I am very pleased with the results of making the carnations.
I would like to make a small donation, but I have no idea how to go about it.
Where can I find your address. It you are in the UK, I can only use Canadian funds, as that is where I live. Please tell me how to do it.
Happy New year,
Maria B.
June said
Hi Maria, and thank you! You can donate online from my shop (change the currency to CAD at the top right of the page before you checkout, and then select PayPal as the payment method), or, if you’d prefer to send a donation through the mail, you can find my Canadian mailing address on my Contact page 🙂