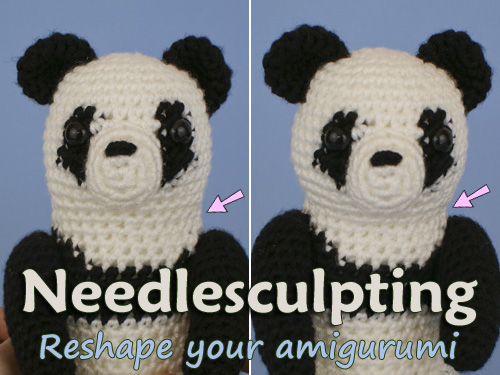
Needlesculpting for Amigurumi
Needlesculpting is a finishing technique you can use to improve the shape of your amigurumi. It uses a yarn needle and length of matching yarn to draw in certain areas of an amigurumi to alter its shape.
If you’re following a pattern with crocheted shaping built in, you shouldn’t need to do this, but it can be a useful tool to have in your arsenal, if you want to:
- Fix ‘lost’ shaping: If you’ve crocheted too loosely or been over-generous with your stuffing, and the built-in shaping has been lost.
- Add extra definition: Exaggerate the shape of your amigurumi.
- Make easy modifications: Alter the shape of a pattern without modifying the stitches you crochet.
Dimple
Drawing in at a point makes a dimple. You can use this to make, for example, an eye socket, or the dimple at the top of an apple!
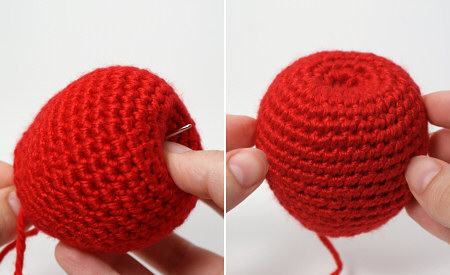
See my free Amigurumi Apples pattern for more details on how to achieve this indentation.
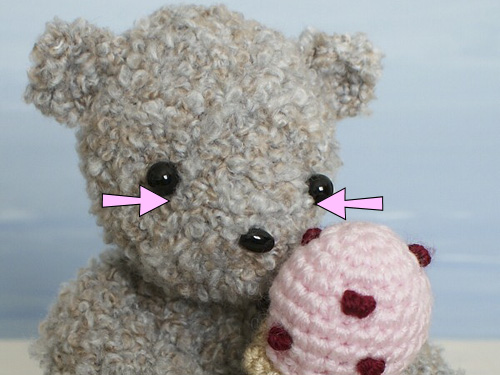
To define an animal’s face by needlesculpting eye sockets, start the yarn at the position of one of the eye sockets, pass the yarn through the head to the other eye socket and then back again, so the sides of the face are drawn towards each other when you pull the yarn tight.
Waist
You can also draw in a piece along a line all the way around the piece, to create a sculpted ‘waist’ that’s narrower than the rest of the piece.
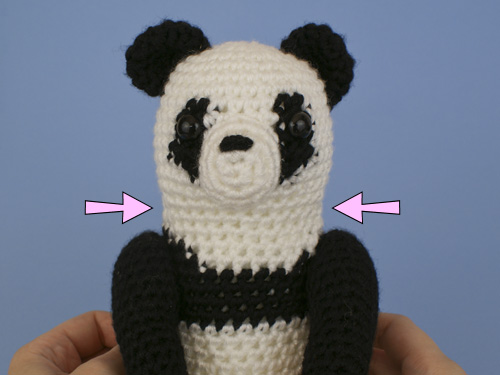
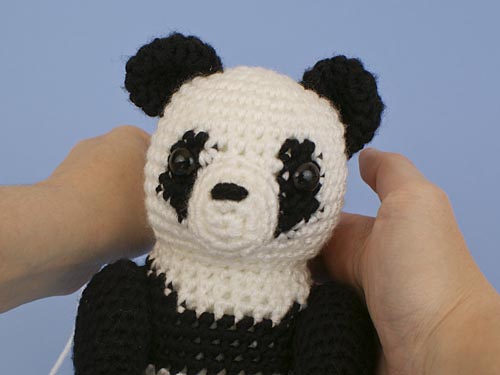
This panda was the last prototype I made before I finalised my Giant Panda design. As you can see, he looks good except he’s a little bulky around the neck. This shaping was corrected for the pattern, but it seemed like a waste to unravel this prototype as he’s so close to perfect, so Mr Panda volunteered to undergo a little amigurumi cosmetic surgery 😉
Note: I’ve used a lime green yarn for demonstration purposes, and then swapped to white yarn for the real fix.
The simplest way to needlesculpt a line is to weave the yarn needle over and under alternating stitches, but I find this leaves an obvious line of stitches in the finished piece:
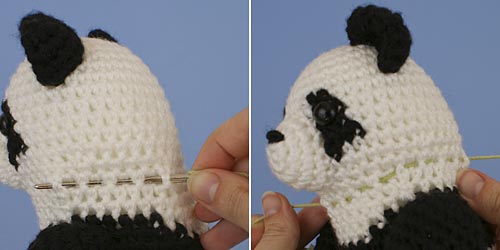
Even in the same colour of yarn, the ‘dashed line’ made by the yarn is too visible for my liking…
For an invisible finish, instead of passing the needle over a stitch, insert the needle beneath the two loops that form the V shape on the front of the stitch (below, left, and see Which is the Right Side? for help recognising these loops).
When you draw the yarn tight, it’ll pass inside the stitch and won’t show from the front (below, right).
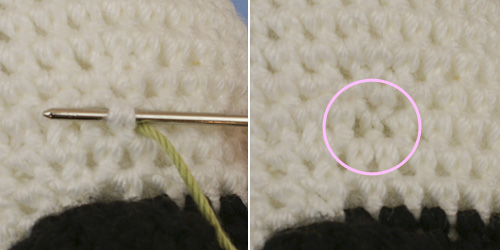
Note: This panda was crocheted from the top down, so the Vs are upside down in these photos!
You can either pass the yarn through every stitch in this way, or, for a faster finish, alternate between passing behind and through each stitch, like this:
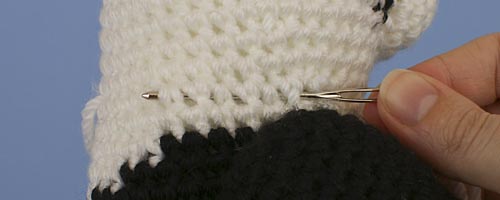
Passing the needle behind a stitch, through a stitch, behind, through, behind, through…
Finishing Off
No matter whether you’re making one or more dimples, a straight channel, or a different shape of indentation, the finishing process is the same:
- Make all your sculpting stitches, passing the yarn through the inside of the piece to reach the next position.
- Bring the yarn out after the last stitch at the same place you started, so both yarn ends emerge from the same hole between stitches.
- Pull both ends to draw in the sculpted areas.
- When you like the look you’ve achieved, tie the ends of the yarn securely together in a square knot.
- Pass the ends back through the same hole between stitches and lose them inside the piece (see my Secure Stitching video for a demo of this technique).
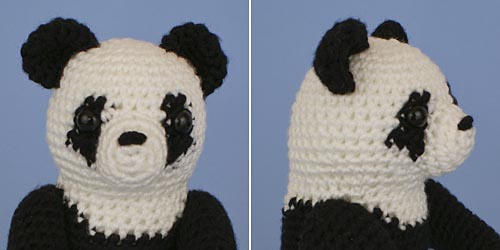
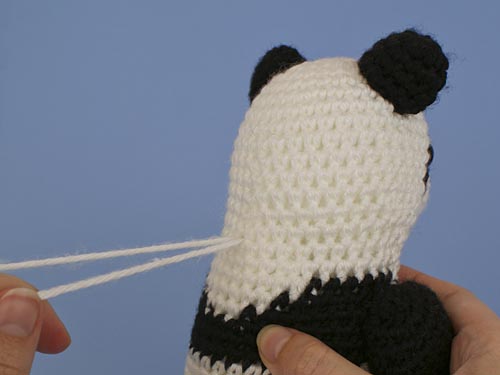
My panda is rescued! Now he has a nicely-defined neck 🙂
Taking it further
You can experiment with this technique to add any size or shape of sculpted line or area you need – just add one or more stitches and pull the yarn tight to see if it creates the effect you want.
If you don’t want to draw two points towards each other (e.g. two eye sockets), or to draw in a complete ‘waist’, it’s best to plan ahead and find a hidden area to anchor your yarn where it won’t show in the finished piece, as the anchor point will be drawn towards the sculpted area(s). For example:
- The inside of the ‘neck’ area, before you attach the head and body together
- Underneath an embellishment or other attached piece, where it’ll be covered by hair, ears, etc
- At the bottom of the piece (e.g. the base of an apple)
Check the result after pulling the yarn ends to tighten your needlesculpting but before tying the knots – if you don’t like the effect, try pulling the ends more tightly or slackening them off. If it still doesn’t look good, you can easily pull out the entire strand of yarn and redo the sculpting with your stitches in different places, until you’re happy with the result.
Needlesculpting can be a useful amigurumi finishing technique, and I hope you’ll find it helpful for defining, modifying, or improving the look of your amigurumi!
Loved this tutorial? I have so many more amigurumi tips and tricks to share with you!
Boost your amigurumi skills with my latest book, The Essential Guide to Amigurumi, your comprehensive guide to amigurumi techniques and tips.
Do you find my tutorials helpful? If so, please consider making a contribution towards my time so I can continue to create clear and concise tutorials for you:
Thank you so much for your support! Now click below for loads more crochet video and photo tutorials (and do let me know what else you’d like me to cover in future tutorials…)


Summer Atchison said
Thank you for another great and easy to understand tutorial that helps me grow my love of amigurumi making even more. I truly appreciate the time you take to create this information for all of us.
Darlene said
Love this technique,thanks!!
Wendelyn said
Great technique. Thank you for sharing!!
Patricia said
Thanks for the advice! 🙂
Ann said
Thank you for this! I had an idea that there was a way to do something like this, but you have explained it beautifully. Many thanks,