Knitted Poinsettia Pattern
© June Gilbank 2013
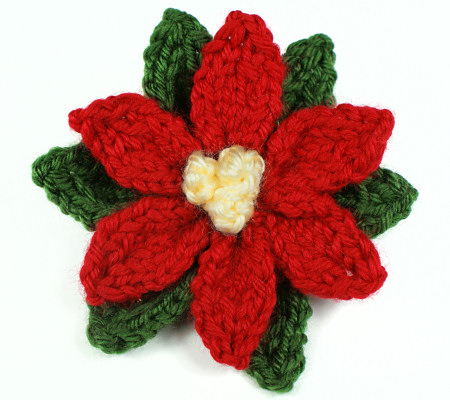
This decorative poinsettia is knitted flat using only basic stitches, so even a beginner at knitting can tackle it. The poinsettia is about 3.5″ (9cm) in diameter, and would make a lovely tree ornament, or a pretty table decoration, gift topper, or brooch.
This poinsettia pattern is Donationware – the pattern is available for free, but if you like it please consider sending me a donation to show your appreciation:

Send me a donation and receive the easy-to-print PDF version of the complete pattern and instructions as a thank you! I’ve kept the knitting patterns for all the pieces on a single page, so you can save on ink by printing only that page, if you prefer.
Donations of any size are much appreciated. Just add the amount you wish to donate, and, once you have checked out and paid, your pattern will instantly be available to download from your PlanetJune account.
The complete pattern and instructions are available below, regardless of whether or not you choose to pay for them 🙂
This is a PlanetJune original knitting pattern. Feel free to use items made from this pattern however you wish, but I’d appreciate credit as the pattern designer. Please do not reproduce the pattern anywhere else; instead post a link to www.planetjune.com/knitpoinsettia/
Not ready to make it yet? Add it to your Ravelry queue: 
You will need:
- Size 4 US/ 3.5mm knitting needles (straight, circular or DPNs will all work equally well
- Small quantity of worsted weight yarn in red, green and yellowSample uses Bernat Satin yarn in Crimson and Banana, and Red Heart Soft yarn in Dark Leaf
- Yarn needle
- Scissors
Size
Approx 3.5″ (9cm) diameter. (Your gauge and yarn choice will affect the finished size slightly.)
Gauge
Gauge is unimportant for this pattern, and the exact needle size isn’t too important either – a size 5 or 6 (3.75 or 4mm) needle would be fine too, but you do need to use a smaller needle than you’d usually use with worsted weight yarn to give the leaves some structure so they aren’t too floppy.
Knitting Tips
- This pattern assumes you have basic knitting skills: casting on, knit and purl stitches, basic knit increases, and left- and right-leaning knit decreases. Teaching knitting is outside the scope of this pattern, so please don’t ask me – if you have questions about knitting techniques I suggest you visit a knitting tutorial site such as knittinghelp.com (I’ve also given the direct links to their casting on, increases and decreases pages, below).
- This is a very simple pattern, and it’ll look fine provided you use the same technique for each leaf, so feel free to use your preferred cast-on/inc/dec methods.
- Cast-on: I used backwards loop.
- Increases: As the increases don’t really show, a simple kfb increase (or M1 after the first stitch of the row and before the last stitch, if you prefer) is fine.
- Decreases: My preferred left-leaning decrease is skp, and right-leaning decrease is k2tog, but if you prefer different left- and right-leaning decreases (e.g. you like ssk instead of skp), feel free to substitute.
Abbreviations
| k | knit |
| k2tog | right-leaning decrease (knit 2 together) |
| kfb | increase (knit into front and back of stitch) |
| p | purl |
| skp | left-leaning decrease (slip 1, knit 1, pass slipped stitch over) |
| st(s) | stitch(es) |
Pattern
Large Leaf (make 6 in green)
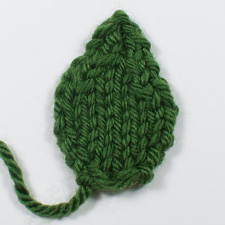
Leaving a 6″ tail, cast on 4 sts.
Row 1: k4.
Row 2: p4.
Row 3: k1, kfb, kfb, k1.
Row 4: p6.
Row 5: k1, kfb, k2, kfb, k1.
Row 6: p8.
Row 7: k8.
Row 8: p8.
Row 9: k1, skp, k2, k2tog, k1.
Row 10: p6.
Row 11: k1, skp, k2tog, k1.
Row 12: p4.
Row 13: skp, k2tog.
Cut yarn, leaving a 6″ tail. Using a yarn needle, thread the tail through the remaining stitches and draw tight. Weave the yarn end diagonally through the purl bumps on the back of the leaf, then snip the remaining tail.
Small Leaf (make 6 in red)
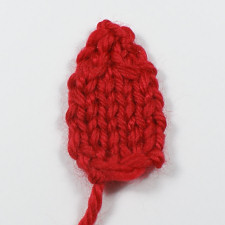
Leaving a 6″ tail, cast on 4 sts.
Row 1: k4.
Row 2: p4.
Row 3: k1, kfb, kfb, k1.
Row 4: p6.
Row 5: k6.
Row 6: p6.
Row 7: k6.
Row 8: p6.
Row 9: k1, skp, k2tog, k1.
Row 10: p4.
Row 11: skp, k2tog.
Cut yarn, leaving a 6″ tail. Using a yarn needle, thread the tail through the remaining stitches and draw tight.Weave the yarn end diagonally through the purl bumps on the back of the leaf, then snip the remaining tail.
Flower (make 3 in yellow)
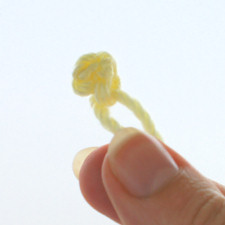
Leaving a 6″ tail, cast on 2 sts.
Row 1: k2.
Row 2: p2.
Row 3: k2.
Row 4: p2.
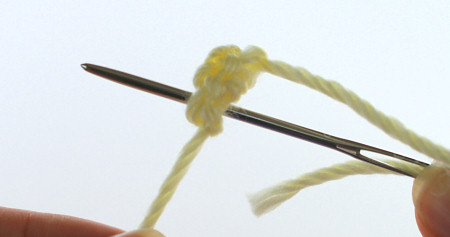
Cut yarn, leaving a 6″ tail. Using a yarn needle, thread the tail through the remaining stitches and draw tight. Stitch through the middle of the cast on edge and pull tight to draw the ends together so the flower becomes a small bobble.
Finishing
Steam Blocking
To reduce curling and straighten out the leaves, steam block them. (This is safe for any yarn, including acrylic yarn, provided you don’t touch the iron to the yarn.)
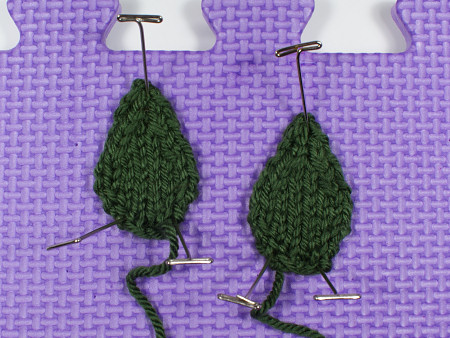
Pin the tip and both bottom corners of each leaf to your blocking surface. Set your iron to full steam and hover it above the surface of the leaf for around 10 seconds. The leaf should feel warm and a little damp to the touch. Leave the leaf pinned in place for a couple of minutes while it cools, then unpin.
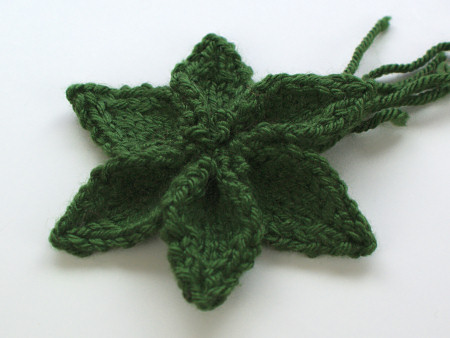
Leaf Ring Assembly
Notes:
- Although the green leaves are pictured here, the assembly process is the same for both the red and green leaves.
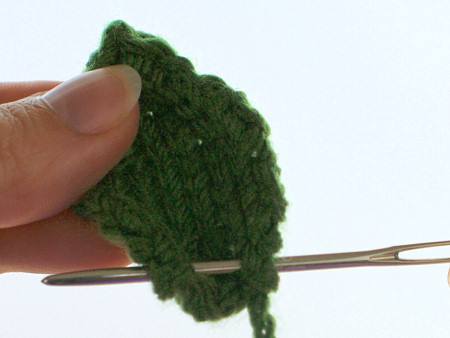
- The right side of each leaf is the side that shows the front of the knit stitches (the v shapes). From now on, always hold each leaf so the right side faces you.
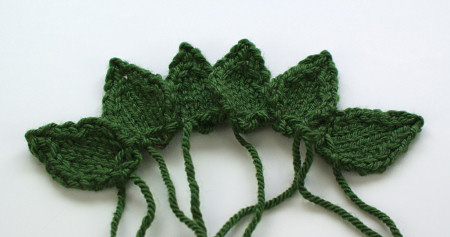
Thread an 18″ length of green yarn onto the yarn needle. Insert the needle up through the bottom right corner of the first green leaf, and then down through the bottom left corner of the same leaf.
Repeat for each of the remaining green leaves, so all six are joined in a row and the yarn passes through the base of each leaf. (You may find it easier to rest the leaves that are already threaded onto the yarn onto a flat surface, so they stay in a line without flipping upside down.)
Grasp both ends of the yarn and pull, to draw the bases of the leaves together into a ring. Tie the ends tightly together to keep the leaf ring in shape, then pull all the ends neatly to the back.
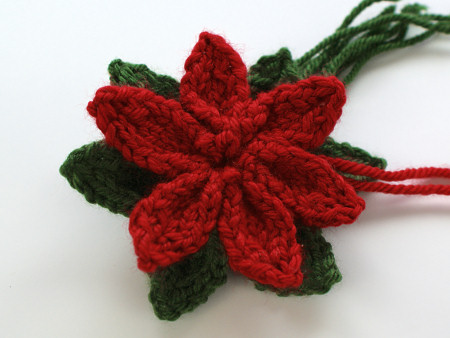
Repeat for the 6 red leaves with a length of red yarn.
Poinsettia Assembly
Thread all the remaining yarn ends from the red leaves through the eye of the yarn needle, then pass them directly through the centre of the green leaf ring to the back. Rotate the red leaves as necessary until the red leaves are offset from the green leaves. Pull the yarn ends until the red leaf ring sits snugly against the green ring.
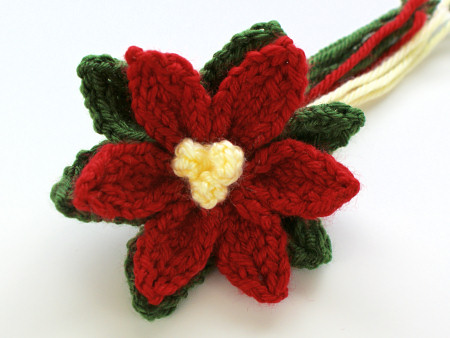
Thread all the yarn ends from the 3 yellow flowers through the eye of the yarn needle, then pass them directly through the centre of both the red and green leaf rings to the back. Pull the yarn ends until the 3 yellow bobbles sit in a neat triangle at the centre of the poinsettia.
You could weave in all the remaining yarn ends, but my preferred method is much faster (and still fairly neat): pull all the remaining ends together at the back of the poinsettia, split them into 2 bundles, and tie together in a secure double (square) knot. Snip the yarn ends close to the knot, so they won’t show from the front of the poinsettia.
Here’s the knot on the back of the poinsettia:
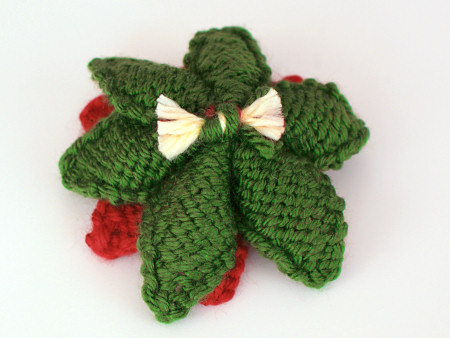
Tip: If you’re making the poinsettia into a brooch or decoration where the back will be visible, try snipping the yarn ends shorter still and stitching a circle of felt onto the centre back of the poinsettia to hide the knot – it’s still easier than weaving in all those ends!
Happy Christmas! I hope you enjoy this pattern. Please leave me a comment below if you do, and consider leaving me a donation. Thanks!


Diane Rehwoldt said
I would like to donate but am already stretched thin. Thank you soooo much for the knit pattern. I am making these to give with Christmas cards to my friends and family.
Elizabeth Charles said
I would totally love to use this pattern to put on my Teddy Bears jumpers that I sell for my business and I would like to be able to knit this pattern for Christmas time please and thank you June
June said
Sounds good, Elizabeth! If you’d like the PDF version of this pattern, you can get it here in my shop 🙂
Jane Roskell said
I have trolled through so many patterns but have plumped for yours .very comprehensive instructions . I just know it will be great . Many thanks Jane .
Gweny said
thank you for this lovely pattern. My plans are to make several sizes in assorted colors to decorate a wreath. I have made several mock up types of poinsettia to try out. yours looks perfect for my lastest projects. Thanks again
Lily said
Love your paterns
Sarh said
I love this…i received a kit to make a pointsetta broach and mid placed the pattern, so this is perfect.
I’m making more to decorate Christmas sweaters.
Mare said
I don’t see and instructions for the flower in the middle of the pointsettia. Please forward
June said
Try scrolling back up, Mare – it’s right after the Large Leaf and Small Leaf instructions 🙂
Daniela said
Oh my gosh thank you so very much, I volunteer at a museum and had nothing to wear for a Christmas-like event we were doing, our theme is based on Noches Buenas, the fable based on poinsettias and I like panicked till I found this pattern from you! Thank you for being a life saver!
Mona said
Hi June,
I love your Pointsettia design.
I would like to make a smaller version and make it into a cute brooch.
Could you give me advise about how to make this in a smaller version?
Thank You!
June said
Mona, you can easily reduce the size of the poinsettia by using thinner yarn together with smaller needles to knit all the pieces. That will also make your brooch look more elegant, as the stitches will be smaller and finer!
Freida Hardin said
Thanks June, for the lovely pattern. I thought this would look good on the Christmas tree this year. I will send you a donation if you would send me your mailing address. I really like your pattern.
Thanks Again Freida
June said
Thank you, Freida! You’ll find my mailing address on my Contact page (but please note it’s much simpler to donate online, as I can’t cash checks/cheques or postal/money orders from here).
Jennifer said
Lovely, lovely flower xx
lesley short said
Awesome flower. Thanks for your time and direction of method to make xx.
Lindy said
Love it! Your Christmas poinsettia is gorgeous.
Love, Lindy xxxx