Crinkle Ball Cat Toy Tutorial
If you have, or know, a cat, and you like to craft, you must try making one of these cat toys. It’s really easy, it only takes 5 minutes, you’ll have a valid excuse for eating chocolates while you craft, and you’ll have the happiest cat in the neighbourhood!
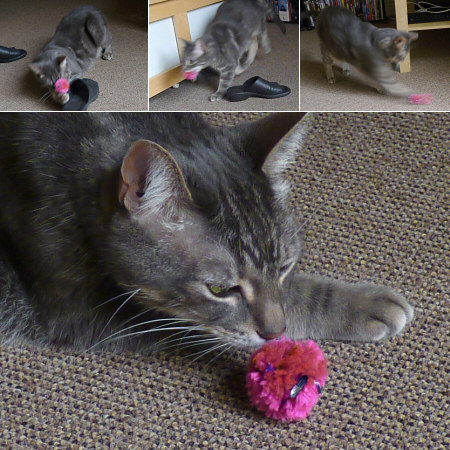
This tutorial is Donationware – the instructions are available for free, but if you like it please consider sending me a donation to show your appreciation:
Send me a donation and receive the easy-to-print PDF version of the tutorial as a thank you!
Donations of any size are much appreciated. Just add the amount you wish to donate, and, once you have checked out and paid, your PDF will instantly be available to download from your PlanetJune account.
The complete instructions are available below, regardless of whether or not you choose to pay for them 🙂
This is a PlanetJune original tutorial. Please do not share or reproduce this tutorial; instead post a link to www.planetjune.com/crinkleball
You will need:
- Yarn (worsted weight or lighter)
- Chocolate or candy wrappers, or similar*
- Pom-pom maker (I use my favourite Clover pom-pom makers, but you can adapt the technique for any brand)
- Dental floss
- Small, sharp scissors
*Note about the ideal wrappers: cats love crinkly noises, and the metallized plastic (plastic foil) that lots of chocolates are individually packaged in these days are perfect for making that crinkly noise when they get scrunched up. The type of wrapper you’re looking for looks shiny like tinsel, scrunches up easily (and noisily), but doesn’t scrunch into a tight ball when you crumple it up (e.g. Fererro Rocher gold foil is NOT what you need here – unfortunately!) – see below.
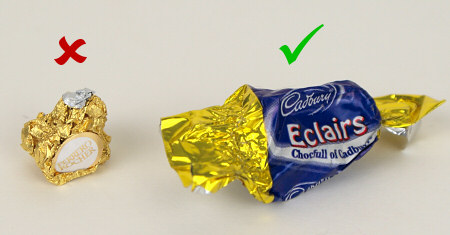
I used Cadbury’s Chocolate Eclair wrappers – such a hardship!
Prepare the Foil
You’ll need 4 pieces of foil per cat toy. For a small pom-pom like mine (35mm), you’ll probably only need one chocolate wrapper, but if your pom-pom maker is larger, or your wrappers are smaller, you may need 2 or 4 wrappers per toy. You may also want to add additional pieces of foil if you’re making a larger pom-pom.
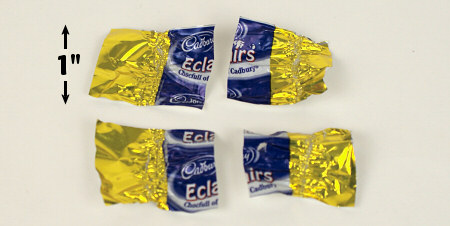
1. Check the diameter of your pom-pom maker. Trim your foil to be the same width as your pom-pom. (By coincidence, my wrappers were 70mm wide, so I could make 2 strips from each wrapper by cutting it in half.)
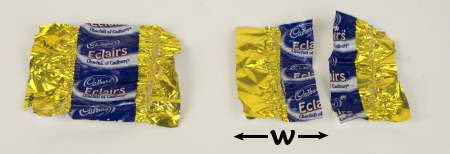
w = width of pom-pom
2. Cut the foil into strips about 1″ (2.5-3cm) tall. The exact height doesn’t matter – I just cut my wrappers in half.
Assemble the Pom-Pom
These specific instructions relate to my Clover pom-pom maker, but you can adapt the technique if you use a different brand.
3. Lay one strip of foil across the middle of the pom-pom maker. Pinch it a bit in the middle so it fits inside the curve (below, left). The two foil ends should just about meet at the bottom of the maker.
4. Wrap one layer of yarn tightly over the pom-pom maker, trapping the foil flat against the maker and compressing it with the yarn as you go (below, right).
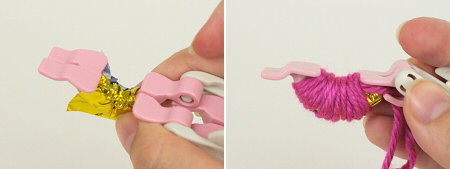
5. Lay a second piece of foil over the middle of the pom-pom maker, on top of the yarn (below, left).
6. Wrap another layer of yarn tightly over the maker, again covering and compressing the foil (below, right). You want to fit as many wraps of yarn into the maker as possible, to make a nice full pom-pom.
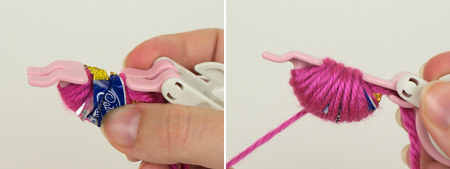
7. Repeat steps 3-6 for the second half of the pom-pom maker (below, left).
8. Snip through the yarn with small, sharp scissors, as directed in your pom-pom maker instructions (below, right). If your foil has overlapped the cutting line, just snip through that too – it’s a cat toy; you don’t need to be too neat and careful with it!
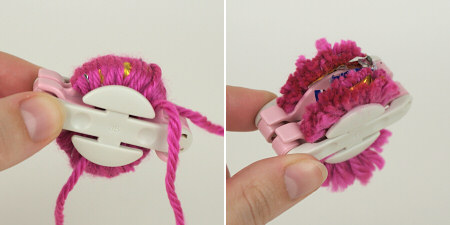
9. Cut a length of dental floss, and tie the pom-pom together as tightly as possible with a secure knot (below, left). Wrap the ends around the the other side of the pom-pom, and tie a second tight, secure knot. Cats are not gentle with their toys and you don’t want the pom-pom to fall apart!
10. Remove the pom-pom maker (below, right). Trim the ends of the dental floss and any overly-long yarn ends and roll the pom-pom in your hands to hide the seam and the floss.
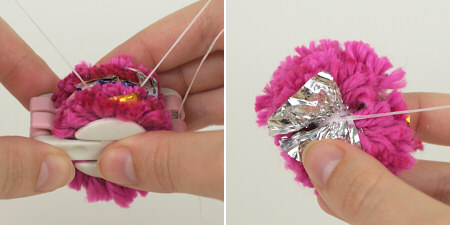
11. Prepare to have a very happy feline! The foil makes an irresistible crinkly noise when the ball is played with.
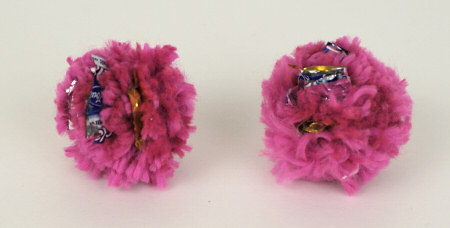
The ball on the right has been thoroughly quality-tested by Maui, and after half an hour of kitty football, stalking, pouncing and batting, being carried by mouth, dropped into shoes and being fished out again, you can see that it hasn’t fallen apart at all!
I hope you enjoyed this tutorial! Please leave me a comment if you did, and consider leaving me a donation. Thanks!
And if you’re up for the challenge, please add an action shot of your cat(s) enjoying their new toys to the PlanetJune Tutorials flickr group 🙂


Pam said
PLEASE NEVER EVER use dental floss when making a cat toy. It is probably THE most dangerous “string” a cat could injest (I’ve worked too many years as an emergency vet tech). If cats swallow dental floss it can literally slice through their intestines. Please use any other material. I can’t count the number of surgeries I’ve assisted in involving dental floss. You have no idea how long an intestine is until you have to cut every inch or two to remove a string of dental floss.
June said
Oh no! Thanks for sharing your experience, Pam. I don’t think it’d be an issue in this case, as it’s not a string of dental floss: there’s less than an inch length of floss left inside the toy, tied into a tiny loop, once you’ve tied it together tightly and cut off the excess. And Maui played with his crinkle ball toys for years without the floss ever coming free – it’s very securely tied into the middle of the toy, and it’s the key to making the toy withstand serious play without ever falling apart. But thank you for the floss warning! I can understand that a length of floss could definitely pose a serious risk if swallowed.
Nancy Janiszewski said
Hello,I’m not a crafts person per se. Where can I find the Pom maker as shon in your tutorial?
I just purchased 2 kittens from one of our local area cat rescues. I’m sure Simon and Spencer would love the little balls. We have old flat foil balls purchased at a pet store. I’m thinking of taking them apart and using them in the new foil balls I’m going to make. There’s lots of crinkle left in those old toys. Mylar would be another wonderful addition to your yarn foil toys. The Mylar really makes a neat crinkle noise.
Again,where can I purchase the Pom-Pom maker?
Thanks and a donation will be on the way today.
Thank you,Kitty hugs,Nancy and the little boys ????
June said
Nancy, I use these Clover Pom-Pom Makers – that’s a link to amazon, but you can probably also buy them from a craft shop local to you.
Suzanne said
A little shot of catnip spray will spice these up perfectly! I am going to try using wool roving and hemp string. thankyou June .
Jessica Bronder said
I wanted to thank you so much!!! I love the idea of Donationware. I shared this page on my Facebook page and will be back for more patterns. Thank you so much. I’m sure my little girl will love these.
Jana said
Just a word of caution: make SURE you clean the wrappers of any chocolate residue first. Chocolate is toxic to cats!
June said
A very good point, Jana – thank you!
Jana said
OOPS! Forgot to add, Bibi will be ONE on February 29th! Technically speaking, that is! She’s actually been around for FOUR years! My little leap year baby! 🙂
Jana said
I am definitely going to make one or two of these for Bibi this weekend!
Judy Carlson said
Oooh! I’ll have to make some of those for Smokey! She’ll love them. I think it’s a great idea to make your tutorials available as Donationware. Now that I have a Kindle, it is really convenient to load pdf’s on it so I can take patterns with me. You put so much care and work in to your tutorials; they are worth the donation!
(Must find suitable chocolate wrappers now!)
Becky said
Hehe, that looks like fun. I don’t have a cat but my friends do. I must try this for them.