Latch hooking is one of those crafts that’s always intrigued me. I always walk past the colourful kits in craft stores, as the large kits are pricey, and the smaller kit designs are more child-focused – think cute puppies and cartoon flowers – and I want a design I’ll like if I’m going to invest my time in making something!
I thought latch hooking would be a good addition to try for my Relaxing Crafts series, so I hunted around and finally found a kit with a beautiful design that spoke to me: plumeria flowers on a rocky beach.
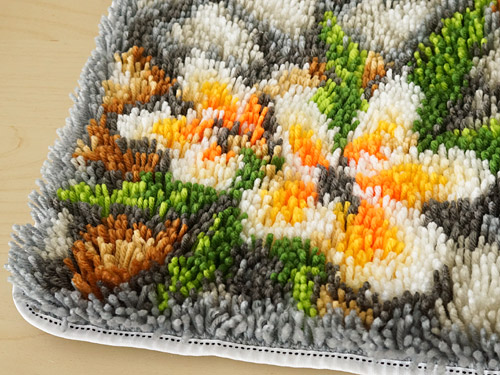
What is Latch Hooking?
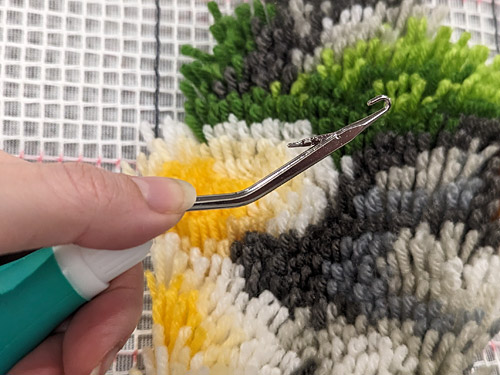
Latch hooking is a little like cross stitch – you have a pattern made of coloured squares, and a canvas you work stitches into. But instead of making a stitch for each square, you have a short length of yarn that you tie onto the canvas with a latch hook. I’ve used latch hooks before for machine knitting, and of course working with a hook is second nature to me from crochet!
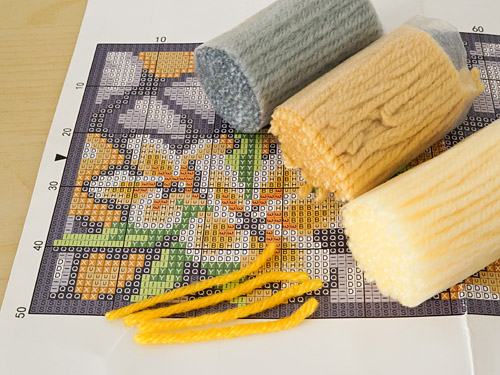
In a kit, the yarn is bundled into pre-cut strands of each colour, so you don’t need to cut endless little pieces of yarn:
The advice, as with cross stitch, is to start from the middle of the design, in the centre of the canvas, and work out from there.
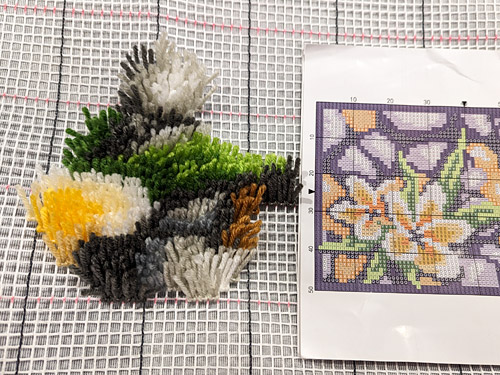
That’s a good way to make sure the design is centred on your fabric, but I ended up regretting that decision (more on that later…)
How to Latch Hook
The instructions I found online all said to latch each strand of yarn in a one-step motion: wrap the centre of a yarn strand around the hook below the latch, insert the hook under a bar in the canvas, wrap both ends of the strand into the latch, and pull through:
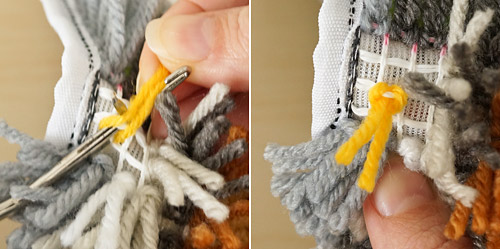
I found it fiddly having to use my non-dominant hand (that’s my right hand, as I’m left-handed) to do all that wrapping. Instead, I treated the latch hook more like a crochet hook, and did a two-step process:
Step 1: Insert the hook under a bar in the canvas, grab the centre of the yarn strand with the hook (below left), and pull the hook back through. Push the hook forward until the yarn sits behind the open latch on the hook (below, right).
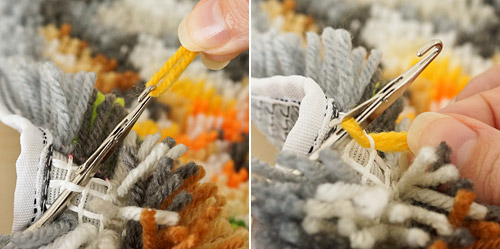
Step 2: Grab both yarn ends with the hook, and pull it back through the loop on the hook – the latch will close around the yarn ends as you pull the hook back (below, left), which makes it very easy.
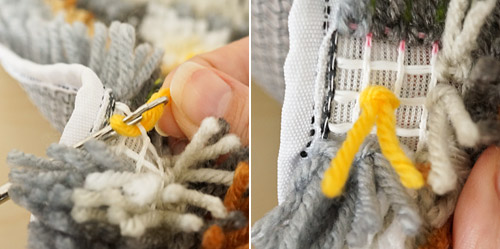
As you can see by comparing the result (above, right) with the photo from the one-step process, with the two-step process the yarn is latched on in the opposite direction (i.e. ‘upside-down’), but that doesn’t matter at all – there isn’t a right or wrong way to attach the strands of yarn, provided you attach them all in the same way. So that’s my top tip for crocheters: use your latch hook like a crochet hook and grab the yarn with the hook instead of manipulating the yarn around and into the hook with your other hand!
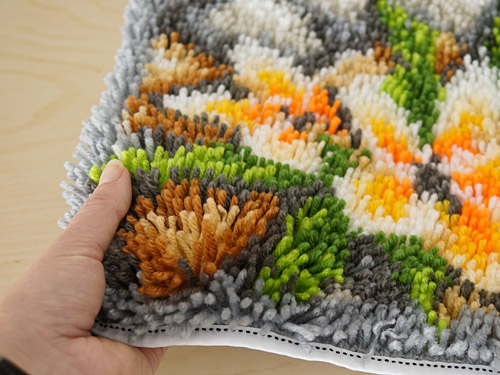
Whichever method you use, the end result is a beautiful, plush fabric like a rug.
My Review
The hook that came with my kit was a bit thin and not very comfortable to use, so I invested in a more ergonomic Boye latch hook that has a soft comfort grip that fits my hand well, and an offset head that keeps your hand further from your work. Buying a better hook was well worth it – you’ll be spending hours and hours hooking even a small project, so there’s no point in suffering!
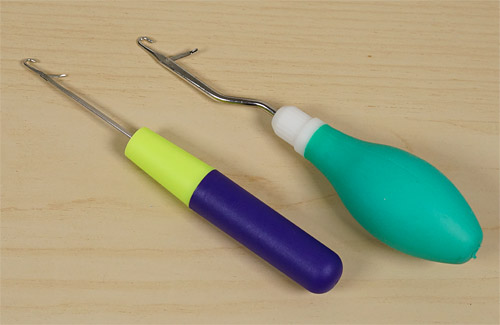 L: cheap hook, R: ergonomic hook
I found the process of latch hooking to be relaxing, but working the right-hand side of my canvas was a bit frustrating, as the yarn I’d already hooked into place kept getting in my way. As I’m left-handed, I found it much faster to hook from right to left, which meant I only had blank canvas beneath my hand. As I started in the middle, the half of the canvas I worked from left to right (away from the middle) was much more of a slog than the half I worked in the more natural (to me) direction.
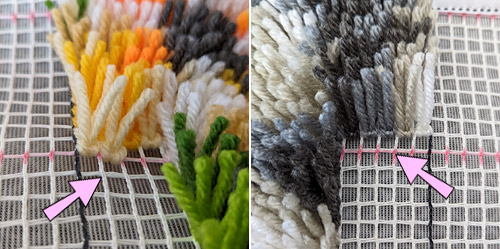 It’s much easier to work from the side where your hook isn’t blocked by the stitches you’ve already made!
In future, if I make another latch hook project I think I’d mark the centre stitch, and then count my pattern carefully up and across from the centre to the top right corner and start from there. That way, I could work left and down across the canvas to the bottom left corner, and always have blank canvas beneath my hand as I work, so the previously worked stitches wouldn’t get in the way of my hook.
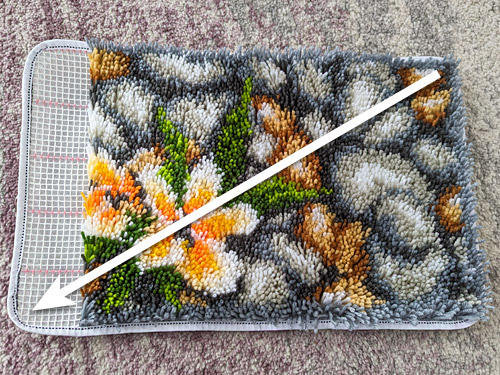 Right-handers: if you want to try this method you’d start at the top left corner and work right and down to the bottom right corner!
To speed up the process of selecting yarn strands, I ended up counting and pulling all the strands I’d need for a small area (10-20 stitches) at once, lay them all down on the project, and then I could easily grab the next one from the pile without having to pull them individually from the plastic wrappers for each stitch. This definitely helped me feel like I was making faster progress.
Once I realised how much easier the left side was for me, I forced myself to finish the entire right side before I was allowed to start on the left side, and I’m glad I did! As I suspected, it was much faster when I got to the left side, and the project became much more enjoyable. I zoomed through hooking the left side, and finally had a completed project:
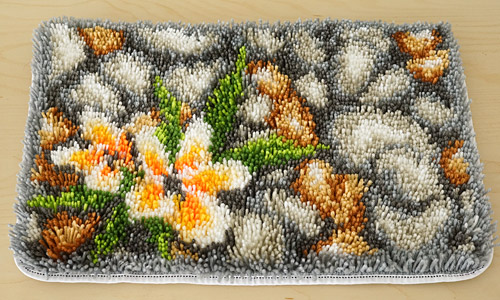 Isn’t it pretty?
Relaxing Craft Verdict
Latch hooking definitely qualifies as a relaxing craft! Once you’ve mastered the technique, it’s just counting the pattern squares and hooking each strand into place – lovely and restful. And if you can find a design you like (there are some tempting latch hook kit designs on amazon!), it’s a nice way to pass the time and keep your hands occupied without having to think too hard about what you’re doing.
Comparing latch hooking with other crafts where you also follow a gridded pattern, I think I prefer diamond painting and cross stitch – with either of those crafts, once you’ve prepared one colour of diamond or threaded one length of floss, you can make dozens of squares of that colour without stopping. With latch hooking, you need to stop and pick up a new piece of yarn for every square, so I found it to be a slower process. But I get bored with any of these crafts after a while, and when that happens I like to mix it up by switching to a different relaxing craft!
I really like my finished project (although I’m tempted to pull out the flower centres and rework them in the dark brown instead of the grey) but… what do you do with a latch hooked piece? I feel that the yarn may be too soft to use it as a functional rug, but I’d like to be able to do something with this piece though (for reference, it’s about 20×12″/50x30cm). If you have any ideas, please let me know!
Have you ever tried latch hooking? Or are you tempted to try it now? I’d love to hear your thoughts…


Estelle said
Why do you think it’s not great as a rug ? My stepmom is thinking of starting a huge latch hooking rug project, and it would be a shame if she did all the work and was disappointed… How thick was the yarn and the grid for you ?
Thanks for the review, it’s exactly what we needed 🙂
June said
That was just my impression – the yarn feels a bit soft to stand up to being walked over repeatedly, but I’ve never had any kind of pile rug so I could be completely wrong about that. Mine is too small to use as a rug anyway, so I can’t really test that out… I’m sure if you buy an actual rug-sized kit it would be fit for purpose! I think the rug canvas and yarn are standard sizes (around 4 stitches per inch, and the yarn looks roughly equivalent to worsted weight to my eye).
Ann said
My suggestion would also have been pillowcase. It sure is a pretty motif! And of course I’m now browsing for a kit to try this myself. 😅 I’ve already got a (very old) wooden hook and wool but they’re left overs with no design or canvas.
June said
Interesting that both of you gave up on it as kids! I can understand why that may be a common experience for kids – I had the same experience with a needlepoint canvas when I was young: I lost interest halfway through and never finished it.
Latch hooking is definitely a slow craft, and it requires significant patience to complete an entire piece, especially one that’s large enough to have a lovely end result. I just set mine aside whenever I got bored and returned to it when I felt like it. If you don’t put pressure on yourself to finish it quickly, it becomes a much more enjoyable long-term project.
Katy K said
That looks beautiful! I tried latch-hooking when I was about 8, I think I did 25% of the project. My Mom finished and mad it into a pillow for my Grandma. Now you’ve got me also wondering if I should try again…
wondrousfestivaleaf956f304 said
June, Your post brought back memories. I remember doing a couple latch hook projects when I my children were young. One was a long rectangle of a snowman and I hung it on an inside door each winter. I think there is not much to do with these pieces other than wall hangings or pillow covers, if they are not suitable for an actual rug. Your finished project is beautiful and I would probably look for a place to hang it for a while to be enjoyed and admired. It is probably a bit large for a pillow. You did send me looking on amazon for dedicated pillow latch hooks and I did see some sweet kits for a future holiday season. Thank you for sharing – Jean
>
June said
Thanks for sharing your memories, Jean! I think I may just put mine on the floor as a mini rug, in an area without too much foot traffic, and see how it goes…
Judith Carlson said
Pretty! I had a latch hook rug kit in Jr. High. I did part of it and gave it away. I think I would have more patience now. You could make a pillow or a wall hanging.