PlanetJune Craft Blog
Latest news and updates from June

PlanetJune Blog: Latest News, Patterns and Tutorials

PlanetJune Stories: Cherie Fishlock

Today’s PlanetJune Story is from Cherie Fishlock and comes to us from Australia. (Isn’t it amazing how crafting connects us all into one big global community?)

Cherie writes:

I’ve been crocheting for a year and am self taught. June’s book, The Complete Idiot’s Guide to Amigurumi, was my go-to guide when crocheting amigurumi especially after I discovered the brilliance of the invisible decrease.

Thanks to June’s amazing emperor penguin pattern I won first prize at the Royal Show in Canberra, Australia in the beginner’s crochet class. I also won champion. It was great seeing the penguin amongst all the crocheted blankets.

I just want to thank June for the well written pattern. I must confess that I crocheted it at the last minute and her clear instructions made the process so much easier especially since I had never done colour changes before.

Unfortunately I couldn’t give June the credit she deserves; I wrote on the entry that it was designed by planetjune.com however that was not displayed.

Considering it was the first show I had ever entered I must say I’m now hooked. 😉

I am impressed: my Emperor Penguin, with its white belly and black back, is my most ambitious pattern for colour changes and Cherie obviously handled them like a pro to scoop the prizes with her lovely penguin.

Congratulations, Cherie – I’m really glad that my pattern could help you showcase your crochet skills and capture the attention of the judges 🙂

PlanetJune stories
Cherie’s Emperor Penguin.

PlanetJune stories
Cherie showing off her prize-winning penguin at the show!

PlanetJune stories
Excellent achievements: certificate, ribbon and rosette.

All very well-deserved, I think, don’t you? Please leave Cherie a comment if you’ve enjoyed this post!

Do you have a PlanetJune Story you’d like to share? I’d love to hear it! Please email your story to june@planetjune.com, together with one or more high quality photos showing what you’ve made from PlanetJune patterns. If I choose your story to feature here on the blog, I’ll send you your choice of pattern from my shop to say thank you!

Comments (7)

Cape Town wildlife XI

This is the eleventh post in my monthly series on the fascinating nature I encounter here in South Africa.

It’s hard to believe, but we’ve now been in South Africa for a whole year! Table Mountain, recently voted as one of the 7 new wonders of the world, towers over Cape Town and the entire city is arrayed around its base. When you live somewhere (as opposed to visiting on vacation) you somehow never get around to doing the major tourist attractions, so we’d never been up it. Then we had a visitor, which meant we also got to do lots of sightseeing around the city, including a trip up the mountain. It’s pretty spectacular, and I thought it deserves its own post, so you can enjoy it too…

Table Mountain is named for its 3km long flat top, which means once you get up the mountain, you can walk along the top without having to do any climbing (yay!) There are paths to walk up the mountain, but we opted for the cable car.

table mountain
The cable car is torture if you, like me, hate heights and get motion sickness, as it has big glass windows and rotates as it climbs. It’s worth it though…

table mountain
Hello Cape Town! The mountain you can see here is called Devil’s Peak and I can see the other side of it from my kitchen window 🙂

The Cape Peninsula has its own ecosystem and a massive amount of biodiversity. The plant life is called fynbos and occurs nowhere else on Earth.

table mountain
Beautiful flowers sprout from cracks in the rocks

table mountain
Naturally-occuring bonsai trees

table mountain
Lovely succulents

And there’s lots of wildlife up here too…

table mountain
Speckled Pigeon

table mountain
Red-winged Starling

table mountain
Black Girdled Lizard

table mountain
Southern Rock Agama

table mountain
My favourite, a dassie! (Click through if you didn’t read about them in my October post.)

table mountain
I included this dassie photo so you can see how sure-footed they are climbing and running among the rocks – those feet really are adapted for mountain climbing.

table mountain
Hummingbirds are native to the Americas. The African equivalents are called sunbirds and they are similar in size and colouring to hummingbirds. This is a female (hence the drabness) – I hope I’ll be able to show you some photos of a more colourful male at some point!

table mountain
Although they don’t really hover like hummers, sunbirds do have similarly adapted beaks so they can reach down into the base of flowers for the nectar.

We spent 3 glorious hours walking around on the mountain top, looking at all the different views and unusual plants, watching the wildlife, and taking in the unspoilt atmosphere. We all managed to get very sunburnt despite our sunblock, but it was well worth it – I definitely agree that Table Mountain should be known as a wonder of the world!

I hope you’ve enjoyed this month’s photos – please leave me a comment if you liked them.

Comments (12)

Worsted weight yarn comparison

NEW! See my fully updated resource comparing dozens more yarns:
Worsted Weight Yarn Comparison

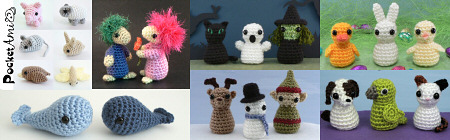
Worsted weight acrylic yarn is what I use and recommend for my amigurumi designs. That’s 100% acrylic yarn, marked as worsted weight, medium weight, or number 4. (Outside North America, it may also be called 10 ply or aran weight.)

worsted weight acrylic yarns

That makes it sound pretty locked down, and that any yarn you choose that fits those requirements will be exactly the same. Of course, if you’ve ever touched, let alone used, two brands of worsted weight acrylic, you’ll know that’s not the case. Thickness, loft (bounciness), stretchiness, softness, shininess – all these properties vary wildly between different yarns all marked as worsted weight acrylic, and that’s why I usually recommend that you don’t mix yarns within an amigurumi.

I thought it might be interesting to try to quantify some of this, as scientifically as possible. So, time for a yarn experiment!

The Contenders

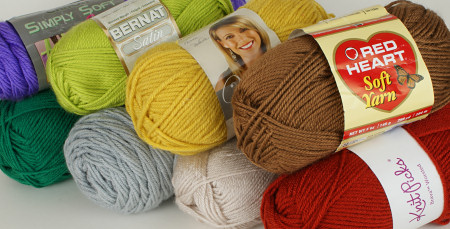
I took 8 samples of worsted weight acrylic yarns, choosing a different colour for each so we can recognise them later:

worsted weight acrylic yarns

  1. Lion Brand Vanna’s Choice (yellow)
  2. Caron Simply Soft (purple)
  3. Hobby Lobby I Love This Yarn! (grey)
  4. Patons Canadiana (beige)
  5. Red Heart Soft (brown)
  6. KnitPicks Brava (red)
  7. Loops & Threads Impeccable (green) – Michaels’ store brand
  8. Bernat Satin (lime)

Test 1: wraps per inch (WPI)

Yarn thickness is often measured in terms of wraps per inch (WPI). To find the WPI, you wrap the yarn around something (e.g. a ruler) so the wraps are touching but not squashed tightly together, and count how many wraps fit into 1 inch. A higher WPI number means a finer yarn.

measuring yarn thickness: wraps per inch
Here there are 12 wraps between the 3″ and 4″ markers on the ruler.

My WPI results were consistently higher than the ones I found on Ravelry, e.g. Bernat Satin (pictured above) apparently has a WPI of 9, not the 12 I measured. But as I’m looking for a trend, not the actual numbers, that doesn’t matter – I measured each of my samples using consistent methodology, so the thicker yarns will have a smaller WPI number in my test.

Test 2: crocheted sample

I crochet with very consistent tension, as you can see by how even the stitches look in my amigurumi. So crocheting an amigurumi-style sample was the best way for me to ensure a consistent result for this test, plus it’s more relevant for amigurumi than a flat square swatch would be. I used an E (3.5mm) hook and crocheted a cup shape with each yarn, using the same pattern for each cup, and making sure the sample was large enough to measure the finished single crochet stitch width and height.

cup-shaped amigurumi sample

As you can see, the samples varied in size considerably:

cup-shaped amigurumi samples
These two samples were crocheted using the same hook and pattern, but the different yarns make a huge difference to the finished size! The Bernat Satin sample easily fits inside the Lion Brand Vanna’s Choice sample.

I flattened each cup to remove any inaccuracy from the 3D shape (it’s hard to measure an accurate diameter). To get an accurate measurement, I measured over 10 stitches and 6 rows to get my average stitch heights and widths.

An Aside: Watch Out!

Even within the same yarn, I’ve found that there can be slight thickness differences between different colours, but here’s an example of a larger difference: for years I’ve been talking with friends about how Bernat Satin seems thinner than it used to when I first started buying it, so I decided to try the WPI test with a sample of Bernat Satin that I bought in 2007.

After verifying that the change in the yarn was real (old WPI 11, new WPI 12), I checked the ball bands from several skeins of old and new Satin. All Bernat Satin has a weight of 100g, but the older balls were labelled as between 149 and 152m per 100g skein. All the newer balls are labelled as 182m per 100g skein. That’s 30 metres more yarn with the same total weight, which means the yarn really has got thinner (and the gauge information was never modified, although the gauge is definitely different since the change!)

So my little caution is to watch out – even if you’re buying the same brand and type of yarn, it may not have exactly the same thickness.

The Results

Yarn Sample Colour WPI Stitch width / mm Stitch height / mm
LB Vanna’s Choice yellow 11 6.2 5.5
C Simply Soft purple 13 5.4 4.8
HL I Love This Yarn! grey 12 5.9 5.0
P Canadiana beige 13 5.3 4.7
RH Soft brown 13 5.3 4.7
KP Brava Worsted red 13 5.6 5.0
L&T Impeccable green 11 6.3 5.5
B Satin lime 12 5.3 4.7

I arranged all the flattened samples by size here so you can see the difference visually too – 0.3mm per stitch may not sound like much, but you can see that it really makes a difference, even in a small amigurumi piece:

worsted weight acrylic yarns
Flattened samples from the top – the height of the samples shows the stitch width variation

worsted weight acrylic yarns
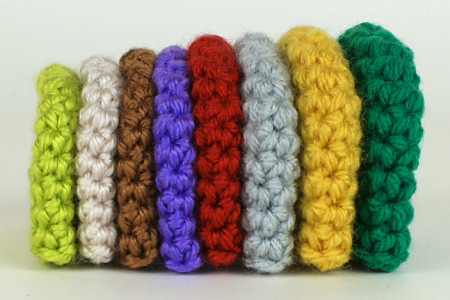
Flattened samples from the side – the height of the samples shows the stitch length variation

Now here’s the table again, this time with the yarns arranged in the same order as in the photos above. Italics show the thinnest yarns, and bold shows the thickest.

Yarn Sample Colour WPI Stitch width / mm Stitch height / mm
B Satin lime 12 5.3 4.7
P Canadiana beige 13 5.3 4.7
RH Soft brown 13 5.3 4.7
C Simply Soft purple 13 5.4 4.8
KP Brava Worsted red 13 5.6 5.0
HL I Love This Yarn! grey 12 5.9 5.0
LB Vanna’s Choice yellow 11 6.2 5.5
L&T Impeccable green 11 6.3 5.5

But it’s not just weight that plays a part; the yarns’ appearance and feel also vary. Old-fashioned acrylics felt hard and looked matte, whereas many modern ‘soft’ acrylics feel silkier to work with, and have more of a sheen to them. You may prefer a firmer, more rigid yarn for amigurumi, or like the shinier, softer look and feel. For me, I like both, but I’d never want to mix them in one project.

This final table of results is more subjective, but it’s my attempt to classify the yarns by which are similar enough to use within one project, both in terms of softness/shininess and weight. These are just my opinion, and I may have invented the term ‘light worsted’, but I feel it applies for subdividing the ‘worsted’ weight into strata of weights that match each other more closely.

Yarn Sample Colour Shininess Weight
B Satin lime sheen light worsted
P Canadiana beige sheen light worsted
RH Soft brown sheen light worsted
C Simply Soft purple sheen light worsted
KP Brava Worsted rust slight sheen worsted
HL I Love This Yarn! grey slight sheen worsted
LB Vanna’s Choice yellow slight sheen heavy worsted
L&T Impeccable green no sheen heavy worsted

So, I’d use any of the top 4 yarns (Bernat, Patons, Red Heart, Caron) interchangeably – they have a similar weight and sheen to them, and the size difference is no more than that between different shades of the same type of yarn. Of the remaining four, they make 2 pairs in terms of weight, but the KnitPicks and Lion Brand are far softer than the Hobby Lobby and Michaels’ store brands, and have more sheen, so I wouldn’t mix them.

Recommendations

  • Although some worsted weight yarns are thicker than others, all make good amigurumi! The only difference is the size of the finished result – they will scale correctly so using the same pattern with a thicker yarn will give you a taller, wider and deeper amigurumi – it will remain in proportion to the original design.
  • These results aren’t so important if you’re making simple amigurumi e.g. a brown bird with a yellow beak and feet, but if you’re making multi-coloured amigurumi with colour changes within the pieces, or more complex shaping, I recommend you use my results (and/or do your own test first), to make sure the yarns you’ve selected are comparable in thickness, feel, and appearance before you start.
  • Don’t believe the gauge info when you’re comparing yarns for amigurumi! Only half the yarns I tested had crochet-specific gauge info, but according to those that did, you’d expect Vanna’s Choice (one of the heaviest yarns I tested) to be thinner than Red Heart Soft (among the lightest yarns in my test) – that’s clearly incorrect. The other gauge information (for recommended hook/needle sizes and knitting) seemed equally random/incorrect compared with my tests.

I hope you found my little experiment useful! I know it’s answered some questions for me, and now I’ll feel more confident about deciding to mix, or not mix, certain yarns in my future amigurumi projects.


The Essential Guide to Amigurumi book by June Gilbank

Loved this tutorial? I have so many more amigurumi tips and tricks to share with you!

Boost your amigurumi skills with my latest book, The Essential Guide to Amigurumi, your comprehensive guide to amigurumi techniques and tips.


Do you find my tutorials helpful? If so, please consider making a contribution towards my time so I can continue to create clear and concise tutorials for you:

Thank you so much for your support! Now click below for loads more crochet video and photo tutorials (and do let me know what else you’d like me to cover in future tutorials…)

See more helpful PlanetJune crochet tips and technique tutorials

Comments (133)

interview with June, part 2

As I’m a 99% self-published designer, I don’t often get profiled in crochet magazines etc, so my Ravelry group decided to interview me to find out a little more about who I am and what I do – my own PlanetJune Story, if you like! I’ll be posting the answers to some of their questions every now and again, and grouping them by theme if they fit together nicely. Here are the questions I’ll be answering today:

Why Amigurumi? (from Monica, theMarkofSMB)
How did you find out about Amigurumi? (from Monica, theMarkofSMB)
Do you crochet from other designers’ patterns? (from Aleksandra, petrOlly)
How did you get into designing patterns? (from Chrisie, CrochetChrisie)
What is your favorite animal? (from Monica, theMarkofSMB)

In 2005, the online craft scene was very different. Imagine a world with no Ravelry, no Etsy, only a handful of craft blogs (and no way to subscribe to them), no social media… It’s strange to think how much things have changed in only a few years!

Back then, amigurumi was pretty much unknown outside Japan, but when I got bored with afghans and scarves, I managed to find something different in crochet that piqued my interest: thread bears – tiny bears crocheted with thread and steel hooks. Free patterns weren’t common back then, and thread bear design seemed to be a closely guarded secret – there was no free way to find out how to make them. As the idea of working in rounds was completely new to me, I had no idea where to even start on making a crocheted toy, so I bought one pattern from a designer on eBay so I could see how these crocheted bears worked.

Now, I really don’t like to follow patterns – crochet or otherwise. I can’t help myself – I have to tweak and ‘improve’. Even my first thread bear didn’t quite follow the pattern I’d bought, and then I started changing them to make them simpler and cuter (unknowingly, I was creating something closer to amigurumi style!)…

thread bears by planetjune
L: loosely based on a pattern I bought; R: my first attempt at a design

thread bear and bunny by planetjune
Further refinements (all are between 4 and 6cm tall as seated)

I got curious and tried making a regular-sized bear of my own design with eyelash yarn and a larger hook:

blue crocheted bear by planetjune
Blue Bear – a very early amigurumi prototype, ahead of its time!

…and that was the end of the story for well over a year. With no blog or online community, nobody saw what I was making, and there was nobody to tell me I was onto something and I should keep going in this direction, so I didn’t.

But then things started to change – we had forums like Crochetville and Craftster to share what we were making, and more people (including me) started their own craft blogs. I began to hear about amigurumi, and crocheted toys were starting to get more popular.

I didn’t really like the style of any other amigurumi I’d seen, so I wasn’t too interested in them. Then I remembered my fuzzy Blue Bear – nobody was making anything like that, despite the proliferation of eyelash yarns around that time – and decided to try remaking it from scratch with more structure and better proportions. And look what happened:

fuzzy crocheted bears by planetjune
Hey, it’s Fuzzy Bear!

I submitted an early version of Fuzzy Bear to the Crochet Pattern-a-Day Calendar, but didn’t hear anything back from them. People on Crochetville and my fledgling blog seemed interested in a pattern anyway, so I thought I’d self-publish it as a PDF and see what happened…

(As it turns out, Fuzzy Bear not only made it into the calendar that year, but also made the back cover! Luckily, by the time I found out, I was already well down this road as a self-published crochet designer.)

It turned out I had a perfect combination of skills for doing this: my science/mathematical background worked well for figuring out all the numbers for patterns, and my technical writing background let me write clear, concise, accurate instructions. And, not only that, but all my other crafty pursuits lent themselves to my designs too:

My love of all animals (and, to answer the question, cats are my favourite ‘pet’ animal and orang utans my favourite ‘non-pet’) and observation skills I used to make my painstaking animal pencil sketches came in handy when I decided to make more realistic animals instead of traditional ‘toy’ shapes.

pencil sketches by June Gilbank
Some of my pencil sketches: cat with flowers, donkeys

And I’d also done lots of 3D modelling before, both in recreating toys from much-loved childhood TV shows:

pencil sketches by June Gilbank
Hand-sewn Charlie Mouse from Bagpuss – my own design (inset pic shows the real Charlie Mouse from the show)

…and making polymer clay sculptures:

polymer clay sculptures by June Gilbank
My versions of the flying pig from an old Telus commercial and Gingy from Shrek

So even though I started down this road by accident, it does make sense, looking back, that I could combine all my skills and interests in this way and find something that was a perfect fit for me – making models of my favourite things is something I’ve always done, many years before I even learned to crochet, let alone knew it could be used to create 3D models. Crochet lends itself to pattern-making more easily than clay sculpture, but, apart from that, the design process is pretty similar for me.

planetjune toy shelves
Some (nowhere near all!) of my amigurumi designs

Although I’m still amazed and grateful that I’ve been able to create a career from this, I’d still be making amigurumi even if nobody bought my patterns, because I just love to do it. Finding out about, and spending time with, animals and nature; crochet; sculpting; design challenges; and a good excuse to fill my house with the cutest toys I can imagine – what could be better?

I hope you’ve enjoyed hearing a bit about my introduction to amigurumi. If you have any questions you’d like to add to the interview pool, please submit them on Ravelry or in the comments of this post – I’ll do another interview post in a little while!

Comments (8)

Easter CAL roundup

Welcome to BunnyFest 2012! Okay, this is actually the Easter CAL roundup, but I’ve never seen a pattern catch the imagination of so many people so quickly the way my Baby Bunnies design has – as you’ll see from this roundup, crocheted bunnies are taking over the world this year.

Easter CAL at PlanetJune

It’s so much fun to see how people are putting their own twists on my pattern to create all kinds of different bunnies. But let’s look at the other CAL entries first, and I’ll save the bunny gallery for the end! Here goes…

Read the rest of this entry »

Comments (7)

Koala crochet pattern

My first marsupial design is here, and it’s a koala!

koala crochet pattern by planetjune

Koala was the first fully-pledged design using my new commissions process, and I’d like to say a big thank you to everyone who trusted my design ability enough to pledge towards this design! I hope I’ve met (or exceeded!) your expectations 🙂

I thought I pretty much knew what a koala looked like before I started my design. It was only once I started researching, though, that I realised why every toy koala I’ve seen before has looked wrong, somehow: they all have flat faces and only the black nose sticks out from the face. It turns out that, viewed in profile, koalas have quite pointy faces, with the nose at the tip, so that became a part of my design challenge…

koala crochet pattern by planetjune

Between the shaped legs, the poseable arms, the one-piece head and body, and the pointy face, I set the bar pretty high and it took longer than I was expecting to get everything right. Even when everything looked good in pieces, once I started to stitch it all together I had to make several more changes until I really felt like I’d got it all right. But, finally, I looked at it, and yes, it had all clicked into place to give me a koala that’s (I think) a perfect blend of realistic and cute.

koala crochet pattern by planetjune

The koala is a nice sturdy 7″ tall and his arms are poseable at the shoulders. (Although I didn’t do this with mine, if yours will be a toy for a child you could add some velcro or a press stud to his hands so they can grasp together and he can cling onto things – I think that would be really cute!)

I hope you’ll enjoy making the koala too – there are some pretty clever shaping tricks in this pattern, so I think you’ll have fun seeing it take shape under your hook. But don’t be scared – it’s no more complicated than any of my other patterns, and I have 23 step-by-step assembly photos so your koala will turn out absolutely perfectly too!

You can pick up the Koala pattern right now from my shop – with a special launch discount for this week only! If you’re not quite ready to buy though, how about queuing Koala on ravelry so you don’t forget about it?

Pattern Survey: When you look at the Koala pattern, you may notice that it looks a little different to all my other patterns: I’ve updated the layout to have less wasted space and to include the new PlanetJune logo. I’ve also taken this opportunity to add some more useful details (finished size, US/UK stitch conversions, and more) that haven’t previously been included in my patterns. Before I launch into the massive undertaking of updating my other 100+ patterns to include the new layout and added info, I wonder if you wouldn’t mind letting me know if there’s anything else you’d like to see in my patterns, so I can make all the improvements at once?

If you can spare a minute to help me this week, please compare the Koala pattern PDF with any of my other (non-donationware) pattern PDFs, and then fill in this 1-minute survey to let me know what you think. I want my patterns to be as good as possible, so this is your chance to tell me if there’s anything I could improve! Thanks for your time – I really appreciate it.

A little note about pledging: now the koala is complete, I’m ready to start designing the next commission to be fully pledged! But, I currently have 15(!) other designs in various stages of progress (don’t even ask how that happened…) so I have plenty to keep me busy until that happens! If there’s another design on the commissions list that you’d like to pledge towards, that would be great, but there will be new PlanetJune patterns coming, either way – I’m keeping the non-commissioned ones as surprises until they’re finished 🙂

Comments (5)

April update

It may be April 1st, but there’s no fooling here – just my usual news update…

Pocket-Along CAL

The top-voted theme for April’s Crochet-Along was a Pocket-Along! This will include all my pocket-sized patterns (PocketAmi Sets 1-6, Mop Top Mascots, Tiny Whale) or, if you’re feeling adventurous, try miniaturizing any of my regular-sized patterns with a smaller hook and finer yarn.

Pocket-Along CAL at PlanetJune

This is a great theme for those of you with busy lives and not much free time to crochet: as the PocketAmi are so small, they work up far more quickly than my other designs. Come join the tiny ami fun at the Pocket-Along thread in the PlanetJune Ravelry group!

Easter CAL

With a week remaining until Easter, there’s still plenty of time to crochet a set of stylish decorative Easter Eggs or the cutest Baby Bunnies you’ll ever see! Here’s a sampling of some of the adorable bunnies that have already been made for the CAL, in case you need a little more temptation:

Easter CAL at PlanetJune
Awwww! I’ll show you full-sized photos of these and more, with credit to the crocheters, in the CAL roundup next Sunday.

Easter CAL at PlanetJune

Don’t forget to share your bunnies, eggs, and more in the PlanetJune Ravelry group so I can include your pics in the Easter CAL roundup 🙂

Review and Win contest

March’s ‘Review and Win’ winner is Hannah B, with her Detail Stuffing Tool review:

Detail Stuffing Tool by planetjune

Best. Tool. Ever. Don’t know how I stuffed before it. It’s so easy to use and it works incredibly.

Congrats Hannah – I’ll email you to find out which pattern you’d like as your prize 🙂

(By the way, if you haven’t bought your Detail Stuffing Tool yet, remember you can also pick one up as part of my Amigurumi Essentials Kit, together with a set of stitch markers for crochet and a selection of safety eyes.)

To be entered into this month’s draw for a free pattern of your choice, just write a review of any product in my shop – thank you!

New Designs…

My koala, the first design commissioned through the new pledging process is now complete, and he’s the most realistic koala I’ve ever seen. (If you follow the PlanetJune Facebook page you’ll have already seen a sneak peek photo!) My next task is to finish editing all the photos and complete the pattern. I hope to have the pattern finished and up in the shop in the next couple of days. Thank you to everyone who pledged for this design – making a koala has been on my list for years, but I probably wouldn’t have ever got around to doing it without the commission!

I wonder which design will be fully pledged next..? Platypus and Sea Otter are the current front-runners, but several others are catching up, and I have no idea who’ll end up reaching the finish line first. So far, I think this new commissions model has been a great success; the only animals I’ve put on the list are ones that I know I’ll be happy to design, so it’s fun to watch the race and wonder which animal I’ll be designing next!

Comments (4)

knitted wristwarmers

Yes, you read it right, this is a post about knitting – who’d have guessed!

I’ve tried, and failed, to enjoy knitting before. I bought straight needles and hated them. I bought dpns and hated them. It always seemed like such a struggle to wrangle the yarn without a handy hook with which to grab it. But, thanks to my practice with knooking, I now understand the shape of knitted (and purled) stitches, and how they fit together. I’ve done a lot of theoretical learning – reading books, watching videos – and I finally hit on a way to make it all work for me! Here’s the June magic formula:

Circular needles: so much easier to keep hold of than those long pointy sticks. I took a chance and ordered some from KnitPicks before I moved out of shipping range, but didn’t have a chance to play with them for many months after that.

circular knitting needle

Knitting right-handed: I’m left-handed, and I crochet left-handed. But you knit with both your hands, so why shouldn’t I learn the ‘standard’ right-handed way and save having to reverse instructions later so they work for a leftie?

English (throwing) style: this is the magic part for me, as a crocheter. Because I’m left-handed, I hold my crochet hook in my left hand, and tension my yarn with my right hand. By knitting right-handed, English style, I can still tension my yarn with my right hand – something I have years of experience with!

Magic loop: This technique makes so much sense to me. Working on one circular needle with a flexible cable instead of constantly switching between DPNs: yes. This is good.

So, with my strategy in place, I tried putting the theory into practice. I don’t like making test pieces, so I decided to make my knitting practice piece into something useful: wristwarmers. Even if they looked awful, they’d come in handy in my unheated house once summer ends.

I made up my own pattern, because that’s just how I like to work. Long tail CO 34, knit in the round with magic loop until the thumb, bind off 6 for the thumbhole, next round backwards loop CO 6 to go over the top of the thumb, continue working until long enough, stretchy bind-off. Easy.

(Don’t I sound like I’ve been doing this for years?! Never underestimate the power of research.)

knitted wristwarmers by planetjune

I love how they turned out! My tension is pretty even for a first attempt, and that’s thanks to using the same hand I always use for tensioning. There are slight ladders at the bottom of the first wristwarmer, before I figured out how to keep the tension even when switching the needles for the magic loop, but I love that too – every time I wear these wristwarmers it’ll show me ‘this is when I learnt to knit’.

knitted wristwarmers by planetjune

I used 4.5mm KnitPicks nickel needle tips with a 32″ cable. The yarn is Bernat Satin in the gorgeous Plum Mist Heather colourway – a very dark purple tinged with red, and pretty much impossible to photograph – if my skin tone looks off here, that’s why! (Indoors, they photographed as almost black.)

I can already tell I’m going to get a lot of use out of these. There’s no central heating in our house and my hands get very cold when I’m working. These will be perfect to wear while I work – I’m wearing them as I type this and they aren’t impeding me at all: success!

knitted wristwarmers by planetjune

I was all fired up after finishing these, and decided to order some larger needle tips so I could try something a little more ambitious. My LYS actually carries the same brand of needles (although outside N America they are known as KnitPro, not KnitPicks – isn’t that strange?!), and told me he could probably get them within 1-3 weeks. That was in November, and they just came in last week; I can confirm that the concept of ‘Africa time’ is no myth – it’s taken 3.5 months for my needle tips to arrive!

I haven’t picked up the needles in the meantime, so I expect I’ve now forgotten everything I briefly knew about knitting and will have to re-learn it all again before I attempt progressing to anything more complicated. It may be a while before you see another knitted project from me…

Comments (16)

    navigation: arrow

    buy crochet patterns and accessories from my online store

    'Everyday Crochet' and 'The Essential Guide to Amigurumi' crochet books by June Gilbank

    Crochet video tutorials and step-by-step photo tutorials

    Free PlanetJune crochet patterns

    Frequently Asked Questions

    navigation: arrow

    Punchneedle Embroidery information, ebook & patterns

    Papercraft ebook & tutorials

    Free PlanetJune craft projects & tutorials

    Ravellenic Games: Team PlanetJune
    PlanetJune Reindeer Games
    PlanetJune Temperature Snake CAL

    June Gilbank

    Hi, I'm June. Welcome to my world of nature-inspired crochet and crafting. I hope you enjoy your visit!

    If you'd like to get in touch, you can contact me here.
    crocheted Canadian flag by PlanetJune
    Proudly made in Canada!
    A fanned-out pile of the books Everyday Crochet and The Essential Guide to Amigurumi, with text 'The answers to all your crochet questions at your fingertips - find out more'

    Want to say thanks? You can send me money in seconds at paypal.me/planetjune (over $20) or paypal.me/planetjune2 (under $20) or send me a donation through my shop.

    Or simply click through from my links before you shop at Amazon, Etsy, KnitPicks, LoveCrafts and more, and I'll make a small commission on your purchase, at no cost to you! Start here:

    ♥ Support PlanetJune ♥

    Tip: This link is also in the footer of every page!

    Thank you so much for your support!