What an amazing year 2012 has been! Even though I’ve been exceedingly busy behind the scenes, when I look at all my 2012 patterns, I feel like I’ve made a lot of artistic progress in my designs this year too:

PlanetJune 2012 crochet patterns
In 2012…
- I created 25 new crochet patterns – a mix of animals, plants, geometric, accessories, commissions, and donationware. All different, and yet, somehow, all very me. Seeing them all together like this makes me feel accomplished!
- As part of my goal to create the essential online go-to reference, I created 9 new video tutorials, 7 photo tutorials, and a handy one-page index for all my crochet tutorials at www.planetjune.com/help 🙂
- I launched the PlanetJune logo and redesigned my blog to make it clearer and easier to use. (The homepage and shop redesigns have been shifted to the 2013 list…)
- I began refreshing my entire pattern catalogue with new clearer formatting, more details, and additional tips where they’d be beneficial. (Sign up for the pattern updates list if you’d like to be notified when you can download the updated versions of any patterns you’ve purchased!)
![PlanetJune by June Gilbank [logo]](/blog/images/pj_logo1.png)
Personal Report
Without going into too much detail, living as a visitor in a foreign country (as opposed to a temporary resident, as I was when we first moved to Canada) is not at all easy. Being treated as a dependent wife instead of a person in my own right is endlessly frustrating; I can’t even do the most basic things (buy a phone, open a bank account, get a library card, etc) in my own name. I’m sure all this contributed to the stress-induced eczema I developed this year, which is complicating my life even further.
It’s not all bad though; the wildlife situation here is spectacular and we’ve had many wonderful nature experiences this year, as well as the small daily pleasures of our garden full of birds, butterflies and lizards. (If you’re interested, you can look back on my year of monthly nature posts.) And, if you’ve been missing my photos, I have good news: I’ve been saving up my photos of all the new animals and birds we’ve seen since my last nature post, and I’ll be doing a big South African wildlife update in the near future, so you can enjoy it too!
Business Report
2012 was all about building for the future: a growing business is a wonderful thing, but you have to be able to cope with the growth. To that end, I’m trying to improve everything so the business will run itself as much as possible, and my customers will be able to easily find answers to all their questions without having to ask me for personal help.
I never imagined that PlanetJune would get this far, but, aside from a slight blip when I moved halfway around the world, my business has grown by 1.5x per year, every year since 2007. I’m sure that growth can’t continue indefinitely – I don’t know of any millionaire crochet pattern designers, so there must be a ceiling! – but, through years of very hard work and some luck, I’ve built a serious business here.
Of course, this business growth brings its own challenges: as sales increase, so does the amount of admin and tech support required. To provide the same level of service to all my customers, I have to put in 50% more time each year – not a desirable or sustainable situation! I discussed this in my post on Beating Craft Business Overwhelm and I’m working on the strategies I outlined there. (And there’s a technical growth side too: I didn’t think I’d ever hit my huge 1TB/month bandwidth limit, but that happened this year, so I had to upgrade my server to cope with all that traffic.)
Looking back
Here’s what I said in last year’s review:
My resolution for 2012 is to work smarter, not harder. I need to slow down and enjoy life, not let it pass me by while I’m working non-stop. I want to invest time into things that will, in the long run, save me time in the technical and administrative sides of the business, leaving me with a larger proportion of time to spend on the creative and instructional sides, and having a life apart from my work.
Did that work? Yes and no. I’ve totally failed on the ‘slowing down and enjoying life’ part, but that was primarily because I’ve been focusing on the other part of the resolution: investing time in things that will save me time in the long run – putting the work in now that will save me endless work in future years.
Although this project is still ongoing, I’ve spent many weeks of 2012 wearing my web-developer hat and coding new PlanetJune features:
- A system to manage pattern commissions.
- A way to automatically re-enable pattern downloads when updates are available.
- A system for adding ‘dummy’ orders into the shop so people who didn’t originally order through the shop can still receive pattern updates.
- An order-fulfillment mechanism for Etsy orders so I won’t need to email patterns by hand any more. (Created, but not yet implemented.)
I’ve also implemented many smaller changes to streamline and automate the business, such as:
- The Master List for all my crochet tutorials, which has already proven to be an amazingly useful resource.
- A ‘triage’ system of rules for incoming emails (referrals to my tutorials, FAQ, or sellers’ list; a bank of standard responses to common questions; new policies such as not replying to any questions not written in English or providing support for patterns written by other people).
- Improved spam-blockers that reduced the spam I have to check from approx 800/day to approx 2/day (a huge time-saver!)
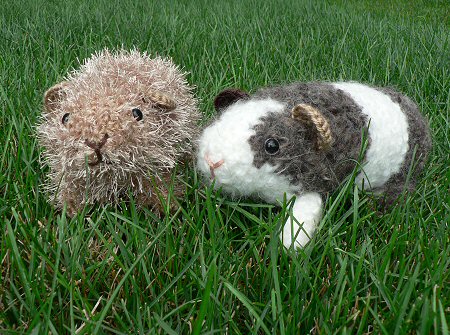
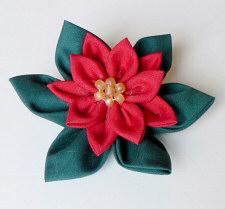
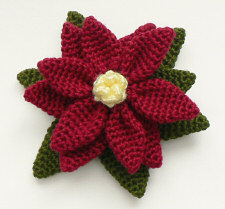
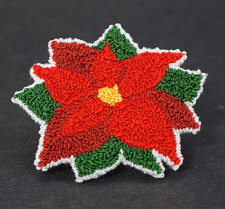
And, because you can’t work all the time and stay sane, I taught myself to knit, and made some stuff for fun:

My 2012 craft projects
What’s next?
Well, I’m still moving towards the goal where the business more-or-less runs itself and I’m free to design, innovate, and teach, and enjoy life without working all the time. Although I had hoped all the big automation and coding projects would be completed this year, that wasn’t realistic – probably because I keep adding to the list and coming up with more ideas! But the pieces I’ve already set in motion have made a huge difference to my workload, so I’m moving in the right direction.
I hope by next year’s review I really will have completed all my big tech goals, and then I’ll have more time to explore some of my other creative ideas – I have plans for online classes and ebooks that I don’t have a hope of finding time to create at the moment (but I’m writing everything down, so my notes will be waiting for me when I have time to get to them!)
This past year, I’ve worked harder than I ever have in my life – I’m essentially working 3 large jobs now: Designer (and photographer, editor, blogger, etc), Administrator (order processing, customer and tech support, etc), and Programmer (web developer, back-end tech support, server manager, etc). But the big goal here is worth it: to transition my business from a very hands-on one-person business to an automated one-person business, so I can spend the majority of my work time creating new designs and tutorials.
This interim stage is hard going, but I’m trying to do something here that (possibly) no other craft business has done: to grow past the one-person level without expanding or outsourcing. I’m hoping that all my automation strategies will pay off in 2013, and I’ll have a virtual assistant (in the form of my own website and systems reducing my workload) instead of having to hire an actual assistant.
Although I anticipate another year of very hard work behind the scenes of PlanetJune, I’m giving this plan one more year to succeed. If it doesn’t, I’d have to either find a way to scale back my business, or take on minions (unless I can come up with another alternative, as neither of those options appeal to me). But for now I’ll think positive: I can make this work!
On the creative side, I’m very excited about the coming year: I have loads of sketches for new designs that I’m looking forward to transforming into crochet; several design series I’ve already started prototyping; and some brand new concepts for design themes that I’m eager to research. I can’t wait to get stuck into some of my new ideas after the holidays…
Thank you so much for continuing to follow me on this journey – your support makes a huge difference to me. Although I know I’ll have some challenges this year, I’m really looking forward to 2013, and I hope you are too.
Happy New Year!