AmiCats crochet patterns!
I’ve been working on a collection of cat patterns for years now, as a companion to my large collection of AmiDogs designs (21 and counting). Cats are one of my favourite animals, but one of the most difficult to depict realistically, and I didn’t want to publish any cats until I was satisfied that I’d done justice to their feline grace and beauty.
It’s been a long process that took over a dozen prototypes to pin down, but I’ve finally reached the definitive PlanetJune cat shape, and I’m very excited to finally be able to show it to you! So, without further ado, allow me to present my AmiCats designs:
About the Designs
With cats, it’s all about the elegant poised shape, and, as I discovered when assembling my early prototypes, the position of certain pieces is absolutely critical. I’ve spent hours studying cat anatomy and refining my prototypes to produce a design that is unmistakably cat-shaped without spoiling the texture of the uninterrupted single crochet stitches.
To ensure that you can follow my pattern and get a beautiful, graceful, cat-shaped result without endlessly repositioning the pieces, I’ve designed the face shaping so the muzzle is built right into the cat, and the front legs are crocheted directly into the body at the appropriate position and angle. All you need to do is follow the pattern and it’ll just work!
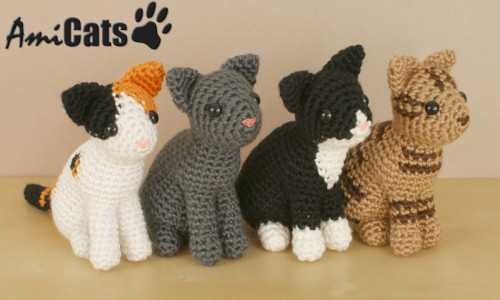
Enjoy the magical shaping with no complications by making a Single-Coloured cat in any colour, or choose from a selection of multi-coloured cats: a black and white Tuxedo, a tortoiseshell and white Calico, and of course the classic striped Tabby.

Top to bottom: Calico, Single-Coloured, Tuxedo, Tabby
Although I used black eyes for my sample cats – it fits better with the PlanetJune style – I intentionally designed all the AmiCats to use 9mm eyes, as that’s the most common size of cat ‘safety’ eyes you can buy. So if you prefer more embellishment, you can use ‘cat’ eyes, embroider a mouth, add whiskers, etc etc, to give your cats the look and personality you want.
About the Patterns
I’ve included two-page appendices for both right- and left-handers that explain my innovative method for joining the legs and body while you crochet so they sit at exactly the right angle in the finished cat. The method is the same for all the AmiCats, so, once you’ve made one, crocheting more AmiCats will be easy and you’ll enjoy seeing the realistic curves of the cat appear in your hands. The simplest and least time-consuming design is the Single-Coloured cat (you can make it in any colour!), followed by the Tuxedo, then the Calico, and finally the Tabby, whose show-stopping stripes are worth the effort.

The pattern also includes bonus instructions to crochet the (optional) pictured nose from crochet thread or embroidery floss and a 1.25mm/size 9 steel hook, and I’ve also given illustrated instructions for making simple felt or embroidered noses, if you don’t want to try crocheting such a tiny nose.
And you can save paper and ink by printing only the appendices you need (crocheted nose; right-handed or left-handed assembly guide, or neither) from any one of the patterns – the appendices are the same for all the AmiCats.

You can buy each AmiCats pattern individually from my shop, or pick up the multipack of all 4 AmiCats for less than the price of 3 – that’s a great deal!
If you’re not ready to buy them just yet, please remember to heart and queue them on Ravelry!
Single-Coloured:  Tuxedo:
Calico:  Tabby:
Launch Discount
Let’s make that deal even better: for one week only, you can buy the AmiCats Collection (including all 4 AmiCats designs) for the extra-special low price of $15. To take advantage of this deal, add the AmiCats Collection to your shopping cart, and enter the discount code MEOW at checkout! (Offer ends Friday 23 January, 2015.)
AmiCats Crochet-Along
And, from today until the end of February, join us in the PlanetJune Ravelry group, where we’ll all be making AmiCats galore. I can’t wait to see all the variations popping up from all over the world! Will you follow the patterns exactly, or change some colours to more closely match your own cat(s)? Either way, please join us, and share pics of your AmiCats…

AmiCats have the Maui seal of approval!
These designs represent the culmination of literally years of research, sketching, and endless refinement, but I feel it was worth the effort. These patterns are so close to my heart. I hope that shows, and that my AmiCats will bring happiness to many fellow cat lovers. If you love them, please do let me know…