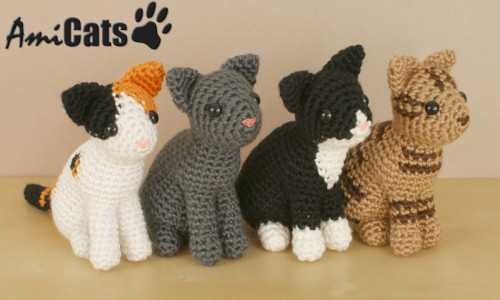
In January 2015, I released my AmiCats Collection, and their reception has blown me away – in well under a year, they’re already within my top 20 bestselling patterns of all time!
Sometimes you strike gold with a design, and this was definitely one of those times, but it wasn’t just a lucky break; it was the result of an unprecedented amount of work, and my most difficult challenge to date.
I mentioned at the time of release that it took me more than a dozen prototypes over a period of three years to complete these designs to my satisfaction. Let’s look back at some of the development stages, so you can appreciate the process that finally got me to the AmiCats you see today, and see how far removed they are from my first (terrible) attempts at making a cat!
This is a story of dogged persistence and refusal to admit defeat, even though there were moments where I thought I’d set myself an impossible task…
Initial Research & Prototyping
Although I’ve always been a cat person and have loved cats my whole life, I’d never really examined their overall shape that closely. I started out, as always, with research, and sketched some basic cat studies to give me a better idea of cat poses and movement.

A few of my initial quick sketches
I narrowed the position down to a sitting-up pose, as I felt this was a typically feline pose – like the way a cat sits when it’s watching something out of a window.
After 3 or 4 prototypes, I felt I had a good clever cat design. The body had a strong kidney shape to allow the legs to sit directly beneath the chest instead of splaying out in front of the body, and the muzzle – unlike a dog’s – was tiny and triangular. I completed assembly of my design, taking all the step-by-step photos that would go into the pattern as I went, and thought it was pretty much finished.

Not one of these photos appears in the final patterns!
Then I showed a photo of my prototype to a trusted friend, and she said ‘it’s nice, but it looks kind of like a wolf cub’. And she was right, of course! Try not to laugh too hard, now:

Woof?
Somehow, despite my efforts at clever design, the essence of ‘feline’ was missing, and I was so close to the design I hadn’t noticed how terribly wrong it had gone until I stepped back and took a proper look at the result.
I decided that my design was missing the fluidity of a cat – you don’t see a cat’s haunches and muzzle as defined shapes, and crocheting them separately lost the smooth lines that are so distinctly ‘cat’.
And there was another problem niggling at me: the front legs had proven fairly difficult to attach smoothly to avoid an awkward crease where they joined the chest. If this gave me problems, with my years of experience of stitching pieces together as smoothly as possible, would it be fair to inflict that on my customers? Of course not.
Major Redesign
With all this in mind, I set myself the challenge of going back to the drawing board to solve these problems. My goal was to reproduce the exact shape of my cat prototype, using completely different shapes and techniques that would give a seamless feline appearance without needing amazing sewing skills…

- The muzzle shaping is now built into the face
- The front legs and body are crocheted together smoothly
- The haunches are built into the body shape
I truly thought I’d nailed it with this prototype – the overall shape was very similar to the previous prototype, but it looked so much better and smoother than my previous attempt! And this cat (nicknamed Proto Kitty) was the basis for the final AmiCats, but of course the story doesn’t end there…
Design Refinement
I began to crochet the ‘final’ cats, developing the colourways and marking patterns as I went. I also spent hours watching my cat Maui, feeling his bone structure and trying to analyse his shape more closely, as I still had that nagging feeling I was missing something.
I’d started all the cats, and completed the two below, before I began to have doubts about the shape of them (although these cats were pretty cute!)

- The eyes stuck out too much from the head
- The chest was underdeveloped
- The front legs were too long and chunky and splayed forwards more than I’d like
- The front paws were overly-large, giving the cats too much of a kittenish look
- The straight back didn’t have that unquestionably feline curve
These niggles didn’t all present themselves at once, so I made many more prototypes as I refined and further refined my design to tweak the shaping to create subtle eye sockets, reduce the size of the paws and the length and thickness of the front legs while bulking out the chest, add that magical cat curve to the back, and create a completely new innovative leg-joining technique that keeps the legs sitting correctly beneath the cat.
With each of these changes, the cat shape grew slowly closer to what I’d hoped for when I began this project, and I started to think that my impossible task may just work out after all….
Resting Period
Finally, finally, I couldn’t find anything else I was unhappy with, and I left each cat sitting next to the TV as I finished it and continued to work on the rest, so I’d see them all the time and let any remaining niggles come to the front of my mind.
I had thought, once again, that they were finished, but this resting period wasn’t wasted: although even I thought I was crazy by this point, I remade the entire Calico cat so I could modify the markings slightly. In doing that I changed it from my least favourite cat to (possibly) the cutest of all – that last tweak is always worth it!
And, when all 4 were truly finished, I decided this was really it, and it was time to take a deep breath and bring my beautifully-shaped AmiCats into the world…

This was the scariest release date of my life, as these designs represented so much love and care, and I was terrified that everyone would be disappointed or critical of them. Thankfully, that wasn’t the case, and I’m as delighted as I am relieved to see people appreciating all the little details that took years to get just right and that make these patterns so unique.
The End?
Not necessarily! Even now, the collection isn’t complete the way I’d originally planned: AmiCats was originally conceived as an ebook, including 6 cat designs. In addition to the 4 standard-body-type designs you see in the AmiCats Collection, I’d intended to make one design each of the two other major body types: the shorter, wider, flat-faced exotic (e.g. a Persian) and the elongated, elegant, long-nosed oriental (e.g. a Siamese). The ebook was also to contain additional bonus supporting matter with embellishment options and examples (different eyes, whiskers, expressions, etc).
I devoted weeks to the prototypes for the other body types, but I still haven’t completed them to my satisfaction, so I made the executive decision that 4 perfect cats now are better than 6 perfect cats in another year or more, and I scrapped the ebook. Although that was a difficult decision, the work I’ve already invested in the remaining designs hasn’t necessarily been wasted: there’s always the possibility of my designing a second AmiCats Collection at some point in the future. (If there’s a particular type or breed of cat that you’d like me to consider for a possible new collection, please do let me know, so I can add it to my Ideas List.)
But, for now, I’m content to leave the AmiCats Collection as this set of four very special and meticulously-developed designs…

I hope you’ve found this 3-year design journey interesting! This project was an extreme example of my design process, partly because cats are so difficult to capture realistically, and partly because I was so invested in the result.
Although my designs usually take a few months (instead of a few years) to go from concept to completion, I always bring this tenacity to my work – whether I want to or not! – exploring alternatives until I’m satisfied that I’ve found the best balance between instructions that are easy to follow and results that are cute, realistic, and unmistakeably PlanetJune. 🙂