Glinting Eyes for Amigurumi
Today I’d like to show you a technique that’ll bring your amigurumi to life when you don’t use shiny plastic eyes. This is particularly useful when you’re making baby-safe or pet toys, where plastic eyes may be a choking hazard.
The Power of the Catchlight
A catchlight is the highlight or glint of a light source reflected in an eye. Compare these kestrel photos I took a few months ago, and you’ll see how appealing a glint in the eye can be:

Where the eye has the magic glint, it brings a spark of life to the photo that makes it irresistible.

The same bird, only a couple of seconds later, but the angle is slightly different, and I didn’t catch a glint in the eye. Although the kestrel is still lovely, do you see how this photo looks dull and lifeless compared with the first?
Now, this principle doesn’t just apply to wildlife photography – the same concept applies in amigurumi! Two-part plastic animal (‘safety’) eyes are the ideal eyes for most amigurumi, because the shiny plastic replicates the shine of real animals’ eyes, giving a glint in the eye which helps to bring your amigurumi to life.
But plastic eyes aren’t always the best solution, especially if you’re making toys for very young children or pets, where plastic eyes may be a choking hazard and should be avoided. Non-plastic eyes can look dull and make your amigurumi feel lifeless, but there’s a simple way to add that spark of life back again.
Adding a Catchlight
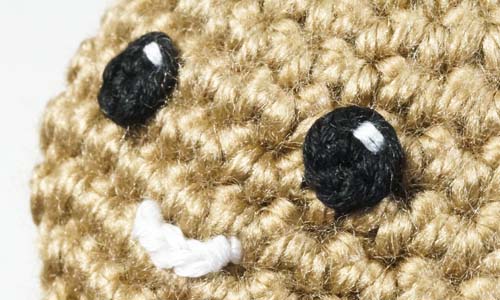
If you crochet eyes for your amigurumi or make them from felt or embroidery, I highly recommend that you add a small white dot with white embroidery floss in the upper right quadrant of each eye, to simulate the glint. It makes the eye look more realistic and gives your toy that spark of life. All you need is a tapestry needle and a short length of white embroidery floss per eye.
Compare these two gingerbread men. Even before they have any features added beyond the eyes, there’s a huge difference in appeal:
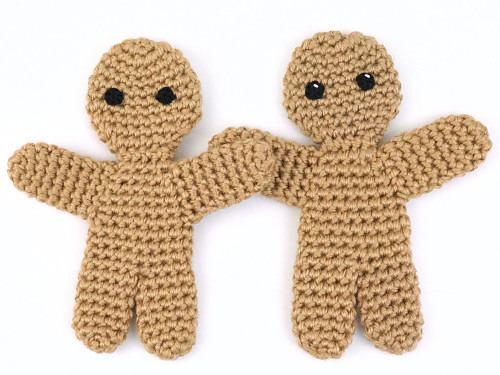
Without a glint, the eyes have a dull vacant stare. With the glint, they have a sparkle of personality!
How to Add the Glint:
- If you’re embroidering the eye directly onto your piece, you can stitch the catchlight on top of your other stitches.
- If you’re attaching a felt or crocheted circle for the eye, you may find it easier to embroider the catchlight before attaching the eye, as you can then hide the thread ends beneath the eye. (If you plan to glue the eye in place, it’s essential to embroider the catchlight before you apply the glue, as it’s very difficult to embroider onto fabric that’s been hardened with glue!)
- You can also add a catchlight with a dot of white fabric paint, but please do practice on a spare crocheted eye before adding paint directly to your amigurumi, to make sure you’re happy with the result.
Glint Size and Shape
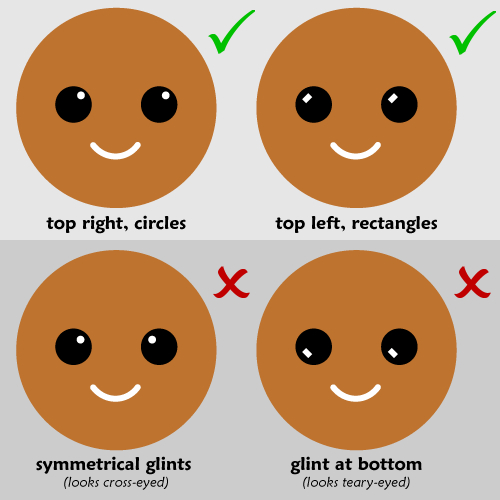
The size and shape of the catchlights aren’t critical. A single stitch can be enough, or, if you prefer a more rounded/square shape, you can make a larger catchlight by making two or three stitches right next to each other. Whatever you decide, try to keep the glint the same size and shape on each eye.
Glint Position
You don’t have to use the upper right corner of the eye, but it’s very important that you add the glint in the same position on each eye – this is one situation where symmetry is definitely wrong! The idea of the catchlight is to suggest that the amigurumi is being lit from one side, and the side with the lamp/sun is the side that reflects that light as a glint. Light typically comes from above, so add the glint above the middle of the eye, but you can choose between the upper right or upper left side for both eyes.
Get Glinting!
This simple technique makes such a difference to any eyes made from fabric, yarn or embroidery floss. I hope you’ll use it every time you make crocheted, felt or embroidered eyes in future, to add an extra spark of life to your amigurumi!
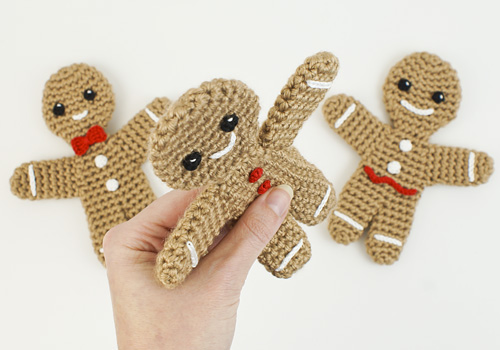
Note: The samples used for this demo are made from my Gingerbread Family crochet patterns.
Loved this tutorial? I have so many more amigurumi tips and tricks to share with you!
Boost your amigurumi skills with my latest book, The Essential Guide to Amigurumi, your comprehensive guide to amigurumi techniques and tips.
Do you find my tutorials helpful? If so, please consider making a contribution towards my time so I can continue to create clear and concise tutorials for you:
Thank you so much for your support! Now click below for loads more crochet video and photo tutorials (and do let me know what else you’d like me to cover in future tutorials…)