retiring PlanetJune Commissions
This is a really hard decision to make, but I think it’s time to retire my PlanetJune Commissions – at least in its current incarnation…
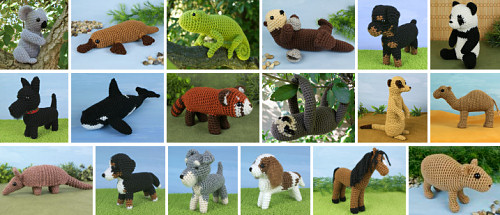
I first created my own Kickstarter-with-a-twist commissions system over 5 years ago. My crowd-funded system helped me to see which of my potential animal designs may be most popular by letting people ‘vote’ with their pledges, and helped me create some lovely animal patterns I may never have got around to designing otherwise.
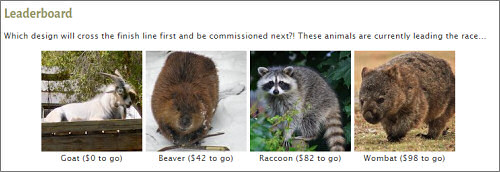
(And there’s still one more commissioned design – the Goat – coming soon!)
Why Close Commissions?
It was a great idea, but a combination of my reluctance to raise the prices ‘too high’ and the reality of life circumstances beyond my control meant that I was always in danger of drowning under a wave of far too many commissions, and never-ending deadlines don’t make the best environment to foster creativity.
I’ve finally got the pricing right, so the rate of new commissions has stabilised to a manageable level, but now I have a different problem: disappearing pledgers. I was left $54 short on the (currently in-progress) Goat commission, due to people who never responded to invoice reminders or personal emails!
I hope nothing bad has happened to those people who I can’t seem to reach – maybe they just changed their email address and forgot to notify me – but the upshot is that I can’t contact them to ask for payment when the time comes, so their non-paying pledges are fogging up the system.
I’ve checked up on all the other current pledgers and I can see that 45 pledges were made by people who haven’t signed into their PlanetJune account in 2017. That means they didn’t check their pledges (as I asked them to do in January) so it’s a good indication that they aren’t receiving my emails and are unlikely to make good on those pledges. And there could be more pledgers who’ve changed their email address since then.
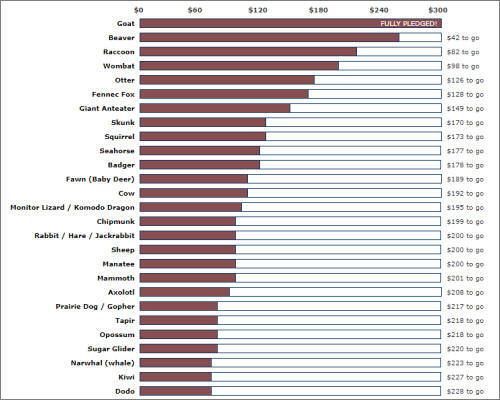
What fraction of these pledged dollar amounts is real..?
My main concern is protecting the commissions system against this happening again in future. It’s not fair to the people making pledges if the design that has more real pledges is not the one that gets made.
I could see only one way to safeguard the current system: by adding an extra layer of rules and confirmations…
- To check that everyone is still happy to pay before I send out any invoices
- To suspend pledging privileges for anyone who’s failed to pay up in the past
- To regularly ask everyone to reconfirm their pledges (and then I’d delete any pledges that weren’t reconfirmed)
- To regularly remind people to update their email address if/when it changes
All that sounds like a lot of extra inconvenience for my pledgers! Being part of commissioning new designs is supposed to be fun, and all those new rules and checks would be anything but, so this isn’t a solution I’d be happy with.
My Decision & Reflections
I’ve reached a point where big life changes are approaching (I’ll share more on that at a later date), and I need to simplify as much as I can. With my choices to either start coding all those new unwanted rules into the commissions system, or call time on this aspect of my business, I’ve chosen the latter.
It’s sad to have to withdraw a popular service from PlanetJune. I’ve put a lot of time and effort into building and coding this system from scratch. I’m proud of how well it worked, technically, and how it allowed my customers to help select my future designs.
(And this decision may not last forever: I could resurrect the commissions system at some point in the future, if and when I can figure out how to combat the problem of non-payers without inconveniencing everyone else.)
Moving Forwards: What’s Happening
The in-progress Goat design will be the last commissioned pattern in this system, and the usual commissioners-only exclusivity period will apply before it goes on general release. I’ve cancelled all other outstanding pledges (so don’t worry – you aren’t liable for any other designs you’ve previously pledged towards!)
I still have the chart showing which designs are clearly more popular than others, and that will definitely help me choose which animals to design in future. (If you’re interested in patterns for one of these animals, keep checking in with my monthly newsletter to see if I’ve designed your favourites yet!)
I also have lots of great ideas for other designs that didn’t fit under the Commissions umbrella, and I’m not scaling back on those, so please don’t worry that I’m moving away from designing crochet patterns – that couldn’t be further from the truth!
Private Commissions
I am still available for private crochet pattern commission, with the usual base rate of $300 for a design that I feel confident I can create with the skills and techniques at my fingertips, and will be able to sell in my shop. The price would be higher for anything else (e.g. a design that requires more development and prototyping or has a larger size or complexity; if you want exclusivity; if I don’t see a further market for it).
(I don’t expect to be commissioned very often at these rates, but please understand that I can’t work for any less – my designs are extremely time-consuming to create – see my Meerkat Design Report series for an example of the work that goes into a commissioned crochet pattern.)
For a much more reasonable rate, please feel free to suggest your pattern ideas to me – if I feel inspired, I’ll create the design anyway (no commission necessary) and you can buy the pattern from my shop for the regular price when it’s ready!
It’s Been a Great Ride…
I’d like to thank everyone who’s taken the time to pledge for new PlanetJune designs – I’ve enjoyed making them for you over the past 5 years, and I hope you’ve enjoyed being part of my design process!
And I’ll be keeping the list of popular animals that didn’t quite get commissioned, so I hope I’ll still be able to make at least a few of your favourites, in time 🙂