Dutch Label Shop thought I might be interested in trying their custom woven labels, and they were right! What better way to brand my crochet art and knitwear than with unique PlanetJune labels?
Dutch Label Shop provided me with store credit so I could test out their labels, but, as always, I was not compensated for this review, and the following is based on my honest opinions!

Dutch Label Shop offer a wide variety of labels for creative artisans to brand their handmade goods. They offer care and size labels for garments, as well as custom brand labels, with low minimum quantities. All the labels are woven (not embroidered), washable, and available in iron-on or sew-on versions.
I decided to try designing two completely different PlanetJune labels, so I could test many of the different label options: a long black label with end folds that I can sew into my handmade knitwear, and a square white double-sided (folded) label that I can stitch to handmade toys and crochet art pieces.
Here’s a sneak peek of my labels:

Don’t they look good?!
My Experience
Note: If you don’t have your own custom logo, it’s easy to create a Basic Label by typing in your text, choosing a font you like, (and, optionally, adding one of their built-in symbols, e.g. I’d have used one of their cute yarn balls if I didn’t have my PlanetJune yarn planet). The colour choices and sizes are more limited, and they don’t offer folded labels, but the prices are much lower for smaller quantities than for the Logo Label, so I’d recommend you look at this option if you don’t have a brand logo. The rest of my review applies to just the Logo labels, as those are what I tested.
The pricing for Logo labels starts high, at several dollars per label, but quickly drops to very reasonable prices when you buy in bulk. As I wanted to test multiple options, I didn’t take advantage of the best bulk buy pricing. I ordered 50 of my black labels and 16 of my white labels for just under $100. (If I was selling my handiwork I’d probably have bought 300 or more labels of each type, to bring the price down to under 1/3 of my cost per label – they’ll last forever, so it’s a good investment.)
As these labels are completely woven, you can choose any colour for the background and one or more colours for your design. If you’d like to match your logo shade, the listed colours give their Pantone codes after the name. You can use an online converter (like this one) to find the closest match to your brand colours.
You can set up your label to be any size and shape you want. One thing that isn’t immediately clear from the setup page is that the label size you select is the complete size of the label that they create, before any folds. (The size of the end folds isn’t mentioned anywhere, from what I can see, but you can get your questions answered quickly using their Live Chat box – as I found out, you need to allow 1/4″ per end fold, if you choose a label with those.)
I created the graphics for my labels based on my logo, and uploaded them as PDF files:

Then I submitted my order and waited. With a Logo label, their designers make sure the label is going to look good before they print it, and they contact you if you’ve done anything wrong. (You can also pay extra to have a photo proof of a finished label emailed to you for approval before they create the entire batch. I didn’t choose that option, but it’s a good idea, especially if you wanted to lower the label cost by ordering in bulk – you don’t want to end up with 300 wrong labels!)
I was surprised when my labels arrived – I thought I’d have been contacted by their designer before the labels were printed, but apparently I provided all the information they needed without querying me on anything (yay, me!)
I was impressed to see that I was sent a few labels more than I ordered, presumably to insure against the possibility of a couple of them being flawed. (As they are individually woven, there is a little more variability between labels than you may expect.)
My PlanetJune Labels

I think these black labels will make my handmade clothing look so professional! My yarn planet is slightly squashed due to the limitations of the weaving process at such a small scale, but overall I’m very happy with the label.
(The predominantly red side is the back, in case you haven’t seen woven labels before! The unused colour is carried on the back while the other is being woven on the front.)
One thing I hadn’t realised is that, no matter which colours you choose for background and foreground, there are white warp threads running throughout the label. You can just see them as a slight amount of grey speckling in the black around my yarn planet. As my logo is so detailed, if I need to order more of these labels, I’ll choose a white background instead of black, to avoid that speckling, and make the label a bit taller, so I could make my yarn planet slightly larger.

As you can see, with the white background and a slightly larger size, my yarn planet looks really good! I think these little square labels are adorable, and perfect for stitching onto crocheted toys.
I chose the ‘double white’ option for a small additional fee, which helps the colours to not show through the white background – as you can see from the back of my label (back right in the above photo), all the white areas are covered with red on the back, but that doesn’t show through at all from the front, so I’m very happy I chose this option.
For the label at the front right of my photo, I’ve folded in the label ends, and finger-pressed them to make a crease. This is how I plan to attach these labels neatly to amigurumi, by sewing the crease lines down to the ami. For sewn pieces, I could leave the ends unfolded and trap them in a seam as I stitch it.
Specifications
For reference, if you like the look of my labels and want to make similarly-sized ones, I made Logo Labels with the following options:
- My black labels are 2.55″ by 0.5″ end fold labels
- My white labels are 2″ by 0.75″ center fold labels with double white
Labels in Action!
And now for the moment of truth – how do they look and function in use?
It only took a couple of hidden stitches on each side to stitch labels into my handknit sweaters, and they look so good:

I conducted an important test by wearing one of these sweaters after I’d stitched the label in. It wasn’t at all itchy or irritating next to my skin, which was a potential concern for me – I couldn’t even feel that the label was there, so it passed my test with flying colours.
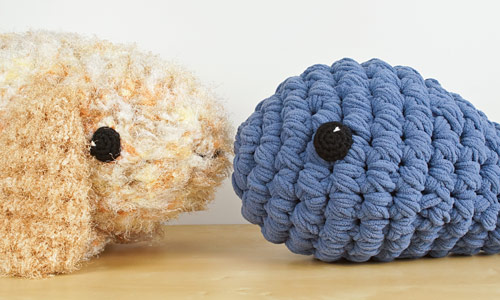
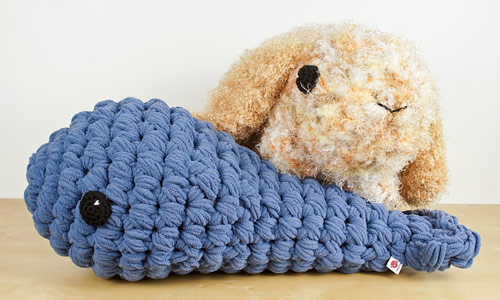
And do you see what Mega Bun is now sporting near her tail?

No? Look more closely:

How cool is that?! A perfect way to brand a one-of-a-kind creation.
Verdict
I’m very happy with my order from Dutch Label Shop. Woven labels look so professional compared with printed labels. They make a great finishing touch to handmade pieces, and I’ll be sewing mine into all my handknits and crochet art pieces from now on, to prove they are PlanetJune originals. 😉
Although I found the wealth of options available when designing my labels a bit overwhelming, the online Live Chat service was very helpful for answering all my questions. And, when my labels arrived and I found a problem with some of my long labels (the weave had somehow been stretched and my logo was almost falling off the end of the label), Dutch Label Shop’s customer support was excellent and they re-sent the incorrectly woven labels with no problems, so I’m happy to recommend them for both their products and service!
Based on my experience, I have a few recommendations to give you the best chance of being delighted with your labels:
- Choose a white background if you have a very detailed logo, to avoid tiny dots of white showing in the areas with the finest detail.
- For the most versatile option, choose a label shape without end folds, but choose a long enough label size to add folds yourself beyond the edges of your design – you can fold and iron or finger-press them yourself to make sure your logo ends up centred on the finished label.
- If you want to reduce the cost, unless you have a graphical logo or want to order hundreds of labels, you could use their Basic option and design a text label with a nice font (and a generic icon from their selection, if you want) to make high quality woven labels at a lower price.
UPDATE: Dutch Label Shop have kindly offered PlanetJune readers a 15% discount for the next 60 days! To order, go to Dutch Label Shop and enter the code planetjune15 at checkout.