Did you know there are now two new additions to the Susan Bates hook line? I had to investigate, and got out all my SB hooks to compare the new styles with my classics:
Susan Bates crochet hooks have always been my favourites, because I find their in-line shape makes it much easier to make perfectly uniform stitches.
What’s an ‘in-line’ hook?
See my Crochet Hook Styles article to understand why the head shape can make such a difference to your stitches. It comes down to personal choice – if you prefer a tapered hook, you probably won’t enjoy any of the hooks in my review below (and that’s okay too, there are plenty of other crochet hook brands out there!)
Now, I prefer aluminium/aluminum (I’ll say aluminum from now on, as the hooks are American!) hooks to bamboo or plastic, as they’re strong, smooth, and rigid. But clearly, even recommending you try a ‘Susan Bates aluminum hook’ in your preferred size doesn’t narrow you down to a single option, so I thought I’d put together a quick roundup of all the currently-available SB metal hooks, so you can make a more informed choice.
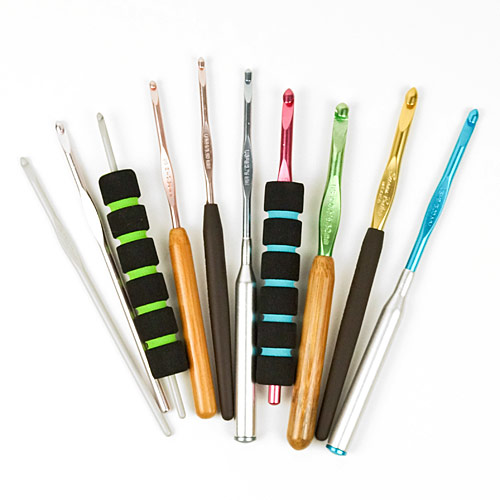
Susan Bates aluminum hooks – the contenders:
Here are all the options I’ll be looking at today:
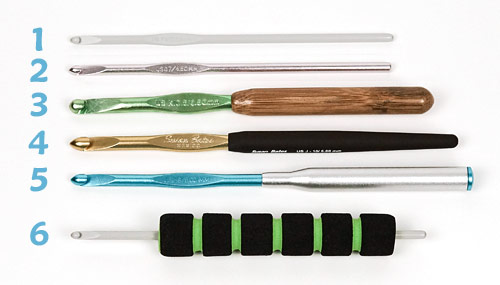
- Quicksilver
- Silvalume
- Bamboo Handle/Silvalume Head
- Silvalume Soft Ergonomic
- Silvalume Super Lightweight
- Crochet Hook Cushion Grip
And now onto the reviews…
1. Quicksilver
The Quicksilver line is the old-school classic Bates hook, but they are still available today. All sizes are the same matte grey colour and very smooth. These are the first hooks I bought in all the sizes when I started crocheting seriously, and mine are still in perfect condition.
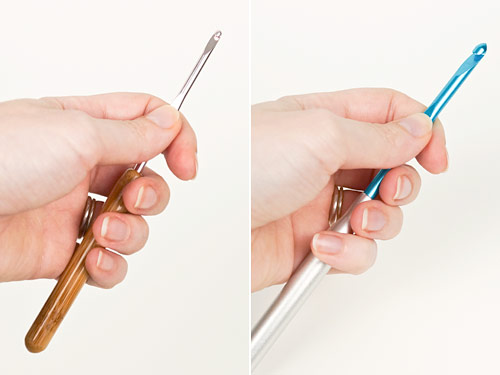
The biggest downside is that, if you crochet with a knife grip like me (i.e. you hold the hook gripped in the palm of your hand), the narrow handle, especially with the smaller sizes, makes it less comfortable to hold and and it’s more likely that your hands will cramp up.
2. Silvalume
 I gradually upgraded to a set of basic Silvalumes, starting with the starter set (sizes F-K US, 3.75-6.5mm), and then adding all the other sizes individually. These anodised aluminum hooks are helpfully colour-coded by size, so it’s easy to tell the difference between your H hook (blue) and I hook (pink).
In a side-by-side comparison, they don’t feel as smooth as the Quicksilvers, but they’re still very smooth, and I prefer them to the Quicksilvers (although possibly just for the convenience of the colours…) Again, the handle is narrow, so not ideal if you crochet with a knife grip.
The newer Susan Bates hook styles below are all based on a Silvalume head, with a built-up handle that you may find more comfortable if you crochet with a knife grip. If you crochet with a pencil grip (with the handle of the hook resting on top of your hand), the handles are unlikely to provide you with much benefit.
3. Bamboo Handle/Silvalume Head
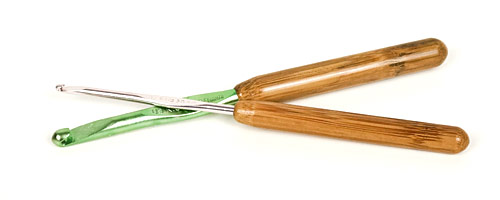
My all-time favourite hook! The bamboo-handled hooks have all the advantages of the Silvalume head with a smooth, warm bamboo handle that I find very comfortable to hold.
I really do swear by these hooks – I have two complete sets, plus another six spares in my most-used size (E US/3.5mm, for my amigurumi)!
4. Silvalume Soft Ergonomic
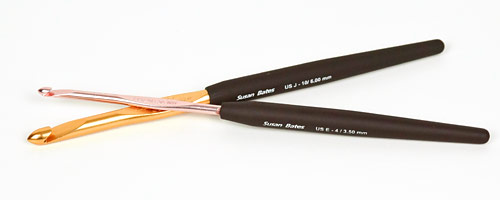
Soft Ergonomic is one of the new SB hooks, with a soft-touch plastic handle. The handle is a little longer than all the above hooks, so may work better for you if you have a larger hand. I find it pleasant to the touch and a definite improvement in comfort to the all-metal hooks, although I personally prefer the wider grip of the bamboo handles.
If you crochet with a pencil grip, you may find the soft-touch handle more comfortable resting on your hand because it’s warmer than an all-metal hook and not too bulky.
5. Silvalume Super Lightweight
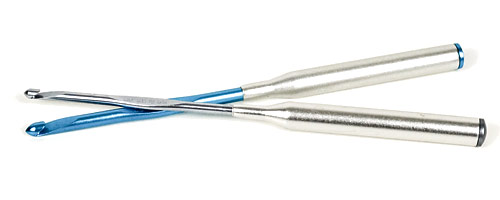
Super Lightweight is the other new hook style, and I must admit this one has me baffled. Aluminum hooks are always lightweight, and, weighing the same size of each of the above hooks, the Super Lightweight hook was actually slightly heavier than any of the others! The handle is made of a brushed aluminum and it is much lighter than it looks from its size – maybe that’s where the ‘super lightweight’ part comes in..?
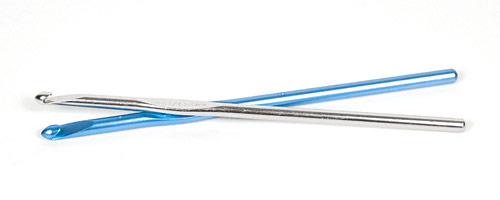
L: Bamboo Handle Silvalume; R: Silvalume Super Lightweight
Like the Soft Ergonomic hook, this one also has a longer handle, which you may find more comfortable if you have larger hands. However, with my small hands and the way I hold my hook, the wide part of the handle only benefits my little finger, so it’s definitely not well-suited to small-handed knife-grip crocheters! And, personally, I prefer the warm feel of the bamboo or soft-touch plastic to this cold aluminum handle.
(For amigurumists, I should mention that the smallest size this hook is currently available in is an F US/3.75mm, so it may be larger than you’d prefer for your amigurumi.)
6. Crochet Hook Cushion Grips

If you already have the older Quicksilver or original Silvalume hooks and don’t feel like the expense of buying a whole new set of hooks but would like a comfort upgrade, cushion grips could be the answer.
These Susan Bates cushion grips come in a set of two, and the packaging says they fit sizes F-J. I found that the green grip has a smaller hole than the blue, and, in my tests, the green works well for sizes E-G7 (3.5-4.5mm) and the blue for sizes H-J (5-6mm).
These grips are squishy and comfortable, and may be the best answer if you have arthritis or find gripping a narrow hook problematic – by pulling the grip up over the thumbrest, you can get the benefit of the foam padding and wider grip for your thumb and forefinger, as well as for your other fingers.
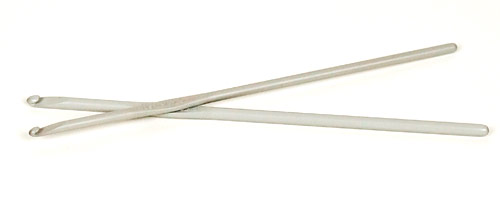
Hook Head Shapes
For completeness, I should also mention that all Susan Bates hooks are not the same – the head shape has changed more than once over the years, and depending on where/when your hook was manufactured, you may find your hook has a pointier or more rounded head, and a deeper or shallower throat cut-out.
My Susan Bates hooks have a mixture of the two, and I can say that I usually prefer to use one with a more rounded head, as it’s less likely to split the yarn, but the pointier ones have their advantages too – for example they come in handy when you need to poke the hook into a tighter stitch (e.g. for my Better Back Loops Only technique!)
Which head shape you prefer is a personal preference, and probably not one you’ll have any control over if you buy a new Susan Bates hook, anyway. But I will say that it doesn’t change my opinion: all Susan Bates hooks have the same in-line shape, and that’s the most important factor to me when I choose a hook.
We’re lucky to have so many hook choices these days, but it can be very confusing, especially if you add all the other brands of hook to the list of choices!
If you’ve been wondering which Susan Bates hook to try, or what the differences are between all the options, I hope this post will help you choose the one you’ll enjoy most.
What’s your favourite hook? Are you a Bates fan too, or do you prefer Boye, Clover, Tulip, or another brand? Please share your recommendations in the comments below 🙂
Notes: Red Heart kindly provided me with samples of the new hooks for my review, but all opinions are my own. The affiliate links above point to amazon.com. If you live outside North America, see my tips for buying in-line hooks internationally.