PlanetJune Craft Blog

Latest news and updates from June

Extreme Crochet: Giant Rug

I’ve been enjoying my extreme amigurumi experiments (more to come on that subject later…) but I thought, for completeness, I should also try using my massive 25mm (1 inch) crochet hook in the way it was intended!

Chunky Elegance Rug Trio crochet pattern by PlanetJune

My Chunky Elegance Rug Trio pattern was designed to be crocheted with an N US/10mm hook and two strands of bulky yarn (#5) or a single strand of super bulky (#6). How would it fare on a super-sized scale?

I decided to try to make the small rug from my pattern (above, left) – the size of the original is only 20″ (50cm) in diameter.

Experiment 1: Jumbo Yarn

extreme crochet experiments

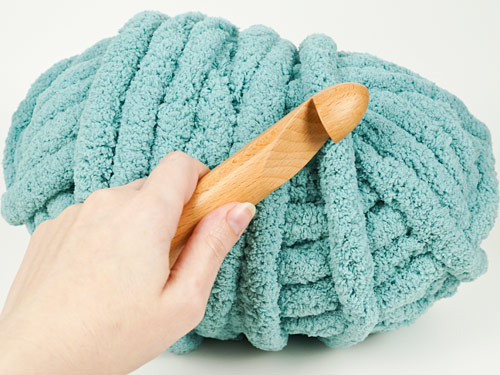
Jumbo (#7) is the recommended yarn size for a hook this large. The term “jumbo yarn” currently covers anything heavier than a super bulky, and some recommend a much smaller 19mm hook instead of my 25mm. I only had one ball of Bernat Blanket Big yarn, so I knew I wouldn’t be able to make a complete rug from it, but it’d be enough of a sample to do some calculations and see how a rug made from jumbo yarn would look…

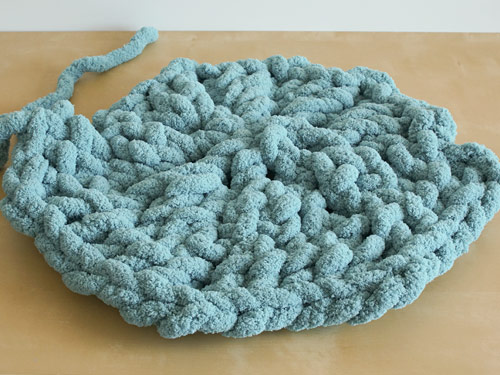
I didn’t get too far; 300g of my jumbo yarn only works out as 32 yards (29m), and that’s not much when one double crochet stitch is 4″ tall! I’d completed Rnd 2 and got halfway through Rnd 3 when my yarn ran out, but this gave me plenty of data.

extreme crochet experiments

The partial rug was soft, thick and squishy – I think it’d make a lovely rug (although I suspect the chenille-style yarn would flatten down like a plush carpet does with time and use).

extreme crochet experiments

Based on my sample, completing the small rug from the trio would need 13 balls of yarn, and the finished rug would be 66″ (1.7m) diameter.

(The large rug from the same pattern would take around 40 balls of yarn and would be twice that size!)

Experiment 2: Three Strands of Super Bulky Yarn

From my Extreme Whale experiments, I know that 6 strands of the super bulky (#6) Bernat Blanket yarn is roughly equivalent to a single strand of Bernat Blanket Big. I tested my hook with fewer strands and discovered that 3 strands of super bulky looks pretty good with my giant hook.

extreme crochet experiments

For this experiment, I tried to find 3 cakes of Bernat Blanket Stripes that all started in the same position in the colourway, so I could hold all three cakes together at once and they’d all change colour at about the same time.

I modified the first round by replacing half the double crochet stitches with chains, as cramming all those dcs into a ring with such huge yarn made a bit of a bump in the middle, and then I followed the pattern as written from Rnd 2.

extreme crochet experiments

My stitches were nicely defined, and one double crochet stitch measured about 2.5″ tall – still pretty huge!

Then, after a few rounds, I could see that I had a major problem: as my yarn is much finer – compared with the hook – than intended for this pattern, my rug was starting to ruffle instead of lying flat. Disaster!

Usually, you’d fix a problem like this by switching to a smaller crochet hook, but my next largest hook was less than half the size, plus the whole point was to use my extreme hook, so I had to try something else. By pinching up the excess fabric until the rug would lie flat, I saw that I could fix the problem by restarting my rug with only 6 repeats instead of 8. Doing this does change the look of the pattern slightly, but that’s infinitely better than a rug that won’t lie flat…

extreme crochet rug

It took just under 4 balls of yarn (1132g) to complete the ‘small’ rug like this, which works out as a total of 830yds (760m) of yarn, held tripled.

And the finished size is 48″ (122cm) in diameter – almost 2.5 times the size of the original small rug!

extreme crochet rug

I was a bit worried that, with the variegated yarn, the colours might all pool together in clumps, but they seem to have spaced themselves out quite nicely around the rug.

It’s large enough to use as a throw over the back of my futon (and I think it looks quite good like this!)

extreme crochet rug

I calculated how much more yarn I’d need to continue with the pattern and make the large size rug: a total of 13 cakes of yarn (300g each), and the finished rug would weigh 3.8kg (8lbs) and measure 8ft (2.4m) in diameter!

extreme crochet rug

On balance, I think I’ll stick with my ‘small’ rug – it’s big enough for me πŸ˜‰

I really enjoyed making this project! It works up so quickly when you use a big hook and yarn, and that’s very satisfying. Making a 4-foot rug with only 11 rounds of crochet is amazingly quick.

Wrangling the three balls of yarn was the hardest part. If you want to try extreme crochet with multiple strands of yarn, I think the key is to have plenty of space to set all your yarn out, so it doesn’t tangle, and pulling the yarn end from the centre of each ball (so they don’t roll around as you crochet). Or (probably a better idea): use the right size of yarn for your hook to begin with, so you don’t have to hold multiple strands together!

Comments (2)

BotaniCAL roundup

The BotaniCAL crochet-along ran from May throughout the summer, and we’ve ended up with so many gorgeous crocheted potted plants, and a few lovely flowers and fruit etc too! My cactus and succulent patterns were by far the most popular options – I’m happy to say that the succulent trend is showing no sign of fading. πŸ™‚

Highlights

All the entries are highlight-worthy, but I thought I’d share the impressive achievements of some of the most prolific CALers:

PlanetJune BotaniCAL crochetalong entries
Monica (MagicalAmigurumi) made all 26 of my individual cacti and succulents – wow! (I bet making the pots got a bit boring by the end…) I hope they’re selling well for you, Monica πŸ™‚

PlanetJune BotaniCAL crochetalong entries
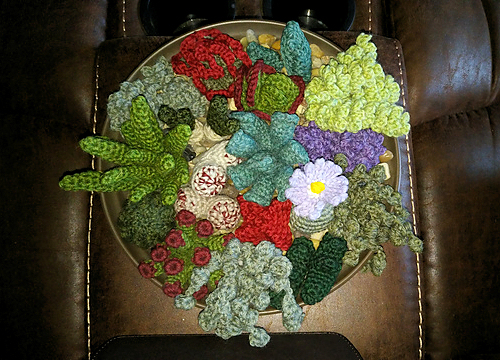
Dagrider made a massive succulent planter including all 16 succulents! Don’t they look so realistic, all together like that?

PlanetJune BotaniCAL crochetalong entriesPlanetJune BotaniCAL crochetalong entries

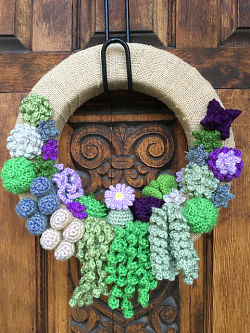
Alicia (aaBrink, left) and Susanna (sujavo, right) both made fabulous succulent wreaths. I love how they took the same concept and ended up with completely different (and equally lovely!) results, by choosing different colour palettes and arrangements for their succulents.

PlanetJune BotaniCAL crochetalong entries
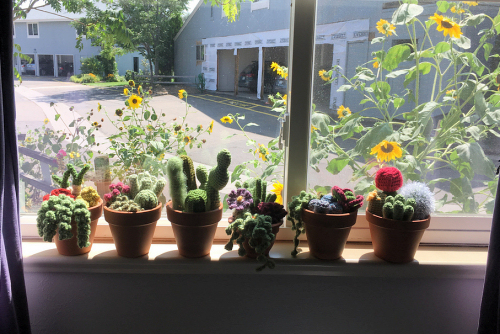
And Judy (jukatca) made all 6 cactus and succulent gardens. ‘Planted’ in real pots and sitting on her windowsill, don’t they look great?

PlanetJune BotaniCAL crochetalong entriesPlanetJune BotaniCAL crochetalong entries

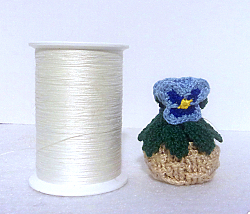
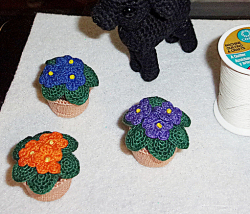
And last but not least (except in size), Michelle (MichelleBogart) loves to make miniature amigurumi with a tiny hook and crochet thread – just look at her mini Pansies and African Violets (with a spool of sewing thread for scale)! Now that’s impressive.


Enjoy the BotaniCAL Gallery

I’ve really enjoyed watching all the plants popping up in this CAL and seeing the creativity in terms of colours, arrangements, scale, etc – there’s obviously a lot you can do with a crocheted pot plant pattern!

Thank you so much to everyone who participated – you can enjoy the full BotaniCAL gallery of projects here on Ravelry πŸ™‚

BotaniCAL participants, it’s not too late to add your missing projects:

  1. Make a Ravelry project for your item
  2. Mark it as finished
  3. Add a photo
  4. Add the CAL tag PJCALMay18

(see the CAL FAQ for instructions on how to do those things)

…and your project will automatically appear in the BotaniCAL gallery!


Pick up a Plant Pattern

The CAL may be over, but you can crochet your own PlanetJune potted plants whenever you want! Here are a few links:


Join Us!

If this looks like fun, the next PlanetJune CAL will be starting shortly and we’d love to welcome you as a participant! PlanetJune crochet-alongs are a low stress way to try PlanetJune patterns as part of our friendly encouraging online community. There are usually small and/or free pattern options if you’re short on time or money, and we’ll offer you any help and encouragement you need, no matter your crochet skill level!

Join us in the PlanetJune Ravelry group and look out for the next CAL announcement there, coming soon πŸ™‚

Comments (3)

review: Susan Bates crochet hooks

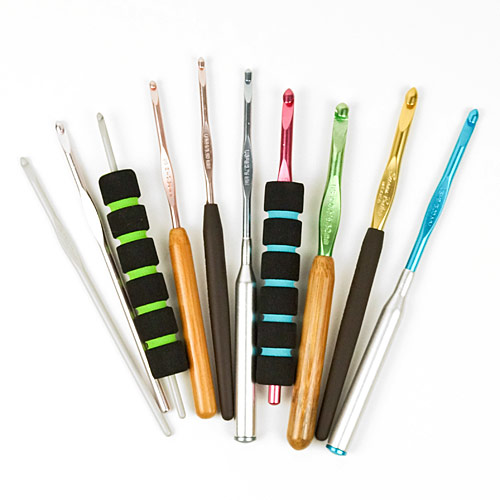
Did you know there are now two new additions to the Susan Bates hook line? I had to investigate, and got out all my SB hooks to compare the new styles with my classics:
susan bates aluminum crochet hooks: review

Susan Bates crochet hooks have always been my favourites, because I find their in-line shape makes it much easier to make perfectly uniform stitches.

What’s an ‘in-line’ hook?

See my Crochet Hook Styles article to understand why the head shape can make such a difference to your stitches. It comes down to personal choice – if you prefer a tapered hook, you probably won’t enjoy any of the hooks in my review below (and that’s okay too, there are plenty of other crochet hook brands out there!)

Now, I prefer aluminium/aluminum (I’ll say aluminum from now on, as the hooks are American!) hooks to bamboo or plastic, as they’re strong, smooth, and rigid. But clearly, even recommending you try a ‘Susan Bates aluminum hook’ in your preferred size doesn’t narrow you down to a single option, so I thought I’d put together a quick roundup of all the currently-available SB metal hooks, so you can make a more informed choice.


Susan Bates aluminum hooks – the contenders:

Here are all the options I’ll be looking at today:
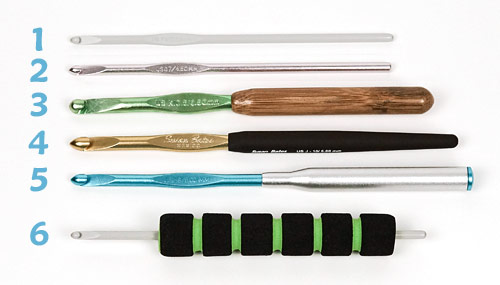
susan bates aluminum crochet hooks: review

  1. Quicksilver
  2. Silvalume
  3. Bamboo Handle/Silvalume Head
  4. Silvalume Soft Ergonomic
  5. Silvalume Super Lightweight
  6. Crochet Hook Cushion Grip

And now onto the reviews…

1. Quicksilver
susan bates aluminum crochet hooks: review

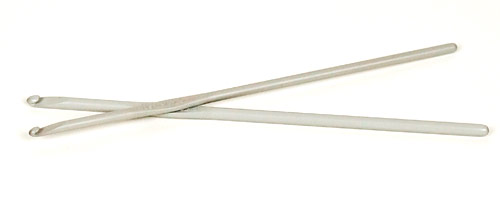
The Quicksilver line is the old-school classic Bates hook, but they are still available today. All sizes are the same matte grey colour and very smooth. These are the first hooks I bought in all the sizes when I started crocheting seriously, and mine are still in perfect condition.

The biggest downside is that, if you crochet with a knife grip like me (i.e. you hold the hook gripped in the palm of your hand), the narrow handle, especially with the smaller sizes, makes it less comfortable to hold and and it’s more likely that your hands will cramp up.

2. Silvalume
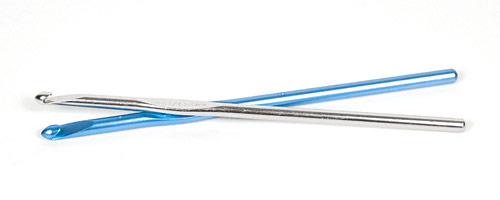
susan bates aluminum crochet hooks: reviewI gradually upgraded to a set of basic Silvalumes, starting with the starter set (sizes F-K US, 3.75-6.5mm), and then adding all the other sizes individually. These anodised aluminum hooks are helpfully colour-coded by size, so it’s easy to tell the difference between your H hook (blue) and I hook (pink).

In a side-by-side comparison, they don’t feel as smooth as the Quicksilvers, but they’re still very smooth, and I prefer them to the Quicksilvers (although possibly just for the convenience of the colours…) Again, the handle is narrow, so not ideal if you crochet with a knife grip.

The newer Susan Bates hook styles below are all based on a Silvalume head, with a built-up handle that you may find more comfortable if you crochet with a knife grip. If you crochet with a pencil grip (with the handle of the hook resting on top of your hand), the handles are unlikely to provide you with much benefit.

3. Bamboo Handle/Silvalume Head
susan bates aluminum crochet hooks: review

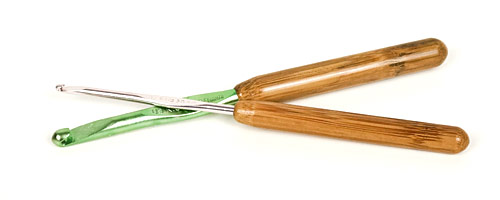
My all-time favourite hook! The bamboo-handled hooks have all the advantages of the Silvalume head with a smooth, warm bamboo handle that I find very comfortable to hold.

I really do swear by these hooks – I have two complete sets, plus another six spares in my most-used size (E US/3.5mm, for my amigurumi)!

4. Silvalume Soft Ergonomic
susan bates aluminum crochet hooks: review

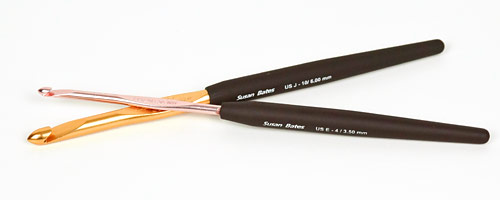
Soft Ergonomic is one of the new SB hooks, with a soft-touch plastic handle. The handle is a little longer than all the above hooks, so may work better for you if you have a larger hand. I find it pleasant to the touch and a definite improvement in comfort to the all-metal hooks, although I personally prefer the wider grip of the bamboo handles.

If you crochet with a pencil grip, you may find the soft-touch handle more comfortable resting on your hand because it’s warmer than an all-metal hook and not too bulky.

5. Silvalume Super Lightweight
susan bates aluminum crochet hooks: review

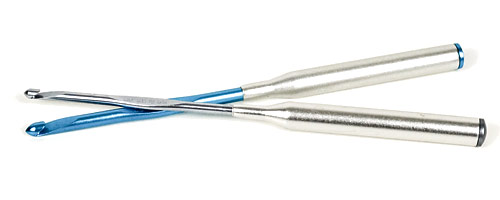
Super Lightweight is the other new hook style, and I must admit this one has me baffled. Aluminum hooks are always lightweight, and, weighing the same size of each of the above hooks, the Super Lightweight hook was actually slightly heavier than any of the others! The handle is made of a brushed aluminum and it is much lighter than it looks from its size – maybe that’s where the ‘super lightweight’ part comes in..?
susan bates aluminum crochet hooks: review
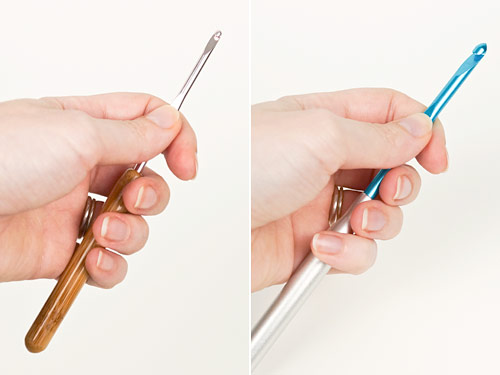
L: Bamboo Handle Silvalume; R: Silvalume Super Lightweight

Like the Soft Ergonomic hook, this one also has a longer handle, which you may find more comfortable if you have larger hands. However, with my small hands and the way I hold my hook, the wide part of the handle only benefits my little finger, so it’s definitely not well-suited to small-handed knife-grip crocheters! And, personally, I prefer the warm feel of the bamboo or soft-touch plastic to this cold aluminum handle.

(For amigurumists, I should mention that the smallest size this hook is currently available in is an F US/3.75mm, so it may be larger than you’d prefer for your amigurumi.)

6. Crochet Hook Cushion Grips

susan bates aluminum crochet hooks: review

If you already have the older Quicksilver or original Silvalume hooks and don’t feel like the expense of buying a whole new set of hooks but would like a comfort upgrade, cushion grips could be the answer.

These Susan Bates cushion grips come in a set of two, and the packaging says they fit sizes F-J. I found that the green grip has a smaller hole than the blue, and, in my tests, the green works well for sizes E-G7 (3.5-4.5mm) and the blue for sizes H-J (5-6mm).

These grips are squishy and comfortable, and may be the best answer if you have arthritis or find gripping a narrow hook problematic – by pulling the grip up over the thumbrest, you can get the benefit of the foam padding and wider grip for your thumb and forefinger, as well as for your other fingers.

Hook Head Shapes

For completeness, I should also mention that all Susan Bates hooks are not the same – the head shape has changed more than once over the years, and depending on where/when your hook was manufactured, you may find your hook has a pointier or more rounded head, and a deeper or shallower throat cut-out.

My Susan Bates hooks have a mixture of the two, and I can say that I usually prefer to use one with a more rounded head, as it’s less likely to split the yarn, but the pointier ones have their advantages too – for example they come in handy when you need to poke the hook into a tighter stitch (e.g. for my Better Back Loops Only technique!)

Which head shape you prefer is a personal preference, and probably not one you’ll have any control over if you buy a new Susan Bates hook, anyway. But I will say that it doesn’t change my opinion: all Susan Bates hooks have the same in-line shape, and that’s the most important factor to me when I choose a hook.

susan bates aluminum crochet hooks: review


We’re lucky to have so many hook choices these days, but it can be very confusing, especially if you add all the other brands of hook to the list of choices!

If you’ve been wondering which Susan Bates hook to try, or what the differences are between all the options, I hope this post will help you choose the one you’ll enjoy most.

What’s your favourite hook? Are you a Bates fan too, or do you prefer Boye, Clover, Tulip, or another brand? Please share your recommendations in the comments below πŸ™‚

Notes: Red Heart kindly provided me with samples of the new hooks for my review, but all opinions are my own. The affiliate links above point to amazon.com. If you live outside North America, see my tips for buying in-line hooks internationally.

Comments (19)

Crochet Investigation: Avoiding the Jog in a BLO Round

Spoiler alert: in doing this jog-minimising back loop only round amigurumi experiment, I have a recommendation for a simple modification to make to your amigurumi that will minimise the jog with those back loop only rounds! If you’re not interested in my experiments, jump straight to the Jogless Back Loop Only Round for Amigurumi video tutorial πŸ™‚

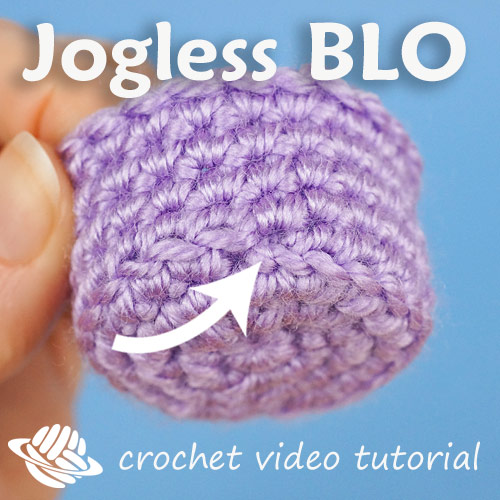
jogless back loop only round for amigurumi by planetjune


Crocheting a round of back loop only (BLO) stitches is a standard method for creating a sharp corner in amigurumi. The biggest problem is that, when you work in a continuous spiral, you end up with a noticeable jog between the first and last unworked loops of the round.

I’ve had several requests to develop a method for minimising that jog, so you know what that means: it’s time for another PlanetJune crochet investigation!

Method

For this experiment, I tested a few candidates that I thought may improve the look of that jog. Modifying one or other of my Perfect Stripes methods seemed like a promising idea, as well as changing the height of the end stitches to bring them closer together.

I crocheted the same small sample for each method so we can compare the effectiveness of each one. Each sample was crocheted in a spiral with a flat circular base, a round of BLO stitches to turn the corner, and then a few more rounds worked straight.

So, here are the candidates:

A. The control sample, as described above, with no attempt to minimise the jog
B. Sample using the No-Cut Join technique for the round before the BLO round and the BLO round
C. Sample using the Invisible Join technique for the round before the BLO round and the BLO round
D. Sample modifying the height of the stitch before the BLO round with a slip stitch

The photos below show each sample from two angles, and, if you’d like to play along, you can compare the appearance of the line of unworked loops around the edge of each sample and see what you think of my ‘improvements’…

jogless back loop only investigation - candidate A

jogless back loop only investigation - candidate B

jogless back loop only investigation - candidate C

jogless back loop only investigation - candidate D

Results

I compared each candidate with the control sample (A) to see how much it improved the appearance of the jog, judging on two criteria:

  1. How continuous the line of unworked loops appears between the first and last stitch of the round (left photo)
  2. How circular the entire round of unworked loops appears (right photo) – note that this effect is more noticeable because the samples are quite small; it wouldn’t be as obvious for a larger piece such as the base of an ami plant pot

Here are my observations:

B. The No-Cut Join gives the worst result of all the test pieces. Although the jog is reduced, extra mess is introduced to the surrounding stitches, and I think the overall effect is actually worse than doing nothing.

C. The Invisible Join gives a flawless result – the join is completely invisible and the round of unworked loops is almost completely circular. However, it’s slow, and leaves a lot of extra yarn ends, so it’s quite an investment in time and effort.

D. The height modifying method is very quick and simple to execute and gives a pretty good result. As the spiral is almost uninterrupted, the unworked loops don’t quite form a perfect circle, but the jog is almost invisible.

My Recommendations

If you want the best-looking back loop only round possible and don’t care how long it takes, switching to joined rounds (for both the round before the BLO round and the BLO round) and using the Invisible Join method from my Perfect Stripes tutorial will give you the most perfect result.

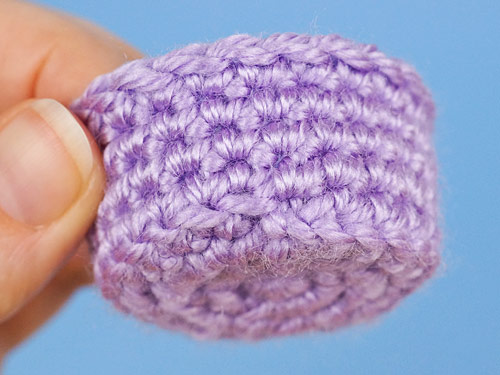
But, my recommendation is: for the best balance of a good result with a quick and easy method, use my height modifying method – now called my Jogless Back Loop Only Round method – for minimising the jog. (And, to give an even better result, combine it with my Better BLO technique – between the two, you’ll end up with a very neat and practically jogless back loop only round, as you can see below.)

jogless back loop only round for amigurumi by planetjune

Impressed? Now learn how to do it, with my new video tutorial:

Continue to A Jogless Back Loop Only Round for Amigurumi video tutorial >>

Comments (3)

Punchneedle PlanetJune logo

I’m so happy to see punchneedle embroidery starting to get more popular (finally!) and thought it was about time I dust off my needle and start some new embroideries of my own. Although it’s mostly the large rug-punch style that’s trending right now, it’s miniature punchneedle embroidery – worked with a smaller tool and standard embroidery floss – that I’ve been enjoying for almost a decade.

Punchneedle really is the easiest form of embroidery – you can draw any shapes on your fabric and fill them with punched loops of colour just like a paint-by-number painting!

Intrigued? Learn more on my Punchneedle info pages.

And now here’s the PlanetJune logo, punchneedle style!

PlanetJune logo in Punchneedle Embroidery

I love the depth that the looped stitches give to the finished piece, don’t you?

PlanetJune logo in Punchneedle Embroidery

I thought you might like to see a little look at the process!

This is the back of the embroidery, and the side that faces you while you punch. You can see it looks like rows of straight stitches. Here, I’ve finished all the red but I’ve only done about half of the white areas:

PlanetJune logo in Punchneedle Embroidery

From the front, you can see the nice even loops that are formed by the punchneedle tool as you punch. The loops are so dense that you can’t even see any spaces in the upper half where the white will define the red sections. But that will all change soon…

PlanetJune logo in Punchneedle Embroidery

After punching the rest of the white stitches and the finishing steps to tidy up any loose threads and messy stitches, here’s the result:

PlanetJune logo in Punchneedle Embroidery

And then the final step – it’s basically finished, but, at this stage of a punchneedle embroidery, you can choose what to do next depending on what you want to do with the embroidery.

You could keep it attached to the backing fabric as in the photo above and frame it like that, fill in the backing fabric with more colours and/or patterns to fill the hoop and use the hoop as a frame, square off the embroidery with more stitches and then frame it, turn it into an applique to attach to something else… Lots of choices!

I decided to mount my logo on a felt backing and cut it out so it became a free-standing ornament:

PlanetJune logo in Punchneedle Embroidery

Isn’t it cool?

Next, I think I’ll return to my punchneedle butterflies project – I want to make a beautiful Monarch to commemorate my return to Canada!


If you’d like to learn more about punchneedle, see my Punchneedle info pages.

And if you’re ready to get started, my ebook, The Punchneedle Handbook: Miniature Punchneedle Embroidery Basics & Beyond, walks you step by step through the entire process of miniature punchneedle embroidery, from selecting tools and materials, to how to punch correctly, and the all-important finishing steps for perfecting your finished embroideries. It’s available in two versions, for right- and left-handers, so you can see step-by-step photos that show you exactly how you’ll be punching.

The Punchneedle Handbook by PlanetJune

Have you tried punchneedle embroidery yet? If not, I’d love to help get you started with this easy and satisfying craft! If you have any questions, please feel free to ask them in the comments below πŸ™‚

Comments (6)

Extreme Amigurumi: Extreme Whale!

After the success of my giant amigurumi baby bunny, Mega Bun, I decided to try some more extreme amigurumi experiments using regular yarn that’s currently available in stores, so I can give you some recommendations.

As before, I used my Susan Bates Xtreme crochet hook, which is size 50 (that’s 25mm, or 1 inch!) and this time I decided to use my smallest, simplest amigurumi animal pattern, Tiny Whale. Is it possible to make an extreme Tiny Whale?! Why yes, it is:

extreme amigurumi whale and standard size whales - all use the Tiny Whale crochet pattern by PlanetJune)

And now let’s look at how I got to this point…

First Attempt: Jumbo Yarn

extreme amigurumi experiments

Bernat Blanket Big is a #7 jumbo weight yarn with a recommended hook size of 25mm – exactly what I was looking for!

(Note: this is a completely different yarn from the #6 super bulky weight Bernat Blanket yarn, which is only a fraction of a size of this monster yarn! You may find ‘Bernat Blanket Big Ball Yarn’ for sale online, but that’s just a big ball of Bernat Blanket, not a ball of Bernat Blanket Big…)

This chenille-style yarn works up beautifully to make a massive and super-soft amigurumi with no large holes. Look at these huge single crochet stitches:

extreme amigurumi experiments

And then: disaster! A ball of Blanket Big weighs 300g but only contains 32 yards (29m) of yarn. It turns out my one ball made less than half of a Tiny Whale, and I had no way to get more of the same colour…

extreme amigurumi experiments

So that was the end of this attempt, but at least my experiment proved that the #7 jumbo yarn is a viable choice for extreme amigurumi.

Verdict: Thumbs up for this yarn, provided you’re prepared to buy several balls to make a single amigurumi! (But please check that your jumbo yarn recommends a 25mm hook size if you’re going to replicate this: “jumbo” covers everything larger than super bulky. Most jumbo yarns I’ve seen are designed for a 19mm hook, and are much less bulky than this.)

Second Attempt: Super Bulky Yarn

Jumbo yarn isn’t very common, so, for my next experiment, I wanted to know how many strands of super bulky yarn, held together, would make the equivalent of a single strand of my jumbo yarn.

I used Bernat Blanket yarn, which has the same chenille-style construction as Blanket Big, but is a much more usable size (the recommended hook size for this yarn is US L/8mm).

I tried to gauge how many strands I’d need by holding several strands up against the jumbo yarn to compare visually and by feel, and then crocheting with them to see what gave the most similar result to my first experiment. And the result? You need a whopping six strands of super bulky yarn to replicate the weight of one strand of the jumbo!

extreme amigurumi experiments

I came up with a variation of chain plying that let me wrangle 6 strands relatively easily, but it was still hard work on such a massive scale. The multiple strands, held tightly together, are clearly visible in the amigurumi and don’t give as soft a finish as the jumbo yarn, but I quite like the effect, and, most importantly, it worked!

Extreme Whale used 500 yards (460m) of Bernat Blanket yarn with a 25mm hook. Despite this huge stitch size, there are no large holes between the stitches and I was able to stuff him directly (unlike Mega Bun, who needed a net to contain the stuffing).

Verdict: The end result is a definite success, but wrangling 6 strands of yarn was an added challenge!

extreme amigurumi whale and standard size whales - all use the Tiny Whale crochet pattern by PlanetJune)

Extreme Whale is exactly six times the size of the original Tiny Whale, at 24″ (60cm) long vs 4″ (10cm) in the original pattern, and weighs in at over 1kg (well over 2lbs) including stuffing!

Final Thoughts

These experiments have shown that it’s definitely possible to scale up an amigurumi pattern by multiple times, provided you don’t mind the look of the huge stitches and you choose an appropriate hook and yarn for your project.

extreme amigurumi experiments

Mega Bun is very happy to finally have a friend of her own size!

extreme amigurumi experiments

If you’d like to make an extreme ami and are debating buying ridiculously thick yarn vs using multiple strands of a finer yarn, you may be interested to know that I compared the cost of each yarn, and the cost of an ami made with 6 strands of Blanket yarn is the same as making the same ami from 1 strand of Blanket Big yarn.

If I make another extreme whale, I’d try to use the jumbo yarn to save on having to hold all those strands together! But Bernat Blanket is very readily available in a wide range of shades, whereas Blanket Big is often unavailable (I think it may be released seasonally in the winter and discontinued every summer) and only comes in a handful of shades. So either option is fine, depending on what you can find.

Pattern Info

If you’d like to make your own extreme (or standard-sized!) amigurumi whale and bunny like mine, the PlanetJune patterns I used are:

What’s Next?

Will I be putting away my giant hook now? Oh no, I’m not done with extreme crochet just yet!

I’ve come up with lots of recommendations throughout this journey so far, and I’ll be compiling all my extreme amigurumi tips for you – and the pattern for my giant crocheted ami eyes – when I’ve finished my final supersized crochet experiments.

Stay tuned for the next extremely thrilling update…

Comments (4)

Donkey crochet pattern

Today I have a new animal design for you that’s particularly close to my heart: a Donkey!

Donkey crochet pattern by PlanetJune

I’ve loved donkeys for as long as I can remember – how can you resist those big soulful eyes and that sweet, gentle character?

Donkey Fun Facts

  • Donkeys are members of the horse family, Equidae, together with horses, zebras and wild asses.
  • Donkeys were domesticated many thousands of years ago and helped to moved the stones that formed the ancient pyramids of Egypt.
  • Today, donkeys are found all over the world and the majority still work as pack animals, helping people to transport heavy loads.
  • Donkeys can be crossbred with horses (to make a mule) or with zebras (to make a zonkey)!
  • As well as being sturdy and dependable workers, donkeys are also friendly and intelligent.

Donkey crochet pattern by PlanetJune

About the Design

I was planning to make my donkey as an expansion pack for my Horse pattern, but once I started making it and comparing real-life horses and donkeys, I found that every single piece was a different shape and size. Donkeys have such a different body type and build, plus completely different ears, mane and tail – there wasn’t anything of the horse pattern left by the time I’d finished!

Just compare the sweet, stocky donkey with the tall, elegant horse:

Donkey and Horse crochet patterns by PlanetJune

Definitely related, but definitely different. Donkeys may not have the glamour of horses, but I think they’re totally adorable. I hope I’ve captured that big-eyed, long-eared, sturdy donkey essence in my design.

Donkey crochet pattern by PlanetJune

Buy Now & Launch Discount

If you love donkeys too, you can pick up my Donkey crochet pattern from my shop right now. Or, if you’re not ready to make it just yet, add it to your Ravelry queue or favourites so you don’t forget about it:

And for one week only, you can take an extra 50c off the price: add the Donkey pattern to your shopping cart, and enter the discount code EEYORE at checkout! (Offer ends Wednesday 11 July, 2018.)

Donkey crochet pattern by PlanetJune

I hope you’ll love my pattern – don’t you agree that donkeys are just adorable?

Comments (11)

Summer crochet-alongs

Summertime is typically the slowest season for crochet, but perhaps I can tempt you back to your hook with a choice of two PlanetJune crochet-alongs to join in with for July and August? Both include some small, quick pattern options if you’re short on time.

If you feel like something a bit different, how about joining the new FantastiCAL, featuring all the PlanetJune crochet patterns with a fantasy/mythical theme:

PlanetJune FantastiCAL - a fantasy/mythical crochet-along
Aliens, Yeti, Unicorns and more – which will you choose?

And, with 99 participants so far and over 60 finished projects, the BotaniCAL is still going strong, so I’m extending it through to the end of August to give everyone more time to finish their projects (or start more…)

You can choose from any of the PlanetJune plant, fruit and flower crochet patterns. If you haven’t joined yet, you’re welcome to sign up, and you’ll still qualify for the CAL discount on the Succulent Collection 3 and/or 4 patterns πŸ™‚

PlanetJune cactus and succulent crochet patterns
These are just (most of) the cacti and succulent choices – you have over 30 botanical patterns to choose from!

You’ll find both CALs in the PlanetJune Ravelry group, and you’re welcome to join either, or both.

Choose your patterns now:

Then come and join us on Ravelry and tell us what you plan to crochet this summer…

Comments

Next entries » · « Previous entries
  • Quick Links: Crochet

    navigation: arrow

    buy crochet patterns and accessories from my online store

    'Everyday Crochet' and 'The Essential Guide to Amigurumi' crochet books by June Gilbank

    Crochet video tutorials and step-by-step photo tutorials

    Free PlanetJune crochet patterns

    Frequently Asked Questions

    Quick Links: Crafts

    navigation: arrow

    Punchneedle Embroidery information, ebook & patterns

    Papercraft ebook & tutorials

    Free PlanetJune craft projects & tutorials

  • Blog Post Categories

  • Blog Archives

  • CAL Galleries

    Ravellenic Games: Team PlanetJune
    PlanetJune Reindeer Games
    PlanetJune Temperature Snake CAL

  • Welcome to PlanetJune!

    June Gilbank

    Hi, I'm June. Welcome to my world of nature-inspired crochet and crafting. I hope you enjoy your visit!

    If you'd like to get in touch, you can contact me here.
    crocheted Canadian flag by PlanetJune
  • June’s Crochet Books

    A fanned-out pile of the books Everyday Crochet and The Essential Guide to Amigurumi, with text 'The answers to all your crochet questions at your fingertips - find out more'
  • Support PlanetJune!

    Want to say thanks? You can send me money in seconds at paypal.me/planetjune (over $20) or paypal.me/planetjune2 (under $20) or send me a donation through my shop.

    Or simply click through from my links before you shop at Amazon, Etsy, KnitPicks, LoveCrafts and more, and I'll make a small commission on your purchase, at no cost to you! Start here:

    ♥ Support PlanetJune ♥

    Tip: This link is also in the footer of every page!

    Thank you so much for your support!