PlanetJune Craft Blog

Latest news and updates from June

Cotton Yarns: an investigation

If you’ve seen my new Eco-Friendly Cosmetic Rounds pattern, you may be wondering what type of yarn is best for making them.

PlanetJune Accessories Eco-Friendly Cosmetic Rounds crochet pattern

  • Does it even matter?
  • Will any cotton yarn scraps work equally well?
  • Should you choose a yarn based solely on colour preference, or is there an advantage in using more expensive yarn, organic yarn, etc?
  • Is mercerized cotton really a no-no?
  • Are the cosmetic rounds really washable and reuseable, or will they look sad and ragged after a couple of uses?

I crocheted all the samples for my pattern using the same brand and type of yarn (Bernat Handicrafter) so I was wondering all those things, which means… it’s time for another PlanetJune investigation! 🙂

The Candidates

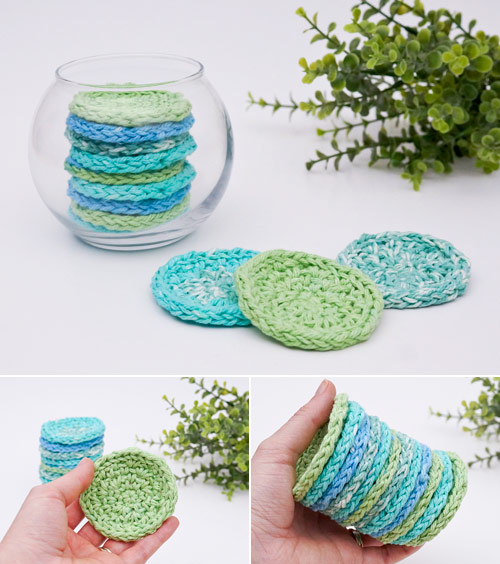
I raided my stash for a selection of cotton yarns for my comparison, and here’s what I chose:

comparing cotton yarns for crocheted cosmetic rounds

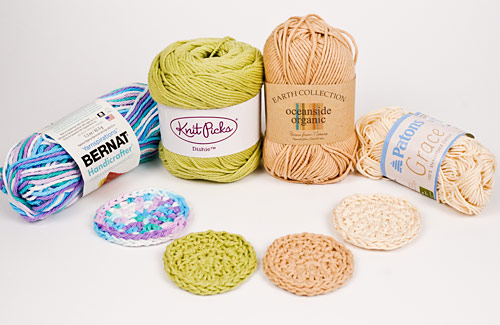
(Yarns and samples, left to right):

  1. Bernat Handicrafter (blue/purple), an inexpensive worsted weight kitchen cotton available from most craft stores (and the same type of yarn I used for my pattern samples)
  2. Knitpicks Dishie (green), a worsted weight cotton, with a smoother look and feel and tighter twist that makes it less splitty than everyday kitchen cottons
  3. Earth Collection Oceanside Organic (brown), a DK weight 100% organic cotton
  4. Patons Grace (cream), a sport weight mercerized* cotton (I held two strands together to approximate a worsted weight)

* I’ve read from several sources that the mercerization process improves the smoothness and sheen of a yarn, while reducing its absorbency, so I intentionally included a mercerized yarn sample in this test so we can see exactly how much less absorbent this yarn will be than the others!

I’ll refer to the samples by number from now on, and I’ll always arrange the samples 1-4 clockwise from top left, or in a straight line left to right.

comparing cotton yarns for crocheted cosmetic rounds

I used the same hook and pattern for each sample, and you can see that there’s a difference in the size of the pads. Dishie (2) is much finer than Handicrafter (1) even though they are both supposedly worsted weight; it’s much closer to the DK-weight Oceanside (3). Holding two strands of Grace (4) together worked well to give me the right weight of yarn for the pattern (useful to know!)

Let’s look at each sample individually:

comparing cotton yarns for crocheted cosmetic rounds

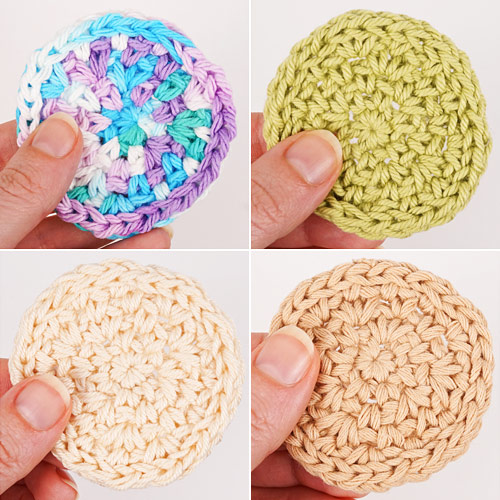
  1. I intentionally made my pattern samples using a ‘standard’ inexpensive kitchen cotton that should be widely available (there are several other comparable lines from other brands, e.g. Sugar ‘n Cream, Peaches and Creme). Some skeins can be a bit harsher-feeling and splittier than others, so I’d recommend you look for softer skeins if you have the option of touching them in-store. The resulting pads are nice and cushiony, without large holes between the stitches.
  2. As the Dishie is both finer and more tightly spun, you can see it left some gaps between the stitches. (If I made more, I might try going down a hook size to reduce the size of the holes.) The yarn didn’t split at all and the stitch definition is lovely, but the finished pad feels a little firm.
  3. Th organic cotton was very soft to work with, but extremely splitty. The finished pad is beautifully soft, though, so perhaps worth the frustration of trying not to split the strands while crocheting!
  4. The mercerized cotton is very smooth, with a nice sheen. The yarn felt firm and not at all splitty. The finished pad feels smooth and firm.

Absorbency Test

Okay, so we know how they look, but how well do they work? Time for an experiment!

I used a graduated pipette (yay, science!) so I could measure the same amount of water for each test:

comparing cotton yarns for crocheted cosmetic rounds

For each sample, I squirted 0.6ml of tap water into the centre of the pad, and watched what happened.

comparing cotton yarns for crocheted cosmetic rounds

  1. The water soaked in within a few seconds.
  2. The water sat on the surface for a surprisingly long time (about a minute) then soaked right through the pad.
  3. The water did not absorb at all – even after several minutes it was still sitting on top of the pad!
  4. The water soaked in immediately.

Yes, that’s right – the mercerized cotton, which I’d been led to believe would be less absorbent, was actually the most absorbent sample!

And the organic cotton, which I assumed would be very absorbent, was eerily waterproof.

I guessed that yarns 2 and 3 may have some fibre-processing treatment residue that was affecting their absorption rate, so I decided to re-run the absorbency test after washing and drying the samples, and see if that made a difference.

Washing Test

I put all 4 samples in a mesh laundry bag (this one is designed for washing bras, so it’s a nice compact size for washing a big batch of cosmetic rounds!) and ran them through the washer and dryer with my regular laundry.

comparing cotton yarns for crocheted cosmetic rounds

How did they fare after the laundry cycle? Let’s see:

comparing cotton yarns for crocheted cosmetic rounds

Not a lot of difference. Here are my observations on close examination:

  1. Fluffed up a bit on washing but also got considerably softer. (And, from my experience of using these for a few weeks now, they don’t look any worse after repeated washings than after the first wash.)
  2. Softened a bit on washing and didn’t fluff up.
  3. Fluffed slightly on washing. It was already very soft, so I don’t think it softened further.
  4. No difference at all – still smooth and firm.

Post-Wash Absorbency Test

I re-ran the absorbency test in exactly the same way as before, with 0.6ml of water dropped onto the centre of each pad.

comparing cotton yarns for crocheted cosmetic rounds

  1. The water soaked in immediately.
  2. The water absorbed over a 5-second period and soaked right through the pad.
  3. The water still didn’t absorb at all. The only way I could get it to wet the pad was to rub the water around on the surface with my finger.
  4. The water soaked in immediately.

So, 1 and 2 became more absorbent after the wash, but 3 did not, and still seems highly water-repellent:

comparing cotton yarns for crocheted cosmetic rounds

Here’s a close-up of 3 so you can (just about) see the big blob of water sitting on the surface of the middle of the pad (and clearly see a tiny droplet just to the left). I still can’t account for this behaviour – it was completely unexpected.

comparing cotton yarns for crocheted cosmetic rounds

And here’s the big shocker – the completely soaked mercerized cotton.

Conclusions

Although the yarns did look and behave differently, any of them would work as cosmetic rounds – and I’ll be adding all these samples to my stack!

The yarns that started out smoother and with more lustre (2 and 4) looked closer to new after washing than the others, which had a little bit of fluffing up. However, fluffing is not necessarily a bad thing – the yarns that fluffed feel softer and less firm than the smoother yarns, and a little extra fluffiness actually makes them feel even softer.

And, most importantly: mercerized cotton is clearly not less absorbent than non-mercerized. I’ve removed that statement from my pattern, and I’ve since done further research and found a source that claims the mercerization process makes cotton more absorbent, which my test would support (although, without being able to test the same fibre pre- and post-mercerization, I can’t prove that definitively!)

Tips for Choosing Yarn

  • As we know, yarns of the same weight (e.g. ‘worsted weight’) are not all exactly the same thickness – see my worsted weight yarn comparison for proof! Different yarns will give you slightly differently-sized rounds, so if you want to crochet a matched set with some variation, I’d suggest sticking to the same yarn line and just swapping colours (or choose a striped yarn so you get multiple colours from one ball!)
  • For sample 1, I used a variegated skein of Bernat Handicrafter in Beachball Blue, instead of the striped colourways I chose for the pattern samples. I found the resulting mishmash of colours to be a bit busy for my taste, with a colour change every couple of stitches, but you may love this effect! Every pad will look different, but still co-ordinated, if you make them with a yarn like this.
  • Does appearance or softness matter more to you? I prefer the feel of the fluffier, softer cottons (after the first wash) to the smoother, firmer yarns. So I’ll be sticking with the basic kitchen cotton for my rounds, even though I prefer the look of the stitch definition of the smoother yarns.
  • As evidenced by my absorbency tests, some yarns may not behave exactly as you expect! So, if you’re unsure about a yarn, I suggest you try making a single pad with it, using it, washing it and using it again. That’ll give you the best gauge as to how well the yarn will do the job, and whether it will fluff up, soften up and/or become more absorbent after washing it. I’d recommend you do this before you make a whole batch from the same yarn, especially if you plan to give them as gifts!
  • Having said that, you can probably make effective cosmetic rounds from pretty much any cotton or cotton-blend yarn. Pull out some cotton scraps and have a go!

eco-friendly cosmetic rounds crochet pattern

If you’d like to make some Eco-Friendly Cosmetic Rounds, you can find the free online version of the pattern here.

Or, send me a donation and receive the easy-to-print PDF version of the pattern as a thank you! The PDF version also includes some bonuses (the pattern for the Mini size rounds – perfect for applying toner – and additional instructional photos and tips, including left-handed photos).


Do you have any experience with cotton yarns? Please share your recommendations for your favourites – or warnings for your least favourites! – in the comments below…

Comments (13)

Incyanity yarn review

I’d like to introduce you to a new Canadian indie yarn hand-dyer, Cheyenne Brammah of Incyanity!

Cheyenne is a long-term customer of mine and she sent me some test skeins of her hand-dyed yarn for my feedback before she launched her shop. But, as always, the following is based on my honest opinions, and I’ve been waiting for the launch so I could tell you how much I enjoyed these yarns!

Cheyenne has a great eye for colour, and choosing her palettes from her own nature photography is inspired – each shade tells a colour story, illustrated by the beautiful photos. Just look at these stunning yarn/photo combos in the lush launch colourways:

Incyanity yarns (photos by Cheyenne Brammah)

I always appreciate bringing inspiration from the natural world into my designs, and looking at these yarns together with their inspiration photos makes my heart happy.

My Experience

Incyanity yarns

Incyanity yarns come in 100g hanks, and are dyed onto high quality bases (currently merino/silk, merino/nylon and merino/bamboo are available). I chose a merino/nylon (teal) and a merino/silk (purple) to test, both in fingering weight – the perfect weight for crocheted shawls!

My yarn was securely packaged and arrived in perfect condition. They looked lovely in the hanks, and even more stunning once I’d wound them into cakes. This is some seriously pretty yarn…

Incyanity yarn

The tonal teal is a lovely shade. It’s just varied enough to provide some fun tonal changes while you crochet, but not so busy to distract from a beautiful stitch pattern in the finished piece.

Note: This shade is a preview of an upcoming colourway. It’s bluer than the Canyon Cascade colourway, but otherwise similar in the tonal variation.

Incyanity yarn

The variegated Amethyst Sky is gorgeous in the skein and absolutely stunning after being wound. Just look at those rich purples tempered with icy blue – this colour scheme could have been designed just for me!

Note: The yarn base felt very nice to me, but Cheyenne wasn’t satisfied with the softness or sheen, and she has since found a vastly superior base for her Incyanity silk blend yarns. You can see how much more pronounced the sheen is now by comparing the same yarn in the shop with the photos of my test skein 🙂

Incyanity yarn in Amethyst Sky colourway

It can be a challenge to find the right stitch pattern for a very variegated yarn in crochet, so I tested it out with this linen stitch swatch to see how the colours would play together. Very pretty! I can definitely see this as a lovely hat or cowl. But, in the end, I chose an unfussy lace stitch pattern for this skein (see my shawl below!), and I think the result is beautiful like this too.

Verdict

I really enjoyed working with both yarns. They felt soft and bouncy, they didn’t split at all while crocheting, the yarn colours didn’t fade at all after soaking (a very important test!), and both blocked out beautifully.

And I think the results speak for themselves – the two shawls I made from my yarn are just gorgeous in these rich colours:

Diamond Lace Wrap crochet pattern by PlanetJuneSweetheart Lace Shawl crochet pattern by PlanetJune

Left: Diamond Lace Wrap; Right: Sweetheart Lace Shawl

If you’re looking for a high-quality, stunningly-coloured, nature-inspired hand-dyed yarn to elevate your next crochet or knit project, I recommend you check out Incyanity 🙂

Comments (5)

free pattern: Eco-Friendly Cosmetic Rounds

I recently started using a facial toner, and suddenly I was throwing out more cotton pads in a week than I usually use in a year! I try to minimise the amount of trash I generate, and, as the bathroom bin started to fill, I decided this had to stop. Enter my new free crochet pattern: washable, re-useable Eco-Friendly Cosmetic Rounds.

PlanetJune Accessories Eco-Friendly Cosmetic Rounds crochet pattern

Use these washable rounds anywhere you’d use a disposable cotton round or facial wipe – for cleansing, toning, or removing makeup – and save money while helping the environment! They crochet up in minutes, take very little yarn, and make a pretty and practical gift.

Eco-Friendly Cosmetic Rounds are easy to clean – simply toss the used pads into a mesh laundry bag or a drawstring bag and run them through your washer and dryer with your laundry.

PlanetJune Accessories Eco-Friendly Cosmetic Rounds crochet pattern

As I like to reward people who choose to donate for my donationware patterns, the PDF version of the Eco-Friendly Cosmetic Rounds pattern also includes the bonus pattern for the Mini size (pictured above; I find this size is perfect for applying my toner!) and additional instructional photos and tips, including left-handed photos. As always, the pattern for the Standard size is free for you to use, and you need only donate if you’d like to thank me for my time in creating it, or if you’d like the easy-to-print PDF version with the bonuses.

Go to the free Eco-Friendly Cosmetic Rounds pattern >>

Or jump straight to donate:

Order the Eco-Friendly Cosmetic Rounds pattern >>

Not ready to make them yet? Add this pattern to your Ravelry queue:

I hope you’ll find this pattern useful! And every step we can make towards helping the environment by reducing waste is a step in the right direction, no matter how small.

Comments (2)

Using a Stitch Marker in Amigurumi [video tutorial]

My next few crochet video tutorials will be in response to customer requests. If there are other crochet techniques you’d like me to cover in future videos, please leave a comment below, or email me (june@planetjune.com) with your suggestions!

If you’ve ever lost your place while crocheting in a spiral, or discovered that you must have made a mistake many rounds earlier, I highly recommend you use a stitch marker to mark the start of every round while you crochet your amigurumi! But how do you go about doing that? How does it help you avoid mistakes, and what do you do if you realise you’ve made one?

Or, if your pattern directs you to mark a specific stitch while you crochet, how exactly do you do that?

thumbnail image for the crochet video tutorial 'Using Stitch Markers in Amigurumi'

In my latest video, I’ll walk you through everything you need to know about using a stitch marker with amigurumi (or any other crochet worked in a continuous spiral), including:

  • How to mark the first stitch of the round
  • How to fix a mistake
  • How to mark a specific stitch

As always, the video is available in right-handed and left-handed versions.

This video is ideal for amigurumi beginners, but I recommend you watch it even if you’ve been making amigurumi for years – you may still pick up a tip or two!

Go to the Using Stitch Markers in Amigurumi video tutorial >>

Comments (2)

Reduce hand pain by releasing your trigger points

Hand and wrist pain is a common story for crocheters, knitters, and other crafters who spend a lot of time making repetitive motions with their hands.

If you visit the doctor, you may be told you have carpal tunnel syndrome, tendinitis, arthritis, an RSI (repetitive strain injury), and that may be the case… or it may not.

Before you consider serious medical treatments like steroid injections or surgery to help with your hand pain, I’d suggest you read my story below, and see if you can fix yourself without the need for drugs or surgical interventions.

Disclaimer: I’m not a medical professional, and if your doctor has diagnosed you with a condition, their recommended treatment may be the right solution for you. But I’d recommend you try this simple self-administered pressure treatment first – it can’t make things any worse, it’s fast and free, and it may relieve you of serious pain!

My Story

In 2007, I was mis-diagnosed with carpal tunnel syndrome.

The pain was debilitating. I could no longer perform everyday tasks without agonizing pain: turning a door handle; pushing open a door with my palm; using a computer mouse; operating a can opener…

I was referred to a specialist, given a fancy wrist brace to lock my wrist straight, and told that if that didn’t fix the problem, my only other options were steroid injections or carpal tunnel surgery.

I wore the wrist brace for months, and learned to mouse left-handed. The brace helped with the pain, but the problem didn’t go away.

Eventually, I found a cure that was ridiculously simple, I could perform on myself at no cost, and has completely fixed the problem.

None of the doctors I visited considered this as a possibility.

The cause of all my debilitating wrist pain was a knotted muscle near my elbow.

Myofascial Pain Syndrome, Trigger Points & Referred Pain

When you overuse a muscle, it can cause sensitive areas of tight fibres to form, creating a knot in the muscle. The point where the knot forms is called a trigger point, and pressing on it causes an achy pain.

Now, here’s the crazy part: the muscle knot at the trigger point can cause serious pain in a different part of your body. This is called referred pain.

So the pain you feel may be caused by a trigger point elsewhere. No matter how much you treat your hand or wrist, you won’t be able to fix the problem if the pain, like mine, is caused by a trigger point in your upper forearm!

Treat Yourself

Once you know where the trigger point is that’s causing your pain, you can ‘unlock’ it – and stop the referred pain – by releasing the muscle knot yourself.

I learnt this ischemic pressure technique by watching a video from Dr Jonathan Kuttner, an expert in chronic muscle and joint pain. He has a couple of quick videos that explain the process – I highly recommend you watch them:

The process is the same to ‘turn off’ any trigger point. The key is to start with low enough pressure on the trigger point so it doesn’t hurt, then to gradually increase the pressure, but never to the level where it hurts.

(From experience, I can tell you that, if you’re too forceful, you’ll end up feeling like you’ve bruised yourself, and you don’t do any good. Slow and gentle is the way to go.)

My Treatment

Coincidentally, the trigger point Jonathan demonstrates ‘turning off’ in his video is the same one that caused my carpal tunnel-like symptoms and wrist/hand pain, so I could follow the instructions in his video exactly.

I’ve never been able to feel the nodule of knotted muscle he describes, but I know I’m in the right place when I feel the tender spot on my arm.

Treating hand and wrist pain with trigger point pressure therapy on the upper forearm

In 2009, when my condition was agonising, I could press the trigger point in my arm and immediately feel the referred pain in the back of my hand and wrist! That’s what convinced me that this was a) a real phenomenon and b) the cause of my problems.

Here’s me from an email I sent in 2009 when I’d just cured myself of my supposed ‘carpal tunnel syndrome’:

The myofascial thing is amazing – my wrist was so painful I couldn’t put any pressure on it while it was at all bent, so I couldn’t even open a door or a jar without it being agonisingly painful. I got one of those wrist splint things and it helped me to avoid the pain but it didn’t get better. And then I was googling and found this AMAZING thing – basically it was a referred pain caused by a muscle knot just below my elbow. And by doing gentle acupressure [sic] with my finger on this point, I healed it! I know it sounds like rubbish, but it’s totally true – when I pushed this exact spot on my arm, I could feel the pain in my wrist, even though I wasn’t doing anything to my wrist. Total magic.

Since then, I’ve rarely had the pain escalate to the terrible point it was at. I always treat it as soon as I realise what’s happening, and the knot has never had a chance to form as badly as it was back then.

I’ve developed the same problem in the other arm too, and now I can always find the trigger point on each arm – I feel a tender ache when I press on them. I try to do the ischemic pressure treatment whenever I remember, to stop the knot from forming in the first place. This works really well for me!

Finding Other Trigger Points

There are trigger points all over the body, and you can consult a trigger point diagram (like this one) that shows the position of the trigger point (marked with an X) and the possible locations of referred pain for that point (shown as a cloud of red). You can use those to help diagnose if any of your unexplained chronic pains may be caused by trigger points, and try to deactivate them if so.

I’ve had several other problems with pain that have also turned out to be trigger point related:

  • I get pain at the base of my thumbs when I crochet (or use my phone) too much, and I’ve discovered that there are two trigger points in the thumb. Treating the lower trigger point at the base of the thumb seems to help me.
  • I also occasionally get terrible upper back pain. When I have it, I can never get comfortable and I can’t sleep for the pain. The back pain turned out to be caused by trigger points, and now when my upper back and shoulders are hurting, I can usually fix it by unlocking the trigger points in my levator scapulae or trapezius muscles. (Here’s Jonathan’s article Trigger Points for Neck Pain).

Give It a Go

I have no idea how many people with hand pains from crochet or other crafts may also actually be suffering from a simple trigger point caused by a knotted muscle in their forearm, but please do try some trigger point pressure therapy and report back here if it helps!

A couple of tips on what to expect:

  • If your pain is bad, I’ve found that it may take daily sessions over a week or two to completely turn off the trigger point, but you should be able to feel an improvement immediately.
  • Your trigger points will probably reactivate in time, but knowing where they are and how to treat them means you can fix yourself in future before the stage of agonising pain, limited function and sleepless nights.

I hope this works for you as well as it has for me.

Here’s to more crafting, with less pain! 🙂

Comments (9)

crochet for Canada Day

My patriotic Beaver just can’t wait until Canada Day (July 1st) to start his celebrations!

Beaver and Canadian Flag crochet patterns by PlanetJune

I’ve just updated my Maple Leaf Collection crochet pattern to also include instructions for making this small thread Canadian Flag too – it’s perfect for an amigurumi to hold.

If you’ve already bought the Maple Leaf Collection, log back into your PlanetJune account, go to your old order for the Maple Leaf Collection and re-download the Canadian Flag Background PDF – you’ll see a new page at the end with the updated details for the thread flag!

Canadiana crochet patterns

I have a small, but growing, collection of Canadian-themed patterns now – the adorable Beaver, and the Maple Leaf Collection (which includes the Canadian Flag background):

Beaver and Maple Leaf Collection (including Canadian Flag) crochet patterns by PlanetJune

Find all my Canadiana crochet patterns here!

Are there any other Canadian icons you’d like me to add to my Canadiana pattern collection? Let me know in the comments!

Comments (4)

Seahorse crochet pattern

I have a very special new design for you today – it’s a beautifully-shaped Seahorse crochet pattern:

seahorse crochet pattern by planetjune

Aren’t they sweet? I’m so pleased with how they turned out 🙂

Seahorse Fun Facts

  • Seahorses are a very unusual-looking type of fish.
  • They live in sheltered areas of warm seas across the world.
  • Seahorses swim upright, using their dorsal fin (at the back) to move them forwards and their pectoral fins (at either side of the head) for steering.
  • They are slow, weak swimmers, so they use their prehensile tails to grasp onto seaweed, coral, etc so they don’t drift away in the currents.
  • Unlike most animals, the male seahorse cares for the babies. The eggs are kept safely in a special brood pouch on his stomach until they are ready to emerge as fully-formed miniature seahorses!

About the Design

My seahorse design is realistically shaped and about 9″ (22.5cm) long when worked in worsted weight yarn.

It’s an elegant low-sew design, as the entire head, body and tail are crocheted as one piece. The only sewing is to attach the fins and coronet.

seahorse crochet pattern by planetjune

I made my samples in Lion Brand Vanna’s Choice worsted weight yarn in realistic seahorsey shades, but you have lots of scope for creativity in your yarn choice!

  • Multicoloured or variegated yarns would work well.
  • Glossy or sparkly yarns would add a magical touch.
  • Scale it down with finer yarn and a smaller hook for a cute miniature seahorse.
  • Make a giant cuddly seahorse using my Giant Amigurumi techniques!

About the Pattern

As always, the pattern includes full instructions and detailed step-by-step photographs for assembly and all special techniques used, so you can follow along and make a perfect seahorse.

I’ve also included stitch diagrams in addition to written instructions for all the fins and coronet, so you can use whichever instructions work best for your learning style.

You’ll love the way it magically comes together…

seahorse crochet pattern by planetjune

Buy Now & Launch Discount

Ready to get started? Pick up my Seahorse crochet pattern from my shop right now. Or, if you’re not ready to make it just yet, add it to your Ravelry queue or favourites so you don’t forget about it:

And for one week only, you can take an extra 50c off the price: add the Seahorse pattern to your shopping cart, and enter the discount code MAGIC at checkout! (Offer ends Thursday 6 June, 2019.)


I feel that there’s something almost magical about these special creatures – don’t you agree? And their beautiful elegant shape lends itself so well to a sculptural design like this.

seahorse crochet pattern by planetjune

I really hope you’ll enjoy my Seahorse pattern. Don’t forget to share photos with me when you’ve made one:

…I always love to hear from you, and to see what you’ve been making from my patterns. 🙂

Comments (3)

Crochet Investigation: Invisible Finish

The standard way to finish an open-ended piece in amigurumi is to join with a slip stitch (sl st) to the next stitch, to reduce the height jog of the spiral between the first and last stitches of the final round. It’s a quick and easy method, and is perfectly fine if you’ll be stitching the piece down to something else so the edge won’t show in the finished amigurumi.

That’s not always the case, though – sometimes the edge will be visible in the finished piece, and in this case the sl st finish isn’t the best choice – it leaves a little bump that’s impossible to hide completely.

When I decided to make a video tutorial to show the most invisible finish for an open edge in amigurumi, I realised that, while there’s a standard method for amigurumi worked in joined rounds (and this actually forms the basis of my Perfect Stripes Invisible Join), there’s no consensus for amigurumi worked in spirals…

And you know what that means: it’s time for another crochet investigation!

Method

All my candidates are based on the standard invisible finish for joined rounds, but I considered two ways that the method can be varied that may affect the look of the finished edge:

  1. Should there be a slip stitch before the join, or not? A slip stitch would reduce the height difference before the join, but might end up more visible than without.
  2. Should there be a duplicated stitch, or an additional stitch added? The additional stitch was my original preferred method from 2009 (there’s no need to maintain the stitch count if the edge won’t be worked back into, so the duplicate stitch isn’t necessary) but is that a good reason to keep doing it? (Of course not – not if there’s a better way…)

So that gives us four candidates for the experiment:

C: no slip stitch, join in next stitch
D: no slip stitch, duplicate stitch join
E: slip stitch, join in next stitch
F: slip stitch, duplicate stitch join

The photos below show the results of each test, together with:

A: the piece after the final stitch is worked, before any join (note the difference in height between the final stitch, below the hook, and the next stitch to its right)
B: slip stitch join (the yarn tail isn’t woven in here, but you can clearly see the knot just below the tail that can’t be completely hidden)

candidates for the most invisible finish around an open edge in amigurumi, by PlanetJune

Results

I compared the 4 samples and noted my observations (don’t worry if you can’t see all these in the photos above; they are much more apparent when viewed from multiple angles):

C: height jog very visible; stitch count not maintained
D: height jog minimised; skipped stitch visible from front; stitch count is maintained
E: height jog minimised; sl st visible from front; stitch count not maintained
F: height jog minimised; sl st and skipped stitch visible from front; stitch count is maintained

C is an immediate fail: you can clearly see that it does the worst job of blending the height difference between the start and end of the final round.

F is the next to go: there’s an extra bar visible beneath the V from either a slipped stitch or a skipped stitch, and F has both while D and E only have one each, so it’s the worst in terms of invisibility, with extra bars visible beneath two stitches.

That leaves D and E. They’re both pretty good in terms of invisibility, but I’m going to award the prize to D: the fact that it maintains the stitch count around the edge makes it the most versatile; you can use it for an open-ended piece or one that will be stitched to something else with no problems, so this means you’ll have one fewer technique to remember!

Refining the Technique

While working on the test, I also noted that the downside of any of these methods is that you have to pull the duplicate stitch very carefully to the right size to make it look truly invisible, which makes it more difficult to then weave in the yarn tail without disturbing the size. So, I came up with a tiny refinement that makes it much easier to control the size of the duplicate stitch and keep it held in place once you’ve adjusted it to the right size.

Intrigued? Good! I’ll explain all in my new Invisible Finish video tutorial 😉

Invisible Finish for Open Edges in Amigurumi - a crochet tutorial by PlanetJune

Continue to the Invisible Finish for Open Edges in Amigurumi video tutorial >>

Comments (2)

  • Quick Links: Crochet

    navigation: arrow

    buy crochet patterns and accessories from my online store

    'Everyday Crochet' and 'The Essential Guide to Amigurumi' crochet books by June Gilbank

    Crochet video tutorials and step-by-step photo tutorials

    Free PlanetJune crochet patterns

    Frequently Asked Questions

    Quick Links: Crafts

    navigation: arrow

    Punchneedle Embroidery information, ebook & patterns

    Papercraft ebook & tutorials

    Free PlanetJune craft projects & tutorials

  • Blog Post Categories

  • Blog Archives

  • CAL Galleries

    Ravellenic Games: Team PlanetJune
    PlanetJune Reindeer Games
    PlanetJune Temperature Snake CAL

  • Welcome to PlanetJune!

    June Gilbank

    Hi, I'm June. Welcome to my world of nature-inspired crochet and crafting. I hope you enjoy your visit!

    If you'd like to get in touch, you can contact me here.
    crocheted Canadian flag by PlanetJune
  • June’s Crochet Books

    A fanned-out pile of the books Everyday Crochet and The Essential Guide to Amigurumi, with text 'The answers to all your crochet questions at your fingertips - find out more'
  • Support PlanetJune!

    Want to say thanks? You can send me money in seconds at paypal.me/planetjune (over $20) or paypal.me/planetjune2 (under $20) or send me a donation through my shop.

    Or simply click through from my links before you shop at Amazon, Etsy, KnitPicks, LoveCrafts and more, and I'll make a small commission on your purchase, at no cost to you! Start here:

    ♥ Support PlanetJune ♥

    Tip: This link is also in the footer of every page!

    Thank you so much for your support!