Tortoise crochet patterns
*Cue the fanfare*
Please allow me to present… the PlanetJune tortoises!
I’m so excited to be able to share my tortoises with you today! I have so much to tell you about them, though, I don’t know where to start…
I’ll limit myself to the relevant pattern details today, and do a follow-up post later to share the long history of this design and my inspiration, and why my tortoise has been the most challenging (and eventually satisfying) pattern I’ve ever written!
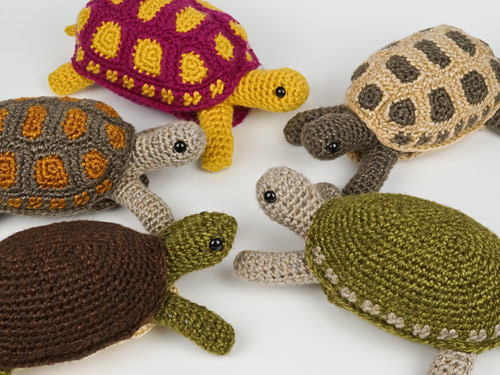
Okay, so what you’re looking at above is actually two patterns:
- Top row: Tortoise – the main crochet pattern
- Bottom row: Simple-Shell Tortoise, Turtle & Terrapin – the expansion pack
What is an Expansion Pack?
- An Expansion Pack is an add-on to an existing PlanetJune pattern.
- The Expansion Pack lets you modify or add to the original pattern to create something else.
- You cannot use the Expansion Pack alone – you must also purchase the original pattern in order to be able to complete the pictured items in the Expansion Pack pattern.
Between the two patterns you can mix-and-match to customize your own perfect tortoises (and freshwater turtles and terrapins). Let’s look at them in more detail:
About the Designs
Both the patterns make amazingly realistically-shaped life-sized tortoises. They are about 8.5″ (21.5cm) long from nose to tail. Of course tortoises start life much smaller than this, and just keep growing and growing throughout their very long lives, but I settled on this size as it looks and feels just like a real pet tortoise!

These are an ingenious low-sew design – the only sewing you have to do in the entire project is stitching the back legs to the body (and those joins will be hidden by the shell, so you don’t even need to do tidy stitching to get a perfect result).

All the tortoises have separate upper and lower shells which are stretched over a fully-enclosed smooth stuffed amigurumi body. This gives a perfect finish with no worries about stuffing leaking through anywhere, and a satisfyingly solid result.

And they are just so realistic! Once you’ve crocheted the shells together over the body, your tortoise’s head and legs will look like they’ve just popped out of his shell so he can go for a walk or find some lettuce to munch. 🙂
Tortoise Crochet Pattern
The main tortoise crochet pattern has a realistic patterned upper shell made of 13 shaped segments that are crocheted together into a 3D shape that perfectly matches the shape of the body beneath.
Don’t be intimidated, though: you’ll be working in a join-as-you-go method: crocheting one piece, then crocheting it together with the previous piece(s) to build up the shell, so you never have more than 2 pieces to confuse you. Every step is clearly set out with explanatory annotated photos so you can match what you’re doing to what you see in the photos.

The lower shell is also realistically shaped and crocheted in one piece so it’s fast and easy to complete.

As there’s such a lot to this pattern, with 18 pages and over 70 step-by-step photos (with over half of those being for the upper shell!), I’ve released it as separate right-handed and left-handed editions, so you can choose your version before you checkout, and the photos will all correspond to exactly what you’ll be seeing at every stage. I’ve only done this with ebooks until now, but this pattern is special in more ways than one!
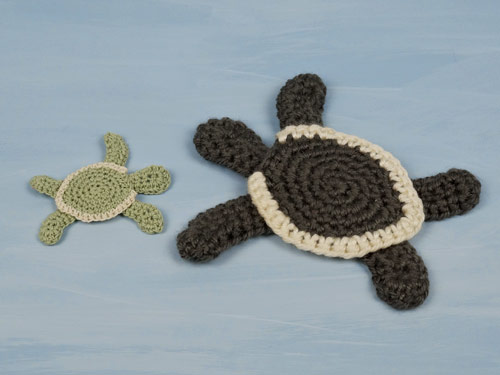
Simple Shell Tortoise, Turtle and Terrapin Expansion Pack
This Expansion Pack includes all the modifications required to crochet a Tortoise much more quickly, with a simple but well-shaped one-piece top shell with or without a contrast trim. This is a simpler and more beginner-friendly option, but still has that realistic tortoise shape throughout!

This Expansion Pack also includes modifications to turn the Tortoise into a (freshwater) Turtle or Terrapin with a pointier nose and pale-coloured lower shell. All these modifications are mix-and-match, so you can make Tortoises, Turtles and Terrapins with the geometric or simple shell style, with either head shape, with or without the contrast trim on the top shell and with a pale- or self-coloured lower shell.
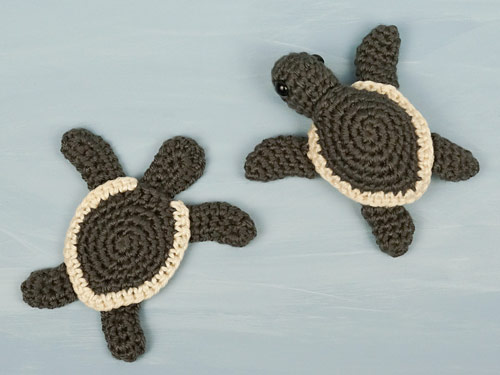
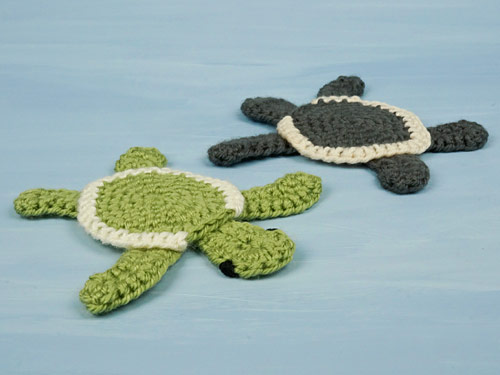
Here are some examples, so you can see the different options in the Expansion Pack:

Left: Pointed (turtle/terrapin) nose; single colour upper shell; contrast colour lower shell
Right: Rounded (tortoise) nose; upper shell with contrast-coloured trim; matching colour lower shell
Colour Choices
For any of the tortoises, you can stick with muted ‘natural’ colours to match the shades of a real tortoise, or get as creative as you want! A brightly-coloured tortoise (like my magenta-and-mustard example) looks vibrant and cute, and would make a lovely decoration for a baby’s room, or a perfect toy for any child. There are no wrong choices when it comes to amigurumi tortoise colours. 🙂

Buy Now & Launch Discount
Don’t you need these tortoises in your life right now?! If so, pick up the patterns with these links:
- Just the standard Tortoise pattern
- Tortoise and Simple-Shell Tortoise, Turtle & Terrapin expansion pack
- Just the Simple-Shell expansion pack (but remember, you can’t use it without the Tortoise pattern!)
Or, if you’re not ready to make them just yet, add them to your Ravelry queue or favourites so you don’t forget about them:
Tortoise: 
Simple-Shell Tortoise etc Expansion Pack: 
And for one week only, you can take an extra 50c off the price: add the Tortoise or Tortoise + Expansion Pack pattern(s) to your shopping cart, and enter the discount code LETTUCE at checkout! (Offer ends Thursday October 29, 2020.)
I hope you love my tortoises as much as I do!
Don’t forget to tag me (I’m @planetjune everywhere) when you’ve made yours 🙂