After my review of diamond painting, I decided to jump in and buy some kits! I ordered my favourite Diamond Dotz kit – the Graceful Swimmer sea turtle – and I also picked up a cheap but pretty kit from amazon of a purple-tinted landscape so I could compare the quality of the two.
Quality
I’d expect the quality of an expensive kit to be higher than a cheap kit, but what are the actual differences, and do they affect the appearance of the end product and/or how enjoyable the kit is to make? Let’s take a look…
Price: I paid $49 (Canadian dollars) + tax for my Diamond Dotz kit, and only $8 + tax for my amazon cheapy! Although the branded kit is much larger than my cheap one, the smaller Diamond Dotz kits don’t cost much less ($40ish) so there’s still a massive difference in price between them and the unbranded kits.
Packaging: The Diamond Dotz canvas was rolled neatly in a protective box, so it had no creases. The cheap canvas was folded flat around the diamond packets, so the canvas was very creased and it wouldn’t lie flat when I first opened it (although it did flatten out when the diamonds were added).
Canvas: The canvas backing is definitely nicer on the expensive kit, but I’m not sure that matters at all – you won’t see the fabric once the piece is finished and it’s been framed or mounted.
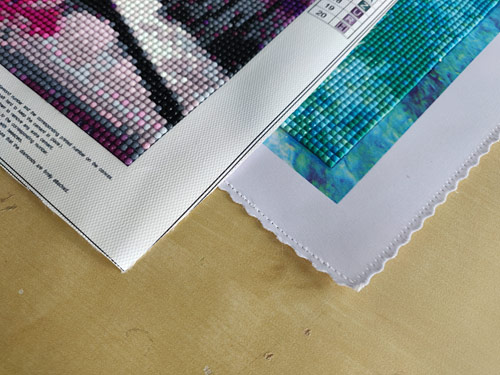
The cheap kit (left) has a rougher canvas backing that’s not finished as nicely as the more expensive kit (right).
Tools: Although the tools provided with both kits are similar, the Diamond Dotz tool has a comfort foam grip, the tray has a spout to pour unused diamonds neatly back into their bag without spillage, and the pink wax comes in a little plastic jar.
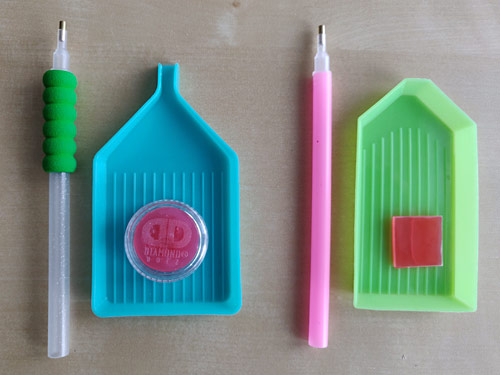
I prefer the Diamond Dotz toolkit (left) because of the foam grip on the tool and the spout on the tray.
Diamonds: My Diamond Dotz kit has square diamonds, and the unbranded kit has round ones (more on that later…). Both kits included far more diamonds than needed to complete the picture. This is intentional, as some of the plastic diamonds will always be flawed, so you can just discard any that would detract from your finished picture without worrying that you’ll run out.

Misshapes, holes, extra material, blobs – you can expect to find a few of these in every kit
Interestingly, I actually found far more flawed diamonds in the expensive kit than in the cheap kit! In both cases, though, there were so many spares that I had dozens of every colour left at the end, despite being very picky and discarding any with the slightest imperfection, so the flaws weren’t a problem in either case.
Adhesion: With my cheap kit, a small section of the adhesive surface stuck to the plastic cover sheet along one of the creases where the canvas had been folded to ship. When I pulled back the cover sheet, the adhesive came away with it, so there was no glue to stick the diamonds to in that area. Apart from that one area, the adhesive surface worked well.
Oh no! The diamonds just won’t stick in this patch where the letters are visible!
Even though my expensive kit was many times larger, I had no problems at all with adhesion – every diamond stuck down perfectly.
Diamond Shape
While the diamond shape happens to be a difference between my kits, it’s just something to be aware of. Neither round nor square diamonds is necessarily a better or higher quality choice.
- Square diamonds fill the entire picture without any spaces, so they give an extra-shiny and neat finish. It’s satisfying to line them all up perfectly and the result is stunning, but it is a bit slow and fiddly to place each one exactly straight.

- Round diamonds are very fast to place, as you don’t need to orient them. A little of the backing canvas shows through between the circles, but it’s so much faster and easier to do, it makes for a joyful project!
I’d definitely recommend choosing a kit with round diamonds if:
- you’re buying a kit for a child to use
- you have less dexterity in your hands or any vision problems
- you want a very relaxing project
But if you like a little more of a challenge, the square diamonds give a brilliant result.
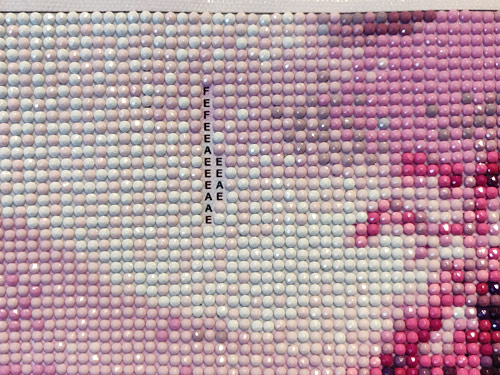
I did have one small issue with the round diamonds on my cheap kit: some of the letter symbols were so large that there was no way to cover the entire symbol with the diamond. You can only see it if you look closely:
Can you see the tiny dots of black below the diamonds in the middle of this photo?
It’s very minor, but it frustrates me, as this would have been easy to avoid (don’t use the largest letters M and W as symbols, or use a slightly smaller font when printing the design). Although this wouldn’t happen with square diamonds as there are no spaces between the diamonds for the backing to show through, this is a flaw in this specific kit design, not a problem with using round diamonds in general, so don’t let this put you off round diamonds!
Misleading Imagery
Here’s where things could go wrong if you buy a cheap kit – I recommend you check that the images you see online include a shot of the finished diamond painting or the chart you’ll receive, not just the original artwork the design is based on.
Branded kits like my Diamond Dotz turtle show a picture of the finished product on the box, so you know exactly what you can expect from the kit you’ll be making.
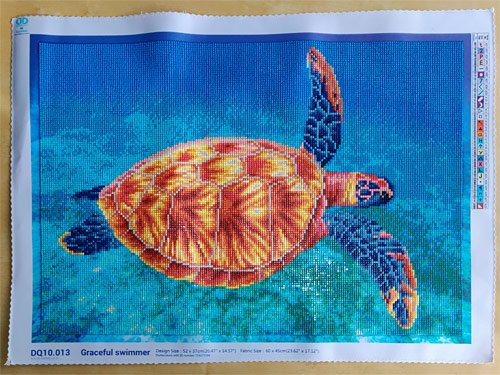
My finished project is lovely! And it looks exactly as I expected it would from the box art.
The cheap Chinese kits you can find on Amazon (for example) often only show the original artwork the kit was based on in their listing photos, and the image you’ll be forming will look very blocky and pixelated in comparison. There’s nothing wrong with buying one of these kits, provided you realise what you’re getting. For example, here’s an amazon listing photo (left) and what they left out of the listing: a photo of the completed kit (right):

I won’t leave you a link to this kit, as I’m not trying to call out this one in particular; this is just one of many misleading examples. You can see how, if you’re buying a kit based on the photo on the left, you may be surprised or disappointed if your artwork ends up looking like the image on the right – they are definitely not the same…
The listings also usually show a digital mockups of ‘the finished kit on a wall’ – not only is the image completely different from the kit you’re buying, but the size is misleading too! For example, here’s a ‘photo’ of my cheap kit:

Let’s compare that with my completed kit:
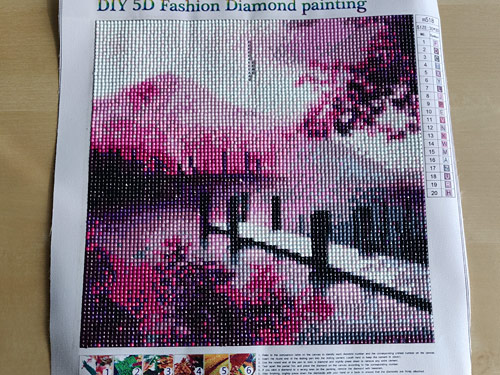
It’s less than 10″ (25cm) square, but the listing image above makes it look twice that size, far more detailed than it is, and pure purple instead of mostly pink!
In general, more abstract and less detailed source images work better for any pixel art, like cross stitch, perler beads, etc. The detail is limited to the size of your pixels (diamonds in this case) – you can’t create a fine line when your ‘paintbrush’ is the width of a diamond! A larger canvas allows for more pixels and therefore more detail.
I’d never consider buying a kit without seeing at least a digitally-rendered example of how the finished product is actually supposed to look. So I recommend, if you’re buying a cheap kit from amazon or similar, you check the reviews for those that include images and see if someone has posted a photo of their finished project. That way, you’ll know in advance whether you’ll like the result, and you won’t be disappointed.
Verdict
I’m happy with both my kits, for different reasons. The square diamonds with the large canvas took a long time and made a beautiful picture, and the round diamonds with the small canvas made for a satisfyingly quick, relaxing project.
With the branded kit, I knew exactly what I was getting and what the finished product would look like, and I imagine the image was carefully selected and customized by hand to be ideal for a diamond painting.
With the cheap kit, I suspect an automated process generated the chart from a pretty picture with little manual input, but if you choose your kit carefully, you can still end up with a lovely result at a fraction of the cost of a branded kit. (I actually prefer the pinky shades in my kit to the purple digital mockup, so I’m not at all disappointed.)
I do have one other recommendation if you’re using budget-friendly kits: I really loved the foam grip and the tray with a spout in my Diamond Dotz kit, so I’d recommend you upgrade your tools! For example, you can buy a Diamond Dotz Accessory Kit (amazon link) including 2 tools, 2 foam grips, 2 trays with spouts and 2 spare wax blocks for only a few dollars. I always recommend investing in good tools, and here’s no exception. You can reuse the same tool and tray while you make as many cheap kits as you want!

It definitely wasn’t cheap, but I think my beautiful sea turtle kit was worth the cost – the square gems are so even and sparkly, and I love the picture!
Next up in my diamond painting adventure…
- Figuring out how to frame my sea turtle art so I can enjoy it! I’ve bought some wood and I’m going to attempt to mount it like a stretched canvas (although I’m not sure exactly how yet). More on that in my next diamond painting update!
- I also need to fix that annoying bare spot in my pink landscape diamond painting. I’ve done some research and it sounds like the solution to this is to buy ‘repositionable tacky glue’ to re-tack the surface – I’ll report back on how that worked out next time, too…