sizing up (and down)
I’ve had a couple of requests lately from people who like my patterns, but want to make a larger version. So, the question is, is it easily possible to ‘size up’ amigurumi designs?
There are a few of ways I can think of to adjust a pattern, so here are my thoughts on this…
METHOD 1: Double everything. By this I mean, every time the pattern calls for 1 stitch, you make 2 (so e.g. if Rnd 1 is 6 sc, you will do 12 sc) AND double the number of Rnds (so you would repeat your new Rnd 1 with a second Rnd of 12 sc). Note: this is not my recommended method! It would be hard to keep track of your rounds and stitch counts, when you are turning each stitch into four stitches.
If you do want to attempt it, it should work fairly well, as sc is a square stitch (same height and width) so by doubling the length and width you are essentially making each stitch into a 2×2 square of stitches, but it’s not perfect – if I was designing a double sized animal I would even up the rounds – e.g. this method will give you stitch counts like this at the end of the rounds: 12 st, 12 st, 24 st, 24 st, 36 st, 36 st… If I was designing it I would even it up to something like 6 st, 12 st, 18 st, 24 st, 30 st, 36 st so the increases are made evenly and not stepped every 2 rounds.
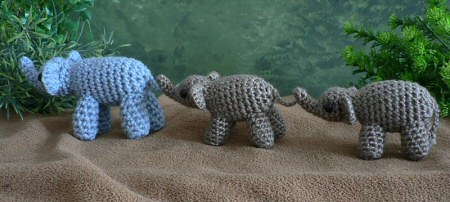
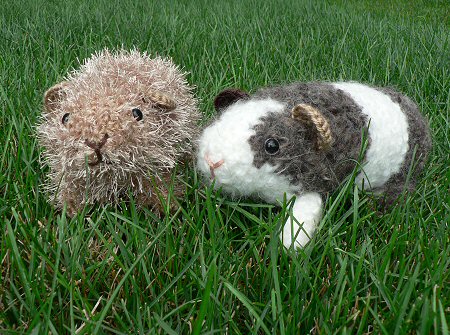
METHOD 2: Use thicker yarn and a larger hook. If you compare the blue and grey elephants below, the greys are made with worsted weight yarn and an E hook and the blue is made with bulky weight yarn and a G7 hook. You can see this has made the blue elephant quite a bit larger.
METHOD 3: Double your yarn (use 2 strands held together) and use a larger hook. You can see the effect of this here:
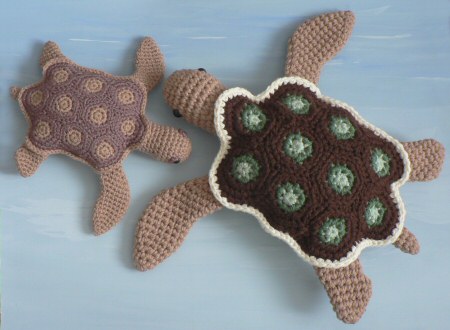
The two turtles use the same pattern, but one uses doubled yarn and a correspondingly larger hook (L instead of G7). The result is a turtle that’s about 1.5 times the size.
Now you could combine methods 2 and 3 to make an ami that’s about double the size of the original, by using 2 strands of a bulkier weight yarn (than the pattern calls for) held together, and a much larger hook. This would be much quicker to make and easier to calculate than method 1, as you would follow the pattern stitches exactly as written.
The downside of using methods 2+3 is that, because each stitch is much larger, the space between the stitches is more noticeable because it’s correspondingly larger. The stitches are also more chunky, so it doesn’t give as smooth a finish as using the finer yarn and smaller hook.
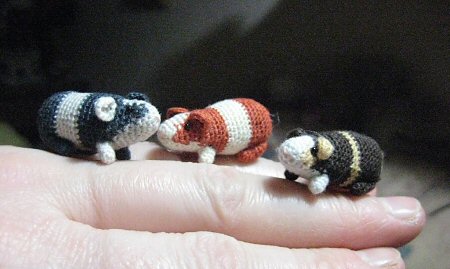
You could also apply Method 2 in reverse to size down a pattern, by using a finer yarn than the pattern calls for, and a correspondingly smaller hook. You can go right down to crochet thread and a steel hook, as shown by bettika67, who turned my life sized guinea pigs:
into the most adorable 1-inch piggies, just by using very fine thread and a tiny hook:
So there you go, 3 ways you could increase the size of a pattern, plus one easy method for reducing the size. This advice isn’t limited to amigurumi (although Method 1 is limited to patterns worked in single crochet). For example, you could turn a pattern for something like a baby hat into a child-sized or even adult-sized hat, or reduce a full-size pattern down to child-sized, by using some of these methods. Hopefully this will give some of you more confidence to attempt some resizing of your own!