happy christmas!

For my last design in 2008, I wanted one more small dog to complete my ‘mini’ set; a breed with a distinctive look to complete my trio…

The Miniature Pinscher is adorably also known as the ‘Min Pin’ – how cute is that?! My Min Pin is just over 6″ long and worked in worsted weight yarn and an E (3.5mm) hook. You could also make a one-colour Min Pin by just omitting the colour changes.
And here’s the complete AmiDogs Set 4 (Chihuahua, Miniature Pinscher, and Pug):

The Set 4 patterns are available individually for $4.50 each, or $11.25 for the set of 3 – all available from the store right now!
I just realised that, quite by accident, I seem to have developed a Christmas crafting tradition of making poinsettias.
In 2006, I made a kanzashi poinsettia:

In 2007, I designed the famous crocheted poinsettia:

Who am I to break with tradition, even if it’s one I invented myself? So allow me to present the 2008 PlanetJune Poinsettia. This year I’ve gone for a polymer clay (FIMO) variety! It’s just over 2″ (5cm) in diameter, and would make a lovely pin or fridge magnet, or just a pretty decoration.
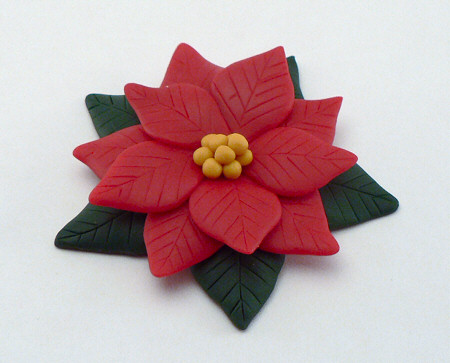
If you’d like to try making one, I’ve put together a tutorial for you so you can give it a go. The good news is that it’s much easier than it looks! There’s no precision involved; in fact, the leaves actually look better if they aren’t all exactly the same size and shape. As the instructions are quite long (I’ve included lots of pictures to make it easy to follow), I’ve given the tutorial a page of its own: Polymer Clay Poinsettia Tutorial.
This is my first polymer clay tutorial, so I hope it’ll all be clear. Please leave me a comment if you like it! And would you like to see more PC tutorials in future? Let me know in the comments!
I’ve had a couple of requests lately from people who like my patterns, but want to make a larger version. So, the question is, is it easily possible to ‘size up’ amigurumi designs?
There are a few of ways I can think of to adjust a pattern, so here are my thoughts on this…
METHOD 1: Double everything. By this I mean, every time the pattern calls for 1 stitch, you make 2 (so e.g. if Rnd 1 is 6 sc, you will do 12 sc) AND double the number of Rnds (so you would repeat your new Rnd 1 with a second Rnd of 12 sc). Note: this is not my recommended method! It would be hard to keep track of your rounds and stitch counts, when you are turning each stitch into four stitches.
If you do want to attempt it, it should work fairly well, as sc is a square stitch (same height and width) so by doubling the length and width you are essentially making each stitch into a 2×2 square of stitches, but it’s not perfect – if I was designing a double sized animal I would even up the rounds – e.g. this method will give you stitch counts like this at the end of the rounds: 12 st, 12 st, 24 st, 24 st, 36 st, 36 st… If I was designing it I would even it up to something like 6 st, 12 st, 18 st, 24 st, 30 st, 36 st so the increases are made evenly and not stepped every 2 rounds.
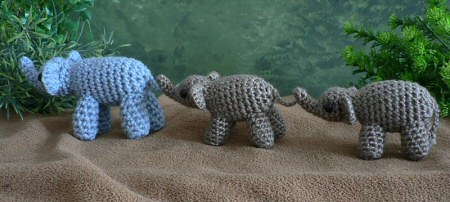
METHOD 2: Use thicker yarn and a larger hook. If you compare the blue and grey elephants below, the greys are made with worsted weight yarn and an E hook and the blue is made with bulky weight yarn and a G7 hook. You can see this has made the blue elephant quite a bit larger.
METHOD 3: Double your yarn (use 2 strands held together) and use a larger hook. You can see the effect of this here:
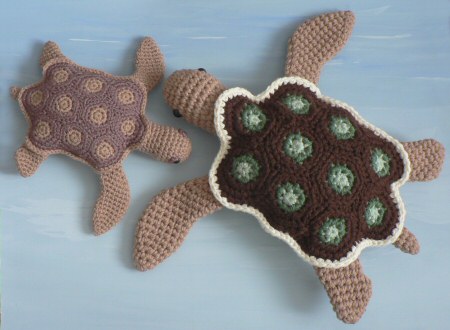
The two turtles use the same pattern, but one uses doubled yarn and a correspondingly larger hook (L instead of G7). The result is a turtle that’s about 1.5 times the size.
Now you could combine methods 2 and 3 to make an ami that’s about double the size of the original, by using 2 strands of a bulkier weight yarn (than the pattern calls for) held together, and a much larger hook. This would be much quicker to make and easier to calculate than method 1, as you would follow the pattern stitches exactly as written.
The downside of using methods 2+3 is that, because each stitch is much larger, the space between the stitches is more noticeable because it’s correspondingly larger. The stitches are also more chunky, so it doesn’t give as smooth a finish as using the finer yarn and smaller hook.
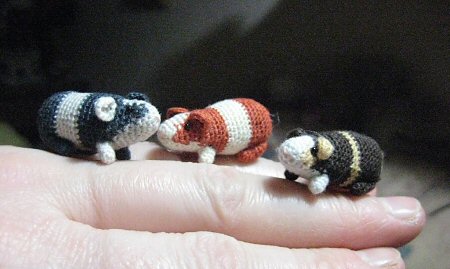
You could also apply Method 2 in reverse to size down a pattern, by using a finer yarn than the pattern calls for, and a correspondingly smaller hook. You can go right down to crochet thread and a steel hook, as shown by bettika67, who turned my life sized guinea pigs:
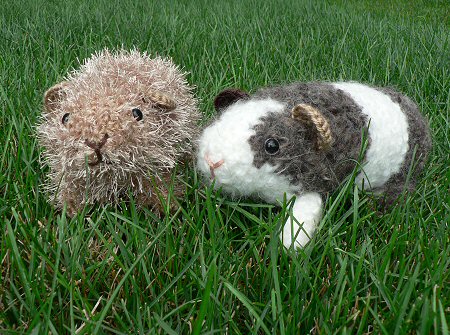
into the most adorable 1-inch piggies, just by using very fine thread and a tiny hook:
So there you go, 3 ways you could increase the size of a pattern, plus one easy method for reducing the size. This advice isn’t limited to amigurumi (although Method 1 is limited to patterns worked in single crochet). For example, you could turn a pattern for something like a baby hat into a child-sized or even adult-sized hat, or reduce a full-size pattern down to child-sized, by using some of these methods. Hopefully this will give some of you more confidence to attempt some resizing of your own!
Sorry for the blog silence; Dave and I have just got back from our vacation in Hawaii! It was long overdue, and it was wonderful. It was a bit of a shock when we got back home though; going from this:

to this:

Winter really hit while we were away. And our snowblower is refusing to start up… 🙁
Nothing much craft-related to report; I crocheted half a sock on the flights to Hawaii, but was too exhausted on the way back to finish it. We didn’t really do much shopping there either, but I did manage to pick up some locally-crafted jewellery from a Farmers’ Market, some fabric and a book on how to make crocheted leis.

Those polymer clay flowers are just begging me to try to replicate them!
Really, we went to see the local nature and wildlife, and we saw plenty of that – stunning scenery, beautiful exotic plants and all sorts of interesting birds and animals. I won’t go into long-winded details here, but my holiday journal and photos of all the amazing things we saw will all be online if you’d like to live it vicariously through me. I’m still working on the write-ups for the last couple of days – check back there soon if you want to see the rest of the trip…


Now I’m refreshed and inspired and now I can’t wait to get back into making stuff, once I’ve finished sorting through the rest of the holiday pics. We had a wonderful time, but it’s good to be back home. Aloha!
My little chihuahua has made a new friend!

I’ve been getting requests for a pug pattern for months, so I thought it was about time I did something about that. Sorry, people who have requested other breeds – I’m still working down my list! I let my ideas percolate in the back of my mind for a while, and then when I can see the design clearly in my head, I start to make it. I definitely have a few more AmiDogs in mind for the coming months, so don’t worry if I haven’t got around to your breed yet.
Anyway, back to the Pug:

Aww, isn’t he a cute little puppy? I hope you think so too.

The pattern comes with fully-illustrated instructions to make the fawn and black pug, and a slightly simplified design (it’s a bit easier to make with no colour changes) to make an all-black version.
If you’d like to make the little pup, the Pug pattern is available right now in the PlanetJune shop! And if you haven’t picked up the Chihuahua pattern yet either, there’s no time like the present…
Here’s a seasonal twist on my origami lucky wishing stars tutorial! Make a pile of stars using strips cut from festive coloured papers (try using offcuts of Christmas gift wrap, or recycle pages from holiday magazines), then string the stars into a garland to decorate your tree.
To make the garland pictured above, I used gold scrapbook paper to make the stars, nylon bead thread to string them onto, and seed beads as spacers. Total cost: under 50c per metre of garland – and it would be even cheaper if you used recycled paper for the stars!
Can you believe it’s almost December already? I’m sure time is moving more quickly this year, don’t you think? The snow has arrived already here in Ontario, so it seems like a good time to start thinking about Christmas preparations.
To get you in the mood, I’ve designed a crocheted candy cane tree decoration. This crochet pattern is so fast and simple, it’ll take no time to whip up enough to decorate your Christmas tree!

It’s beginning to look a lot like Christmas…

If you’d like to find out how to crochet some candy canes (and I promise they are sooo simple you won’t believe it!) click through to the free pattern 🙂
![]()


![]()


![]()
![]()
![]()


