Joining Amigurumi
Looking for my amazing Amigurumi Seamless Join? If not, read on for basic amigurumi joining instructions:
When making amigurumi, you will often need to join an open-ended crocheted piece (e.g. the top of a leg or tail or a muzzle) to a closed crocheted piece (e.g. the body or head). Sewing these together neatly can be tricky and can make the difference between a cohesive finish and an untidy messy join. In this tutorial I will demonstrate the method I developed for sewing pieces together neatly, with an almost invisible join.
Both pieces are usually the same colour, but, for the purpose of this tutorial, I will be joining an open-ended brown piece (right) to a closed grey piece (left):
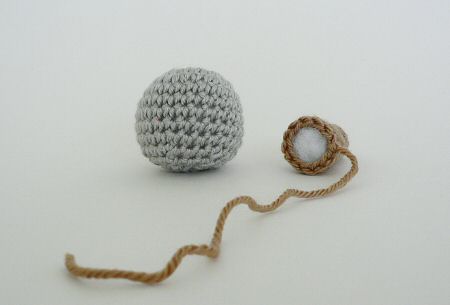
You will usually have a long yarn end left over from the open-ended piece to sew the two pieces together. For further clarity in the tutorial, I have substituted the brown yarn end (above) with pink yarn. Thread a yarn needle with the yarn end:
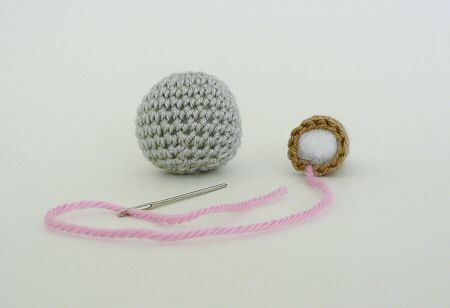
Hold the two pieces together in their final position, with the yarn end towards you. Note: I’m left-handed, so my stitches go from left to right and I hold my work with the open-ended piece on the right. If you’re right-handed, you will probably find it easier to mentally ‘flip’ all my images (left to right).
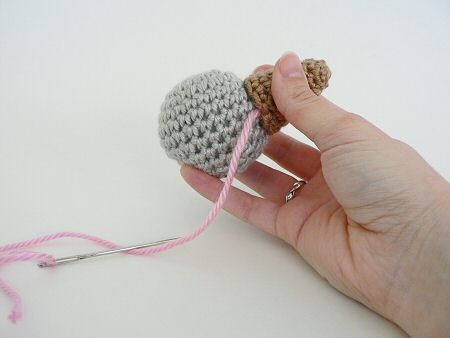
Begin the first stitch into the main piece, just outside the place where the two pieces touch:
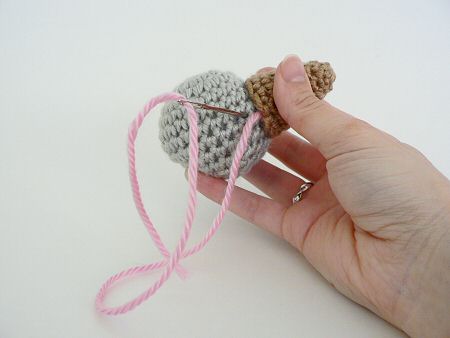
Bring the needle back out of the main piece where it will be covered by the second piece, then through both loops of the next stitch of the open-ended piece (going from inside to outside):
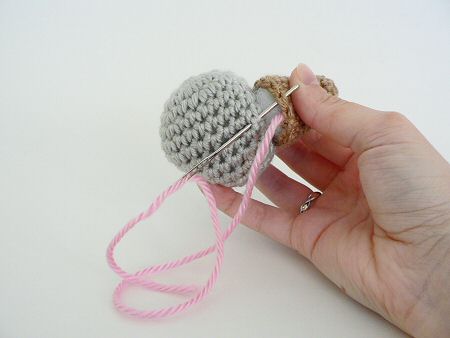
Draw the yarn all the way through so there is no slack, but do not pull it overly tight. Your first stitch is complete. If you are using the same colour yarn for both pieces and the sewing, the stitch will blend into the crocheted stitches and will not be obvious, unlike in this picture:
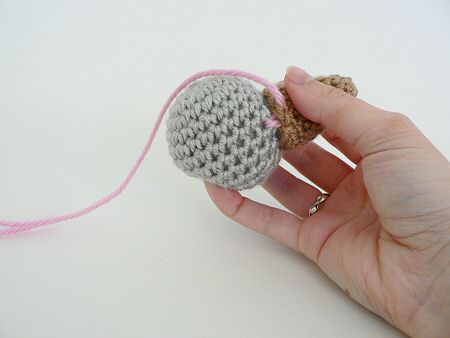
Repeat the same process with the next stitch: insert the needle into the main piece just outside where the two pieces meet, coming up further inside, then through both loops of the next stitch of the open-ended piece, going from inside to outside:
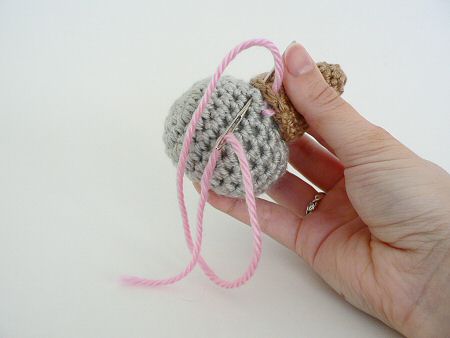
Repeat for each stitch around the open-ended piece. When you get the hang of it, you can do the complete stitch in one move:
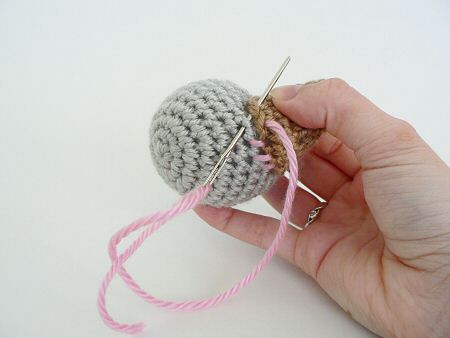
Here’s a close-up of exactly where the stitch should be made:
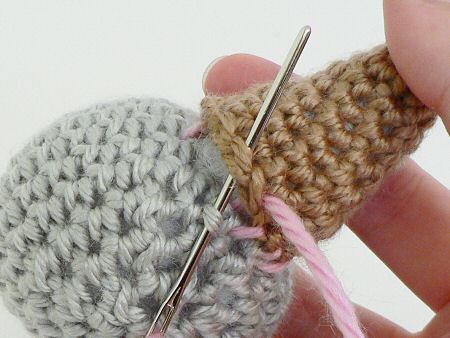
And here is the finished result – a nice, smooth join:
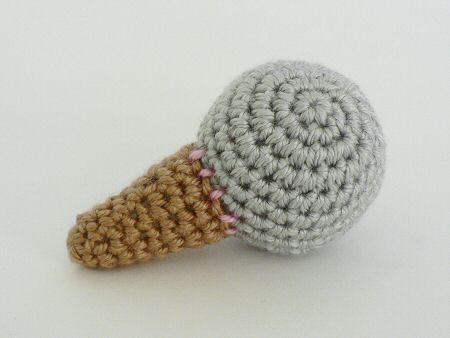
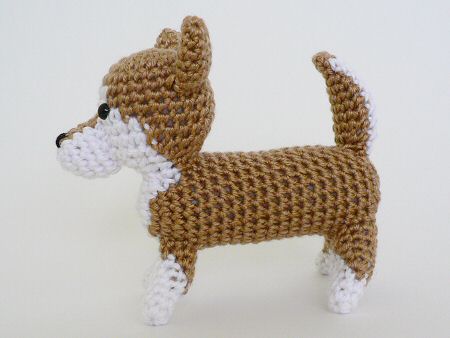
Look at the size of the stitches – to make the best join, the stitches should be visible like this, but of course they will not show up like this in your real work where you use one colour instead of three! Here’s an example of my technique in action:
I hope you find this tutorial useful! Happy amigurumi making…
Loved this tutorial? I have so many more amigurumi tips and tricks to share with you!
Boost your amigurumi skills with my latest book, The Essential Guide to Amigurumi, your comprehensive guide to amigurumi techniques and tips.
Do you find my tutorials helpful? If so, please consider making a contribution towards my time so I can continue to create clear and concise tutorials for you:
Thank you so much for your support! Now click below for loads more crochet video and photo tutorials (and do let me know what else you’d like me to cover in future tutorials…)


Lauree K said
Hi, I am making my first stuffed Labrador puppy and wonder how to sew up the head. This is my first project beyond blankets and scarves so am new to the sewing part of it. Thanks.
June said
Lauree, is this my AmiDogs Labrador pattern? If so, you can use exactly the technique I describe on this page, or, for an even cleaner result, my Amigurumi Seamless Join. If it’s not my pattern, the same advice may apply, but if it doesn’t, please contact the pattern designer for further asssistance 🙂
Patricia Taplin said
Hi June. Thank you for the above tips for joining parts on crochet amigurami, the one I have most difficulty with is joining the head to the body, natter how I line up the head with the centre of the tummy it always ends up with the head going a little to the left. Have you any useful tips for this . Regards Patricia.
June said
Hi Patricia, well, first of all, the good news is you don’t need to be too precise when attaching the head – unlike legs, which need to be straight so the animal can balance, the head can be tipped a little up or down and/or or to one side, and it just adds personality!
But if you do want to get it straight and are having trouble, you can pin it into place first, using 4 or 5 dressmaker’s pins around the base of the head and going into the body (just be careful not to stab yourself with the sharp ends as you sew!). Or you can just do what I do, and hold it in place, but stop every 2 or 3 stitches to make sure it hasn’t shifted, and undo the last couple of stitches if necessary, or just correct the angle as you continue. It does get easier with practice, but even I still have to redo a few stitches here and there to get the placement exactly how I want it!
(And one other thing: if the base of the head has multiple colours, I like to make one stitch with each yarn end first to make sure I keep all the colours aligned with the same colours on the body, and then go back and stitch around the rest of the head.)
shannel said
I love your tutorials. I’m so excited to do it right.
Thank you so much
Shanna said
So when joining pieces I understand how to do that. there are some projects that want you to crochet the pieces together and in a round and they say to pick up stitches. I’m pretty sure I know how to do that but how do you make it to where the piece won’t look funky?
June said
I’m afraid I can’t help with questions regarding other people’s patterns, Shanna. If it’s a technique used in a PlanetJune pattern, please let me know which you’re talking about and I’d be happy to offer any clarification you need!
mary said
Thanks so much for sharing! I was struggling with getting my amigurumi seams to look neat, and this really helped me alot! ????
Rita Silveira said
Thanks for sharing,Ifinished joining an amigurumi it’s come well.God Bless You.
Debbie Soileau said
Thank you for this information. I have been crocheting for 45 years and have never crocheted a stuffed toy, so I am a little nervous making my first one. I am a very visual person and this tutorial for joining is so helpful! Looking forward to seeing more from you in the future. Thanks again!
Ashley said
When you’re crocheting the heads or body for amigurumi, do you usually close them off just as you finish it? I’m asking because I’ve noticed on this one pattern I have, it says “bind off, weave in ends, and stuff.” for all of the parts. I’ve been doing it where once I’m done with either the head or body, I’ll stuff it and sew it together like I do for the rest of the parts. I won’t close it off before I sew them together is what I’m saying. I don’t want them looking like a snowman either(for ami that don’t have legs or arms, I mean). The ice cream cone that you have as an example would be different because it’s supposed to be a circle, but what about a chibi sized ami with a small body and a not much bigger head? I guess what I’m trying to ask is which way would you think would look better? What is the typical way of doing it. Sorry for the long question… I didn’t realize it would be so long.
June said
Different methods produce different results, but there isn’t one correct way of doing anything in amigurumi – a good pattern will explain the way to achieve the effect the designer intended, and you’ll find detailed instructions on how, when, and where to close and attach each piece in each of my patterns. If you’re not following a pattern, you can choose any method that gives you a result you like – just try a few things and see what you like best 🙂
Kate said
Thank you for this great tutorial. Joining pieces together hasn’t always been my forte but your method makes it so much easier 🙂
Maria said
I’m a beginner/intimidate crocheter I want to make animals
maia said
hi there, you have a really nice website! i’m just starting amigurumi and have a big trouble to joint 2 part especially if there’s between two different color yarn, i also hard to read pattern because of language problem,but i’m still try to find the way, hope i can do it better and better, sorry about my English, i’m from Indonesia
???????? said
Is available on fotoobyasnenie assembly. I am delighted!
I did not have this knowledge. Thank you!
CDC said
Thank you for the wonderful tutorials on your blog! We’re having a white elephant gift exchange at work so I decided to have fun and make a white elephant. You’ve taught me the magic circle and how to put the limbs on. Thanks for the help!
Jessica said
Hi June,
Inspired by your technique, I created a method for joining two different colours of amigurumi, while hiding the seam. I have given you credit in the post too.
Thanks
wherethepixiesroam.blogspot.com.au/2012/12/how-to-join-different-colour-amigurumi.html
um omer said
i like the tutorail sooooooooooooo much
yarnhooker said
I’m still a beginner and seeing this made me understand a bit more. But. . . what about when you’re done stitching and it comes time to cut the end of the yarn tail? Do you just do the last stitch and then cut the yarn down so it’s not visible? Or is there a way to weave more in so you know the yarn will stay and your joint piece won’t come off?
June said
You do need to hide the yarn end securely so it can’t pop out. See my reply to someone else who asked the same question here 🙂
Cheese with Noodles said
Thank you for the tutorial! I’ve crocheted 3 little stuffed animals so far and hadn’t actually looked up how to attach the pieces to each other before. I had been using my crochet hook. It looks like this will be a little easier to control. Good to know exactly what patterns mean when they say to sew the pieces together 🙂 Today I plan to crochet a bunny amigurumi or two (smallest stuffed animals I’ve made so far!) and will use this method for sewing the limbs onto the body.
MJ said
June,
Thank you so much for all the tutorials, especially the video ones!
I am learning so much from you, and I’ve been crocheting since I was just a little tyke, and am now teaching my grands how to crochet as well.
Your site is one of the best I’ve found yet!!
MJ
RB said
Im just a beginner, trying to make an amigurumi cactus, i was worried about how i would join the pieces together, until i found your tutorial! thank you so much for your help =)
cijay00 said
can i use a crochet hook to to join the pieces?
June said
You can crochet the pieces together, but it’ll make a bulkier join, so I advise using a yarn needle. See also my video tutorial: how to make a Seamless Join in Amigurumi.
Jasmine said
Hey June
Do you use thread or yarn too sew your body parts together?
June said
I use yarn in the same colour as I did to crochet them – it makes the least visible join 🙂
Jasmine said
Hi June,
I’m having trouble sewing my feet to my body. The body is eggshapped and every time I sew the feet they look all outta wack. PLease help!!!!
June said
I don’t really know what to suggest without seeing the body and how the feet are supposed to look! Maybe try stitching the two feet together first (if they are supposed to touch) and then stitch them onto the body as one big piece?
Emma said
Hi June,
really great site – loving it! Am new to crochet and it has been helping me a lot. one thing though, i was joining a black body to a white head. i used black thread but you can see it along the white neck line at the front. what would you suggest here? the pattern is the grim reaper in the creepy crochet book.
many thanks,
Emma
June said
It’s impossible to make a join like that (joining an open piece of one colour to an open piece of another colour) totally invisible – because of the colour change at the join, your stitches will always show unless you change colour for the last round of one of the pieces. A good pattern should explain which colour yarn to use to join the pieces and how to get the best-looking join… It looks like the Creepy Cute patterns typically have some sort of collar that covers the join later, so you don’t have to worry about it as it won’t be visible once the pattern is complete 🙂
Emma said
ok cool, thanks for explaining June. yeah, i think my grim reaper hood should come round the front more.
nyss said
thanks for the wonderful tute – great to point people to when they ask for help with this ^_^
Jenny said
I absolutely love your site and tutorials. Your instructions are very clear and you’ve turned something I found daunting into something totally feasible. Thank you!!
Jenna Bristol said
This is great! I have a sort of related question. When a pattern calls for stitching on facial features, etc., how do I attach the yarn or thread before beginning the straight stitches or back stitches or whatever?
June said
Jenna, if the head is open at the bottom, you can come up through that opening so your end will be hidden once the head is stitched down to the body.
Otherwise, begin at the back of the head and pass the needle through to the front. Ignore the dangling end at the back of the head until you’ve finished stitching, then pull it very tight and snip it very close to the head so the remaining end is drawn inside the head and won’t be seen.
Hope that helps!
Lori said
Thanks for the great pics and tutorial for joining pieces on my “critters”.
Susan said
Hi June,
Thanks so much for this tutorial. I’ve ordered your book but it’s stuck somewhere in Christmas post. This tute means I can finish my presents.
Also magic to have pictures in left-handed orientation as I am. It’s a nice change for the other guys to have to mirror-flip instead of me! 🙂
Thanks again and happy Christmas, Susan
June said
You’re welcome, Susan! I’m afraid it’s all right-handed in the book though – sadly us lefties are still a minority, so I had to flip all my photos for the book 🙂 Happy Christmas to you too!
pattypansy said
I would also like te know —which is the wrong and which the right side of the work and does it really make a difference. Enjyed your tutorial- neat and easy to follow
June said
Patty, take a look at my tutorial ‘Which is the Right Side?’ at www.planetjune.com/help 🙂
Silvina said
Hi June! your amigurumi’s tutorials are great. Your page is in my INSPIRING SITES’ carpet. I understand how to join them but I can
June said
Silvina, you can see how to get rid of the yarn end after joining by looking at the end of my Ultimate Finish tutorial: www.planetjune.com/blog/the-ultimate-finish-for-amigurumi/
(If you’re joining pieces together, you can tie a little knot around a post of a stitch along the join first, and make sure the knot is also pulled to the inside when you pull the yarn tight, so it won’t be seen on the finished piece.)
Silvina said
Thanks, I’ll practice… love your page…
Anna said
Thank you soooo much!
I messed some of my Amigurumis just because I did not know how to sew parts together.
Cheryl said
Just to add to the above: when you’ve threaded your tail in one direction you have to pick up a stitch before you turn and go back the same way, otherwise the thread would just come out.
Cheryl said
The best way to secure your tails is to thread them through your work one way in a straight line, then thread them back through those same stitches in the opposite direction – so they are going back on themselves. This is much like the “backtack” sewing stitch you would use on a sewing maching to finish your work. (Obviously do this in such a way that the tails aren’t showing on the outside of your work.)
Eo said
This is so incredibly helpful. I’ve been trying to muddle may way through patterns in the past, but now it all makes sense!
Can I ask what you do with your ends? I normally just stuff them in, but I’ve had some problems with them popping back out :/
June said
As Cheryl says below, you can weave the ends through your stitches one way, and then back the other way.
An easier way for amigurumi, though, is to just take the end right through the body (through all the stuffing) from one side to the other, and then make another stitch heading back through the body again, in a slightly different direction, then snip off the remaining end. Same principle – if you pull on the stitches, the yarn won’t slide out because it’s ‘facing’ both directions – but it saves having to actually weave the yarn through your stitches.
To make it even more secure, you can knot the yarn around the post of one of your stitches before losing the end inside the piece.
Eo said
Thank you both for the help!
Jessica said
Thank you June! As always you provide the best tutorials on amigurumi : )
Can I please make a request? Could you please make a tutorial on how to weave in the final ends after you have joined the pieces? I read your description as above…but I am such a visual person, and would love to see a tutorial. I understand if you don’t have time. Thanks
June said
I’ll add it to my list, Jessica 🙂
Silvi said
Thank you! It is very helpfull!
Parker said
Oh my goodness, this tutorial was so helpful! Thank you!
Clar said
Oh. All the pattern did instruct was to just fasten off and end with a long tail. Well i guess i ought to join with the sl st then. Thanks 🙂
clar said
hi, im new to crocheting. just wondering, do you have to join up the stitches at the end of the last round with a slip stitch before joining or is that unnecessary?
June said
clar: your pattern should instruct you how to finish each piece before joining the pieces. In general, it’s best to join with sl st at the end of the last round. This will give a smoother open edge, which will make it easier to join the pieces neatly without leaving any holes.
Eleanor said
Thank you so much! A great pictorial explanation of the joining process…and left-handed too!!! I never find things explained for lefties, and I’m always the one trying to mentally flip everything around. Ha Ha you righties…now you know how it feels 🙂 just kidding you guys…but it’s nice to see something from our point of view!
Jonnie said
This is the BEST tutorial EVAH!! I enjoyed making my first amigurumi but was DREADING sewing on the pieces and parts. It seemed like I was messing up all of the nice, neat work I’d done on the body parts. You make it looks so easy — and it is. It seems so simple now and it looks so much nicer.
Thank you SO MUCH for sharing!! I’m going to share this link on Ravelry.
sheene said
thanks for sharing! 🙂 really helpful..
Rowena said
Thanks for that – a simple technique, excellent description and it looks great – can’t wait to try it out tonight!
Tracy said
i’m making a baby pig for my dad’s birthday with my OWN pattern… now i can sew the pig’s leg to the body. YAY!
Nicole said
Hi June,
I am a brand newbie to amigurumi & I am really confused about which way is the right side & which way is the wrong… can you shed any light on this for me? Also I am making a pattern from the book Kyuto Japanese Crafts Amigurumi & trying to make the furry bunny but am stuck on the ears…. (I know – basic & I can’t get it) – any advice you could offer would be great.
Nicole
Jeannie said
Great tutorial, June! My problem is knowing where to place the pieces/parts. I made a reindeer (sorry, someone else’s pattern I think) and can’t get his legs, antlers, ears, etc., in the best places. It would be so helpful if patterns could tell you to “mark this spot” for the different parts. Also, I was wondering, do the plastic pellets in the bottom of the legs help the cutie to stand up better?
June said
kkelly, all I can say is that if it’s crazy talk, call me crazy – I do the exact same thing 🙂
kkelly said
This is a great tutorial, and makes me happy to see I’ve been basically doing it correctly, if a little messy. But I run into a problem at the end. I’ve just been doing a stitch and then making a knot through it, then sort of tucking the rest of the long piece of thread into the inside of the piece. Is that crazy talk?
Emma said
Thank you soo much for posting this!
I’ve been getting into all sorts of pickles trying to join my little friends together.
You’ve made some lovely things and well done for mastering left-handed crochet, It looks so confusing!
June said
Suzi, it’s not a silly question 🙂
I changed colour where necessary so I was always joining the brown parts with brown yarn and the white parts with white yarn. It’s not a lot more work (except more ends to fasten off and weave in) and the end result is much better if you match the yarn colours.
Suzi.BC said
I love your tutorial, but can you answer a silly question ? On your dog at the bottom pic, did you join everything with one colour or other? Thanks I am still just a beginner! you have such beautiful patterns.
Suzi.BC