Love Hearts crochet pattern
© June Gilbank 2011
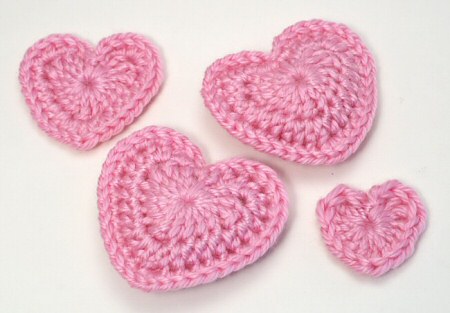
This is a clever little pattern to make sweet hearts in three sizes – each heart builds on the pattern of the previous heart. You can also make a bonus puffy heart to give a total of 4 different designs in this one pattern! String them into a garland, add a pin back to make a cute brooch, or fill a bowl with pretty hearts for Valentine’s Day decorating.
UPDATE April 2020: If you’re making pairs of matching hearts for COVID-19 patients and their families, use the Puffy Heart (D) pattern, preferably in pink or red. I thank you for offering some comfort to those who are suffering.
UPDATE March 2022: If you’d like to make hearts to support the current Ukraine crisis, please see my new Two-Tone Heart versions of this pattern, to make hearts in the colours of the Ukranian flag.
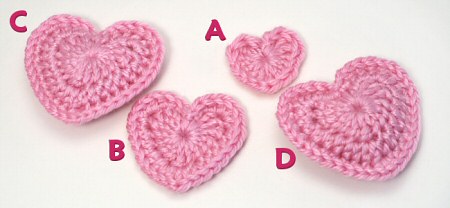
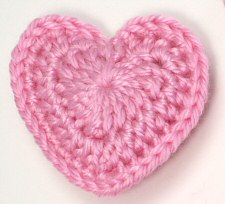
A: Small Heart; B: Medium Heart; C: Large Heart; D: Puffy Heart
This pattern is Donationware – the pattern is available for free, but if you like it please consider sending me a donation to show your appreciation:
Send me a donation and receive the easy-to-print PDF version of the pattern as a thank you!
NEW! Now, in addition to the standard (US) terminology PDF pattern, with your donation you’ll also receive a second PDF file with a version of the pattern in UK crochet terminology.
NEW! Both the US and UK versions of the pattern have been updated again to include the complete Two-Tone Heart pattern (flat and puffy versions) and colour change tips.
Donations of any size are much appreciated. Just add the amount you wish to donate, and, once you have checked out and paid, your pattern will instantly be available to download from your PlanetJune account.
The complete pattern and instructions are available below, regardless of whether or not you choose to pay for them 🙂
This is a PlanetJune original crochet pattern. Feel free to use items made from this pattern however you wish, but I’d appreciate credit as the pattern designer. Please do not reproduce the pattern anywhere else; instead post a link to www.planetjune.com/hearts
Not ready to make it yet? Add it to your Ravelry queue: 
Terminology
| ch | chain |
| ch-sp | chain space |
| dc | double crochet (treble crochet for UK/Aus) |
| hdc | half double crochet (half treble crochet for UK/Aus) |
| sc | single crochet (double crochet for UK/Aus) |
| sl st | slip stitch |
| st | stitch |
| tr | triple (treble) crochet (double treble crochet for UK/Aus) |
You will need…
- E US/3.5mm crochet hook
- Small quantity of worsted weight yarn in red, pink, or the colour of your choice
- Yarn needle to weave in ends
- Optional: small amount of polyester fibrefill stuffing for the puffy heart
Gauge
Gauge is unimportant for this pattern. I like to crochet the hearts with a small hook so they are rigid and there are no gaps between the stitches; if you prefer a looser, floppier heart, use a G or H hook instead.
Notes for all hearts
To make these hearts, you must be comfortable with the magic ring technique. Instead of single crocheting into the magic ring, the entire first round (Heart A) is crocheted directly into the ring, and then the ring is pulled tight to complete the round. This same pattern also forms Rnd 1 of all the other hearts, so read these instructions before beginning any of the hearts!
- As you crochet Rnd 1, you may need to stop and snug together the bases of the stitches you’ve already made, so that you can fit all the stitches into the magic ring.
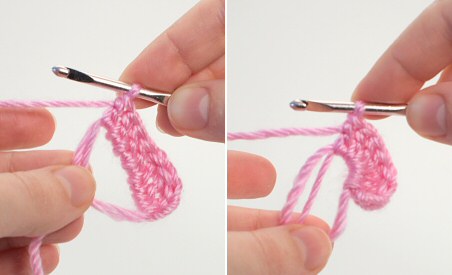
Left: Halfway through Rnd 1. Right: The same stage after pushing the bases of the stitches together. - When you reach the end of Rnd 1, pull the magic ring almost closed, leaving a small hole in the middle.
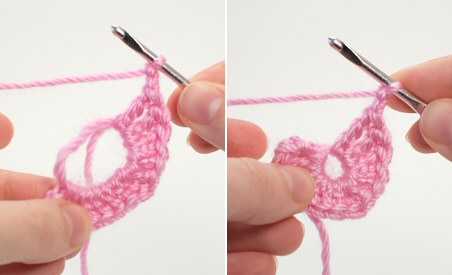
Left: Rnd 1 finished. Right: Magic ring pulled almost closed with a small hole remaining. - To complete Rnd 1, make the final sl st into the remaining hole, and then pull the magic ring tightly closed.
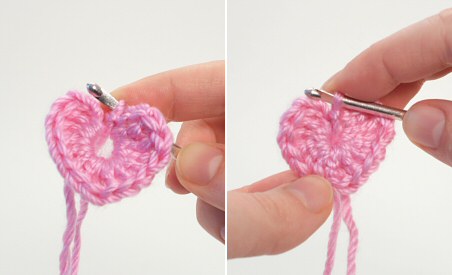
Left: Final sl st made. Right: Magic ring pulled tightly closed.
A: Small Heart
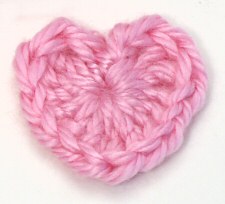
Make a magic ring, ch 2.
Rnd 1: (3 tr, 4 dc, tr, 4 dc, 3 tr) into magic ring.
Pull the magic ring mostly closed, leaving a small space in the middle, ch 2, sl st into the remaining hole in the magic ring. Pull the magic ring tightly closed.
Fasten off. To complete the heart, see Finishing (below).
B: Medium Heart
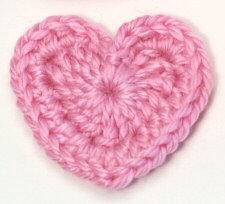
Make a magic ring, ch 2.
Rnd 1: (3 tr, 4 dc, tr, 4 dc, 3 tr) into magic ring.
Pull the magic ring mostly closed, leaving a small space in the middle, ch 2, sl st into the remaining hole in the magic ring. Pull the magic ring tightly closed.
Note: do not turn work, continue working anti-clockwise (clockwise for left-handers) around the heart, working into the stitches of Rnd 1, and starting by working into the ch-sp formed by the ch 2 you made after the magic ring.
Rnd 2: sc in ch-sp, 2 hdc in next st, 3 hdc in next st, 2 hdc in next st, hdc in next 3 st, 2 hdc in next st, (hdc, dc, hdc) in next st, 2 hdc in next st, hdc in next 3 st, 2 hdc in next st, 3 hdc in next st, 2 hdc in next st, (sc, sl st) in ch-sp.
Fasten off. To complete the heart, see Finishing (below).
C: Large Heart
Make a magic ring, ch 2.
Rnd 1: (3 tr, 4 dc, tr, 4 dc, 3 tr) into magic ring.
Pull the magic ring mostly closed, leaving a small space in the middle, ch 2, sl st into the remaining hole in the magic ring. Pull the magic ring tightly closed.
Note: do not turn work, continue working anti-clockwise (clockwise for left-handers) around the heart, working into the stitches of Rnd 1, and starting by working into the ch-sp formed by the ch 2 you made after the magic ring.
Rnd 2: sc in ch-sp, 2 hdc in next st, 3 hdc in next st, 2 hdc in next st, hdc in next 3 st, 2 hdc in next st, (hdc, dc, hdc) in next st, 2 hdc in next st, hdc in next 3 st, 2 hdc in next st, 3 hdc in next st, 2 hdc in next st, (sc, sl st) in ch-sp.
Note: do not turn work, continue working anti-clockwise (clockwise for left-handers) around the heart, working into the stitches of Rnd 2.
Rnd 3: sc in next 2 st, (sc in next st, 2 sc in next st) three times, sc in next 6 st, 3 sc in next st, sc in next 6 st, (2 sc in next st, sc in next st) three times, sc in next 2 st.
Join with sl st into first st.
Fasten off. To complete the heart, see Finishing (below).
Finishing (Hearts A, B ,C)
As Hearts A, B, and C are flat, you’ll need to weave in the yarn ends.
Starting tail
Note: Make sure your magic ring is pulled tightly closed before you begin weaving in the ends – this is your last chance to avoid having a hole in the middle!
This yarn end should already be at the back of the work (the side facing away from you as you crochet). Using a yarn needle, weave the end, a few stitches at a time, underneath the backs of the stitches of Rnd 1.
End tail
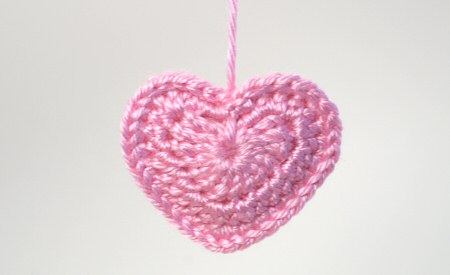
If you’d like to make a hanging loop to string your hearts into a garland, keep the end tail long and use it to form the hanging loop. If not, draw the yarn end to the back of the heart (the side facing away from you as you crochet). Using a yarn needle, weave the end under the backs of the stitches of Rnd 1, as you did for the other end.
D: Puffy Heart
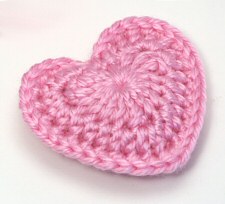
Heart D is a puffy version of Heart C, made by crocheting 2 hearts together with a small amount of stuffing in between them.
- Begin by crocheting 2 x Heart B, but do not fasten off the yarn when you have completed the second heart.
- Holding both hearts with wrong sides together, begin to work Rnd 3 of Heart C, inserting the hook through both layers to begin each stitch (see picture below).
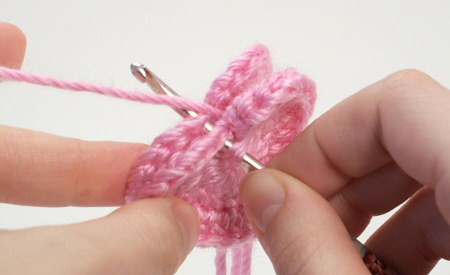
- When you have one lobe of the heart left to crochet together, stuff all the yarn ends into the heart, then add a small wisp of stuffing to puff up the heart a little (see pictures below).
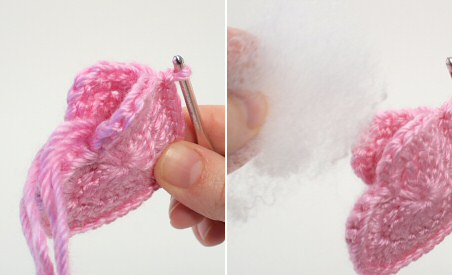
- Complete Rnd 3, again crocheting through both layers.
- Fasten off. If you’d like to make a hanging loop to string your hearts into a garland, keep the yarn tail long and use it to form the hanging loop. If not, use a yarn needle to lose the end between the two layers of the heart.

I hope you enjoy this pattern. Please leave me a comment below if you do, and consider leaving me a donation. Thanks!


Suzy said
I like your hearts and it will make a smart ” Have some tea with me” if you leave an opening at the top to put a teabag in the heart Don’t you think so too
Anna Plummer said
Great Idea!!!
Mary Crippen said
I used your heart pattern to make a pair of barefoot baby sandals by creating a toe loop at the pointed end of the heart, then adding a strap to the center of the top of the heart. It turned out perfect! Thank you for the pattern.
Kathryn Duffy said
Hi was just wondering if the pattern was in English or American please xx
June said
Kathryn, please check the Terminology section at the top – you’ll always find the stitches clearly explained in all my patterns 🙂
Joyhewitt said
Hi June,I would love to learn Amarigumi,and try one of your heart patterns,how do I send you a donation in great British pounds please,sorry to be a pain,put it down to my age I’m 71 and always ready to learn new types of craft,I do crochet,knit and macrame,but really love to make some of your items,kind regards Joy x
June said
Hi Joyce, please see the answers to How can I pay for my order? and Can I pay in my own currency? in my FAQ 🙂
Marian said
Love your website, June. You offer the best and most comprehensive heart-making tutorial one could hope for. All I can donate is a giant thank-you for your generosity. The recipients of my heart-topped cupcake pin cushions will be thrilled!
Adelyn said
thank u for share this wonderful work!!
Danielle said
Could you please give me the measurements for the large heart ? Thank-you for the helpful patterns.
June said
Danielle, the exact size depends on your exact hook and yarn, and how tightly you crochet, but my large hearts are about 2.5″ (6.5cm) across.
Rebecca Biggs said
I wanted to say thank you for posting this. At this time, I cannot afford a donation but I want to make these for my upcoming wedding as decor. Again, thank you
Christine Adametz said
Just found this site and the instructions – I had been making these without the magic ring technique (just a regular chain ring) and though my hearts came out okay (I made a ton two years ago and made garlands for the archways – so fun!) this is SO much better! More garlands are in my future… this time with worsted red crochet cotton for the heart, and a nice size 10 white cotton lace around the edge! Thank you so much for the excellent instructions!
Shibu said
I have just made Heart A & B. And used a magic circle for the first time. I taught myself crochet about a year ago and learnt the other way. To be fair, it’s more fiddly the magic circle way BUT the result is spectacular!!! I think it’s practice that will perfect the technique. I am deliriously happy that I can make these cute hearts at will. God bless you.
tmlaren said
I absolutely love this pattern and how quickly it works up! I am doing it in cotton crochet thread with a 2/2.25mm needle to make pins for all the “girly” girls in my family. 🙂
I have one suggestion: Even though you begin instructions with “do not turn work, continue working anti-clockwise (clockwise for left-handers) around the heart, working into the stitches of Rnd …”, it would be nice if you would tell us whether or not the sc or top of chain (at beginning of previous round) count as a stitch. For example: In Round 2, instead of “2 hdc in NEXT st,” could you state WHICH stich? And, at the beginning of Round 3, instead of “sc in next 2 st,” could you state WHICH stitches there, as well?
I apologize but, I have never been a fan of the direction “next stitches” as some patterns count a certain stitch and some don’t. So, I end up stitching and ripping and formulating my own pattern based on my own results…which takes time … and is frustrating! LOL
Thanks, again, for a wonderful pattern to play around with. I’m sure all of my “girly” girls will be pleased!
June said
There are no turning chains in this pattern, so there’s no real ambiguity (it’s the turning chain that may or may not count as a stitch in most patterns, and that’s what can lead to confusion when that’s not specified). In this case, every stitch from the previous round counts as a stitch, so the ‘next stitch’ is literally the next stitch. I hope that helps!
Jess said
Oh these are ** FABULOUS **!!! my daughter actually pinned almost a year ago and I am just now getting to it and I must say Thank You for such confidence and simplified directions from a newby!!!
Colette Baker said
Thank you so much, I have a friend who puts together and donates memorial boxes for the parents of babies that have passed and now each box will have a little heart in it.
Di said
thanhs a ton. I make beanies for prem babies and little ones in hospice. Each will now have little hearts on them. From Oz
Dolly Khodair said
God Bless you!!! Dolly Khodair, Saudi Arabia
jaya sampat said
thank you so much, for the free patterns they are excellent. wish you all the best.
Sarah said
Hi I’m totally in love with making these hearts I do have a question,
Would u mind if I were to make them into keyrings to donate for the British heart foundation please ?xx
June said
Sarah, of course you may! As per my FAQ, you may do whatever you wish with items made from my patterns (and, if you choose to sell them, please give me credit as the pattern designer if that’s possible).
Destiny said
Thank you so much for this pattern!!! I’m working on a fun project based on a beloved computer game, and these hearts are perfect! I hope I finish it before Valentine’s Day! 😀
May I link a photo to you once it’s done? ^_^
Toni Moore said
The hearts are precious. Thanking you for sharing the pattern.
Tina Burton said
Hi June,these are the best hearts I’ve seen and I’d love to make them, but I’m a bit stuck on just one thing – ‘sc into the ch-sp’.
I know it means to crochet into the chain space, but I don’t know where the chain space is!
How do I find it or know where it is?
Tina x
June said
Tina, working into a chain space simply means you work into the space beneath the entire length of chain, instead of inserting your hook into one of the individual chain stitches. In this case, instead of inserting your hook into either the 1st or 2nd chain of the ‘ch 2’, you’ll insert it into the larger gap beneath both chains.
Tina said
Hello, thank you, that’s helped 🙂
Usually you can see the chain space quite obviously – it’s a large hole – but on a small project like this, I just can’t see any holes so thought I must be missing something!
Sue McEndree said
These are wonderful. Thank you for sharing the instructions.
Jacqueline Martens said
A couple of years ago I made a donation and took the pattern from your site. I just want you to know how many people have been touched by your pattern and my ministry. Hospice Hearts are a part of their healing practice and nurses carry them in pockets to distribute to families of patients in peril. I’ve touched the spirits of young, mentally disturbed children who sit patiently watching my hands create the heart, and when they’re given the calm of being able to hold something in their hand that’s warm and fuzzy makes smiles. A small thing to many, but to others all the world. Thank you again for your pattern and your caring. You have illuminated dark corners with the love. Enjoy your day. Blessings and Peace.
June said
Thank you, Jacqueline – I’m so happy to hear that!
Violet said
Your hearts are absolutely beautiful!
Shelly said
Thank you for sharing this pattern! I needed a heart for a hat I was making and this one is too cute! Best heart I’ve seen!! Thanks!!
Deedre Sigmond said
Dear June, I loved your magic ring video, the invisible decrease. I make cat balls for a rescue. Now I moved into the hearts. the patern is simple. I am excited. I taught myself threw your videos and you simple instructions. thank you for your hard work. Do you have a simple cat pattern to make? One that is flat.
Thank you, Deedre
Makena said
Hi I love all your patterns and I will make a bunch of these hearts and sew them together to make a blanket. Thank you for this pattern.
linda $mit said
From South Africa – I’ve been searching for a heart with a difference and I have found it. Thank you
Liliana eugenia said
Dear June: Thanks for the pattern !!! very easy to do, I did some for my mom and my sister too, there are so happy !! Congratulations for you from Argentina!!!
Iris said
leuk bedacht echt sssch
maria lucia cotruffo said
MUITO OBRIGADA!!!!It means Thank you so much in Portuguese…. Lots of love from BRAZIL….
Emma Zimmerman said
These hearts are fantastic!!!! i played around with different size hooks with kitchen cotton( sugar & cream and peaches & Cream ) and got them large enough to make coasters and now trying different size hooks and multiple starnds to make potholders out of the pattern and a dishcloth. This is a GREAt pattern love it, love it. Thank you. donation comimg on pay day.
Emma
Emma Zimmerman said
Hi, me again. I lost some of your patterns from a few years ago. It took me awhile to remember your name and site. Back when I first found you I don’t think you had pay-pal. But in exploring your site I see you do now. So no I’m not crazy when I first remarked in the other post I wished you had pay-pal, for now you do GREAT, I can donate a little each month when i get my social security or hubby gets paid.
Emma
Cindy said
Thank you for the pattern! These hearts are so cute and are just perfect for putting on the bookmarks that I am making for my sons 5th grade Valentines Day party!
Magda said
Hello June!
i’ve searched for a heart tutorial for a long time and i’ve tried a lot of them, but honestly – yours is the best, easy, clear and the heart is sweet and pretty.. this is what i wanted
Thank you so much!
greetengs from Rome!
ayaka said
June,
Thank you so much for posting this tutorial.
I really love these hearts
I’d like to share this tutorial with Japanese bloggers.
Do you mind if I translate this tutorial to Japanese, and post on my blog?
Of course I will link back to this tutorial.
I hope that you are OK with that.
June said
I’m afraid not, Ayaka – please see my translation policy (in my FAQ) for my reasons why. Thanks for your understanding!
lauren said
I want make a D heart but I have holes in the C heart what do I do?
June said
Lauren, there are vertical slits between the stitches as you’re using tall stitches, but the D heart uses just a wisp of stuffing to make it puffy; it isn’t a fully 3D heart, so small gaps shouldn’t matter. If you have large gaps or holes between your stitches, you must be using too large a hook for your yarn. I used an E (3.5mm) hook with worsted weight yarn for my hearts – if you’re using a finer yarn or a larger hook, you’ll get a floppier heart with larger holes, as the stitches won’t be packed as tightly together, so I suggest you try again with a smaller hook, or thicker yarn.
Rene said
So sweet, thanks!
Hugs
Rene
Christine said
These are the best hearts I have seen! Thanks SO much for these!
carrieeiler said
iam tryig to crochet a heart for my cousions blanket and having troble where elso can i look iam a beggener on making a heart
June said
Carrie, I suggest you ask for help in my Ravelry group – there are lots of crocheters there who can help you with any of my patterns 🙂
Anna said
Hello, June!
I want to say thank-you for this lovely pattern! It’s by far the best heart-shape I’ve found online, and I’ve been looking for quite a while. Thanks again!
Dedri said
Hi 🙂 I just wanted to say that your heart pattern is very cute. I have featured it on my site – along with 2 other cute heart patterns. Thank you for sharing! I am going to find the link to your newsletter right now!
Dedri
misha said
thank you
Nicole said
Help Please, I have made a few different crochet items and i really love these hearts, i have done round 1 but for some reason cant get to grips on the second round, i seem to stitch the point in the wrong place and it looks lopsided.
please could you let me know what i am doing wrong?
Thank you.
June said
Nicole, without seeing your heart, I can’t see where you’re going wrong. As a complete guess, I’d say you’re probably making either too few (if your point comes after the centre) or too many (if your point comes before the centre) stitches into the ch-sp at the beginning of Rnd 2. At the beginning of Rnd 1, if you try slipping a stitch marker around the ch 2 and a second marker into the first tr, you’ll be able to see clearly where to make the first two stitches of Rnd 2, and hopefully it should all work out from there.
Jo said
The very best crochet heart pattern I have found – it is beautiful 🙂
aisha said
very nice >>>> thanx alllllllllllllot for you
shasha Mahanama said
it was so beautifully it didn’t take even 5 mins . to finish it . i will be trying with others too soon.thank you .
shasha .
(hope to be a face book friend of yours !!! )
nitzan said
Thank you for the great patterns!
Tamara said
Thanks so much for sharing these – so cute! I linked to this page from my blog this morning for a roundup of back to school patterns. It’s at tinyurl.com/cxwdx26 if you want to check it out.
Donna said
Have you made a how-to video of the love hearts? I’d love to try it but need to see them actually being made.
June said
I’m afraid not, Donna – each video takes me several hours to film and edit, so I’m concentrating on building a video library of crochet techniques that can be used over and over, not specific pattern demonstrations. You could watch my Magic Ring video though – it’s the same basic technique, but instead of working 6 sc into the ring (as I show in the video) you’ll work all the stitches of Rnd 1 of the heart into the ring. Maybe that will help you!
teresa nadal said
Es precioso, Wonderfull, Maravilloso para tener en casa y regalar Que lindos!!! Gracias Teresa
Diane thomas said
Thanks so much for sharing,that is a delightful heart pattern and it takes no time at all to make Diane