Basic Rose crochet pattern
© June Gilbank 2009
This basic rose pattern is a perfect introduction to crocheted flowers, and it’s so versatile – make it in any size and colour you like!
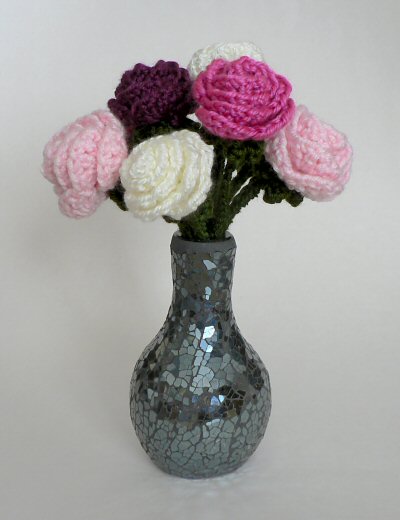
Here are some ideas for use:
- Use the optional stem pattern below to create a whole vase of roses
- Stitch a pin to the back of a rose to make a pretty brooch
- Accessorize a bag by sewing on a couple of roses
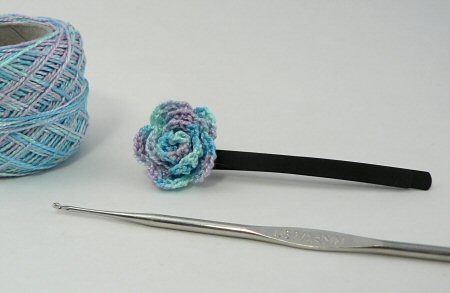
- Sew or glue a small rose to a hair clip or plastic hairband
This Basic Rose pattern is Donationware – the pattern is available for free, but if you like it please consider sending me a donation to show your appreciation:
Send me a donation and receive the easy-to-print PDF version of the pattern as a thank you!
Donations of any size are much appreciated. Just add the amount you wish to donate, and, once you have checked out and paid, your pattern will instantly be available to download from your PlanetJune account.
The complete pattern and instructions are available below, regardless of whether or not you choose to pay for them 🙂
This is a PlanetJune original crochet pattern. Feel free to use items made from this pattern however you wish, but I’d appreciate credit as the pattern designer. Please do not reproduce the pattern anywhere else; instead post a link to www.planetjune.com/basicrose
Not ready to make it yet? Add it to your Ravelry queue:
Terminology
| ch | chain |
| sc | single crochet (double crochet for UK/Aus) |
| dc | double crochet (treble crochet for UK/Aus) |
| st | stitch |
You will need…
- A suitably sized crochet hook*
- Small amount of yarn* in a floral colour, e.g. pink, red, purple, yellow, orange, cream or white (plus green for the optional stem)
- Yarn needle (or embroidery needle for a thread rose)
* Hook and yarn sizes: This pattern will work with any size yarn, provided you choose a suitable hook size for your yarn. For my roses, I used:
- Worsted weight yarn and a size G (4mm) hook, which produced a 2″ diameter rose
- Size 8 pearl cotton and a size 7 (1.5mm) hook, which produced a 3/4″ diameter rose
Crochet Instructions
Ch 46.
Row 1: sc in 2nd chain from hook and in each chain across. (45 st). Ch 1, turn.
Row 2: sc in first st, [skip next st, (dc, ch 1, dc, ch 1, dc, ch 1, dc) in next st, skip next st, sc in next st] 11 times.
Fasten off and cut yarn, leaving a long end for stitching the rose together.

After completing Row 2, your rose should look like this (except it won’t lie straight like this!). In this picture, the scalloped edge is at the top and the flat edge is at the bottom.
If you look at your work, you’ll see that one edge is flat and the other edge is scalloped. Starting at the opposite end of your work to the long yarn end, begin to roll up the rose into a spiral, and roll so that the flat edge stays flat.
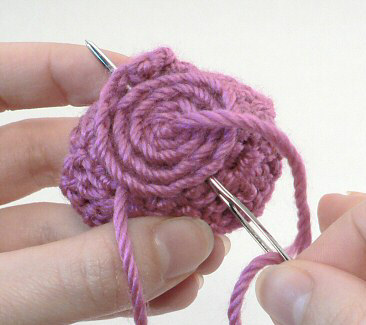
Watch the back of the rose as you roll, and form the flat edge into a flat spiral
Thread the long yarn end with a yarn needle, then run the needle through all the layers of the flat edge from one side to the other, passing through the centre of the rose. Draw the yarn taut, but do not pull it tightly to compress the bottom of the rose – you want to maintain that flat spiral shape at the back. Rotate the rose and go back through the centre, passing through all the layers again. Rotate once more and stitch back through again. Fasten off and weave in both ends of the yarn.
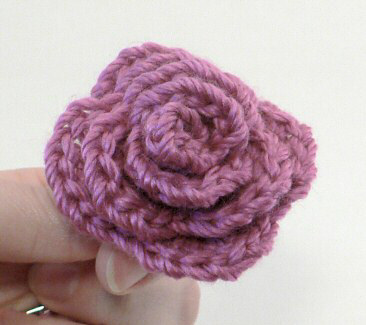
The front of the rose after stitching
Optional: Stem
Terminology: The green outer parts of the flower that sit at the flower’s base are called the calyx.
Calyx
Ch 5.
Rnd 1: sc in 5th chain from hook, to form a circle. Sc in each st around the circle. (5 st)
Rnd 2: (sc in next st, ch 4, sc in 2nd chain from hook and in next 2 chains) five times. Fasten off and weave in ends.
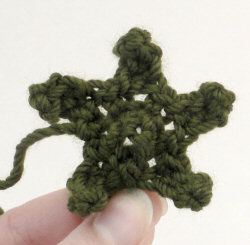
Star-shaped calyx
Stem
To make the stem, use a pipe cleaner or length of floral wire. Fold it in half and make a twist by the fold (you may need pliers to help you with this if you are using a stiff wire).
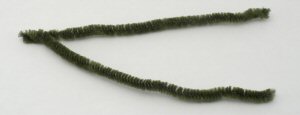
Folded pipe cleaner stem (or use floral wire)
The points of the star shaped calyx will want to curl. Make sure they are curling down, away from the rose.
Poke the twisted end of the wire up inside the centre of the calyx, so it sticks out of the top by about 1cm. Thread a yarn needle with your green yarn, directly from the yarn ball, and stitch the stem in place by stitching through the base of the calyx and between the two arms of the stem with a couple of stitches. Remove the needle but do not cut the yarn if you plan to cover the stem with yarn (as explained below).
Twist the rest of the stem wires together. NOTE: For safety, I like to fold up the very ends of the pipe cleaner or floral wire, so there aren’t any sharp points at the base of the stem.
You can either leave the wires uncovered, or, for a more polished look, cover the stem with the green yarn. Here are two simple methods to cover the stem:
- Single crochet around the stem. This will leave a row of chains down one side of the stem. Fasten off and weave the end back up through a few stitches.
- Wrap the yarn around and around the stem. Knot the yarn around the end of the stem and secure the knot in place with glue before cutting the yarn.
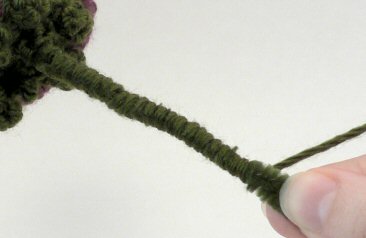
Wrapping yarn around a pipe cleaner stem
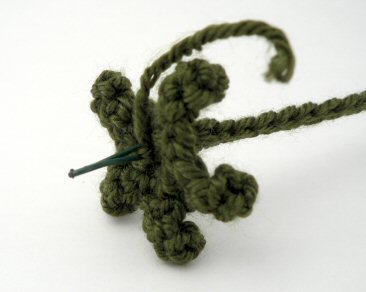
This stem is single crocheted around floral wire
(note also the green floral wire sticking out of the top of the calyx)
Poke the visible end of the wire up through the back of the rose, to help anchor it in position. (NOTE: Make sure the wire is not visible from the top of the rose! If it is too long and is visible, fold it down inside the rose.)
With a yarn needle and a length of either yarn, stitch the base of the rose to the calyx. Weave in all remaining yarn ends.
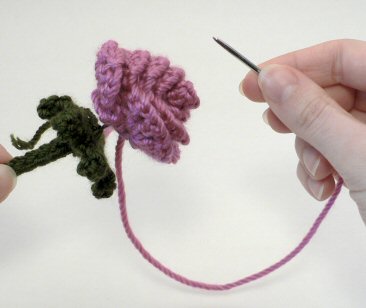
Stitching the rose to the calyx
I hope you enjoy this pattern. Please leave me a comment below if you do, and consider leaving me a donation. Thanks!


jay said
This is amazing!!!
Thanks for the idea. 🙂
Kerry said
This rose works up in no time at all! I used a hand dyed wool yard in shades of pink and it is definitely the cutest flower I’ve made in a long time! Thanks
Zeren said
Hi! I love your patterns! Is it okay if I make a microsoft word copy of it? The reason why is if my laptop is not able to connect to wi-fi, I will have a pattern to make and I can crochet without wi-fi! Please and thank you! Also can I make a microsoft word of the tiny whale one? Thanks!
June said
Hi Zeren! As long as you use the word files for your personal use only, and don’t share them with anybody else, that’s fine. If you’d like to send me a donation for the patterns, you’d get the printable PDF version of them as a thank you! But that’s not required – you’re free to use and enjoy them without sending me a donation 🙂
Gaby said
Thanks for the pattern….Although, I did and dont understand your instructions for the calyx pattern, I dont end up with triangles…..is something wrong with me???
June said
This part: (sc in next st, ch 4, sc in 2nd chain from hook and in next 2 chains) forms each point of the star. It’s not really a triangle shape, just a line – it looks more like a triangle when you move onto the next point of the star.
The sc at the beginning of the bracketed instruction is stitched into a stitch of the previous round; everything else in the bracket ignores the previous round. Then when you start the next repeat, you’ll sc into the next st of the previous round – hence 5 repeats into the 5 stitches of Rnd 1.
Without seeing your work, I can’t see if or what you’ve done wrongly, but I hope what I’ve just said clarifies the instructions for you!
Crystal Guarneri said
Thanks for this pattern, I love it. Makes a great mothers day gift and also a great grandmothers day gift. Thanks for sharing this pattern with me.
Mellina said
June,
I would consider myself a slight bit better than a beginning crochet-er even intermediate 🙂 though I’ve been dabbling in it for at least the last 11-12 years My husband and I work our local renaissance faire (have for many years) and this is the time of year where i usually pull out my crochet work and fiddle with it. I was looking for a pattern for small roses to give away as “favors” to friends at the end of our run of season, as is customary to do for your fellow reenactors. This is such a simple pattern and I thank you for providing it for us to make such lovely gifts for friends and family! 🙂 As to the poster who made comment that your pattern is not original and you should give credit to the original designer, well, I’m sure similar patterns have been around since the beginning of crochet history, so NOTHING is truly original however, for you to offer it free is not only thoughtful but commendable! 🙂 If I manage to make enough to sell! I will be sure to offer my donation and thanks here as well as credit to your design. I’m far from designing my own yet!
Mellina
Los Angeles
Sam said
This is an awesome pattern I’ve tried others before but this one is my favorite. I’m making a dozen of them to send to my sister in alaska 🙂
anna said
Hey, I love the flower I made. But Mine didn’t come out like yours. I followed the instruction But when I continued row 2 mine started spiral like when I Crocheted a candy cane. But I made the best of it. here’s a pic of it.. i238.photobucket.com/albums/ff195/XXraynbogurlXX/Picture0383.jpg. I had used ibrakeforyarnpatterns.blogspot.com/2006/03/basic-star-flower.html For the leaves although it’s a basic star flower.. I used my creativity since I didnt get it right!!!
Love ur Roses!!
melissa rose said
thank you very much for the pattern its amazing. ive been looking for a nice, simple one to make my bf for his birthday. i love roses and i love the buds more than the fully open rose. this is an awesome pattern thankyou very much for it. i will say that i dont have any green yarn at the moment so i sued wire and beads to make the stared bottom and the stem i doubled and twisted it to stand up, though it wouldnt stay in a vase. 🙂 again thank you very much.
Stacey said
Thank you so much for this pattern and for your generous copyright statement. I stumbled on the idea of making bouquets of all sorts of different flowers, all crocheted. Your rose is the best, and I plan on putting it in my personal bridal bouquets. Once they’re done I’d be happy to send pictures. Once again, thank you so much for sharing!
Agnes said
I can’t figure out the star shaped Calyx mine doesnt’ look the same after I do all the stiches…lol
Froggy said
Thank you for providing this small token of love for my Grand Mother who has lost her sight. She loves roses but can no longer see them, so with your wonderful pattern i can make her a dozen and she can have them with her forever to feel.
God Bless you 🙂
Farida said
Excellent!!!!So simple yet very beutifull
Keep up the good work
Christina said
Dearest June,
I have taken up crocheting as a hobby again now that I am retired. I was searching for a rose to attach to a simple cloche hat that I made when I came across your site. This is the first time that I have ever responded to a comment made by a blogger. One expects opinionated emotion in a blog concerning politics, religion, but never on something so peaceful as a needlework site. I just had to reply to the the person known as “Jas”. It upset me that she was so ungrateful and disrespectful to you and that she made me want to send this. I had to, for you and for me. It sounds like she is of my generation and I am embarassed over her juvenile behavior. I am also sad for her, it must be awful to spend this time of life with bitterness and resentment. I know how one negative comment can cancel a hundred positive ones…..don’t let it. Consider the source and pat yourself on the back for the kind and gracious person that you are. I am joining the grateful people and say Thank You. Much abundance to you in all things, may you be blessed as you bless.
Christina
doaa said
I doing crochet as bags,doilies,and baby boot
How are view these in the side?
doaa said
Thankes so mutch ,its nice and cute
Elayne said
A beautiful and easy pattern. I have been looking for this for a long time. Thank you
kris said
ok i have to laugh at the suggestion of you stealing someones patterns. june i know how many hours you put into designing this rose and it is very well done. this pattern as well as all of your other patterns are so well written and beautifully designed. i hope one bad comment won’t keep you from giving us more of your wonderful creations. keep up the good work –
your #1 fan!!!!!
Jas said
This pattern is nothing new. I’ve been doing this sinse 1970’s!! so if anything you stole my pattern let alone others stealing yours it maybe even isn’t yours to begin with. jmtsw
June said
Jas: I know I am not the first person to crochet a rose, and all rolled up crocheted roses have similar features 🙂 I did develop the specific stitch pattern to create this rose, so it is my own design. I have made it available here as a free pattern for everyone to enjoy.
The patterns of mine that were stolen were some of my original animal designs which I sell at www.planetjune.com/shop -the theft had nothing to do with this rose. I work very hard to create my patterns and they are my livelihood, so for someone to steal and distribute them is very distressing.
I’m sorry you don’t see my rose as the gift to the crochet community that I intended it to be.
Pam said
I like the rose pattern and am wondering if you have a way to attach the roses to a crotcheted block for making an afghan.
Thank you in advance for your help.
June said
Pam, The rose design isn’t really suited to be made into an afghan, because of the rolled-up design. You would do better to find a pattern for an afghan square containing a rose that is worked in the round. There are several pretty designs available in the Roses category on Crochet Pattern Central: www.crochetpatterncentral.com/directory/roses.php
Karla said
I just made some of your roses and they turned out beautifully. The group of three in the link (one for me, my mom, and my daughter) are for my great aunt’s casket.
Thank you.
Atelier papillon said
Tr
Susie said
thanks for this pattern….I am making some for my friends’ daughters’ grave, she past away two years ago and flowers are so expensive and don’t even last long….so I can’t wait to fill the urn with these beautiful creations…..
Nell said
I love your rose pattern. I’ve been looking for awhile for a rose pattern that looked like a rose. Thanks for posting.
June said
Carol, that’s not an easy question to answer… If you want to sell your roses, work out the cost of all the materials you used to make them, and make sure you add something to that cost to account for the time it took you to make them. You have to try to come up with a figure that you’ll be happy to receive in exchange for your roses, and your customer will be happy to pay – it’s a delicate balancing act. Good luck!
Carol said
I made 12 roses and someone would like to buy them.
I don’t know what to charge.
Can you help me. Thank you
Quita said
Just wanted to say thank you for the rose pattern. I had been looking for one and this is the only one I found that I really liked!! I made a bouquet for my mom for Mother’s Day and one for my son’s teachers for the end of the yr thank you gift. They are such a big hit! I can’t wait to try out some of your other patterns!
Thanks again.
Crochet hugs to you from Texas!
~ Quita~
nydia said
My daughter send me the Fuzzy Ferret pattern she bought. It is wonderful, I can understand the easy instructions.” Muchas Gracias ” Thank You for the free patterns available, for putting the Rose, the poinsettia, Pattern online to share it with other people like me. With love, from Puerto Rico nydia
Jean said
I was so excited when I found this rose pattern. For did have it once
but I did lost it and have been looking everywhere for it.
So I can make them again – they make lovely gifts to take to the
Nursing Home for the elderly ladies who live there for they just loves
to recieve little gifts and it’s rewarding to see these elderly ladies just
SMILE AGAIN for a moment.
Thank You for putting the Rose Pattern online to share ir wirh other
people like myself.
Thank You Again and May God Always Bless You ..
Sarah said
Is there any way to make this rose a little bit bigger?
Maybe just chain more in the beginning and follow the same pattern?
June said
Sarah: yep, just add any multiple of 4 to the starting chain and you’ll add that same multiple of petals to the rose, so adding 12 ch, for example, would add 3 more petals – easy!
many said
thank you very much it’s cute
June said
Linda: for a rosebud, you could use the same pattern with fewer petals. Try this:
Ch 18.
Row 1: sc in 2nd chain from hook and in each chain across. (17 st). Ch 1, turn.
Row 2: sc in first st, [skip next st, (dc, ch 1, dc, ch 1, dc, ch 1, dc) in next st, skip next st, sc in next st] 4 times.
Fasten off and cut yarn, leaving a long end for stitching the rose together.
And for a smaller calyx:
Ch 5.
Rnd 1: sc in 5th chain from hook, to form a circle. Sc in each st around the circle. (5 st)
Rnd 2: (sc in next st, ch 2, sc in 2nd chain from hook) five times. Fasten off.
Follow the assembly and stem instructions from the full-size rose 🙂
Shaheen said
So beautiful! Thanks for the pattern.
linda said
June these r very prettyI am gonna make some as soon as (I finish my other 2 projects.
Do you have a pattern fo arose bud,or know where I could find one?
Thanx
Linda
Lucy Said, said
THANK YOU SO MUCH FOR LETTING ME COPY YOUR CROCHETED ROSE PATTERN. I HAVE BEEN LOOKING FOR ONE TO MAKE FOR MOTHER’S DAY FOR SOME FRIENDS OF MINE. GOD WILL BLESS YOU FOR YOUR GOOD DEEDS. LOVE , LUCY
kaylynn said
Thank You I love this pattern it is a great pattern for mother’s day, birthday’s, or any other occasion. I really love this thank you.
Izzy said
oh my goodness!! i made something very similar a few weeks ago except i had 56 stitches, so it had a few more petals. how funny!!
Bethany said
These are so cute! I’ve been wanting an easy basic rose pattern for awhile, yours seem to be the perfect match. Do you mind if I sell some?
June said
Hi Bethany, as per my copyright statement, you are free to sell items made from my patterns provided you give me credit as the designer 🙂 As this is a donationware pattern, I’d be very grateful if you send me a donation to say thank you, but it’s not required.
Lori Marshall said
June many thanks for the rose pattern, your certainly creative and I appreciate the freebies.
Kind regards
Lori (kiwioz)
Andrea said
oh, beautiful! when will I find the time to crochet these… oh well. Love them!
Christine said
Awesome roses!!! You deserve a great donation regardless.
Cora Shaw said
I just love this design!
Cora
ZULLY said
HOLA QUE DIVINA LA ROSA BESOS DESDE URUGUAY
Jana said
Ahh. Clarification! I like the way you put the calyx and stem on here! I stitched the calyx to the rose FIRST! This looks MUCH easier!
Kathy Bartholomew said
Brilliant. I like your version better than another version I saw. I also like the stem and calyx…Can’t wait to try this one…
Idadown said
So simple, so nifty. Fantastic June. Cant wait to make a few for my little miss (who just loves clips in her hair) – pink of course.
Amanda said
Thanks June! As always, an AWESOME idea.
Inga said
cute idea, Thanks!
NE?E YILMAZ said
thank you
Anne said
Love these, I’ve got a lovely crystal vase and am going to fill it with your roses.
Many thanks for sharing.
Anne x