Amigurumi Balloons
© June Gilbank 2010
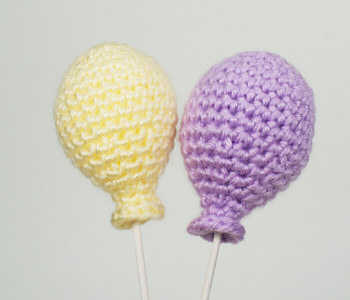
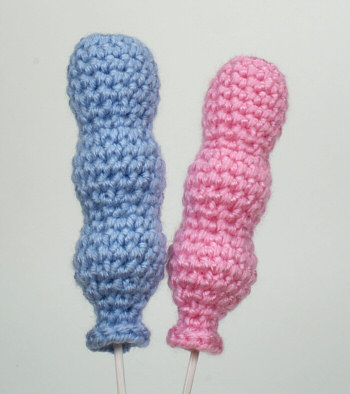
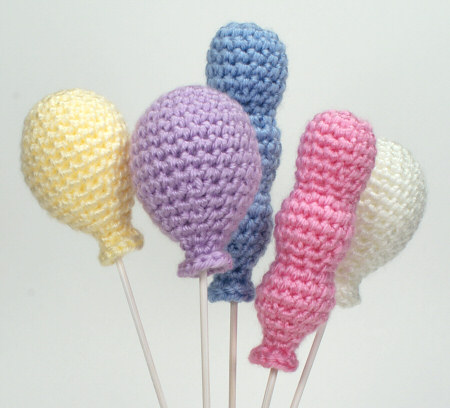
What better way to celebrate than with a bunch of balloons? Made in pastels like these, they’d be perfect for baby shower decorations or for Easter. Made in bolder colours, they’d brighten any occasion! I’ve created 2 different amigurumi balloon patterns for you: the standard round balloon, and the extra-fun long balloon. Each balloon only take a few minutes to crochet, so you can whip up a bunch in no time!

This pattern is Donationware – the pattern is available for free, but if you like it please consider sending me a donation to show your appreciation:

Send me a donation and receive the easy-to-print PDF version of the pattern as a thank you!
Donations of any size are much appreciated. Just add the amount you wish to donate, and, once you have checked out and paid, your pattern will instantly be available to download from your PlanetJune account.
The complete pattern and instructions are available below, regardless of whether or not you choose to pay for them 🙂
This is a PlanetJune original crochet pattern. Feel free to use items made from this pattern however you wish, but I’d appreciate credit as the pattern designer. Please do not reproduce the pattern anywhere else; instead post a link to www.planetjune.com/balloons
Not ready to make it yet? Add it to your Ravelry queue: 
Terminology
| ch | chain |
| invdec | invisible decrease Note: If you prefer, you may use a standard sc2tog decrease in place of each invdec. |
| sc | single crochet (double crochet for UK/Aus) |
| sl st | slip stitch |
| st | stitch |
You will need…
- E US/3.5mm crochet hook
- Small quantity of worsted weight yarn in any colour
- Stitch marker
- Yarn needle to weave in end
- Polyester fibrefill stuffing
- Some sort of stick for the balloon strings, e.g. lollipop sticks, dowels, bamboo skewers
Notes
- Do not join at the end of each round; rounds are worked in continuous spirals.
- Use a stitch marker to mark the beginning of each round. Move the marker up each time you start a new round.
Round Balloon

Make a magic ring, ch 1.
Rnd 1: 6 sc in magic ring. (6 st)
Rnd 2: 2 sc in each st around. (12 st)
Rnd 3: (2 sc in next st, sc in next st) six times. (18 st)
Rnd 4: sc in each st around. (18 st)
Rnd 5: (2 sc in next st, sc in next 2 st) six times. (24 st)
Rnds 6-10: sc in each st around. (24 st)
Rnd 11: (invdec, sc in next 2 st) six times. (18 st)
Rnd 12: sc in each st around. (18 st)
Rnd 13: (invdec, sc in next st) six times. (12 st)
Rnd 14: sc in each st around. (12 st). Stuff balloon through hole.
Rnd 15: (invdec) six times. (6 st)
Rnd 16: sc in each st around. (6 st).
Rnd 17: 2 sc in each st around. (12 st)
Join with sl st to next st. Cut the yarn, leaving a long end.
Long Balloon

Make a magic ring, ch 1.
Rnd 1: 6 sc in magic ring. (6 st)
Rnd 2: 2 sc in each st around. (12 st)
Rnd 3: sc in each st around. (12 st)
Rnd 4: (2 sc in next st, sc in next 3 st) three times. (15 st)
Rnds 5-7: sc in each st around. (15 st)
Rnd 8: (invdec, sc in next st) five times. (10 st)
Rnd 9: sc in each st around. (10 st)
Rnd 10: (2 sc in next st, sc in next st) five times. (15 st). Stuff 1st section through hole.
Rnd 11: (2 sc in next st, sc in next 4 st) three times. (18 st).
Rnd 12: sc in each st around. (18 st)
Rnd 13: (invdec, sc in next 4 st) three times. (15 st)
Rnd 14: (invdec, sc in next st) five times. (10 st)
Rnd 15: sc in each st around. (10 st)
Rnd 16: (2 sc in next st, sc in next st) five times. (15 st). Stuff 2nd section through hole.
Rnd 17: (2 sc in next st, sc in next 4 st) three times. (18 st).
Rnd 18: sc in each st around. (18 st)
Rnd 19: (invdec, sc in next 4 st) three times. (15 st)
Rnd 20: (invdec, sc in next st) five times. (10 st). Stuff 3rd section through hole.
Rnd 21: (invdec, sc in next st, invdec) twice. (6 st)
Rnd 22: sc in each st around. (6 st).
Rnd 23: 2 sc in each st around. (12 st)
Finishing
Draw the end through the last loop on the hook, and pull tight to form a knot.
– or –
Use an invisible join to give the neatest finish.
Using a yarn needle, weave the end down to the ‘knot’ of the balloon.
To make the balloons ‘float’ in the air, you’ll need to use a rigid stick as the balloon’s string. I used bamboo skewers, painted white with acrylic craft paint. You could also use thin wooden dowel (again paint it white too look more like string if desired) or lollipop sticks.
Safety note: please take care with sharp objects around young children. Bamboo skewers have sharp points, so snip the sharp ends off before using them if the balloons bay be within reach of little hands.
Insert the stick into the open bottom of the balloon. (Optional: apply a thin layer of white glue around the top of the stick before inserting it, so the stick will be glued to the stuffing.) If the hole is too large, make a few stitches around the ‘knot’ area of the balloon with the yarn end, and draw tight around the stick. (Note: I didn’t feel that this was necessary with my balloons.)
Pass the yarn end through the balloon, coming out somewhere along the balloon’s side. Draw the yarn tight, and snip the end close to the balloon. The yarn end should retract back inside the balloon after it is cut.

I hope you enjoy this pattern. Please leave me a comment below if you do, and consider leaving me a donation. Thanks!


Cheyenne said
my cat took off with the first one. so they make great cat toys too. thanks for the pattern.
Sarah said
Thank you for a great pattern they will look great on my daughters party table
Shannon said
These are awesome! I just made the first of a batch for a baby shower and it was so easy and it looks so cute! The only thing I had issues with was I tried to follow the link on the invisible join and the site said the page doesn’t exist; was that post taken down or something?
June said
Thanks for letting me know, Shannon – there was a mistake in the link URL. I’ve fixed it now 🙂
Shannon said
Sweet, thank you! 😀
Rosa said
lindos globos gracias por ense
Carol Bogan said
Hi, I am considering making the balloon pattern. I need suggestions on the best way to anchor them when using a skewer etc. I see the cup shown in the picture, but what do you have inside…Stryofoam? You don’t list any detail suggestions for the container (type/size). It would really help a novice crocheter like myself.
Thanks in advance
Carol in Michigan
June said
Carol, I don’t suggest a specific container because it’s completely up to you what you do with your balloons – there’s no right or wrong answer here! You can stick the ‘strings’ into anything that will hold them in place. I used a big block of poster tack inside a pot that I made from cardboard and origami paper, but I don’t suggest you do the same – that was just how I chose to photograph the balloons and it isn’t part of the pattern.
The best solution for you really depends on what you want to do with your balloons, and how many you want to make – here are a couple of ideas to get your imagination going:
I’m sure you get the idea – this part is nothing to do with crochet and all about having fun choosing what to do with the things you crochet!
Carol Bogan said
Thanks for the quick response and help in giving me some suggestions for the balloon container for a novice like myself. I haven’t crocheted in years and just started picking it up again since I recently retired.
Have a great one… Your site is terrific
Muna Nana said
Just popping in to say I will be making some of these to raise money for the St. Joseph’s Hospice here, if that is okay with you. Also wanted to say that, having bought your wonderful patterns for the Afri-Ami Elephant and the Aqua-Ami Sea Turtle, I am now attempting to recreate your Discworld Scupture for my 28 year old son. I will post Pics on Ravelry when I am done. is there any way for me to post them here?
As Always, Thank you for the wonderful patterns you create and share.
Muna
Diana said
Thank you for the pattern. It’s very easy to follow and the balloons are lovely! I’m currently using your pattern to make cute balloons for my daughter’s birthday. 🙂
Mrs C said
Hello
I am going to make these balloons! Before I start, I have a question…Do I do both rounds of the ‘magic ring’ then start at round 1 of the pattern, or just the first one the to create the ring and then start round 1 of the pattern?
Hope this makes sense!
Thanks for this cute pattern, can’t wait to have a go!
June said
Take a look at my magic ring tutorials – the magic ring is just the loop of yarn you form; there are no stitches crocheted as part of the ring itself. (The ch 1 locks the loop together, all the stitches of Rnd 1 are worked directly into the magic ring, then you pull the ring closed at the end of Rnd 1.)
Maria Kagianin said
Hallo, June your website is so organised and your balloons are so beautiful, I’am a begginer in chrochet and I would like to know what do you meen by saying magic ring? Thank you very mach!
June said
Hi Maria, I have both photo and video tutorials at www.planetjune.com/magicring 🙂
GUemeila. Konkson said
i love your pattern. It really great for parties.
My son Gordon loved it
Guen 🙂
Cat said
Although all your patterns are great, this pattern is one of my favourites. It’s such a cute, quirky, creative gift idea! I also think your discworld model is amazing and I will definitely craft it at some point (something with too few hours in a day). Keep up the good work and thanks for sharing your creativity on the web!
-Cat
Jennifer said
I love this pattern I made some for my daughter and she pretends to give them to her stuff animals. Thanks for the pattern
Melissa said
I love your patterns! These and your crochet hearts are absolutely adorable!
Sandra said
Thank you so much for posting a free pattern, not many people do it these days, but it get’s depressing trying to make things when you have to pay for all the yarn and every single pattern and sometimes it doesn’t seem worth it to make things. Will definitely consider donating since it’s not demanded. Thank you!
Crochetlover said
Hello!
This one is very good in man ways, they dont fly away and they are cute, and I be happy when i see them!
Im from sweden, and i cant speak english very well, so sorry if you dont understand every sentence i wrote… =)
Buss said
very cute n nice!! lovely….,,
Aidan Van Gossen said
Oh, they are so cute! For the skewer, is there anything that we can’t use?
June said
Not really – within reason. If it’s going to be an ornament, you can use anything to make the stick. If it’s going to be around children (who may pull the balloons off the sticks), you need to take safety into account and make sure there aren’t any sharp points. Just use your common sense and you’ll be fine 🙂
Bri said
So cute! Thanks for the pattern =) I just wanted to point out instead of using a dowel or a stick of some kind, you could use a string at the bottom, but hang the balloon with invisible thread from the top.
Mary S. said
This amigurumi ballons are very neat and great. I just finish on compltely and it is super. I didn’t think that I was going to be able to make them since it was my second project that I crochet. Thanks a lot for sharing your work.
cindy said
these are great I am using these to decorate tables, They are going to be orange and white. Thank you so much
LAVINA CHAFFIN said
I love your patterns and would like to know if you have a charity, or is the donations to help offset the cost of your web site.
June said
Hi Lavina, I’m glad you’re enjoying my patterns !The optional donations are not for a charity – they go to me, to help offset my costs and give me the opportunity to produce more free patterns 🙂
funandfang (renske) said
These are great! Thanks for sharing! I will use them on the next birthday!!!
Lisa said
Thank you for a great pattern, off to go find some other great patterns to print and buy :).
Rachel said
Cute balloons June!!