See my Amigurumi Discworld info page.
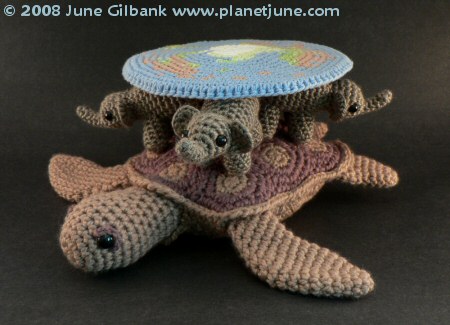
Thank you so much for the Discworld love; I’m so happy you get what I was trying to do here. I also have some news: I contacted Terry Pratchett’s agent, to ask if there was any possibility that Terry could see my Discworld, and Colin kindly agreed to show the pics to Terry. And I have a reply from Colin about Terry Pratchett’s reaction:
He gave a quiet laugh and said, ‘Well, if you’re going to crochet Discworld then that’s the way to do it!’
Thank you, Terry! (And Colin.) This has made my day!
I thought I would share my happiness by revealing some more details of my Discworld project. I’ve had several requests from people wondering how I managed to accurately crochet in the landmasses of the Disc. I’m not intending this as a tutorial or method for you to follow – I just thought you might like to see the crazy method my mind came up with to crochetify the Discworld 🙂
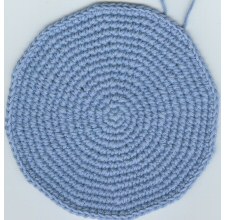
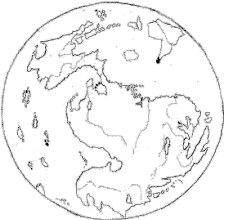
First, I started by crocheting a plain blue circle for the underside of the Disc. I scanned this into the computer. Then I used the Discworld Mapp to sketch (with pencil and paper) a map of the landmasses and a rough guide for my colour changes. I scanned this into the computer too:

I edited my sketch to remove the white background and darken the lines to black to make them easier to see. I resized the two images so they were the same size, and then layered the map over the crocheted Disc:

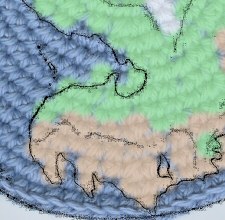
Now for the slow part… but I figured it was better to make the mistakes digitally than to have to rip back when it came to the crocheting part. In my graphics software, I picked a paintbrush that was about the same size as one crocheted stitch, then began to colour in my map onscreen. I kept the coloured layer translucent, so I could still see the stitches beneath. Here’s a close-up, and the complete digitally-coloured map:

Lastly I turned off the black sketch layer, and printed my ‘pattern’:

With all that work done, I just had to reproduce my digital crochet in reality! No secret method here – just careful counting and colour changes.
When I had finished, I crocheted both discs together around the edges, to keep it together and give a subtle Rimfall effect. I also stitched the two discs together at various points across the surface (with blue yarn in the blue areas only, so it doesn’t show), to avoid any problems with it trying to puff up in the middle – it’s called the Disc, not the Lens 😉
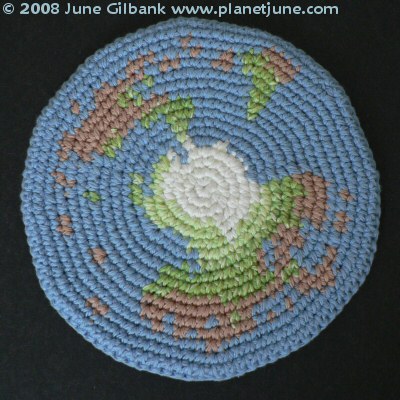
Oh, and you may also be able to see from this pic that I used a variegated green yarn, so I chose the lighter green parts of the yarn to be closer to the Hub, fading to darker green towards the Rim. I just thought it added a little more depth:
That’s it! As I said before, it really was a labour of love, and it took much longer to design than to actually crochet! And now I can say it’s officially Pratchett-approved 🙂
You can, of course, buy the patterns for my Turtle and Elephants, if you are so inclined.
I hope you enjoyed this insight into the unusual way my mind works. Please leave me a comment if you did…
See my Amigurumi Discworld info page.



Mark said
I am a huge fan of sir Pterry. i met him once and he signed one of my balloon art pieces.
i also crochet and have recently started creating characters from the Disc. Ridcully, Rincewind, the luggage, Cheery Littlebottom so far.. have not done the whole Disc.. that’s very cool.
Caitlin said
Hi June!
I’m working on making this for my father- he loves discworld!
I have a question about the disc: are you perhaps lefthanded? I noticed that the stitches spiral the other way round than they normally do and it’s confusing me a bit.
Thank you for sharing this!
Caitlin
June said
Yes! If I’d been granted permission to sell a Disc pattern, I’d have designed and crocheted a second, right-handed version, and given you the option of purchasing either, but as I never received permission to do that, you’ll have to follow the method I used to create my colour map vs trying to copy my exact stitches.
Caitlin said
Thanks for your response!
No problem, I’ll just have to work a bit harder then. I assume you made the circle the same way everyone does? first round 6sc, second round 6x inc, third round 6x *sc, inc*, etc?
Happy holidays!
June said
Yes, 6 increases per round is the standard formula for a flat circle in single crochet. I staggered the increase points so it didn’t become hexagonal as it grew. And, if you make the plain blue circle first, you can use that as a template for your own colour map 🙂
Caitlin said
I see! I just looked up how staggering increases work. I had never considered this before! Is it right for me to assume that you used the centred method of staggering? So in the even rounds, you’ll increase by doing 6x *SC, Inc, SC * for round 4, 6x *sc2, Inc, sc2* for round 6, etcetera? ??
June said
I don’t recall exactly how I did it – I may have shifted some increases to make the colour positions work better (that’s what I’d do if I were making one today! ) – but yes, alternating the increases between the middle and start (or end) of each repeat is the simplest way to avoid the hexagonal problem 🙂
Caitlin said
Sorry about those extra question marks at the end, they’re supposed to be an emoji, but only after I posted my comment did it show that it does not know the emoji that I was using 🙂
June said
I think teaching my blog to use emojis might have to be one of my first goals for 2020 *eyeroll emoji for outdated blog technology*
June said
I think I’ve added proper emoji support! A good start to the year:smiley:
Frouk said
Thank you for this brilliant idea. I’m a big fan of Discworld and I love to crochet.
Clare said
My son happened across your gorgeous piece of work and then tagged me in it! He is a massive Terry Prachet fan! So I’ve bought the turtle and elephant patterns so I can have a go at recreating this for him.
Thankyou for sharing your amazing talent with the rest of us 🙂
Anna said
Hello June!
I’m in process of making this for myself. I can see the change of colour distinctly enough, but I would like to ask how many stitches did you start off with in your MR and how many did you end up with around the circumference?
Thanks!
Anna
June said
Anna, a flat circle in single crochet always follows the same formula: 6 sc in the magic ring, and 6 increases in each subsequent round. The number of rounds you need will depend on the yarn you use – you want it to end up in proportion to your turtle and elephants! For more details on making the best flat circle and more, see my book, The Complete Idiot’s Guide to Amigurumi. 🙂
Frances said
Eeeh, Sir Terry actually contacted you! That is so awesome. I came looking for a Discworld pattern after the sad news today that he has passed away 🙁
Muna Nana said
Hello June,
Having bought the AquaAmi Turtle and the AfriAmi Elephant patterns, I have started on Discworld for my 28 year old son. I have all the parts ready to assemble but have yet to to the disc. My question is, Did u you bulky or worsted weight yarn for the disc? just to make sure I have my proportions right. I am figuring it was bulky…
Regards,
Muna
June said
Muna, actually, I used kitchen cotton for the disc (to make it stiffer) and that always comes in worsted weight. But unless you’re planning to copy the photos of my disc stitch for stitch (or round for round) you can just crochet a circle until it’s large enough to cover the 4 elephants’ backs – it doesn’t have to have the same number of rounds as mine 🙂
Emma said
Hi June,
Thought I would say how much I loved your discworld! I used your patterns to make one of my own. It is one of my favorite pieces and lives on my mantle piece, and is much envied by my geekier friends.
Here is a picture of it (imgur.com/a/HMYzF).
Also you are right- it takes a LONG time to make!
quicksilver7 said
Your project is so amazing & impressive. I am making a Discworld soap cozy for the Ravellenic Games (Rav name given above) & I used your pictures here as a model/guide for making my own little Discworld. Yours is far more impressive. 🙂 But thank you so much for sharing this wonderful work & providing even the loosest of guides!
Kimberly Chapman said
It’s awesome! Your mapping technique is genius.
And I’m not surprised Colin gave you a positive response, because he also allowed me to post a free tutorial for my Discworld cake (kimberlychapman.com/crafts/cakes/discworld/discworld.html). It’s wonderful when the mega-creators are so supportive of us fan-level creators.
Jennie said
OMG….
I would totally look at buying something like this!
Will you crochet other Discworld characters?
Juanita Sales said
I think it is so beautiful, I feel it is done with alot of love. It is so creative.
Jayne Wallace said
This is an absolutely amzing work of art!
I too have been a Pratchett fan since childhood and now as a school librarian take great pleasure in showing new minds the joy that is Discworld. Found your blog via Pinterest and will forward it on to others – especially the Random Salad Company who currently have a large scale model for their shows of Sir Pratchett’s works – I think they may look into this idea for a long term replacement.
If you ever get permission to sell the pattern, shout it out as I know a fair few librarians and book shop people who would love this.
Good work and keep turning the pages!
Jayne Wallace
Sukeeta Fallstar said
I would be seriously interested in purchasing one of these from you if you have the inclination to make anymore. My friend shared this on Facebook and I know she would be interested in getting her hands on one. Neither of us can crochet to save our lives. If we could, I would buy the patterns for Turtle and Elephant. Email me if you would consider making some for purchase 🙂
Angela said
Would it be possible to buy this in completed form? My joint condition precludes that much crafting (sadly), but I would love to get this for some dear friends. If you only have the one, how much would you charge to commission making another? This may all end up being just a discussion- sadly, fund are limited. But it is so fantastic. And you will get other requests soon. This post seems to be going locally viral in the craft/nerd subset. I’d love an email back from you if you get the chance.
Thank you for you time, and your beautiful work!
-Angie
Heidi Durham said
It it beautifully awesome! I’m so glad someone posted it on facebook so I could see it too. :^)
Gayle Williams-Brett said
A friend just posted this on facebook. I am impressed with your creativity and attention to the fine details. Kudos!
Paine said
Hi!
That is GORGEOUS!!! I would like to buy one of you, seeing as I am a catastrophe at doing anything that isn’t food. Is that a possibility? Please contact me if I an. i would LOVE that! <3
Megan said
I just came across this on Pinterest. So impressive!
Elisha said
Wow! This is awesome and amazing!!! (^_^) I knit, and can knit toys, but crochet eludes me as yet, but I love the adorable things you can crochet! (^_^)
marina said
Hi!
Just sent you a message on ravelry and only then found this post.
As soon as I have he time I’ll attempt my own discworld 🙂
My compliments!
Marina