I saved a tweet from @craft_tips:
Warm water, baking soda, aluminum foil. Insert tarnished silver, remove after 10 minutes. Clean!
The idea of a quick and easy method to clean it without any effort was too good to pass up – I have a lot of silver jewellery (because I only wear silver or white gold jewellery) and some is horribly tarnished. I googled to try to find more details and the consensus seems to be that foil, baking soda, a little salt, and boiling water are the magic formula.
Let’s see it in action!
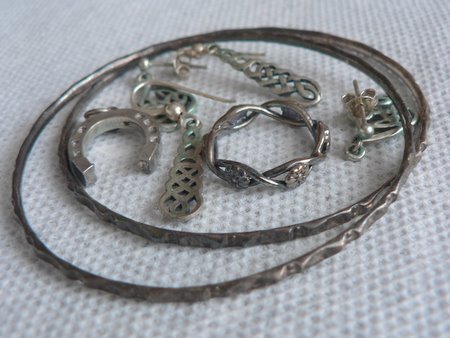
Before (I chose the blackest, most tarnished pieces for this photo. Note also the green tarnish on the two earrings next to the horseshoe charm – I’ll refer to this later!)
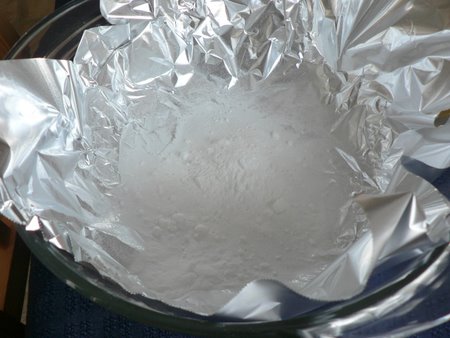
Aluminium foil in the bottom of a glass bowl, with baking soda and a little salt
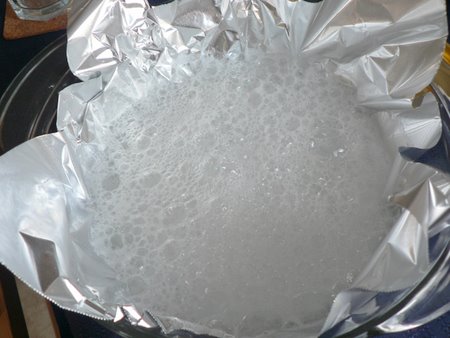
Boiling water added – bubbles!
I added the jewellery – the trick is to make sure that each piece is in direct contact with the foil. Here comes the science part (I probably haven’t mentioned this before, but I used to be a Materials Scientist in a past life): the black tarnish on your silver is silver sulphide. An electrochemical reaction causes the sulphur to transfer from the silver to the aluminium foil, and the tarnish disappears! You can tell it’s working when you smell the sulphur (bad eggs)…
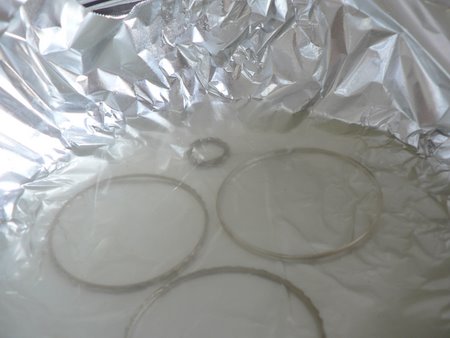
Look how dirty the water becomes (I’d taken out most of the jewellery by this point)
Most of my jewellery came out clean and shiny. Some had a whitish powdery residue (probably from the salt etc) but after rinsing them in clean water, they were fine. Some still looked black, but the black came off easily when I dried it on some paper towel:
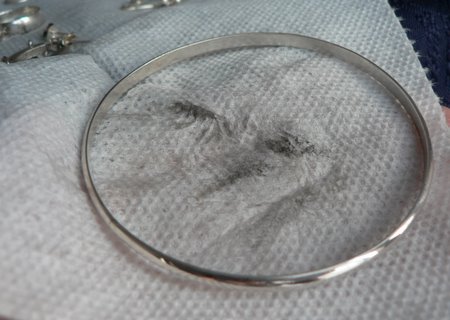
The remaining black tarnish rubbed off easily on a paper towel
Now here’s something interesting: the silver that started with green tarnish to begin with didn’t get clean – it turned orangey/black. This makes sense – pure silver is very soft, so the standard 925 silver (sterling silver) is made from 92.5% silver, and the remaining 7.5% is often copper. It would have been the copper content in the silver that produced the green tarnish in the first place.
Look at the result of the ‘cleaning’ of the green-tarnished pieces:
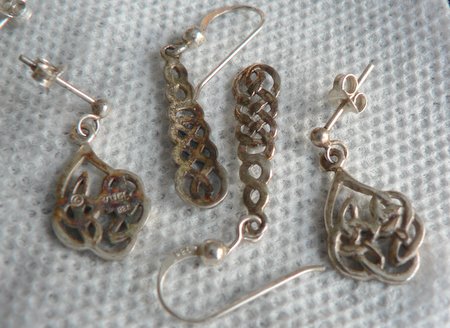
Yuck – discolouration from the copper content in the silver
The good news – this isn’t permanent. I used silver polish on these pieces and they turned back to shiny silver (phew!). But I recommend that if you have any silver with green tarnish, don’t use the baking soda method – it won’t help!
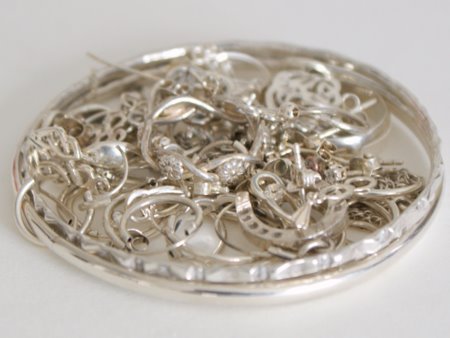
After rinsing (and polishing the copper from the surface of the above earrings), here’s all my jewellery:
And here’s the final proof that it does (mostly) work – remember my blackened flower ring from the first picture? Look at it now!
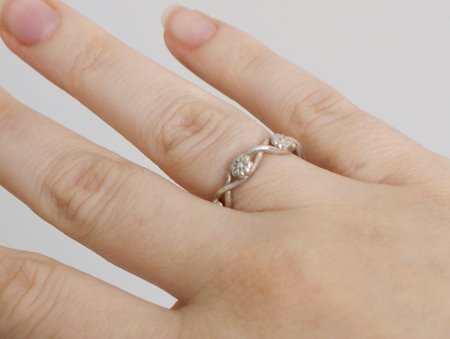
Clean and shiny!
Yay! I can wear it again! And I didn’t have to polish into all those little crevices by hand 🙂
If you’d like to try this technique yourself, you just need aluminium (that’s aluminum to the Americans) foil, baking soda, salt, and boiling water to make most of your silver look like new again with zero effort! Just don’t forget to rinse the pieces after cleaning (if you leave the salt residue, it’ll corrode the silver).
I hope you found my review interesting – just tell me if I get too science-geeky and I’ll scale it back in future 🙂
Edited to add:
Several people have asked about silver jewellery that includes gems or other stones. I’ve mentioned a few important tips about those in the comments, so I thought I should add them here too:
- Pearls are NOT stones and must be treated very carefully with only a damp cloth or a very mild soap solution. NEVER put pearls into a baking soda solution!
- The finish of some gems may be damaged by hot water or salt, so do Google for cleaning instructions for your particular gemstone to make sure it’s safe before you try this or any other cleaning method.
- If your stones are glued in place, there’s also a chance that the glue will react with the solution, or even melt in the boiling water.
So, if in doubt, save this technique for your silver jewellery that’s all. silver and doesn’t have any gems, stones, crystals etc.


Amanda said
Hi June, thanks for such a thorough blog post – my inner nerd rejoices! I wish I had read yours first. I just tried a similar cleaning method I found online with foil, baking soda, salt and detergent for my silver jewelry (and one white gold and diamond earring). All turned out beautifully (almost “too clean”) but a moonstone set in sterling has darkened from white to a pearly blue-grey. Despite my mother telling me not to take things so seriously, I am so upset with myself for somehow ruining this ring (it has great sentimental value to me). Do you have any advice? Thanks so much! Amanda
Christine Haggis said
Just a few words on silver jewelry with stones. Never let opals get wet: I was told by a reputable jeweler. Opals are made from tiny crystals not a single one like diamonds etc. Hence the miriad of colours reflected in them. So any jewelry with an opal stone should not be subjected to this form of cleaning it will probably crack the stone. Nor would I let pearls come into contact with this solution. Crystals with tiny flaws can crack if they are heated so I would not recommend this method of cleaning for your rings or pendants etc with gemstones of any kind.
Jax said
Hi,
Interesting discussion!
I have a large silver tray, that is extremely tarnished…. do I wrap the tray in foil, soak in boiling water, with the baking soda & salt?
Nina said
Hi June
Such a useful discussion. Thanks very much! Do you have any idea whether it would be safe to clean silver with some gold-plated areas using this technique, please? Would the gold-plating survive?
Nina
Rene said
Hi. Did I miss the part where it says how long to leave the silver soaking?
Theresa said
Hi, I feel like an idiot…I read something similar on another site and did it on my silver necklace with amber. The silver came out great but the amber lost it’s shine and looks awful. Any advice?
June said
Oh no, Theresa! 2 seconds of googling tells me that water turns amber cloudy and you should never get it wet 🙁 Just google for how to clean cloudy amber – you should be able to find lots of information and instructions to fix it. Good luck.
Edie said
I had forgotten this method and appreciate the reminder. I did this for the silverplate dinner set also using a foil lined dishpan. I always had the other side filled with hot water so that they were rinsed right away dried and put away. If left to drip dry you can end up with spots. So glad I found your blog. Will be looking for you on Face Book. 🙂
Lesley said
Hiya,
Have been pondering what to do with a silver charm bracelet I
Val Anderson said
Did this in my stainless steel sink before seeing your caution and now can’t get rid of the rotten egg smell in my kitchen. There is no apparent damage, just a smell.
Any suggestions?
June said
Oh dear! I don’t know of a solution, I’m afraid, but I’d try scrubbing the sink with a paste made from baking soda and water, then rinsing it thoroughly. And open your kitchen window, if you can, to let the smell air out.
Tracey Newman said
Have used this method before and wasnt so successful 🙁 perhaps it was because I did it in a stainless steel sink. Will try your way 🙂 can you tell me approximately how much baking Soda? Also I have a large tray that is brass with a Silver Coating. It is from India so the coating is very thin. This has been cleaned off with Silver Polish 🙁 I am going to get it re dipped in Silver. However there is a patch of black green tarnishing in the centre. Any ideas how i should remove this before dipping it?
Love your blog
Regards Tracey
June said
Tracey, I put in enough baking soda to cover the foil. I’d suggest you use a brass polish or similar to remove the black green tarnish before replating with silver.
Elizabeth said
As a chemist, I am questioning your science background. Just by the way you keep misspelling “sulfur” as “sulphur”. What’s up with that?
June said
You didn’t catch that I also keep misspelling “aluminum” as “aluminium” and “jewelry” as “jewellery”. I have 2 science degrees from Cambridge University in the UK, hence I use British terminology. I’m surprised you’ve never encountered the alternate spellings before, as a chemist…
Joanna said
I’d heard before about this method but it’s interesting to read WHY it works so thank you for the explanation. I’m looking forward to trying it for myself. One question, though, does it matter if the shiny side of the aluminium is facing up or down?
June said
Joanna, either side should work equally well. The composition of the foil is the same on both sides; it just gets polished more on one side during the manufacturing process, so it appears shinier on that side 🙂
Patti said
Can you use this method to clean other tarnished silver pieces like silver trays? How would you go about it? Does it have to be in a “Glass” dish or could you do it in a stainless sink or aluminum pan since the items are larger? This is most interesting , and I’m glad to be able to put it to use! Thank you so much!
June said
You could definitely use something like a plastic washing up bowl instead of a glass bowl. If the whole silver tray doesn’t fit into the solution at once, you could clean one side, then rotate it and do the other side (you may need to start again with new foil and solution).
As this process uses a chemical reaction which converts part of the foil into aluminium sulphide, I won’t recommend you try it in your sink or any metal container, as it may alter the chemical reaction. Foil is disposable, but you don’t want to corrode your sink – better safe than sorry!
Lissa said
Just tried this on my silver – fantastic result. Thanks so much for the easy to follow directions!
maggie said
I just tried your suggestion, and it worked perfectly, I cleaned a ring I wanted to give to my great niece, I was so pleased, I didnt even mind the sulfur smell!
Vikki said
Such a great tip, my favourite ring has quite intricate detail in the “shoulders” either side of the stone and its a real bugger to clean, it always looks dirty. I think I will give this a go as its sterling silver!
Amanda said
Does this technique work for any other type of jewelry like gold? or white gold?
June said
I’m afraid not, Amanda – the chemical reaction only occurs with silver, not gold. On the plus side, gold (and white gold) doesn’t turn black like silver does, so it’s much easier to clean anyway!
metin2 yang said
it is very nice
Micheline Bocklage said
Just wanted to let you know that the header icon on the website appears to be corrupted, there’s a large quanity of brown and green lines running across it.
June said
Andrew: yes, it should work well for silver plated items- it’s actually preferable to silver polish which would wear away more of the silver plating each time you polish it.
As for the non-silver knife blades, they shouldn’t be affected by this method. They won’t be cleaned, of course, but they shouldn’t be harmed when you clean the silver handles.
Just remember, in all cases, to rinse the pieces thoroughly as soon as you remove them from the solution, to rinse away the salt residue.
Andrew Lewis said
Does this work as well for silver plated items. Also I have silver plated handle knives with, of course, non silver metal blades. Can I use this method for them as well?
Verena said
Please keep it science geek-y. I am a med student and prefer to know the real mechanisms, especially when I can later apply the principle to something else.
wnda lee said
Great instruction, very good tip, and pls don’t scale back the science, it works for the likes of Alton Brown on ‘Good Eats’, it’s the best part. Thanks v.much
June said
Mary, as I mentioned in the comments above, I put in enough baking soda to cover the foil, and just a pinch of salt 🙂
Mary said
What ratio of ingredients do you use in your mixture?
aya from Israel said
thank you thank you thank you thank you thank you thank you thank you
i have some stuff: cups, box, Yudaika and (of course 🙂 ) jewels.
Most of them I inherit recently…. they weren’t cleaned for years, decades actually.
I stumbled upon your blog, read your method and went immediately to try it.
I’ve “spent” the last hour cleaning some of it with your instructions… amazing results
well now I have to buy some more backing soda and go on with the cleaning
SOOOOO EASY, SUCH GREAT RESULTS
Jen said
I LIKE science geeky!
This is a good, classic method for cleaning silver. Thanks for reminding me of it!
Tiffany said
Thank you for sharing this great info! We are going to be mentioning your blog on this Sunday’s Inspired at Home Radio show. www.inspiredathomeradio.com
Creatively,
Tiffany
Abi said
That’s so awesome, I”m going to clean some of my jewellery now. But I have a question, will it ruin a necklace that has beads with the silver?
ed hardy said
It was a very nice idea! Just wanna say thank you for the information you have shared. Just continue writing this kind of post. I will be your loyal reader. Thanks again.
June said
Jana: I put in enough baking soda to cover the foil, and just a pinch of salt.
Lee, I’m no expert, but I would say it depends how your stones are mounted:
If they are fixed in a silver setting, there should be no problem with glass or most stones* – they will not react with the baking soda solution – just remember to rinse them in water immediately after removing from the solution.
If they are glued in place, there is a chance that the glue will react with the solution, or even melt in the boiling water. I didn’t see a problem with my jewellery (I had some cubic zirconia (fake diamond) stud earrings and they were not damaged when I cleaned them in this way.
One important caveat: pearls are NOT stones and must be treated very carefully with only a damp cloth or a very mild soap solution. NEVER put pearls into a baking soda solution!
*And a second caveat: the finish of some gems may be damaged by the salt, so do Google for cleaning instructions for your particular gemstone to make sure it’s safe before you try this or any other cleaning method.
Jan said
Love this post and this is a wonderful method for cleaning silver. I would like to add a cautionary note. While the ingredients won’t harm most stones, the boiling water can. Opals, emeralds and amber do not like heat or rapid temperature changes. The amber can discolour or even craze if there is an inclusion and the opals and emeralds can crack. Emeralds and rubies are sometimes treated with oils which the boiling water can wash away and leave your stones dull and dry-looking. Always be cautious with softer stones such as turquoise, larimar, malachite and lapis. Your caution about pearls is 100% true. Thanks for the post…love the “sciency stuff” 🙂
Lee said
Can I use this method on silver jewelry with stones in it? Not precious gems, but moonstone or pearls or even just glass.
Jana said
Hi, June! What a great tip! One question, though, how MUCH salt and baking soda should I put in???
I am home in Saudi now. Got in around midnight last night. Hopefully the jet lag won’t last but another day or so and then I plan to do my punchneedle! Yay!
Robyn said
This reminds me of a science project I did in grade school. I put salt and lemon juice in a glass bowl,then put in really dirty coins and something in the salt and lemon would shine them right up! Seemed to work better on pennies.Don’t know if the copper had something to do with it but it was a fun project. What memories. Man I feel old now! LOL!Oh and awesome job again June. See ya on Facebook!
June said
Okay, I was trying not to bog you down with too much science, but as some of you are interested, I’d better set a few things straight!
1. How it works
The water + baking soda + salt form a pathway that conducts electricity between the silver and the foil. An electric current forms and the sulphur transfers from the silver to the aluminium – as Idadown says, this is because the alu is more reactive and so the sulphur ‘prefers’ the alu to the silver (and no, the aluminium is not being plated onto the silver!).
2. How do we know this is happening?
Firstly, you can smell the sulphur after it is released from the silver (the bad egg smell – this is actually hydrogen sulphide gas, produced by a secondary reaction between the alu sulphide and the water). Secondly, the ‘dirt’ you can see in the water above are actually tiny yellow flakes of aluminium sulphide.
3. Why is this such a good method?
This is a non-destructive process – the sulphur is removed from the surface of the silver, but none of the silver atoms are touched. Regular silver polish, or cleaning with toothpase, both contain abrasives that remove the silver sulphide from the surface. This means that, over time and with repeated cleanings, your silver is worn down more and more each time you polish it. This is especially important to avoid with silver plated items, as you can wear the plating right down and expose the other metal beneath!
And one more thing – if you do accidentally remove the black layer from deliberately ‘oxidised’ jewellery, Idadown’s boiled egg method should fix it! The jewellery will become completely black from the sulphur in the egg. Then you can polish the raised areas with a silver polishing liquid or cloth, leaving the blackened surface in the lower areas. Fixed!
Here ends today’s science lesson 🙂
amber said
For jewelry that isn’t too badly tarnished you can try toothpaste. Any standard toothpaste with fluoride will work. Just put a dab in the palm of your hand, roll the piece of jewelry around for a few minutes and then rinse it off. It comes out untarnished and shiny! Not sure what the science is behind it, but I guess some sort of reaction with the fluoride?
That’s a method my mom taught me when I was little and she didn’t want me playing with boiling water.
amber
Oops…forgot to say great post! Looking forward to your next one.
amber said
For jewelry that isn’t too badly tarnished you can try toothpaste. Any standard toothpaste with fluoride will work. Just put a dab in the palm of your hand, roll the piece of jewelry around for a few minutes and then rinse it off. It comes out untarnished and shiny! Not sure what the science is behind it, but I guess some sort of reaction with the fluoride?
That’s a method my mom taught me when I was little and she didn’t want me playing with boiling water.
amber
Katrin said
Hi June. That
Erin @ Living and Loving In L.A. said
What a nifty little trick! I am definitely going to have to try this! I LOVE little tips like this!
Jefferson said
Impressive method and thanks for sharing it. I guess its the baking soda that does the bulk of the work, all that fizzing will loosen the dirt. Does this work on other metals? I would imagine so.
Amanda said
June, I was RIGHT NOW about to buy a jewelry cleaning kit for my tarnished silver. 😮 THANK YOU!
Idadown said
The aluminium is a more reactive metal than silver; meaning it has a greater affinity for the sulfur ions than the silver (silver sulfide is the oxide). So the aluminium strips the sulfur from the silver, forming aluminium sulfide, and leaving silver metal (nice and shiny).
Silver reacts very readily with sulfur, hence traditionally it was a no-no to eat eggs with a silver spoon. It does not react with oxygen. Hence silver can take a long time to tarnish, depending on how much sulfur is comes into contact with.
Aveen: you can retarnish your silver by letting your ring react with the sulfur in the yolk of a boiled egg. This website has some nice recipes: www.finishing.com/1000-1199/1178.shtml
Denise said
That was great. Geeky, but geeky is good 🙂 It helped explain what’s going on. I’d love more posts like this if there’s a chance.
futuregirl said
Oh, no! It’s not to science geeky. This is great! 🙂
bjewelled said
Good point by Aveen! Never use this method, or any liquid dip cleaner, on jewellery that has been deliberately “oxidized”, i.e. tarnished, such as much of the silver jewellery from Bali and Indonesia. A regular polish with a proprietary cloth is all that is normally required.
Of course, the best method of avoiding tarnish is to wear the jewellery – the constant movement against your clothes and skin will keep it shiny. But, if not being worn ensure the jewellery is kept in a pouch or jewellery box to minimize exposure to the air – sulphur in the atmosphere is the main cause of tarnishing.
Aveen said
I tried this for the first time about a year ago and was astounded at the results! Love the before and after photos. Just be careful if you have any oxidised jewellery (i.e. blackened as part of the design) as this method will lift off all the black – I ruined a Celtic-style ring!
Carina said
Science-geeky is NOT a bad thing, m’lady! (-;
Thanks for posting about this!
SiSi said
very neat trick June,
Thanks for trying it out and letting us know. I’ll be sure to keep this in mine the next time I need to clean my silver jewelry:)
Reba said
Thanks for the tips! 🙂
Ann said
Wow – look how bright and shiny! I’m impressed and will try this in the future. Gotta love a ‘no work’ method; it’s good to save our fingers for other things like crocheting and paper rolling, right?! Never knew it as anything other than aluminum – so you taught me TWO things today. 🙂