PlanetJune Craft Blog

Latest news and updates from June

Archive for Sewing

The Handmade Clothing Project

Before our inter-continental move, I pared down my wardrobe by about half, getting rid of anything worn out, badly fitting, or no longer my style. That’s left me with a very minimal wardrobe, and now I really need to replace some of the items I purged.

Shopping catastrophe

I went clothes shopping for the first time last weekend and it was an absolute disaster… Everything is far more expensive here than in Canada. I have a gut feeling about how much I’d be willing to pay for something that’s okay (not bad looking, functional, plain, fits well enough or can be easily modified, a good basic piece) vs something that’s perfect (I love it and know I’ll enjoy wearing for years, great style and/or detailing, the perfect fit) and these prices were far, far higher than my range. There’s no way I’m ever going to be able to justify paying more than my perfect piece price for a merely okay item.

I spent 2 hours browsing and getting more and more despondent. The only thing I even liked enough to consider was a t-shirt in a sale rack, but then I saw the price tag: reduced from $45 equivalent to $30 equivalent! I’ve paid $30 for a t-shirt once, but it’s my favourite top and has loads of detailing (fitted bodice, lace, pleats, gathered neckline) that, for me, justified the price. This was just a plain striped t-shirt… Um, no.

I left the shirt on the rack and gave up on the whole clothes shopping idea. On my way out, I stopped at the craft store and bought some beads, and then I went home to cheer myself up by making something…

Making is fun

sewing books
(Please excuse my translucently pale skin – being sick for 6 months does takes a toll on a girl’s complexion…)
sewing books

Two bracelets and a necklace for under $2 – now that’s my kind of shopping! And because I chose all the supplies myself, I could make sure that the necklace is subtle and will go with all my pink and purple tops, and that the bracelets are bolder and will look perfect next to indigo denim. Being crafty is so much more fun than buying mass-produced, over-priced stuff.

When life gives you lemons…

And that gave me the idea to try turning this disappointment into an opportunity: maybe I can make my own clothes in future..? I can take the time that I used to spend wandering malls looking for the elusive piece that has a June-approved style, colour, fit, and price, and use it to learn to stitch garments that I’m guaranteed to like. And so the idea for the Handmade Clothing Project was born.

This will be a huge challenge for me: I’m by no means an expert at sewing, and very inexperienced at making garments from scratch – shortening or modifying existing clothes to fit is more my level at the moment. But I have designed and stitched up bags, a skirt and a t-shirt from scratch in the past, so I think I should be able to do this, if I start with very simple items.

a-line skirt
I made this simple skirt in 2008 and it’s still one of my favourites – plus I get the bonus “yay, I made this!” feeling every time I put it on.

Gearing up

I can begin the Handmade Clothing Project with almost no costs: I already have a moderate fabric stash (acquired over the years from remnant bins – I can’t resist a bargain), a wonderful sewing machine, and a small library of books to help me on my way:

sewing books

Now all I need is to buy a voltage converter so I can plug my 110V sewing machine into a 240V socket, and I’ll be ready to go! This will obviously be a time-consuming process for me, and I’m still busy trying to get my business back up to speed, so don’t expect new clothing posts every week. But I will share my Handmade Clothing Project successes (and failures) here as they occur – maybe it’ll inspire you to try making clothing too.

Do you make any of your own clothes, or have you ever considered trying it? If so, feel free to join in with the Handmade Clothing Project. (You can still buy clothes too – this isn’t a hardcore “I will never buy clothing again” pledge!) There are no time limits or deadlines, and the only Clothing Project rules are to make stuff you can wear and have fun with it. Crocheting and knitting clothes counts too – you don’t have to sew. Just think how good it’ll feel every time you put on a handmade item – I’m pretty sure you won’t ever get that feeling from anything you bought at the mall…

Who’s with me?

Comments (31)

cutting down and cutting up

This is the first post I’ve written using my new BlackBerry (although the photos were taken back in Canada a few weeks ago)! I hope this works, as I won’t have internet access for my laptop until our furniture arrives in a couple of months and we can move out of this temporary accommodation. Here goes…

Cutting Down (aka downsizing my wardrobe)

As part of our move preparations, I sorted through all my clothes and donated any that didn’t fit or suit me any more. We gave away over 8 garbage bags full of clothing (mostly mine) and I reduced my wardrobe by about half! In case this makes me sound like a clothes junkie, I should probably clarify that most of these clothes had UK labels, which makes them at least 8 years old(!) – I really don’t like to get rid of anything that I may find a use for some day…

I do feel the occasional twinge of regret about all the stuff I’ve donated, but, on the whole, it’s liberating to have reduced my wardrobe by so much. If you have the time, I recommend you refresh your wardrobe too. This is how I did it:

How to refresh your wardrobe

  1. Try on every single item of clothing you own
  2. Look at yourself in a mirror (full-length if possible) and pretend you’re in a shop fitting room
  3. Ask yourself ‘Would I pay to buy this right now?’

If the answer is ‘no’, it’s time to repair/refashion/donate/toss it, and reclaim some space in your closet!

Cutting Up (aka mending and refashioning)

My plan was to pack only wearable clothes for the move, so I donated the larger ‘project’ items (like sweaters I’d had vague plans to felt and make into something at some point – i.e. I’d probably never actually do anything with), and concentrated on the simpler alterations I needed to bring everything else into wearable condition:

Exhibit A: Mending. New buttons attached, belt loop stitched back on, strap stitched back down. Quick and easy when you actually sit down and do it, and now I’ve rescued 3 pairs of pants and a top from the mending pile.

mending: new buttons, fixed belt loop, fixed strap
Mending: new buttons, fixed belt loop, fixed strap

Exhibit B: Extra-long pants. Oh look! I’ve been Americanised! I used to say ‘trousers’ – I wonder when that changed… It’s ridiculously easy to take up pants neatly, although I can never remember how to do it. Luckily, I wrote a really good tutorial for it in 2007 – it saves me from having to figure the method out each time! How embarrassing that I had 2 pairs I’ve never worn because they’ve been sitting, with the tags still attached, waiting for me to take up the excess length. 2 brand-new pairs of pants to add to my wardrobe – very nice.

alteration: shortened pants
Shortening: I cut 3″ off the bottom of these pants and re-hemmed them

Exhibit C: Too-short pants. As I’m 5’2″, I’ve made the mistake of buying “short” length trousers in the past, and worn them for far too long before I realised they were that awkward ankle length. I’ve donated almost all of these faux pas pairs, but I have these linen-mix jeans that I really love (apart from the length). What to do with them? I’ve seen tutorials for adding a decorative ribbon or strip of fabric at the bottom, but that’s really not a look I’d like to wear. So, I used my handy taking up trousers tutorial again, and converted them into capris! Same method, different result.

alteration: too-short pants to capris
New capris: cropped pants from embarrassing ankle-length jeans

Exhibit D: Too-long skirt. I’m not going to subject you to a ‘before’ photo – let’s just say that this ankle-length skirt, circa early 90s, was not at all flattering on my short pear-shaped frame. But it fits nicely, I like the print, and you’d never guess how old it is (apart from the dated style). It’s a stretch fabric – always a challenge to work with – but I got brave with my scissors and cut it off at knee length, zig-zag stitched around the raw edge to stop it from fraying (I don’t have a serger), then turned up the bottom edge and stitched a new hem. I only folded the hem over once in this case to reduce bulk and weight. I skeptically tried the straight stretch stitch on my sewing machine for the first time – it really works! I now have a really cute knee-length skirt, and, added bonus, I have a sizeable piece of leftover fabric (which I packed with my fabric stash).

alteration: ankle-length to knee-length skirt
Swishy knee-length skirt from ankle-length horror (it was too cold to model it for you but, trust me, it looks good)

That’s the last I’ll see of my trusty sewing machine for a couple of months; it’s packed in our shipping container and (I hope) on its way to us! My efforts rescued 8 items of clothing – not bad for a couple of hours’ work. I’m particularly happy with Exhibits C and D: my new capri pants and knee-length skirt will be perfect for the warmer climate here in South Africa!

Mend, refashion, donate and/or toss – wouldn’t your wardrobe benefit from a little spring cleaning too?

Comments (5)

felt poinsettia tutorial

I somehow stumbled into a personal holiday tradition of crafting a different poinsettia every year. With the exception of my first poinsettia (because I was a novice blogger back then and the idea hadn’t occurred to me, so I only have a quick guide that I wrote in the comments of that post) I have a full (free) pattern available for each of my holiday poinsettias – see the links below the pics if you’d like to make your own!

tsumami kanzashi poinsettia by planetjunecrocheted poinsettia by planetjune
polymer clay poinsettia by planetjunepunchneedle poinsettia by planetjune

Top (L-R): 2006 kanzashi poinsettia; 2007 crocheted poinsettia 
Bottom (L-R) 2008 polymer clay poinsettia; 2009 punchneedle poinsettia

So similar, and yet each has its own style. I love this tradition I created! I wonder how long I can keep thinking of new poinsettias to add to the collection…

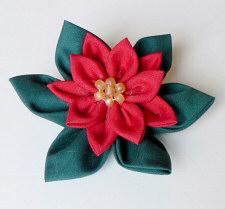
The 2010 PlanetJune Poinsettia is almost a return to that very first kanzashi poinsettia, but with a twist: to keep it fast and simple, it’s made from felt. It would make a beautiful gift topper or table decoration, and you can increase the size to make it as big as you want – just cut the green squares slightly larger than the red, and you’ll be fine!

felt poinsettia by planetjune

I had intended to make a fancy-schmancy version too, in purple and white, with embroidered petals and leaves, but you’ll have to imagine how lovely that would have been (in my head, at least, it’s stunningly beautiful) – sadly, it’s already too close to Christmas and I just don’t have any more time to spare. Maybe that can be my next year’s holiday poinsettia 🙂

Anyway, I hope you’ll enjoy my 2010 poinsettia design!

Go to the Felt Poinsettia tutorial >>

Comments (2)

refashioning an unflattering top

I bought a cute summer top last week. It was very inexpensive, the colour was lovely, the fabric had a nice texture, and it looked like it would be a cool, pretty, summer top.

And then I tried it on. Um…

the original baggy top
Please excuse the bathroom fixtures in these photos – it’s the only place I have to take photos of myself in the mirror!

I don’t know which body types the ‘potato sack’ look would flatter, but it’s certainly not mine. Is it a maternity top? No it’s not – I did check after seeing the fit, or lack thereof! Do I need a smaller size? No – it’s a size XS. Ridiculous.

I thought of returning the top, but then I decided to try a little refashioning instead to see if I could improve it. The fabric doesn’t stretch, so I had to take care not to make it too fitted – I need to be able to get it on and off!

Step 1: Measure for new side seams. I turned the top inside out, tried it on, and pinned new seamlines down each side. I took in about an inch and a half on each side, tapering out a bit at the bottom because I didn’t want it to get too tight around my hips. (Turning the top inside out first lets you pin the new shape while you wear the top, and means that you can stitch directly along your pin lines once you take it off.)

Step 2: Sew new side seams and cut off excess fabric. I stitched along my pinned lines with a straight stitch, and then cut off the excess fabric 1/4″ outside my new seams. A serger would be helpful here, but I don’t have one, so I used a zig zag stitch to overcast the new raw edges so they wouldn’t unravel after cutting the fabric.

taking in the side seams
L: pinning the new seams; R: the top after sewing the new seams

Already a little improvement, but I think we can do more…

Step 3: Add an elastic empire waist at the front. I tried on the top and pinned an empire waistline under the bust, from one side seam to the other. Next, I measured myself along that line and cut a piece of 1/4″ elastic to the same length. I pinned the ends of the elastic to the side seams at the front along the empire waistline. To keep the resulting gathers in the fabric even, I stretched the elastic so that the fabric was flat, and pinned the two together at several points along the elastic.

elastic pinned in place

Step 4: Stitch elastic in place. I picked a pretty stretch stitch that happened to match the texture of my fabric, and stitched the elastic to the front of the top, stretching the elastic as I went so that the fabric lay flat as I sewed.

right side of empire waist

Now the front looked good, but the back was still bulging with excess fabric.

Step 5: Make ribbon ties. I salvaged the strips of fabric I had cut from each side and unpicked the original seams so I had 2 strips of fabric from each side of the top. I ironed them flat and trimmed each pieces into a 1″ wide strip. Then I stitched each pair together to make two longer strips, and ironed the long edges into the middle (using my 1/2″ bias tape maker to keep the strips straight). I couldn’t hide the raw edges because I didn’t have enough fabric width to fold the strip in half again, so I just zigzag stitched down the middle of each strip, catching both raw edges as I went. I ended up with two 24″ ribbons to tie together at the back of the top.

ribbon tie

Step 6: Attach ribbon ties. I unpicked enough of each side seam just underneath the elastic to insert the unfinished end of the tie to the inside. I then turned the top inside out and re-stitched the side seams, trapping each tie in place as I sewed.

Turn it back the right way out and… Ta-da!

refashioned top

Still loose and floaty, but it has enough shape to not make me look horribly dumpy – which, as I’m only 5’2″ tall, is a prime consideration for me! Potato sack into cute summer top in 6 easy steps 🙂

Comments (28)

cute plush hamster

It just occurred to me that I haven’t really shown you this hamster yet. You may have spotted him (in progress) in the demo video for my Detail Stuffing Tool:

I wanted to make a stitched project to use in the demo video, to show people that my tool has uses beyond stuffing amigurumi. Coincidentally, only a couple of days earlier, I’d saved the link to an adorable hamster pattern at Nuno Life, even though I had no plans at the time to make one. And then the perfect excuse came along: a cute hamster toy and the prop I needed for my video, all in one!

plush hamster by planetjune

When I was clearing out my old bedroom at my parents’ house last year, I brought back all my old craft supplies from when I was a kid: rubber stamps, spirograph, cross stitch supplies, and a small stash of fur fabric and felt from my pre-teen toymaking endeavours. It seems strange that I’ve had these materials for around 20 years (let’s not think about how old that makes me sound!) – is that old enough to call them ‘vintage’ craft supplies? Ha!

I found that I had the perfect golden hamster-coloured fur fabric and pink felt in my rediscovered treasures. I’ve always hoarded supplies, to the extent that I used to not use anything in fear of making a mistake and ‘wasting’ it, so it’s especially satisfying to finally be able to use some of my precious, carefully guarded materials.

The pattern was easy to follow (just remember that, as with most Japanese sewing patterns, the pattern shapes don’t include a seam allowance, so cut outside the lines to add your seam allowance) and the minimal instruction was enough to piece it all together. I snipped two tiny eyeholes in the fur before stuffing so that I could use safety eyes with backs. The nose (made by the pattern seams) seemed too low to me, so I cut a tiny piece of felt and made a higher nose. Finally, I trimmed the fur around the eyes so they weren’t obscured.

plush hamster by planetjune

It was a small and satisfying hand sewing project, and look how cute my hamster is – especially those little ears!

plush hamster by planetjune

If you’d like to make one too, check out Runo’s free hamster pattern 🙂

Comments (8)

Detail Stuffing Tool reviews

A little ‘newsy’ post today. The Detail Stuffing Tools are back in stock, and I aim to keep them in stock permanently from now on. Thanks to everyone who ordered one already; I mailed out all the backorders yesterday (unless you also ordered out of stock eyes in which case they’ll be on their way tomorrow; I just didn’t anticipate getting so many orders over the past couple of weeks!) This is what my poor Post Office lady had to deal with yesterday:


Eek! If only I could print postage online, I’d save hours waiting at the Post Office and writing out customs labels, but Canada Post in their infinite wisdom have decided that the ‘Light Packet’ rate can only be obtained in person at the Post Office…

Detail Stuffing Tool by planetjune

And the reviews of the stuffing tool have started to come in! I know my tool is now indispensible to me – I keep one with every in-progress crochet project – but it’s great to hear that other people like it too. Firstly, a review by Jessica (aka Plushroom Soup), a plush artist and one of the first people to snap up my new tool on launch day. She says:

This little number may not look like much, but boy is it handy! I’ve used everything in the book trying to more efficiently stuff tiny plush parts (tiny fingers and toes are the worst!)—chopsticks, knitting needles, wooden dowels, doll stuffing forks, the Stuff It tool, etc. But nothing had good enough grip for the stuffing; the tools would just slide right through. Wooden dowels were the closest to providing what I needed, but I still struggled. Especially because tiny dowels have a tendency to snap in half while I’m stuffing.

Enter the Detail Stuffing Tool! This neat tool makes quick work of stuffing tiny parts. It’s extremely easy to use and has excellent grip for the stuffing. No more slipping, and stuffing right where I need it.

You can read the rest of her Detail Stuffing Tool review at Plushroom Soup!

And secondly, did you know that March is National Crochet Month? It’s nice to see crochet getting more recognition, although I’d like to see an International Crochet Month next time… Silverlotus, a cross-stitcher and knitter, and novice crocheter (although you wouldn’t guess that from her work!) has written a lovely post about a certain crochet designer for National Crochet Month, including this little snippet about my Stuffing Tool:

Just this month June introduced her new detail stuffing tool, which helps make stuffing little amigurumi creations so much easier. And, my dear cross stitching readers, I know it would make stuffing biscornus and ornaments much, much easier too. I recommend it highly.

See her full review of me (*blush*) on her blog, Reflections in the Pond.

Yay, thanks so much, ladies! If you’ve bought my Detail Stuffing Tool, I’d love to know what you think of it too!

And if you’re still saying “huh? stuffing tool?” here’s my demo video so you can see what all the fuss is about:

Comments (5)

Detail Stuffing Tool

I’m so excited to launch my new product today! The Detail Stuffing Tool came about because it’s really difficult to stuff tiny things, or to get that last bit of stuffing in before you close up a hole. After making a million AmiDogs legs (that’s what it feels like, anyway!) and other tiny pieces that have to be stuffed firmly, I realised I needed a better way of doing it…

Dollmakers have a special forked metal stuffing tool, and that’s where I got the inspiration for my tool. The dollmaker’s tool costs around $15, and I wanted to produce something more affordable – if you’re anything like me, you lose tools far more often than you break them, so an inexpensive plastic tool is much more appealing!

Detail Stuffing Tool for amigurumi and plush by planetjune

Whether you crochet, knit, or sew stuffed toys or amigurumi, you need a Detail Stuffing Tool! Not convinced? I’ve made a short video to demonstrate the benefits of the tool, and techniques for using it:

More Details:

Get a grip on your stuffing: Fiberfill (especially the better quality ones) can be quite slippery, and if you try to use the end of your crochet hook or a chopstick to stuff, you’ll find that the fibres just slide around the edge of the stick, and you end up poking a hole in the stuffing instead of pushing the stuffing into the hole! The Detail Stuffing Tool has two prongs that catch the fibres of the stuffing so it can’t slip away as easily, and twisting the tool as you insert it spins the stuffing fibres into the piece with ease.

Stuff the tiniest pieces: The head of the Detail Stuffing Tool is small enough to fit inside the tiniest amigurumi part. The added bonus is that you can use it to add an extra bit of stuffing to a closed shape after you’ve finished crocheting (when you only have a 6 sc hole remaining to stitch closed) so you can stuff as firmly as you want without having to struggle to avoid catching the stuffing fibres while you crochet that last round.

Stuff right into the corners: The Detail Stuffing Tool also works really well to stuff tiny pieces for sewn plush toys. It can be really difficult to position the stuffing exactly where you want it to fill a tiny finger or arm or nose. By twirling the stuffing around the tool to make a firm blob of stuffing at the head of the tool, you can place the tool inside the tip of the piece, and then grip the stuffing from the outside as you withdraw the tool, so that the stuffing stays in place.

I’ve been using my prototype tool for a couple of months, and I couldn’t be without it now! It makes the pesky task of stuffing small pieces so much less frustrating, and I love that I can easily stuff all my pieces more firmly by adding additional stuffing into the tiny hole that remains after finishing the crocheting.

Detail Stuffing Tool for amigurumi and plush by planetjune

I hope you like my Detail Stuffing Tool – now available to purchase from the PlanetJune shop! I really think it’s a tool that’s been missing from the world of stuffed toymaking until now 🙂

Comments (13)

making cat toys

Today is my furbaby Maui’s 6th birthday. (Well, we adopted him when he was a year old, so we don’t know his actual birthday, but we settled on this date for him so it wouldn’t be too close to Christmas.) If you don’t know my lovely boy, here he is:

Maui
Awww, handsome cat!

The actual subject of this post is making toys for your cat, and whether it’s worth the effort. I’d like to demonstrate with a couple of toys that I made for Maui three years ago (please excuse the photos – my photographic skills have clearly improved since 2007!)…

__(‘Read the rest of this entry »’)

Comments (17)

Next entries » · « Previous entries
  • Quick Links: Crochet

    navigation: arrow

    buy crochet patterns and accessories from my online store

    'Everyday Crochet' and 'The Essential Guide to Amigurumi' crochet books by June Gilbank

    Crochet video tutorials and step-by-step photo tutorials

    Free PlanetJune crochet patterns

    Frequently Asked Questions

    Quick Links: Crafts

    navigation: arrow

    Punchneedle Embroidery information, ebook & patterns

    Papercraft ebook & tutorials

    Free PlanetJune craft projects & tutorials

  • Blog Post Categories

  • Blog Archives

  • CAL Galleries

    Ravellenic Games: Team PlanetJune
    PlanetJune Reindeer Games
    PlanetJune Temperature Snake CAL

  • Welcome to PlanetJune!

    June Gilbank

    Hi, I'm June. Welcome to my world of nature-inspired crochet and crafting. I hope you enjoy your visit!

    If you'd like to get in touch, you can contact me here.
    crocheted Canadian flag by PlanetJune
  • June’s Crochet Books

    A fanned-out pile of the books Everyday Crochet and The Essential Guide to Amigurumi, with text 'The answers to all your crochet questions at your fingertips - find out more'
  • Support PlanetJune!

    Want to say thanks? You can send me money in seconds at paypal.me/planetjune (over $20) or paypal.me/planetjune2 (under $20) or send me a donation through my shop.

    Or simply click through from my links before you shop at Amazon, Etsy, KnitPicks, LoveCrafts and more, and I'll make a small commission on your purchase, at no cost to you! Start here:

    ♥ Support PlanetJune ♥

    Tip: This link is also in the footer of every page!

    Thank you so much for your support!