free pattern: tiny whale
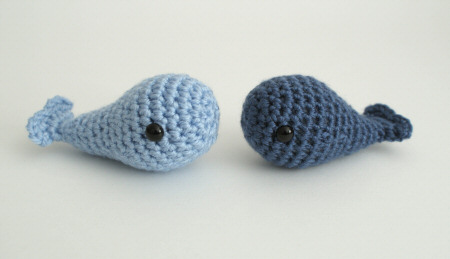
This little whale is the perfect size to sit in the palm of your hand! But even better than that: he’s crocheted all in one piece, so there’s no sewing involved to make him!
Continue to the Tiny Whale crochet pattern.
This little whale is the perfect size to sit in the palm of your hand! But even better than that: he’s crocheted all in one piece, so there’s no sewing involved to make him!
Continue to the Tiny Whale crochet pattern.
As if my book release wasn’t enough news for today, I’ve got more to share!
When I was at the zoo looking for inspiration a couple of weeks ago, there was a big cage full of hanging-by-their-feet-fast-asleep flying foxes. I thought I’d take a picture, and just as I got the camera out, this guy woke up and stuck his tongue out at me – what a scamp!
Now that kind of cheeky behaviour is just too appealing to ignore, and with Halloween approaching, it gave me a great idea for a new pattern…
Flying foxes, of course, aren’t foxes at all – it’s another name for the fruit bat. Fruit bats are very different to regular bats. Most true bats eat insects and fly using echolocation, whereas fruit bats are gentle creatures that feed on fruit or flower nectar. As you can see from the above photo, they are really cute and furry, with big eyes that help them to see in the dark, and long foxy faces.
Ironically, as fruit bats are typically much larger than other bats, they are often used to represent ‘scary’ vampire bats in horror movies. But there’s really nothing to be afraid of, unless you’re a piece of banana or mango…
My fruit bat is all worked in single crochet (as usual). His wings are worked in rows instead of rounds. Pipe cleaners in his wings let you wrap the wings around his body, but you can easily omit these if making the bat as a toy for young children or pets.
The Fruit Bat pattern is available for only $4.50 from the PlanetJune store.
Now, if you’re looking for some Halloween decorations, here are some ideas:
1. Make a fruit bat all in black with red eyes and dangle him from the ceiling with a string (here’s a faked version I photoshopped!)
mwah-hahahaha
2. Or try the classic Halloween PocketAmi: Black Cat, Ghost and Witch – a bargain at only $5 for the set of three patterns!
3. How about a scary pumpkin Jack-o-Lantern? (Or try the cute or realistic pumpkin varieties). The Pumpkin pattern is free (but donations are much appreciated and will give you a nice printable PDF file in return!)
Happy Halloween!
If you follow me on Twitter or Facebook, you’ll have already had a sneak peek at this guy:
He’s a gecko, a type of smallish lizard found in warm to tropical climates. Leopard geckos, the type you’ll see most often kept as a pet, have tiny claws on their feet, but most other gecko species have toe pads that let them climb up vertical walls!
My first introduction to a day gecko was in Hawaii last year, where this little guy was living in our room and spent his time climbing up and down the window frame:
So cute! I’ve had the idea to make a gecko in the back of my mind ever since then. My little Hawaiian buddy was only about 3″ long (a bit small for a crocheted version), but some of the Madagascan species of day gecko reach 9-11″ long. You’re probably familiar with Madagascan geckos from the talking one in those Geico ads 🙂
My crocheted gecko is 10″ long, and, like his cousins, climbs the walls with his special toe pads! Here he is climbing my window:
I think he’s after my origami decorations!
…and climbing back down again
(Okay, he needed a little assistance to stay in place on the window, but isn’t the effect perfect?!)
Gecko is only my 2nd reptile design (after my Sea Turtle) but he was a lot of fun to make. Maybe I should try some other more unusual animals in future – what do you think?
The Gecko pattern is now available to purchase from the shop!
Remember my Red Fox from last week? I decided to make him a cousin in a white brushed yarn, to be an Arctic Fox, and now I’ve completed both patterns. Two different foxes with very different appearances – which is your favourite?
Arctic Fox is a great project to try if you’re intrigued by the idea of brushed crochet. Brushing the finished crocheted pieces gives a realistic fur effect, and because it’s all done in one colour, that’s one less thing to worry about 🙂 Full instructions are given in the pattern – all you need is a wire pet brush or a mohair brush, and you’re guaranteed to get a cute fluffy result! And the pattern also works with regular yarn, if you don’t want to try the brushing technique.
Red Fox has a totally different appeal, combining 3 colours with that distinctive shape to make a realistic amigurumi fox with a cunning glint in his eye!
It’s amazing that you can achieve such different effects with just a crochet hook, some yarn and the single crochet stitch! I really do love crochet…
The patterns are for sale in the shop for $4.50 each. If you’d like to try both types of fox, I’ve made a fox multipack including both patterns for only $7.
Happy crocheting!
The lovely Sister Diane interviewed me for the latest episode of her podcast, CraftyPod #97: Two Ways to Publish a Craft Book, with June Gilbank. We talked about our experiences in print and eBook publishing. If you have any interest in publishing a craft book at some point, either the traditional way (through a print publisher) or by self-publishing an eBook, you should definitely listen – there’s a lot more to publishing a book (either way) than you might realise!
For my non-crafty family and friends who don’t have any interest in the subject matter but just want to hear me and my English accent, my section starts at 13 mins through 🙂
I’m also very happy to be able to reveal my latest punchneedle design, entitled Serengeti Sunset. Distinctive acacia trees are silhouetted against the African sunset as giraffes and an elephant wander the plains of the Serengeti:
This design is a little different from my others – I laid it out as a long landscape, which would make a great embellishment for a purse or bag, as well as a stunning wallhanging.
I also modified the design to create a tapered coffee sleeve to fit over a standard disposable coffee cup. The loops of punchneedle embroidery form a thick, dense fabric which is perfect to use as a barrier to stop your hand from being burnt while holding your hot beverage of choice! Look stylish while you help save the environment by not using a second cup or a cardboard disposable sleeve each time you buy a coffee:
The full instructions for both the flat rectangular embroidery and the tapered coffee sleeve (with full assembly instructions) are provided in the Serengeti Sunset pattern.
The Serengeti Sunset pattern costs $5, or take advantage of my new special offers:
I’ve set up a new mailing list for my punchneedle designs, so please sign up for that if you’d like notification when I release new patterns!
I hope you like my latest design! Please leave me a comment if you
do…
The Great Dane has been on my list of AmiDogs to create for a long time, but it presented a few logistical problems:
I wanted the Dane to be a bit larger than my other AmiDogs, because when you think Great Dane, you think BIG, but trying to support a larger body on long thin crocheted legs wouldn’t be possible without some kind of wire support inside the legs, which I didn’t want.
So, that led to the decision to make a seated or lying dog. I didn’t want to make this design much more difficult to follow than my other AmiDogs patterns, so I couldn’t use the same tricks that I used for the legs on my Ring-Tailed Lemur pattern.
Finally, after much prototyping, I got it! All the pieces are really simple to make. The finished Great Dane is 10″ long (including his tail) or 8″ if you don’t count the tail, and the pattern has instructions for a single-coloured and dual-coloured dog. I’ve also included 2 different ears in the pattern, because Great Danes look so different when they have cropped ears:
…and when their ears are left natural:
The AmiDogs Great Dane crochet pattern is now available for purchase in my store. You can buy it individually, or did you know that I now have a listing for a custom set of AmiDogs? You can mix and match to create your own set of any 3 AmiDogs patterns for the same bargain price as a regular set of AmiDogs!
I hope you like him!
Just in time for the weekend, The Moon punchneedle pattern is now available from the PlanetJune shop.
The finished moon is 5″ in diameter, and the pattern includes 4 colourways for the Moon: Purple Moon, Sepia Moon, Blue Moon, and Harvest Moon (thanks Alice for suggesting that last one!).
There are three ways to buy The Moon pattern:
I can’t describe how happy I am with all the interest I’m been getting since I released my eBook – this week has been an absolute whirlwind, and it’s wonderful to see that people are finally starting to pay attention to punchneedle! Thank you so much for all the positive comments and encouragement you’ve sent me!
And thanks to Craft for their lovely write-up, and Sister Diane at CraftyPod for her wonderful review of my book!
Please let me know if you have any punchneedle pattern requests or any questions I can help you with 🙂
I’m so happy to finally be able to reveal the secret project I’ve been working on for the past couple of months. You may remember that I discovered a little-known traditional technique called Punchneedle Embroidery a couple of months back, and posted about my first experiments with it.
Since then, I have been busy researching, learning, experimenting, designing, and testing, and I’m so excited by my results!
Why isn’t Punchneedle more popular? I think the reason is that all the available patterns seem very focused in one genre (country/primitive style) that doesn’t appeal to a lot of today’s crafters, so Punchneedle hasn’t seen the surge in popularity that many other traditional crafts are experiencing.
Well, I’m here to change all that – this technique is too good to be overlooked any longer! Here are just a few of the reasons I find it so appealing:
Intrigued yet?
I’ve written an eBook called The Punchneedle Handbook: Miniature Punchneedle Embroidery Basics & Beyond. This eBook includes everything about punchneedle from the absolute basics for those who have never heard of this craft, to my techniques that will allow absolutely anyone to create beautiful punchneedle embroideries. I designed the eBook to be a go-to reference book for all your punch needle questions. See more details and the table of contents.
I’ve made an excerpt from the eBook into a free tutorial so you can get a taste for what punchneedle is about.
Of course, a techniques book would be useless without some patterns, and this is the part I’m really excited about – time to show you my initial designs! I hope you like them…
I’ve found that designing in 2D is very different to designing in 3D – I think that the shaping is the most important feature of my crochet patterns, whereas with these punchneedle designs it’s really the colour that gives them such impact.
(I’m also working on another piece – something very different to the above designs, which will show a different side of punchneedle – more on that later today.)
Square designs are so useful because they can easily be sewn directly together to make a larger piece, or fabric borders added to make quilt squares etc. Here’s what I’ve made with my three jungle designs:
… a cute little green linen tote bag. The techniques I used to join the finished embroideries together and to attach the fabric ‘frame’ to make the front of the bag are covered in detail in The Punchneedle Handbook.
My punchneedle patterns are available individually or in a set of any three patterns of your choice. As an introductory offer, I’m also giving away one pattern (of your choice) FREE with every purchase of The Punchneedle Handbook eBook!
I know this has been a long post, but I had a lot to cover! If you’re interested in learning more about punchneedle, here’s a summary of your options, with links:
Please let me know what you think of my new venture! I anxiously await your comments…