PlanetJune Craft Blog

Latest news and updates from June

Archive for Crochet

Koala crochet pattern

My first marsupial design is here, and it’s a koala!

koala crochet pattern by planetjune

Koala was the first fully-pledged design using my new commissions process, and I’d like to say a big thank you to everyone who trusted my design ability enough to pledge towards this design! I hope I’ve met (or exceeded!) your expectations 🙂

I thought I pretty much knew what a koala looked like before I started my design. It was only once I started researching, though, that I realised why every toy koala I’ve seen before has looked wrong, somehow: they all have flat faces and only the black nose sticks out from the face. It turns out that, viewed in profile, koalas have quite pointy faces, with the nose at the tip, so that became a part of my design challenge…

koala crochet pattern by planetjune

Between the shaped legs, the poseable arms, the one-piece head and body, and the pointy face, I set the bar pretty high and it took longer than I was expecting to get everything right. Even when everything looked good in pieces, once I started to stitch it all together I had to make several more changes until I really felt like I’d got it all right. But, finally, I looked at it, and yes, it had all clicked into place to give me a koala that’s (I think) a perfect blend of realistic and cute.

koala crochet pattern by planetjune

The koala is a nice sturdy 7″ tall and his arms are poseable at the shoulders. (Although I didn’t do this with mine, if yours will be a toy for a child you could add some velcro or a press stud to his hands so they can grasp together and he can cling onto things – I think that would be really cute!)

I hope you’ll enjoy making the koala too – there are some pretty clever shaping tricks in this pattern, so I think you’ll have fun seeing it take shape under your hook. But don’t be scared – it’s no more complicated than any of my other patterns, and I have 23 step-by-step assembly photos so your koala will turn out absolutely perfectly too!

You can pick up the Koala pattern right now from my shop – with a special launch discount for this week only! If you’re not quite ready to buy though, how about queuing Koala on ravelry so you don’t forget about it?

Pattern Survey: When you look at the Koala pattern, you may notice that it looks a little different to all my other patterns: I’ve updated the layout to have less wasted space and to include the new PlanetJune logo. I’ve also taken this opportunity to add some more useful details (finished size, US/UK stitch conversions, and more) that haven’t previously been included in my patterns. Before I launch into the massive undertaking of updating my other 100+ patterns to include the new layout and added info, I wonder if you wouldn’t mind letting me know if there’s anything else you’d like to see in my patterns, so I can make all the improvements at once?

If you can spare a minute to help me this week, please compare the Koala pattern PDF with any of my other (non-donationware) pattern PDFs, and then fill in this 1-minute survey to let me know what you think. I want my patterns to be as good as possible, so this is your chance to tell me if there’s anything I could improve! Thanks for your time – I really appreciate it.

A little note about pledging: now the koala is complete, I’m ready to start designing the next commission to be fully pledged! But, I currently have 15(!) other designs in various stages of progress (don’t even ask how that happened…) so I have plenty to keep me busy until that happens! If there’s another design on the commissions list that you’d like to pledge towards, that would be great, but there will be new PlanetJune patterns coming, either way – I’m keeping the non-commissioned ones as surprises until they’re finished 🙂

Comments (5)

how to make a magic ring in crochet [video]

Link easily to this tutorial in your patterns: www.planetjune.com/magicring

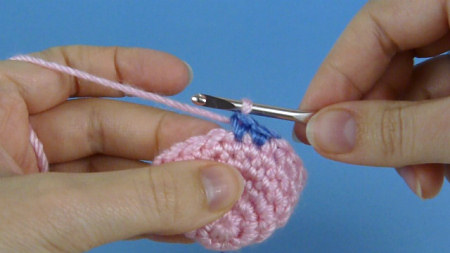
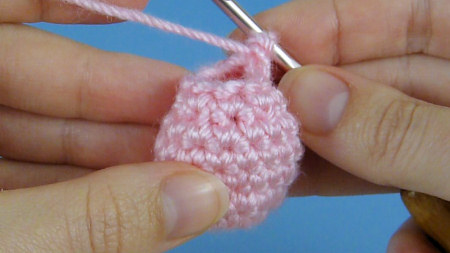
My magic ring tutorial seems to have become pretty much the definitive photo guide that people link to in their crochet patterns, but it’s not enough for everyone. It’s taken a while, but the much-requested magic ring video tutorial is finally ready.

Now, I know that 99% of my regular readers probably already know how to make a magic ring, but it may be worth your time to watch my video anyway – I have a special little tip that makes the technique much easier!

magic ring for crochet video tutorial, by planetjune

If you’re new to crochet, let me explain that the magic ring (also known as an adjustable ring) is an essential technique for crocheting in the round when you want to avoid the hole in the middle that you see when you start with a slip knot and chain and work into the chain. If you make, or want to make, amigurumi, you need this technique!

And now to the video tutorial (in right- and left-handed versions, of course):

Magic Ring for Crochet (right-handed)

Magic Ring for Crochet (left-handed)

Note: The videos may look a little small embedded in the blog: if so, you can fullscreen them or click through to YouTube (links: right-handed; left-handed) to watch them full-sized 🙂

Magic Ring Tips

  • You can use magic ring in any amigurumi pattern – if it starts with a chain, just replace the starting ‘Ch 2, X sc in 2nd chain from hook’ with ‘Make a magic ring, ch 1, X sc in magic ring’.
  • To work in joined rounds instead of the spiral I demonstrate, simply sl st into the first st at the end of Rnd 1, then ch 1 to begin the next round.
  • Magic ring is also pretty handy for other crochet patterns worked in the round, too. For taller stitches, instead of the ch 1, you would ch 2 (for hdc), 3 (for dc), or more for even taller stitches, then work Rnd 1 of your stitches into the magic ring. Note that, with taller stitches, the turning (or non-turning, if you’re working without turning) chain typically does count as a stitch, so where I say to ignore the ch 1 in the video, you’d instead count that chain as the first stitch of Rnd 1, and sl st into the top of the chain before beginning Rnd 2.

If you enjoy my crochet tutorial videos, please help to spread the word about them, and/or subscribe to the PlanetJune YouTube channel.


The Essential Guide to Amigurumi book by June Gilbank

Loved this tutorial? I have so many more amigurumi tips and tricks to share with you!

Boost your amigurumi skills with my latest book, The Essential Guide to Amigurumi, your comprehensive guide to amigurumi techniques and tips.


Do you find my tutorials helpful? If so, please consider making a contribution towards my time so I can continue to create clear and concise tutorials for you:

Thank you so much for your support! Now click below for loads more crochet video and photo tutorials (and do let me know what else you’d like me to cover in future tutorials…)

See more helpful PlanetJune crochet tips and technique tutorials

Comments (43)

interview with June, part 1

As I’m a 99% self-published designer, I don’t often get profiled in crochet magazines etc, so my Ravelry group decided to interview me to find out a little more about who I am and what I do – my own PlanetJune Story, if you like! I’ll be posting the answers to some of their questions every now and again, and grouping them by theme if they fit together nicely. Here are the first three:

How did you learn to crochet? (from Sandy G, via the blog)
Who taught you to crochet? (from Monica, theMarkofSMB)
What was the first thing you ever crocheted? (from Linda, Fatals-attraction)

In 2003, my husband and I moved from the UK to Canada, and I had time on my hands while I looked for a job. I’d always liked making things and I’d dabbled in various crafts in the past: polymer clay, cross stitch, candlemaking, sewing, and others. At the time, there was a big craft shop in the middle of Toronto (Lewiscraft – the chain closed years ago, sadly) and I spent a lot of time in there, looking for things to try out that wouldn’t cost much money. I tried teaching myself to knit, but didn’t really enjoy it. Then I picked up a crochet hook and a ‘learn to crochet’ book, and fell in love.

Did you notice I avoided the obvious “I was hooked!” pun there? I hope you’re proud of me!

(I’ve just remembered, this wasn’t actually my very first experience with crochet: my aunt apparently taught me the basics when I was tiny, but I don’t remember that at all, although I do still have my old hook – I always wondered why I had a crochet hook in my childhood sewing box!)

I’ve never been much of a pattern follower – I like to make up my own things (a precursor of things to come…). I also don’t like to start with really basic projects. So I decided I’d learn as I go by making an afghan to use against the cold Canadian winter, using squares of single crochet, and that’s what I did.

Here’s the thing: I didn’t really know how to crochet at the time, and this was an ambitiously large project for a total beginner! I made that basic rookie mistake of thinking you should insert your hook into the back loop (instead of both) to begin each single crochet stitch. I’d never heard of gauge, or blocking. I slip stitched my pile of squares together, but sadly didn’t know about leaving a long tail to weave in securely when you finish off, so my poor yarn tails are only about an inch long. I’d also never heard of edging, which would have given my afghan a nicer finish…


My first afghan (made in 2003-2004, photo from 2006). One of these squares is the first thing I ever crocheted!

It’s not perfect, but that’s okay. I still use it all the time; I keep it draped over a folding chair in my office so I can sit comfortably when I’m making videos and tutorials. The BLO single crochet doesn’t look like a mistake, unless you know it’s not what I intended! And I love being able to see the first thing I ever crocheted and know how far I’ve come.

After that, I decided to learn all the crochet stitches by making a sampler afghan – and yes, I did need a pattern for that! I used the 63 Easy-to-Crochet Pattern Stitches booklet (highly recommended if you’d like to crochet a stunning heirloom afghan, or to practice a large variety of crochet techniques and stitches).

Puzzling through the instructions for the trickier squares was what made me finally realise my mistake with the back loops, and ending up with squares of vastly different sizes is how I learnt about the importance of gauge. It took almost 3 years, but I finished it (with a sneaky extra round of sc around the edges of the tinier squares to even the sizes up a bit!) and it looks pretty impressive, even if it’s not quite perfect:


My second afghan (started Feb 2004, finished Nov 2006, photo from 2006)

The moral of the story is that, clearly, nobody starts out as an expert! These two afghans show my crochet learning experience in every stitch, and I love them both for that. It was a self-taught struggle – especially with no Ravelry or YouTube videos to consult as you can now – but, by the time I’d finished the sampler afghan, I really understood crochet. I could have made a 2nd, perfect, sampler afghan, but it was time for me to try something different…

I think this post is long enough now – I’ll save the story of how I got into amigurumi, and the rest of the interview questions, for another day. 😉

I hope you’ve enjoyed hearing a bit about my crochet background. If you have any questions you’d like to add to the interview pool, please submit them on Ravelry or in the comments of this post – I’ll do another interview post in a little while!

Comments (15)

Commissions: moving the goalposts

When I launched my pattern commissions page on Friday, I wasn’t sure which of these scenarios to expect:

  • I might get no interest at all – I didn’t think that would happen, but as a worst case scenario I’d have lost nothing more than the time taken to set up the database and code the page.
  • I might get a few nibbles, and a pattern commission every couple of months – this was my predicted outcome.
  • I may get 2 pattern commissions at once – I didn’t think this was likely, but, just in case, I built in a clause that, should 2 patterns get funded within a month, I’d only collect the pledges for the second pattern after completing the first.

Well, I underestimated – in a big way. (I told you I was bad at making calculated business decisions!)

planetjune crochet pattern commissions
Eek – it’s going too well!

It’s been less than 4 days and I have one design fully pledged and several others getting close. I haven’t even notified my mailing list yet, so there could be a huge rush of pledges at that point. At this rate, my business could turn into full-time commissioned designs, which, while very flattering, isn’t something I can actually do – I still have all my other hats to wear, and a commitment to continue to make crochet videos and tutorials. I cannot possibly commit to creating more than one commissioned design per month – I can’t work more quickly without the quality of my designs suffering, and that’s not something I’m prepared to sacrifice (and, I’m sure, not something you’d want to pay for).

Plus, the commissions are only for basic animal designs. Anything complicated, or unusual, or something I’d be taking a gamble on in trying to create a design for it, is not going to appear on that commissions list – I have to wait for inspiration to strike before I can design things like that, and I need to leave myself time to let that inspiration happen.

planetjune crochet patterns
There’d be no dinosaurs or succulents if I only made commissioned designs!

So, here’s my solution: I’m moving the goalposts by raising the total commission amount from $60 to $90. Minimum pledges will still be $6. For the koala (which is already fully pledged at $60) there’ll be no change – I’ve already committed to designing that.

planetjune crochet pattern commissions
The updated system

If you’ve already pledged:

  • Your pledge stands at the dollar amount you originally agreed to.
  • The change shouldn’t make any practical difference to you – by the time my koala design is finished, I’m sure the pledges will be back up to the level they were when you pledged, or higher.
  • As before, you won’t have to pay for your pledge until I’m ready to begin the design.
  • If, however, you feel hard-done-by, just email me if you’d like to cancel your pledge. I’m not trying to con anyone – just to set up a system that will work in the long term.

I’m going with full transparency here and I hope you’ll understand my reasons for this – the whole point of the commissions system is to gauge which design ideas may be most popular, but without making a change to the system, all the options will soon look equally popular! It’s an entirely new system, and the challenge (and also the potential reward) of innovating is that you just can’t know in advance how successful an idea may prove to be.

I expect the pledging frequency will drop after the initial flurry, but I may need to tweak the system a little more in the coming weeks/months, and I may, at some point, have to shift the totals again. If I do have to, my rules will remain the same:

  • Any design that is already fully pledged will remain so.
  • Whichever design is fully pledged first will be created first.
  • The dollar amount of your pledge(s) will remain unchanged.
  • If you really need to cancel a pledge, you may do so by emailing me before the design is fully pledged.

The first two points mean there’s still value in pledging early if you’d like to see your favourite design(s) made more quickly, so please don’t see this as a sign to stop pledging!

I think this is the fairest way of doing things, but if you have any suggestions, please feel free to share them in the comments or by email – your opinion counts too!

Comments (7)

commission a PlanetJune pattern

I have a lot of design ideas – too many, in fact. We live in an amazing world, and there are just too many wonderful animals and plants for me to be able to recreate them all in crochet. To help me decide which to make next, and see which would be popular choices, I’ve launched a new pattern commission model, so now you can help me make my design choices!

The way it works is like a mini Kickstarter, but exclusively for PlanetJune designs. If you’d like me to design a new crochet pattern, instead of commissioning me outright to design it for you, now you’ll be able to make a pledge towards the design commission.

If you love the idea and want to get the pattern as soon as possible, you can pledge the entire commission amount; if you’re happy to wait a while for some other people to come in with you to make the total amount, you can pledge as little as $6 towards the commission, or anything in between.

There’s nothing to pay at the time you make a pledge; the pledges stay active until a design is fully funded, and, at that point, I’ll collect the pledged monies and start designing. Once the design is complete, I’ll email a copy of the pattern to each of the pledgers.

On the Commissions page, you’ll see a graph showing the design ideas currently available for commission, and their current pledge states. As soon as you make a pledge, the graph will update to reflect it:

commission a crochet pattern design from PlanetJune
These are just test pledges so you can see what the graph will look like when I have some real pledges – I’ve reset them all to $0 now.

You can also suggest new ideas to me; I’ll add each to the Commissions list if a) I’d be happy to make a design for it and b) I’m confident I’ll be able to design it in the designated timeframe. More complicated or unusual requests may take longer to get right, so, if I like them, I’ll either design them anyway, just because I want to, or they’ll be available for private commission, with deadlines and pricing dependent on the design itself.

If you click through to the Commissions page, you’ll also get a first glimpse of my new logo in action! Refresh the page and you’ll see the photo in the header changes, so (in future, once the rest of the site has been updated) you’ll see a different photo there each time you go to a new page on my site:

new header
Ooh, new logo alert!

It’s a really exciting time for me at the moment: I finally have the time to make progress on projects that have been in the works since long before I left Canada – everything got indefinitely postponed when things got too hectic… It was exactly a year and a day ago that I first started planning this new Commissions model, so it’s extra-nice to have it finally coded up and ready to go!

Site navigation will improve once I have the new blog design finished, but for now, there’s a text link to the Commissions page at the top of the right sidebar. —>

*click* – that’s the sound of another piece of my grand plan slotting into place 🙂

Comments (8)

amigurumi faces: secure stitching

I have a little trick that I use when I’m embroidering noses etc onto amigurumi faces, to easily hide the starting and ending tails of my thread and to keep my stitches secure. I thought you might like to see it in action in a new video tutorial.

It’s easy to hide the ends in the exposed stuffing if you’re stitching onto an open-ended piece, but not as obvious when you have to embroider onto a piece that’s already closed up, leaving you with no hidden place to start from. It’s especially important to fasten the ends securely if your amigurumi will be played with – you don’t want that cute face to get snagged on something and unravel!

secure stitching for amigurumi faces and embellishments, by planetjune

If you’re using non-safety eyes, this is also how you can stitch them on after you finish crocheting and stuffing the piece, so you can make sure they’ll be in the right place and give the cutest expression. (Crocheted 3D pieces change their shape when you stuff them: they stretch widthwise as the stitches expand into position, but not lengthwise. That’s why I recommend stuffing the head before placing the eyes, nose, and any other features – even if that then means pulling out the stuffing so you can attach the backs of safety eyes before re-stuffing!)

You can also use my secure stitching technique for attaching other embellishments onto your amigurumi – buttons, beads, sequins, felt patches, etc – it’s perfect for hiding thread ends of any type, whether you’re using worsted weight yarn with a large yarn needle, embroidery thread with an embroidery/tapestry needle, or even fine sewing thread or invisible nylon thread with a hand-sewing needle.

And now to the video tutorial (in right- and left-handed versions, of course):

Amigurumi Faces: Secure Stitching (right-handed)

Click to watch this video on YouTube.

Amigurumi Faces: Secure Stitching (left-handed)

Click to watch this video on YouTube.

Note: The videos may look a little small embedded in the blog: if so, you can fullscreen them or click through to YouTube to watch them full-sized 🙂

If you enjoy my crochet tutorial videos, please help to spread the word about them, and/or subscribe to the PlanetJune YouTube channel.

Baby Bunnies crochet pattern by PlanetJune

FYI, I’m demonstrating the technique in this video using one of my Baby Bunnies designs – the crochet pattern is now available in my shop and includes the patterns for 3 varieties of realistically adorable baby rabbits: Dwarf, Angora and Lop. 🙂


The Essential Guide to Amigurumi book by June Gilbank

Loved this tutorial? I have so many more amigurumi tips and tricks to share with you!

Boost your amigurumi skills with my latest book, The Essential Guide to Amigurumi, your comprehensive guide to amigurumi techniques and tips.


Do you find my tutorials helpful? If so, please consider making a contribution towards my time so I can continue to create clear and concise tutorials for you:

Thank you so much for your support! Now click below for loads more crochet video and photo tutorials (and do let me know what else you’d like me to cover in future tutorials…)

See more helpful PlanetJune crochet tips and technique tutorials

Comments (17)

Baby Bunnies crochet pattern

Bunnies are one of the most commonly-designed toys – maybe second only to the ubiquitous teddy bear. I’ve even designed 3 different bunnies myself, previously. But I don’t think I’ve ever seen a realistically-shaped amigurumi rabbit, which is strange when you think about it, because real bunnies (especially babies) are one of the cutest things you’ll ever see!

We could all use a little more cuteness in our lives, so I decided to do something about that, in the form of my new Baby Bunnies crochet pattern:

Baby Bunnies crochet pattern by PlanetJune

My Dwarf, Angora and Lop bunnies are so adorably tiny – about 4.5″ (12cm) long – that they can sit in the palm of your hand – just like real baby bunnies!

Meet the Bunnies

1. Dwarf
There was a time when I was desperate for a grey Netherland Dwarf rabbit. With their short ears and big eyes, I thought they were absolutely irresistible. My dream of a bunny of my own didn’t work out (although I ended up with the world’s most intelligent guinea pig instead, so that was okay!) but now, 20+ years(!) later, I finally have my little grey dwarf bunny:

Baby Dwarf Bunny crochet pattern by PlanetJune

FYI, while researching this breed, I discovered that this solid grey colouring is actually called ‘blue self’ in the rabbit breed standard – just like with cats!

2. Angora
Ever since I made my alpaca from alpaca yarn, I’ve been planning a series of natural fibre amigurumi, of fibre-producing animals made from their own yarn. With that in mind, I bought one precious 22g skein of locally-produced angora a couple of years ago – it was the only one I could find in my budget, and was unfortunately a 2-ply laceweight yarn: not exactly ideal for amigurumi! Here’s how to turn laceweight into worsted with a minimum of effort (a ball winder is essential though!):

  1. Wind the skein into a ball.
  2. Hold both the outside and centre ends together, and wind them together into another ball.
  3. Repeat step 2 with the doubled yarn, to make a ball with 4 thicknesses of yarn wound together.

Now, this isn’t exactly ideal; the new ‘plies’ aren’t twisted together, so you have to be careful to pick up all 4 strands of yarn with your hook as you form every stitch. But it was sooooo worth it to get to work with this angora yarn: although it took concentration to make sure I was grabbing all 4 strands with my hook, the yarn was deliciously soft and a real pleasure to work with. A little part of me did worry that I was ‘wasting’ this high-quality fibre, but, now I see the end result, I don’t regret it at all:

Baby Angora Bunny crochet pattern by PlanetJune

I wish you could reach out and touch her through your screen; words don’t do justice to how amazingly soft and fluffy she is!

3. Lop
Rounding out the party, I just had to add a baby lop to the collection. I couldn’t stop saying “awwww!” while I was looking up reference photos for this one; do a Google image search for baby lop bunny and you’ll see what I mean. Go on, do it now so you can see what I mean; I’ll wait… Right? Ahhh, the cuteness!

Baby Lop Bunny crochet pattern by PlanetJune

* * *

I’d love to take the credit for my clever timing with this design, but when I started it in January, it didn’t even occur to me that this would be a perfect design for Easter and the upcoming spring season. (I put that down to southern hemisphere confusion – it’s hard to think about Easter when you’re in the middle of summer.) But now, serendipitously, Easter is 6 weeks away, so it’s the perfect time to start making bunnies galore. The March PlanetJune CAL (more details nearer the time) will be Easter-themed, so I’m hoping to see a lot of adorable bunnies in amongst the crocheted Easter Eggs this year 😀

Baby Bunnies crochet pattern by PlanetJune

Tempted to make an armful of bunnies of your own? You can pick up the pattern right now from the shop – it even has a special price until the end of February! If you’re not quite ready to buy though, how about queuing Baby Bunnies on ravelry so you don’t forget about it?

Comments (29)

book review: Simply Crochet

I won the eBook version of this book through its blog tour, so I decided to review it for you. The following, as always, is based on my honest opinions!

Overview

Simply Crochet: 22 Stylish Designs for Every Day by Robyn Chachula is a crochet project book built around an unusual but useful premise: stash-busting! The 22 projects are split by the number of balls of yarn each uses: eight 1 ball projects, seven 2-3 ball projects, and seven 4-5 ball projects.

Simply Crochet review by PlanetJune

Partly because it includes patterns contributed by 15 crochet designers, there’s a real variety of projects in this book, including garments for women and children, and wearable and home accessories. This means that, while you probably won’t want to make all the included designs, there’s something for everyone here, and you’re bound to find some projects that you’d like to make. And you’ll also find a variety of techniques: thread crochet, tapestry crochet, tunisian crochet, motif-based designs, felting.

Here’s a selection of the designs that most appealed to me:

Simply Crochet review by PlanetJune
L-R: Tunisian Neck Lattice by Vashti Braha; Annabel Shawl by Kristin Omdahl; Linked Jacket by Robyn Chachula

And, as I clearly gravitate towards a certain style, here are some of the other designs, to give you a more complete picture of the variety of patterns:

Simply Crochet review by PlanetJune
L-R: Tallula Baby Top by Marlaina Bird; Dots and Dashes Baby Blanket by Ellen Gormley; Flapper Hat by Margaret Hubert

As with all Interweave books, it looks elegant and is clearly laid out. The patterns are easy to follow and all include Robyn’s excellent stitch diagrams and schematics. Tips from each of the featured designers on making the most of your yarn stash and crocheting on a budget are also scattered throughout the book.

As the book is intended to be used for stash-busting, the yarn requirements for each project give the weight of the yarn used in the design e.g. ‘Sportweight (#3 Light)’ as well as the specific yarn used for the sample. (I think this is a very useful addition that should be included in all crochet books, to make it easier for you to substitute yarns.)

Although there is a short section at the back of the book with descriptions of the stitches used, I wouldn’t choose this as a learn-to-crochet book. But, as a project-based book for crocheters, I think it works very well.

My Experience

Being short on time and looking for something I’m not too familiar with, I decided to test out Robyn Chachula’s Mystic Cuff (p27). I don’t dabble in thread crochet often, as gripping the work tightly enough to force my hook into the tiny spaces plays havoc with my hands, so I’ve never made anything doily-like before.

Simply Crochet review by PlanetJune
Mystic Cuff by Robyn Chachula (large text added by me to obscure the pattern!)

I have tiny wrists so I figured I’d need to adapt the pattern so the cuff wouldn’t fall off my hand. Here, I ran into a little problem: the gauge section only gives the finished cuff measurement, which means I’d have to complete the entire cuff to find out if my gauge matched Robyn’s, and then adjust the pattern (or my hook) and restart accordingly. It would have been helpful to have a gauge measurement as the size after Rnd 1, or even a guide as to what wrist size it fits (the cuff overlaps itself, so the finished measurement is larger than the wrist size) so I’d know much earlier if I needed to start over to match the gauge.

As my hands wouldn’t tolerate crocheting two cuffs in thread, I decided to assume my gauge was close enough and make my cuff smaller by dropping one repeat. My only other change was to substitute a larger crochet hook (2.25mm) for the foundation chain, as I knew I’d have problems working back into those chains if I made them with the recommended 1.5mm hook. And then I got to crocheting…

I found Robyn’s stitch diagram to be so clear that you could easily complete the cuff without reading a word (apart from how and when to attach the beads). I always prefer to check the written instructions too as I go, to make sure I haven’t misunderstood anything in the diagram, and I did find a couple of errors here in the way the repeats were structured (an extra dc2tog at the end of Rnd 3, and a missing ch 2 at the end of Rnd 4). However, the stitch diagram was correct in both cases, and is clear enough that I doubt many people would use the written instructions anyway. (I notified Interweave about the errors, so I expect Simply Crochet will be added to their Crochet Book Corrections page shortly.)

Aside from those minor glitches, which were easy to fix with a glance at the stitch diagram, the cuff came together very smoothly. I’d never seen beads attached in this way before – it was a very elegant method (although a bit tricky to guess how many chains were covered by each bead, so I made my starting chain too long, just in case, and unravelled the extra chains later). I finished the cuff easily. It took me 4 days because I didn’t want to risk giving myself longer-term hand pain, but it would be a very fast project if you don’t have hand problems like mine!

Simply Crochet review by PlanetJune
Isn’t it lovely?

Now for the bad news. It turns out that my gauge was way off: 20% smaller! That means that I could have made the cuff with no modifications, and it probably would have been only slightly too large for me… As it is, my modified cuff barely meets around my wrist, let alone has the overlap needed for the clasp. This is the only pattern in the book that doesn’t give a gauge swatch measurement, probably because the finished project is smaller than a typical swatch size, but it would have been helpful to know sooner that my gauge was so much tighter than Robyn’s. Even after blocking, it was still far too small, so I had to come up with a different method to affix the cuff around my wrist (I bent an eye pin into a tiny hook shape and stitched it to one end of the cuff):

Simply Crochet review by PlanetJune
I think my bent-pin solution for my too-small cuff is quite elegant!

The Mystic Cuff is a very pretty design. For most people, it’d be a quick enough project to whip up another one if your gauge was off – and you could give the original ‘gauge swatch’ (i.e. finished cuff) to a friend with a smaller or larger wrist. My complaint with the gauge is really only because of my own difficulties with thread crochet and hand pain, so making it once was enough for me, but now I have a solution for my sizing error, I’m very happy with my modified version:

Simply Crochet review by PlanetJune
My finished Mystic Cuff

Peeves

There’s not much to criticise here! Aside from the small errors I noted above (which I’m sure will be fixed with errata shortly) I only noted a couple of things:

  • The Billows of Baubles scarf (p19) is worked in stainless steel yarn, which isn’t something that’s commonly available, so I doubt it figures in many people’s stashes. As this is supposed to be a ‘use up your stash’ book, it would have been nice if there was a note about how the scarf might look if crocheted with a non-steel yarn of the same weight – it obviously wouldn’t be “an elegant sculptural accessory” as described.
  • The Linked Jacket (p129) mentions 2 hooks and eyes in the materials list. In one photo, it shows each side of the hooks and eyes attached to some sort of backing fabric or ribbon, however there’s no mention in the instructions of attaching the hooks and eyes. A little guidance as to placement of the fastenings, and whether that backing fabric is required (and if so what to use for it) would have been helpful.

Final Thoughts

Simply Crochet is a stylish book of crochet patterns featuring a nice variety of modern designs. The instructions are all clearly written and charted, the photos are clear and elegant, and the yarn weight and yardage info make it much easier to substitute yarns than in many other crochet books.

Sometimes pattern books can be very focused: all hats; all afghans; all one weight of yarn; all using one technique. If you’re looking for a project-based book featuring many different options for size, style, technique, and yarn weight, Simply Crochet will definitely fit the bill. Although it’s unlikely that every project in the book will appeal to you, there’s plenty of variety here to keep any crocheter interested!

Comments (6)

Next entries » · « Previous entries
  • Quick Links: Crochet

    navigation: arrow

    buy crochet patterns and accessories from my online store

    'Everyday Crochet' and 'The Essential Guide to Amigurumi' crochet books by June Gilbank

    Crochet video tutorials and step-by-step photo tutorials

    Free PlanetJune crochet patterns

    Frequently Asked Questions

    Quick Links: Crafts

    navigation: arrow

    Punchneedle Embroidery information, ebook & patterns

    Papercraft ebook & tutorials

    Free PlanetJune craft projects & tutorials

  • Blog Post Categories

  • Blog Archives

  • CAL Galleries

    Ravellenic Games: Team PlanetJune
    PlanetJune Reindeer Games
    PlanetJune Temperature Snake CAL

  • Welcome to PlanetJune!

    June Gilbank

    Hi, I'm June. Welcome to my world of nature-inspired crochet and crafting. I hope you enjoy your visit!

    If you'd like to get in touch, you can contact me here.
    crocheted Canadian flag by PlanetJune
  • June’s Crochet Books

    A fanned-out pile of the books Everyday Crochet and The Essential Guide to Amigurumi, with text 'The answers to all your crochet questions at your fingertips - find out more'
  • Support PlanetJune!

    Want to say thanks? You can send me money in seconds at paypal.me/planetjune (over $20) or paypal.me/planetjune2 (under $20) or send me a donation through my shop.

    Or simply click through from my links before you shop at Amazon, Etsy, KnitPicks, LoveCrafts and more, and I'll make a small commission on your purchase, at no cost to you! Start here:

    ♥ Support PlanetJune ♥

    Tip: This link is also in the footer of every page!

    Thank you so much for your support!