PlanetJune Craft Blog

Latest news and updates from June

Archive for Crochet

free pattern: Posy Blossoms (flowers & leaves)

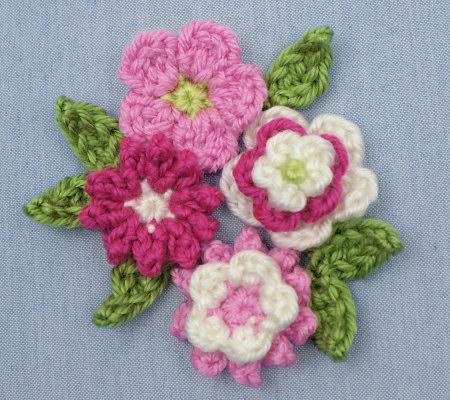
Posy Blossoms is my latest donationware crochet pattern for you! What began as an idea to make a tiny basic flower shape expanded until I had a set of seven different sweet miniature flowers with two leaf designs. As they all go together perfectly, you can mix, match, stack and combine endlessly to create floral embellishments perfect for any situation.

posy blossoms crochet pattern by planetjune

Make them in your favourite colours, or themed colours to match decor or occasion. (Thinking ahead, don’t you agree that dark green leaves with white and/or red blossoms would make beautiful winter/Christmas decorations..?) You can make each blossom in one or two colours, and stack the smaller blossoms on the larger ones in the same or contrasting colours.

Each tiny component takes only minutes (or less!) to crochet. The sizes vary from approx 0.75-1.5″ (2-4cm) diameter when worked in worsted weight yarn, and of course you could miniaturise them further with finer yarn and an appropriately smaller hook.

posy blossoms crochet pattern by planetjune

Use a single flower to embellish a hairclip, stitch two or three to a bag or purse, or combine your favourites into a larger posy for a brooch or pin. Stitch them around the neckline of a t-shirt or cardigan, embellish a photo frame, decorate your amigurumi, create floral crocheted jewellery… The only limit is your imagination!

posy blossoms crochet pattern by planetjune

Above and below, you can see one example of how I used this pattern (3 x blossom A with the optional knotted centre, plus 1 x double leaf I) to make a sweet forget-me-not posy hair clip:

posy blossoms crochet pattern by planetjune

As always, the pattern is free for your use, but if you’d like to send me a donation towards it (completely optional), you’ll receive the nicely formatted and easy-to-print PDF version of the pattern as a thank you.

I hope you’ll enjoy this pattern – I can’t wait to see how you use it! I’m hoping we’ll see a huge range of embellishments, accents and decorations, all made using unique combinations and colour schemes.

Go to Posy Blossoms pattern >>

Crochet Along with us!

The new PlanetJune Crochet-Along is an extended BotaniCAL, taking us through from now until the end of September. The botanic theme, chosen by the members of my ravelry group, covers all my flower, plant and fruit patterns, so this is the perfect chance to start creating with my new Posy Blossoms pattern, and to be inspired by how other people are using it!

PlanetJune BotaniCAL crochet-along patterns
PlanetJune Botanicals patterns – find them all in the Flowers & Plants section of my shop.

(By the way, although the Ravellenic Games have now ended, the Team PlanetJune roundup and prize drawing will be later this week, as there’s a 24 hour grace period for posting projects to the finish lines and I don’t want to omit anyone from the roundup post or from receiving their contest entries.)

Please join us at the BotaniCAL thread in the PlanetJune Ravelry group if you’d like to crochet Posy Blossoms – or any other PlanetJune Botanicals – along with us!

Comments (5)

vacation crochet

In the UK, there’s a TV ad campaign for an energy company featuring a character called Zingy. It’s a hugely popular series of commercials, but there’s no official Zingy merchandise available (yet).

Zingy from EDF Energy commercial
Zingy character and photo copyright Beatbots LLC, for EDF Energy commercials.

My sister is a big fan so I told her I’d make her a Zingy. Of course, I had no craft supplies with me, so I had to buy everything I needed locally – quite a challenge on the tiny island of Jersey! The best I could manage was DK weight yarn, a 3mm tapered hook (as far as I could tell, there are no in-line hooks available in the UK…), fibrefill, and some black and white felt. Here’s what I came up with:

zingy fan art by planetjune
My crocheted Zingy fan art. I’m not licensed to produce a pattern for the Zingy character, so please don’t ask me for one!

Considering the constraints, I think he turned out well, and the recipient is happy, so that’s the main thing πŸ™‚

I also had a chance to solve a problem using crochet: my sister had a dress with plastic rings connecting the bodice to the straps, but one of the rings had broken. The only way to replace the ring would be to unpick the stiching on the bodice loop and the strap, and re-stitch them around a new ring. And then I had the idea to crochet a ring directly, with no need to unpick any stitching. I bought some embroidery floss in a complementary colour, made a magic ring that passed through both strap loops, and crocheted over it, rotating it as I crocheted so the straps didn’t get in the way.

Of course, I had to replace both rings so both sides of the dress would match, but it only took a few minutes to crochet each replacement ring, and it ended up looking prettier than with the original plastic rings:

crocheted dress strap rings by planetjune
Close-up of new rings attaching the adjustable straps to the dress bodice, crocheted from embroidery thread.

I had packed yarn and hook to create my next crochet lace shawl design while I was away, but I didn’t even get halfway through it as I only worked on it during my flights and on one evening. But that’s okay – I can still look forward to finishing the shawl (I’m planning to do a beaded edging), and I’m glad I could do a little helpful crochet while I was visiting my family!

Comments (1)

Ravellenic Games training

I’m back from visiting my family! It was lovely to see them, but, wanting to make the most of my rare time with my parents, sister, and brother-in-law, I didn’t slow down when I got first a sore throat and then a cold, and as a result I’ve ended up with full-blown bronchitis (not much fun). Now I have to try to recover while trying to catch up on everything from the last week, but it was worth it to have some special family time πŸ™‚

Ravellenic Games 2012: Team PlanetJune

I haven’t had a chance yet to remind you about the Ravellenic Games, which start tomorrow! If you’d like to challenge yourself to crochet anything from any of my patterns, there’s still time to join Team PlanetJune and compete along with us to complete crochet projects and earn medals during the timeframe of the Olympic Games.

Prizes!

If you complete one or more events for Team PlanetJune, you’ll be entered into the draw to win special prizes from PlanetJune and Suncatcher Eyes.

There are a total of six prizes on offer:

  • $10 gift certificate for the PlanetJune shop (1 winner)
  • A free pattern of your choice from PlanetJune (2 winners)
  • 10 pairs of eyes (your choice of colours and sizes) from Suncatcher Eyes (1 winner)
  • 5 pairs of eyes (your choice of colours and sizes) from Suncatcher Eyes (2 winners)

And all other medalling (not meddling!) Team PJ members will receive the runner-up prize of a PlanetJune discount coupon – there are no losers here πŸ˜€

Events

There are lots of Events you can participate in (and we have a handy events’ list for the ones that are applicable for Team PlanetJune), but I thought I’d give you a couple of examples with the projects I’m hoping to medal in:

WIPs Wrestling
RULE: not touched since May 15 2012; projects can’t cross compete in other events

As my original amigurumi kingfisher unfortunately went MIA after being photographed for a certain magazine, I’ve been wanting to crochet a replacement. I started last year, but I’ve been so busy since then that I haven’t had a chance to work on it for months, so the Ravellenic Games will be the perfect opportunity (and incentive) to get him finished.

wip: amigurumi kingfisher by planetjune, in progress
I don’t think I’ve touched this kingfisher project bag since 2011!

Toy Toss
I won’t be crocheting any other existing PlanetJune patterns for the games, but this is the event category you can use for all my amigurumi! There is no design event, so I’ll be entering my next commissioned design, the Sea Otter, in the Toy Toss event too. To medal in this event, my challenge to myself will be to complete the actual design and sample otter, and not necessarily to publish the pattern by the end of the games (there’s no point in including the pattern writing in the challenge, as I need the instructions to be clear and perfect, and I can’t rush that).

Synchronized Stash Busting
RULE: use only stash yarn that is over a year old

You can qualify for the stashbusting event with a project that’s already entered in another event, so my Sea Otter design will also qualify here, as I originally bought yarn with a sea otter design in mind in 2008 (as part of an AquaAmi Set 2 that I never finished). I just never got around to actually designing it until it was commissioned – one of the reasons I love my new commissions process! But the yarn is still sitting in my stash, ready to go.

wip: amigurumi sea otter by planetjune, in progress
Some, but not all, of these yarn colours will be turned into a cute sea otter…

Training
We’re not allowed to start our projects until the Olympic opening ceremony (9pm tomorrow, UK time, i.e. 3PM Eastern, noon Pacific), but training (i.e. research, swatching, choosing yarns, etc) is allowed! So I’ll be relaxing on the sofa with my laptop and trying to get this bronchitis under control while training for the Toy Toss by doing lots of sea otter research. It’ll be fun – sea otters are totally adorable and I’m looking forward to learning more about them, to make sure my design will be perfect.

I’ll also be hunting through my big yarn stash bags to see if I can locate the cream colour I had bought for my otter’s face. Otherwise I’ll just give him a light taupe face instead, which is fine – sea otters’ faces lighten with age, so mine can just be a younger one πŸ˜‰

Join us?

Team PlanetJune - Ravellenic Games 2012

We’ll all be cheering each other on with our projects, so if you’d like some added motivation to help you crochet something special over the next couple of weeks, please join Team PlanetJune – we’d love to have you, and you may win a prize too! You can join at any time during the games, which end on August 12th, so don’t worry if you miss the opening ceremonies tomorrow.

It’ll be fun to see how many medals we can amass between us by the end of the games. Go Team PlanetJune!

Comments (1)

crochet seat cover

This post comes to you from beautiful Jersey, where I’m visiting my parents at the moment. My chair and I are actually on different continents right now, but I finished making this cover and took the photos before I left on my travels…

You may remember that the only way I was able to fix my badly-ripped office chair seat was with ugly frankenstitches:

mending my chair
I fixed the rip, but it’s certainly not pretty…

I decided to crochet a quick seat cover to hide the unsightliness. I picked a stitch pattern from a Japanese stitch pattern book and looked through my stash for some suitable yarn. I decided on Loops & Threads Impeccable – it feels hard and tough compared with the soft acrylics I usually use, so I’m hoping that means it’ll be hard-wearing too. I picked black to match the chair, with a dark red accent to match my fireplace, and started crocheting…

crocheted seat cover by planetjune
This stitch pattern was really fun to crochet!

(These really aren’t my colours, but working from stash means making compromises, and at least it matches the chair. Anyway, I won’t really see the finished cover much as I’ll be sitting on it almost all the time, so it doesn’t matter too much what it looks like – I just don’t want to see the ugly ‘scar’ from the giant rip any more!)

My one skein of black Impeccable just covered the seat top, with no yardage left over to crochet the side edges to keep it in place. I thought I’d use up some dark grey Impeccable for those, but at the first fitting I realised that wasn’t going to work:

crocheted seat cover by planetjune
Yuck!

So I sacrificed some of my precious Vanna’s Choice so I could redo the sides in black, and I ended up with this:

crocheted seat cover by planetjune
Much better!

A few details:

crocheted seat cover by planetjune
A custom-curved side at the front helps the top piece fit over the curved front of the cushion and stay in place.

crocheted seat cover by planetjune
I crocheted extra tabs at the back to tuck into the very tight space between the back and seat cushions (left: untucked tab; right: wedged into place). The tabs hold it all very firmly in place without visible ties.

And the end result is a nicely fitted cover:

crocheted seat cover by planetjune
It fits like a glove!

This was a satisfyingly fast project to complete, and it’s really nice to be able to use my crochet powers for good (I mean, to solve a problem by making something I actually need). The finished seat cover is a big improvement over the frankenstitches, and now I’m saved from buying an expensive new chair – mission accomplished! πŸ™‚

Comments (24)

the cleanest stripes in amigurumi: a comparison

Spoiler alert: in doing this amigurumi stripe technique experiment, I invented 2 new techniques that make much neater stripes than I’ve ever seen before! If you’re not interested in my experiments, jump straight to the Perfect Stripes for Amigurumi video tutorial πŸ™‚

perfect stripes for amigurumi by planetjune


It’s usually best to work amigurumi in a continuous spiral, to avoid any visible seams. The most useful reason to use joined rounds instead is if you’re forming stripes: you end up with a very obvious ‘jog’ between the start and end of each stripe with spiralled rounds, as the ends don’t meet.

striped amigurumi by planetjune
Some examples of stripes in amigurumi

I’ve had requests for a video showing how to crochet neatly in joined rounds, and, while making my sample for the video, I didn’t like the results I was getting, so I thought I’d try a little experimentation to make sure I’d demonstrate the best way to make joined rounds for stripes, with the joins as seamless and jogless as possible…

Joining: the basics

To form joined rounds in single crochet, when you reach the end of a round, you sl st into the first stitch of that round. Then, to raise your hook to the height of the next round, you ch 1. But there are several ways to accomplish this, so I tried every option I could think of, to see what gave the best result and whether it’s worth joining your rounds or not…

Spiral (no join)

The standard amigurumi continuous spiral.

#1: Change to new colour in the last loop of the stitch before the colour change, sc in each st around.

amigurumi stripe investigation by planetjune
It’s the bane of amigurumists: perfect stripes from the front (left), but a ‘jog’ at the back (right, marked by arrows).

The stitches are all even – there’s no seam at all – but the ends of the stripe don’t meet up at all.

Travelling Join

#2 and #3 are the same except for the point where you change colour (before or after the sl st).

Ch 1, sc in next st and in each st around, sc in sl st, skip ch 1. With [#2: same; #3: new] colour, join with sl st to first st.

amigurumi stripe investigation by planetjune

The seam is almost invisible but the colour jog is still fairly prominent with both options. #2 has too much yellow, and #3 has distracting bars of brown showing at the join of the yellow.

amigurumi stripe investigation by planetjune

And here’s the main problem with using either of these Travelling Join methods: the end of the round travels forward by one stitch with each round (marked by dotted lines in the pic to the right). This means it’s impossible to hide your seam at the back of the piece, because the seam moves with every stripe.

So far, #2 is the winner.
I should just add here that NeedleNoodles also has a jogless stripes tutorial. Her method is far better than both my #2 and #3, but it still uses a travelling join, so you can’t use it for any patterns with shaping (e.g. most of mine, which have shaping that defines the front or top) or anywhere you want to hide all the joins in one line at the back.

Stacked Join

#4 and #5 are the same except for the point where you change colour (before or after the sl st).

Ch 1, sc in first st (the same stitch you sl st’d into), sc in next st and in each st around. Skip sl st, skip ch 1. With [#4: same; #5: new] colour, join with sl st to first st.

amigurumi stripe investigation by planetjune

The stripe ends match up more closely, and the start of the round doesn’t travel. #4 is the method I’ve recommended in the past, and it’s reasonable, although you can see that the yellow has a little jump in the last stitch. #5 has very obvious brown bars at the join of the yellow.

amigurumi stripe investigation by planetjune

The downside with these Stacked Join methods is the series of visible horizontal bars along the seam (marked by arrows here). They’re caused by the sl sts that you don’t work back into, but the end result is that it looks like you’ve stitched along this seam with a series of too-loose whipstitches – and it’s even more obvious in reality than in my photo.

So far, #4 is the winner.

Experimentation

With my research done, it was time to invent my own join. The requirements were:

  • The seam must line up at the back to minimise visibility – it can’t travel around the piece.
  • The horizontal bar from my other stacked joins must be reduced as much as possible.

amigurumi stripe investigation by planetjune

To save you from boredom, I’ll skip a full summary of the couple of dozen variants I tried (you can see some of the rejects in my samples above!) and just present the winners…

Perfect Stripes

I’ve created 2 methods to create the best stripes in amigurumi: the Invisible Join and the No-Cut Join.

amigurumi stripe investigation by planetjune
#6: Invisible Join; #7: No-Cut Join

Can you see how much better they are than any of the standard joins?! The Invisible Join (as the name suggests) gives a slightly better finish, but the No-Cut Join is faster and less fiddly, so I recommend using a combination of the two for any pattern where you need to single crochet in joined rounds and/or make stripes. (More about that on the tutorial page.)

Now I have these new techniques at my disposal, you may well see more PlanetJune patterns involving stripes in the future! Curious how they are done? Allow me to demonstrate…

Continue to the Perfect Stripes for Amigurumi video tutorial >>

Comments (9)

crocheted gaming dice pattern

Gamers, take note: they’re here! My set of giant crocheted gaming dice, by popular demand:

crocheted d20 system gaming dice by planetjune

I cut out felt numbers to make my dice, but this is a fiddly and time-consuming technique, so I’m not recommending that you do the same: I give tips in the pattern for using fabric paint or embroidery to create the numbers, in addition to the templates I used to make my felt numbers and full numbering diagrams to create a perfect set of gaming dice.

Of course, the Gaming Dice pattern isn’t just numbering diagrams: it also has the ‘missing’ d10 shape – the only odd-one-out dice shape that isn’t one of the Platonic solids, and hence not part of my original set! I had a real challenge on my hands to create the d10 shape: it’s not formed from regular polygons like other dice, but from 10 kite shapes that combine into a pentagonal trapezohedron.

Not only was I constrained by the limits of making a good pattern (i.e. something that you can follow without tearing your hair out or getting confused) but it had to match the look, style and size of the 5 platonic solids in my Polyhedral Balls pattern, to make a complete matched set. And, after many prototypes, this is the d10 I came up with:

crocheted d10 shape by planetjune
I crocheted it in grey to separate it from the other colourful balls, as it’s not part of the Polyhedral Balls pattern and I’m hoping not to confuse anyone with this addition!

Because of the constraints, the final d10 shape looks slightly less pointed from the side (above, left) than a real d10, but the shape is essentially correct, and it functions perfectly as a die – one side always lands facing up, and all 10 sides are equal, so there’s equal chance of any number coming up.

Gaming Dice is my first Expansion Pack pattern – although I have another 9 in the works, and ideas for even more – so I hope I’ve set everything up clearly in the shop so people will understand what exactly they are buying. (If anything is confusing, or you think may be confusing to someone else who hasn’t read the explanation in this post, please do let me know so I can fix it before I bring out any more Expansion Packs!)

What is an Expansion Pack?

Expansion Packs by PlanetJune

  • An Expansion Pack is an add-on to an existing PlanetJune pattern.
  • The Expansion Pack lets you modify or add to the original pattern to create something else.
  • You cannot use the Expansion Pack alone – you must also purchase the original pattern in order to be able to complete the pictured items in the Expansion Pack pattern.

Gaming Dice, in particular, includes:

  • The crochet pattern and assembly diagrams for the pentagonal trapezohedron (aka d10 shape!)
  • Full numbering diagrams to accompany the assembly diagrams (for the d10 and all 5 of the original set), in right- and left-handed versions
  • Tips and suggestions for numbering the dice with fabric paint or embroidery
  • Templates for the felt numerals I used for my sample dice

You can buy the Gaming Dice Expansion Pack for $3 individually from the shop, or, if you haven’t yet bought the Polyhedral Balls pattern, you can select it as an add-on to that pattern before you add it to your shopping cart, and save $1 on the pair.

Launch Discount

Now, as I only just released the Polyhedral Balls a couple of weeks ago, you’re probably wishing you’d waited to buy it so you could get the combined-purchase discount, but don’t worry – I’ve figured out a way for you to get the discount too!

If you’ve already bought Polyhedral Balls, all you need to do is add the Gaming Dice Expansion Pack pattern to your shopping cart, together with anything else ($5 minimum), then use the code GAMERSRULE at checkout to get your discount! (Valid until end of June 2012.)

Note: If you don’t need anything else right now, this also applies to Gift Certificate purchases, so you can pick up a $5 gift certificate now, get your discount, and have $5 in your PlanetJune account ready for your next purchase, or to send to a crocheting friend!

crocheted d20 system gaming dice by planetjune

I’ve been planning for a long time to create Expansion Packs that extend the value of patterns you’ve already bought without you having to pay the full price again for something similar. I’m very interested to see how well this first one works out. There’ll be more to come! πŸ˜€

Comments (15)

chameleons!

I just have to share pics of the first chameleons people have made from my new pattern – I knew it would look great in variegated/ombre yarns as well as solids, but now I can prove it! And I think the page in my pattern with posing suggestions and examples was worth adding too – just look at these brilliantly-posed examples:


theMarkofSMB & CrochetChrisie


yasminlangley & theMarkofSMB


yasminlangley & Veggie


planetjune & theMarkofSMB

(If you’re wondering about the significance of that last pic, Michigan J Chameleon is a reference to this wildlife post of mine!)

These were made as part of the Free-For-All CAL in the PlanetJune Ravelry group, but I couldn’t wait for a whole month to share them with you. Thank you to Monica, Chrisie, Yasmin and Becky for letting me share their photos – I love how the yarn choices and poses give each chameleon his own personality, don’t you?

Comments (6)

Amigurumi Chameleon crochet pattern

That’s right, it’s my 3rd commissioned design – the Chameleon!

Chameleon amigurumi crochet pattern by PlanetJune

Thank you to my chameleon pledgers – this design was especially fun for me, as I could run out into the garden to consult with my ‘pet’ (actually wild) chameleon, Kermit, whenever I had a shape or proportion question πŸ˜€

Chameleons are probably the most fascinating of lizards because of their unique physiological adaptations. Here are a few of the most interesting chameleon facts for you!

Chameleon Fun Facts

  • There are well over 150 species of chameleon, ranging from under 1″ to 30″ in length.
  • Most chameleons are found in Africa and Madagascar.
  • A chameleon shoots its amazingly long tongue at its insect prey. The tongue is as long as its body and has a suction cup on the end to capture the insect.
  • Chameleons move slowly for camouflage, with a swaying motion like a leaf blowing in the breeze.
  • Chameleon colour changes are usually due to stress or other emotions, not for camouflage as popularly believed.

I can attest that chameleons are very hard to spot if they want to stay hidden! I’ve spent hours playing ‘where’s Kermy’ in my garden, and sometimes I find him on a branch I swear was empty moments before πŸ˜€

Kermy is a Cape Dwarf Chameleon, and he obviously influenced my design decisions – especially with the bright green colour – but my aim was to create the archetypal chameleon without getting too fussy with excessive details. So here are the factors I needed to build into my design:

  • Chameleons have large eyes, but their eyelids are fused together leaving only a small opening for them to see through. Each eye can swivel independently through 180° so chameleons can hunt and look for predators in all directions simultaneously.
  • Chameleons have amazing Y-shaped feet to grip onto branches. (They actually still have 5 toes on each foot: the toes are just joined together into forward- and backward-pointing groups.)
  • A chameleon’s prehensile tail can be held straight out for balance, curled around a branch for stability when climbing, or coiled tightly when asleep.

Chameleon amigurumi crochet pattern by PlanetJune

Some species have large horns, spines, crests or stripes, so, if you’re feeling especially creative and want to make a different type of chameleon, you could crochet extra pieces and add them. Of course, chameleons are found in almost every colour: red, blue, yellow, brown, orange; the easiest modification would just be to make one in a different colour – or wouldn’t a chameleon look amazing crocheted in a variegated yarn?

This design does use pipe cleaners for poseability, so please, as always, be sensible and omit the wires from a toy for babies or young children. (I give tips in the pattern for how to make your chameleon still look good if you choose to omit the wires.)

Chameleon amigurumi crochet pattern by PlanetJune

(A little note about my Commissions process – it’s still going strong – in fact, my 4th and 5th commissions were fully pledged before I even had a chance to complete this one! I didn’t anticipate this level of demand when I set up the commissions process, so I’ll be making some more changes later today or tomorrow – see my next blog post for details.)

Chameleon amigurumi crochet pattern by PlanetJune
With my arm for scale – he’s about 8″ long with his tail fully coiled up!

If you pledged towards the commission, you should have already received your copy of the pattern. Otherwise, if you’d like to make a chameleon of your own – or a whole troop in different colours – you can now pick up the Chameleon crochet pattern from the PlanetJune shop! I hope you like it πŸ™‚

If you’re not quite ready to buy though, how about queuing Chameleon on ravelry so you don’t forget about it?

Comments (14)

Next entries » · « Previous entries
  • Quick Links: Crochet

    navigation: arrow

    buy crochet patterns and accessories from my online store

    'Everyday Crochet' and 'The Essential Guide to Amigurumi' crochet books by June Gilbank

    Crochet video tutorials and step-by-step photo tutorials

    Free PlanetJune crochet patterns

    Frequently Asked Questions

    Quick Links: Crafts

    navigation: arrow

    Punchneedle Embroidery information, ebook & patterns

    Papercraft ebook & tutorials

    Free PlanetJune craft projects & tutorials

  • Blog Post Categories

  • Blog Archives

  • CAL Galleries

    Ravellenic Games: Team PlanetJune
    PlanetJune Reindeer Games
    PlanetJune Temperature Snake CAL

  • Welcome to PlanetJune!

    June Gilbank

    Hi, I'm June. Welcome to my world of nature-inspired crochet and crafting. I hope you enjoy your visit!

    If you'd like to get in touch, you can contact me here.
    crocheted Canadian flag by PlanetJune
  • June’s Crochet Books

    A fanned-out pile of the books Everyday Crochet and The Essential Guide to Amigurumi, with text 'The answers to all your crochet questions at your fingertips - find out more'
  • Support PlanetJune!

    Want to say thanks? You can send me money in seconds at paypal.me/planetjune (over $20) or paypal.me/planetjune2 (under $20) or send me a donation through my shop.

    Or simply click through from my links before you shop at Amazon, Etsy, KnitPicks, LoveCrafts and more, and I'll make a small commission on your purchase, at no cost to you! Start here:

    ♥ Support PlanetJune ♥

    Tip: This link is also in the footer of every page!

    Thank you so much for your support!