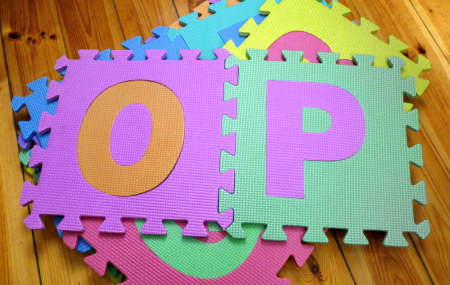
PlanetJune Craft Blog

Latest news and updates from June

Archive for Crochet

wet blocking for crochet (& knit)

Wet blocking is a process used to finish articles made from yarn. It basically involves soaking your finished piece of knitting or crochet to wet it thoroughly then shaping it to the final dimensions, pinning it into place, and leaving it to dry. When dry, the piece will hold its new dimensions (until you wash it, in which case it’ll need to be blocked again while it dries).

Why Wet Block?

Pretty much everything can benefit from blocking, to even up your stitches and square up the edges. But, for lacy projects, blocking is essential for opening up the stitches and showing off the stitch pattern.

wet blocking
My Rippled Lace Rectangular Shawl before and after blocking – there’s no comparison!

You’ll find wet blocking instructions in all my crocheted lace PlanetJune Accessories patterns, but I thought it might be helpful to go into a bit more detail here – I’ll explain how to wet block, the best tools for blocking, and some clever money-saving substitutions (also useful if you don’t have a local shop that sells the specialised blocking tools).

Basic Wet Blocking Instructions

  1. Soak your piece in lukewarm water until thoroughly saturated.
  2. Gently squeeze without wringing, to remove most of the water.
  3. Lay out on a clean towel and roll the towel up to remove excess moisture.
  4. Lay out onto your blocking surface (foam floor tiles, or a large dry towel on a flat surface).
  5. Gently ease into shape, using a tape measure to make sure the piece is shaped symmetrically or achieves the required dimensions.
  6. Use blocking wires and/or pins to keep in position while it dries.
  7. When completely dry (typically about 24 hours), remove the pins and/or wires.

Wet Blocking Tools

The minimum requirements for blocking are:

  • A towel to remove excess moisture
  • Towel(s) large enough to lay out your project onto
  • A surface you can pin into (a bed, carpet)
  • Rustproof pins

But, with a couple more purchases, your blocking will be much easier and more successful. The magic tools are:

  • Blocking wires
  • Foam floor tiles

Blocking wires are a revelation! Any time you need to wet block a crocheted (or knit) piece with straight edges, they save so much time and make a straight edge much easier to achieve. When you stretch a wet piece to block it and pin it into shape while it dries, the fabric between each pin tends to be stretched less, and you end up with a slightly scalloped edge, where each pinned point is stretched out more than the area between pins. You can minimise this by increasing the number of pins you use, but that takes a lot of pins, and a lot of time. If you weave a blocking wire along an entire straight edge of a piece, you need only a few pins to keep the wire in position, and the final edge will be perfectly straight. This is especially crucial for lace projects.

wet blocking
The blocking wire keeps the entire edge perfectly straight with very few pins

Foam floor tiles are waterproof and make a perfect surface for pinning into – especially if you don’t have a spare bed or carpeted floor to leave your work pinned to for 24-48 hours! The interlocking edges allow you to create a surface as large as you like, anywhere you have room for them.

wet blocking
Foam floor tiles are the perfect waterproof surface to pin into

Money-saving Tips

You can buy all these from yarn shops, for example KnitPicks sell reasonably-priced foam Blocking Mats ($25), Lace Blocking Wires ($20), and T Pins ($3). But you can save even more money by looking for the same products in everyday shops (this is also helpful if you don’t have access to a yarn store that sells dedicated blocking supplies). Here are my top tips:

wet blocking
Blocking wires (welding wires) and T pins

Stainless steel welding wires are identical to blocking wires, and you get over twice as many for about the same cost – so split a pack with a friend! Look in a hardware store for 4ft welding wires, and make sure they are marked as stainless steel so they won’t rust.

T pins. Okay, you can’t beat the KnitPicks price on these, but, for those outside their shipping range, you can also find T pins with dressmaking supplies in sewing shops. Just make sure you get rustproof pins – they’ll be touching your wet yarn and you don’t want to leave rust-coloured stains on your beautiful handiwork!

wet blocking
Foam floor mats (play mats)

Foam floor tiles or play mats for kids are identical to blocking mats. You can buy 2ft or 1ft square tiles in bright colours or serious grey, but I prefer the set of 12″ letter mats pictured above: with 26 interlocking mats I can arrange them into the shape of any crocheted piece I’m ever likely to make. Wait for a sale and you can pick up a set for under $10 – they may look a bit unprofessional, but you get far more blocking area than in an ‘official’ set of blocking mats, for far less money.
UPDATED 22 Mar 2013: Please read my warning about colour transfer if you use these mats!

Blocking is Key

Next time you’re crocheting lace, don’t worry if it looks less than encouraging while you’re crocheting – that is just part of the magic of lace! You can stretch it out between your hands to give you a temporary idea of how the finished stitch pattern will look after blocking. It’s always worth blocking your finished work to make it look its best, even if you use an acrylic yarn:

wet blocking
My Climbing Eyelets Triangular Shawl is 100% acrylic fingering weight, and, although the effect isn’t as dramatic as with the laceweight alpaca, blocking it still made a big difference. And, a year and a lot of use later, my shawl still looks just as good as the ‘after’ photo.

After all the effort you’ve put into crocheting a beautiful lacy piece, don’t skimp on that one last day waiting for your blocked piece to dry – it’s well worth it to turn your work from okay-looking to spectacular!

Ready to try making and blocking some crocheted lace? How about joining the PlanetJune Accessories Crochet-Along (on Ravelry)? The CAL runs until the end of the year, so you still have plenty of time ๐Ÿ™‚

Comments (20)

narrow pointed tubes for amigurumi [video]

Link easily to this tutorial in your patterns: www.planetjune.com/tube

how to make narrow pointed tubes for amigurumi, by planetjune

I know, you’re probably saying “Huh? What’s a narrow pointed tube?” Well, that’s the best generic term I could think of to describe thin pointy bits on amigurumi, such as spikes, legs, horns and tails.

thin-legged reptile and amphibian crochet patterns by planetjune

I know that the trickiest parts of my reptile and amphibian patterns (pictured above) are those really thin pieces that make the legs (and chameleon toes and tail). With many of my new dinosaur patterns (see a few examples below) featuring spikes and horns, I thought it was time to give you a demonstration of the way I crochet the tiniest thin tubes without difficulty. I hope you’ll find my tips useful!

Dinosaurs Set 1X Expansion Pack crochet patterns by PlanetJune: Amargasaurus, Kentrosaurus, Pentaceratops

Here’s the video tutorial (in right- and left-handed versions, of course):

Narrow Pointed Tubes for Amigurumi (right-handed)

Click to watch this video on YouTube.

Narrow Pointed Tubes for Amigurumi (left-handed)

Click to watch this video on YouTube.

Note: The videos may look a little small embedded in the blog: if so, you can fullscreen them or click through to YouTube to watch them full-sized ๐Ÿ™‚

Written Instructions

  1. At the end of Round 1, pull the magic ring gently closed (but not too tight, or it’ll be difficult to begin Round 2).
  2. At the end of Round 2, pull the magic ring tightly closed, then, before you begin Round 3, turn the piece right-side out. This is a little tricky, and it’s much easier to understand if you watch the video, but, in case you can’t do that, here’s my description from the video:

    To turn a narrow piece inside out, gently peel the stitches back, starting from the last stitch you made, and working backwards around the circle. It’s a slow process, so just keep pulling back around the edges gently, and the stitches will gradually reverse, until the magic ring pops through to the front, and you can see all the ‘V’ shapes around the edge of the piece. Once you’ve got it right-side out, roll the piece between your fingers to help set the stitches the right way out.

  3. Now you can begin Round 3, with the piece right-side out. Continue to crochet around the tube, and you’ll find it’s all relatively easy from here, even with a tiny 4-stitch tube. Just keep rotating the work, and single crocheting into the next stitch.

If you enjoy my crochet tutorial videos, please help to spread the word about them, and/or subscribe to the PlanetJune YouTube channel. And let me know if you have any requests for crochet techniques you’d like me to explain in a future video tutorial!


The Essential Guide to Amigurumi book by June Gilbank

Loved this tutorial? I have so many more amigurumi tips and tricks to share with you!

Boost your amigurumi skills with my latest book, The Essential Guide to Amigurumi, your comprehensive guide to amigurumi techniques and tips.


Do you find my tutorials helpful? If so, please consider making a contribution towards my time so I can continue to create clear and concise tutorials for you:

Thank you so much for your support! Now click below for loads more crochet video and photo tutorials (and do let me know what else you’d like me to cover in future tutorials…)

See more helpful PlanetJune crochet tips and technique tutorials

Comments (9)

9 new dinosaur crochet patterns

What could be better than my 9 amigurumi dinosaurs? How about 18 amigurumi dinosaurs?!

18 dinosaur amigurumi crochet patterns by PlanetJune
Click image to enlarge! The 9 new dinos are on the left in this picture, with the original 9 on the right.

This project has been a long time in the making; I kept getting requests for more dinosaur designs, but a lot of dinosaurs look fairly similar and I didn’t feel comfortable with the idea of changing a few parts and calling it a whole new pattern – that doesn’t seem fair to my customers! – so my Expansion Pack (EP) idea was born.

What’s an Expansion Pack?

Expansion Packs by PlanetJune

  • An Expansion Pack (EP) is an add-on to an existing PlanetJune pattern.
  • The EP lets you modify or add to the original pattern to create something else.
  • You cannot use the EP alone – you must also purchase the original pattern in order to be able to complete the pictured items in the EP pattern.

I put on my research hat and investigated all kinds of dinosaurs to find the most interesting types to add to the collection, and now I’d like to introduce them to you…

Meet the New Dinosaurs

Dinosaurs Set 1X Expansion Pack crochet patterns by PlanetJune: Amargasaurus, Kentrosaurus, Pentaceratops
Dinosaurs Set 1X, L-R: Amargasaurus, Kentrosaurus, Pentaceratops

  • Amargasaurus was small for a sauropod, at only 33 ft long. It could easily be recognised by its impressive neck and back spines. It was a herbivore and lived in the early Cretaceous period.
  • Kentrosaurus was 17 ft long – only half the size of its better-known relative, Stegosaurus. It was well-armoured with a spiked tail and shoulders. Kentrosaurus was a herbivore and lived in the late Jurassic period.
  • Pentaceratops was a 28-ft long relative of the Triceratops. Its name means ‘five-horned head’, but its large elongated neck frill was even more impressive than its horns. It was a herbivore and lived in the late Cretaceous period.

Dinosaurs Set 2X Expansion Pack crochet patterns by PlanetJune: Dimorphodon, Kronosaurus, Spinosaurus
Dinosaurs Set 2X, L-R: Dimorphodon, Kronosaurus, Spinosaurus

  • Dimorphodon was a member of the Pterosaur family. (Pterosaurs aren’t actually true dinosaurs, but flying reptiles that lived in the same time period.) Dimorphodon was a small pterosaur, with only a 4 ft wingspan, but had a large head, a puffin-shaped beak and a long tail with a diamond-shaped tip. It ate fish and lived in the Jurassic period.
  • Kronosaurus was a huge 30-ft long member of the Plesiosaur family. (Plesiosaurs aren’t actually true dinosaurs, but aquatic reptiles that lived in the same time period.) Kronosaurus was a short-necked plesiosaur from the early Cretaceous period. It lived in the sea and ate cephalopods.
  • Spinosaurus was 40-50 ft long – even larger than a Tyrannosaurus Rex! A long crocodile-like skull and the spines which formed a sail on its back made Spinosaurus instantly recognisable. It was a carnivore from the middle Cretaceous period.

Dinosaurs Set 3X Expansion Pack crochet patterns by PlanetJune: Protoceratops, Iguanodon, Panoplosaurus
Dinosaurs Set 3X, L-R: Protoceratops, Iguanodon, Panoplosaurus

  • Protoceratops was a small herbivorous dinosaur, at only 6-8 ft long. Unlike its relatives (including Triceratops and Pentaceratops), it had no horns, only its ridged neck frill. It lived in the late Cretaceous period.
  • Iguanodon was a herbivorous dinosaur from the early Cretaceous period. It was 30 ft long and weighed 4-5 tons. It could walk on all four legs or run on its back legs. Its name means ‘iguana tooth’ (as its teeth resemble those of modern iguanas).
  • Panoplosaurus was a 23-ft long ankylosaur from the late Cretaceous period. It was a herbivore with a heavily armoured back, a row of spikes along each side, and extra-long shoulder spikes. Unlike the related Ankylosaurus, it did not have a tail club.

EP Pricing Info

These expansion pack designs keep about half of the original pattern, and the other half is new, so I’m charging only $2.50 apiece – half the price of the original. And it gets even better if you buy a multipack set: only $6.50 for a set of 3.

The multipack EP sets correspond to Dinosaurs Sets 1, 2 and 3, so I’ve called them Dinosaurs Sets 1X, 2X and 3X to make it clear which EPs match up with which original set. And, for this launch week, you’ll only pay $6 each for any (or all!) of the three 3-pack expansion packs – a real bargain for 3 new dinosaur patterns! (No code required – the additional discounts are already set up in the shop, for this week only.)

Original Dinosaur Re-releases

All 9 of the original dinosaur patterns have now been given their makeover. If you log into your PlanetJune account, you can download the new versions of any dinosaur patterns you’ve already purchased, for no additional cost, for the next 2 weeks. (If you order any dinosaur patterns from today onwards, you’ll automatically get the updated versions.)

Dinosaur amigurumi crochet patterns by PlanetJune
18 dinosaur patterns – all in the new and improved format!

Future Plans

As I moved further into designing the Expansion Packs, I realised that the dinosaur I’ve had most requests for – Velociraptor – wouldn’t be possible here: in order to make a raptor, every component of the closest pattern (T rex) would have to be rewritten, which means it’s not an EP; it’s a whole new pattern! So, although 18 dinos is already an impressive collection, if these EPs sell well, it may not be a completely crazy idea for me to design Dinosaurs Set 4 (and maybe even Set 4X?) before I call this range complete ๐Ÿ˜€

Handy Links

  • If you’ve already bought the original Dinosaur patterns, you can pick up the new Expansion Packs (individually or in sets) from the Expansion Packs section of my shop.
  • If you’d like to pick up any original Dinosaurs + EPs, you’ll find each relevant EP as an add-on for the original patterns and sets, in the Prehistoric & Mythical section.
  • If you’d like to add any of the 9 new dinosaurs to your Ravelry queue and/or favourites, there’s a link from each individual pattern page in my shop.
  • If you’re admiring the colours of my dinosaurs, they are all made from Lion Brand Vanna’s Choice yarn – it has the best range of beautiful colours, and nothing in the range clashes with anything else, so you can’t go wrong.

Oh, and if you’re intimidated by the thought of crocheting the thin spikes on some of the dinos, don’t worry – those will be the subject of my next video tutorial, coming later this week! And then I may just need to collapse for a little while and recover from this mammoth project…

I really hope you love my new (and improved) dinosaur collection!

Comments (12)

Pine Cone Collection crochet pattern

I’ve had to reshuffle my plans a bit this month, as I polled my Ravelry group and discovered that mid-November (my intended release date for this year’s festive pattern) was far too late, so here we are, a month earlier, and it’s time to announce my Christmas design, complete with a launch week discount…

My Pine Cone Collection crochet pattern includes 6 different pine cone designs (3 thin and 3 round). Each cone is worked in one piece, with a clever, easy-to-memorize stitch pattern that results in highly realistic pine cones with perfectly offset scales.

pine cone collection crochet pattern by planetjune

I’m very happy with how realistic these pine cones look in any shade of solid or variegated brown (I used 6 shades of Red Heart Soft and Bernat Satin for my cones; the exact shades are also given in the pattern) and I just couldn’t stop making them once I got started. Once you grasp the concept for the scales it’s really simple, with no counting involved, so they make a perfect TV-watching project where you don’t have to concentrate much on what you’re doing.

Make them in any colour(s), and pile them in a bowl or vase, make them into a wreath, hang them from your Christmas tree, or string them into a garland.

pine cone collection crochet pattern by planetjune

Of course, pine cones don’t only make lovely Christmas decorations – especially in natural colours, they can be used as decoration throughout autumn and winter, or for natural woodland-look decor at any time of year.

If you are thinking about Christmas, wouldn’t they’d also look wonderful in bright and/or sparkly yarns as tree ornaments, or grouped together into wreaths or garlands? (You’ll have to use your imagination a bit here: apparently mid-October is far too early to find Christmas trees in South African shops!)

pine cone collection crochet pattern by planetjune

Pine Cone Collection includes the complete patterns for the 6 different sizes of pine cones pictured, 3 thin and 3 round, with sizes varying from 2-4″ (5-10cm) tall. The pattern also includes modifications that will enable you to make cones of any size, with the same overlapping scale pattern.

pine cone collection crochet pattern by planetjune
Thin cones: A (long), B (medium), C (short)
Round cones: D (small), E (medium), F (large)

If you like it, please don’t forget to favourite/queue Pine Cone Collection on Ravelry:

This week only, you can pick up the Pine Cone Collection pattern with a special launch week discount. (There’s no code needed; you’ll see the special price automatically in the shop.) I love my bowl of pine cones – I think they are perfect for fall/winter decor – and I hope you’ll enjoy the pattern too!

Comments (15)

amigurumi acorn donationware

Amigurumi Acorn was one of my first free patterns, from 2007. I created it before I came up with the idea of donationware patterns and I’ve been meaning to add it to my donationware library for a long time. I wanted to show that this popular pattern is far more versatile than just the cute smiley acorns I originally made, so I’ve made a second example set of acorns to showcase the more realistic look you can also easily achieve with this pattern:

amigurumi acorn crochet pattern by planetjune
Cute acorns and realistic acorns – both from the same pattern

To bring the pattern up to standard before adding it to my shop, I’ve revisited and updated the text, and reprocessed the photos to be brighter and clearer. If you’d like to donate for this sweet pattern, I’ve also included lots of additional bonus info in the PDF version:

  • Eye positioning tips
  • How to invisibly stitch the acorn to the cup
  • An unwired (child-safe) twig pattern (you can see this on my realistic acorns, below)
  • Suggestions for use, and bonus tips

amigurumi acorns crochet pattern by planetjune
My new realistic acorns have a child-safe wire-free twig (bonus pattern only in the PDF)

The improved Amigurumi Acorn pattern is perfect for an autumn wreath or other fall-themed decor; I hear that some people even have an autumn-themed Christmas tree! Although the worsted weight acorns are about 2″ tall, you can miniaturise the pattern with finer yarn or thread and a smaller hook and make adorable acorns that are closer to life-sized.

As always, the basic pattern is free for your use, but you’ll get the bonus tips if you choose to donate for the PDF version. I hope you’ll enjoy it!

Go to Amigurumi Acorn crochet pattern >>

Comments (2)

free pattern: Frosty Windows Scarf

Today I have a new PlanetJune Accessories donationware pattern for you: the Frosty Windows Scarf. With a pretty but easy-to-memorise stitch pattern, you can work up this scarf in almost any yarn. Once you’ve crocheted a couple of repeats, you’ll fly through it – it’s a perfect pattern for handmade gifts or for stashbusting!

PlanetJune Accessories Frosty Windows Scarf crochet pattern

Work it in any weight yarn – although I’d recommend DK weight (#3 light) or heavier for a snuggly scarf – with an appropriately sized hook. As with all my accessory patterns, this pattern has both written instructions and stitch diagrams, and it also includes full instructions for increasing the length and width if you’d like to make a wrap or shawl version!

Frosty Windows Scarf by PlanetJune

As always with my donationware, the Frosty Windows Scarf pattern is free for your use, but if you’d like to send me a donation towards it (completely optional), you’ll receive the nicely formatted and easy-to-print PDF version of the pattern as a thank you. As a bonus, the PDF also includes some additional exclusive info:

  • Step by step photo tutorial for the ‘tr2tog over next 5 st’
  • How to calculate how much fringe you’ll need
  • Step by step photos for making and attaching the fringe

I hope you’ll enjoy crocheting this scarf for yourself, and maybe you’ll make a few extras as Christmas gifts for friends and family?

Go to Frosty Windows Scarf pattern >>

Crochet Along with us!

Please share photos of scarves you’ve made from this pattern in the Accessory-Along CAL in the PJ ravelry group. We’ll be crocheting accessories from now until the end of the year, so you have plenty of time to join in and make even the largest, most ambitious accessory projects – or maybe multiples of the faster ones to give as gifts…

PlanetJune Accessories CrochetAlong
You can find all these patterns in the PlanetJune Accessories section of my shop.

Please join us at the Accessory-Along thread in the PlanetJune Ravelry group if you’d like to crochet a Frosty Windows Scarf – or any other PlanetJune Accessories – along with us!

Comments (1)

ultimate finish for amigurumi [video]

Link easily to this tutorial in your patterns: www.planetjune.com/finish

Continuing with my plan to make video tutorials for every essential amigurumi technique, here’s the latest one: the Ultimate Finish. This is the neatest way to fasten off and close the remaining hole when you’ve finished crocheting a piece of amigurumi. Together with the invisible decrease, you’ll be able to make the bottom of your amigurumi look almost as neat as the top, with a smooth, gap-free base.

ultimate finish for amigurumi video tutorial, by planetjune

(If you already know this technique, you can skip this video, if you like – there’s nothing extra that I didn’t show you in my original ultimate finish photo tutorial – it’s just another addition to my essential crochet tutorials video library.)

And now to the video tutorial (in right- and left-handed versions, of course):

Ultimate Finish for Amigurumi (right-handed)

Click to watch this video on YouTube.

Ultimate Finish for Amigurumi (left-handed)

Click to watch this video on YouTube.

Note: The videos may look a little small embedded in the blog: if so, you can fullscreen them or click through to YouTube to watch them full-sized ๐Ÿ™‚

If you enjoy my crochet tutorial videos, please help to spread the word about them, and/or subscribe to the PlanetJune YouTube channel. And let me know if you have any requests for crochet techniques you’d like me to explain in a future video tutorial!


The Essential Guide to Amigurumi book by June Gilbank

Loved this tutorial? I have so many more amigurumi tips and tricks to share with you!

Boost your amigurumi skills with my latest book, The Essential Guide to Amigurumi, your comprehensive guide to amigurumi techniques and tips.


Do you find my tutorials helpful? If so, please consider making a contribution towards my time so I can continue to create clear and concise tutorials for you:

Thank you so much for your support! Now click below for loads more crochet video and photo tutorials (and do let me know what else you’d like me to cover in future tutorials…)

See more helpful PlanetJune crochet tips and technique tutorials

Comments (14)

Rippled Lace Rectangular Shawl crochet pattern

With the Accessory-Along crochet-along about to begin on October 1st, this was perfect timing for me to launch my latest PlanetJune Accessories design, the Rippled Lace Rectangular Shawl. Two harmonising shades of yarn undulate together to create a beautiful gossamer-fine shawl with airy lightness and amazing drape.

Rippled Lace Rectangular Shawl crochet pattern by June Gilbank

The lace pattern has a 2-row repeat, so youโ€™ll pick it up in no time and be able to enjoy crocheting without having to worry about a complicated pattern. The clever stitch pattern is worked continuously from 2 balls of yarn; there’s no fastening off between stripes, or lengths of stranded yarn to worry about hiding. You can even omit the edging and the shawl will still look good!

My lace patterns are designed to be worked with normal-sized hooks into the spaces between stitches, which means that, after the foundation row, there’s no hunting for those tiny fine loops to work into, and they are a pleasure to work.

Rippled Lace Rectangular Shawl crochet pattern by June Gilbank

As always, I include full instructions for modifying the size of the shawl in both length and width – you can make it as narrow as a scarf, or as wide as a blanket, and the length is only determined by how long you want it (and how much yarn you have available).

My shawl uses an entire 400m/50g skein of the main darker colour, and 86% of the contrast colour skein – you can see that it’s very long and a shorter version would still be ample for most people. I used a laceweight baby alpaca yarn (KnitPicks Alpaca Cloud in Foxtrot Heather and Iris Heather) which is surprisingly warm, even with such an open lacy design – I’m really going to enjoy wearing this!

Rippled Lace Rectangular Shawl crochet pattern by June Gilbank

The Rippled Lace Rectangular Shawl is a versatile pattern; here are a few modification suggestions to get you started:

  • Use contrasting colours of yarn to punch up the ‘wow’ factor of the rippled stripe effect.
  • Work the design in a heavier yarn (fingering weight/sock yarns would look lovely) to give a more substantial shawl with more warmth and coverage.
  • Omit the edging, or edge with a third colour, and you’ll be able to make the most of your 2 skeins of yarn in the shawl body.
  • For a faster project, make a narrower scarf-width version.

Rippled Lace Rectangular Shawl crochet pattern by June Gilbank

I hope you’ll enjoy this shawl as much as I do! You can buy the Rippled Lace Rectangular Shawl pattern individually from my shop, or buy it as part of a custom set of any three PlanetJune Accessories designs for a bargain price.

If youโ€™re not quite ready to buy though, how about queuing it on ravelry so you donโ€™t forget about it?

If you’d like to make this shawl, or any of my other accessory designs, I hope you’ll join us in the PlanetJune Ravelry group for the Accessories crochet-along. The CAL officially starts on October 1st, but if you can’t wait to get going, feel free to start crocheting early!

Comments (5)

Next entries » · « Previous entries
  • Quick Links: Crochet

    navigation: arrow

    buy crochet patterns and accessories from my online store

    'Everyday Crochet' and 'The Essential Guide to Amigurumi' crochet books by June Gilbank

    Crochet video tutorials and step-by-step photo tutorials

    Free PlanetJune crochet patterns

    Frequently Asked Questions

    Quick Links: Crafts

    navigation: arrow

    Punchneedle Embroidery information, ebook & patterns

    Papercraft ebook & tutorials

    Free PlanetJune craft projects & tutorials

  • Blog Post Categories

  • Blog Archives

  • CAL Galleries

    Ravellenic Games: Team PlanetJune
    PlanetJune Reindeer Games
    PlanetJune Temperature Snake CAL

  • Welcome to PlanetJune!

    June Gilbank

    Hi, I'm June. Welcome to my world of nature-inspired crochet and crafting. I hope you enjoy your visit!

    If you'd like to get in touch, you can contact me here.
    crocheted Canadian flag by PlanetJune
  • A fanned-out pile of the books Everyday Crochet and The Essential Guide to Amigurumi, with text 'The answers to all your crochet questions at your fingertips - find out more'
  • Support PlanetJune!

    Want to say thanks? You can send me money in seconds at paypal.me/planetjune (over $20) or paypal.me/planetjune2 (under $20) or send me a donation through my shop.

    Or simply click through from my links before you shop at Amazon, Etsy, KnitPicks, LoveCrafts or Crochet.com, and I'll make a small commission on your purchase, at no cost to you! Start here:

    ♥ Support PlanetJune ♥

    Tip: This link is also in the footer of every page!

    Thank you so much for your support!