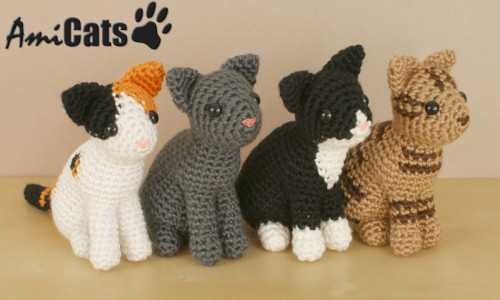
PlanetJune Craft Blog

Latest news and updates from June

Archive for Crochet

IG Crochet 2: Tutorials & Practice Projects

Idiot's Guides: Crochet by June Gilbank

This is Day 2 of my week of posts telling you all about my new book, Idiot’s Guides: Crochet, which will be released in 7 days, on 5th August.

For my main intro to the book, how to order your copy, and the other posts in this series, please see my main IG: Crochet info page.

Tutorials

Making really clear, easy to follow tutorials is something I’ve been perfecting for years, so I knew exactly what I wanted for the tutorials in this book:

  • Lots of photos, so you’re walked through every stitch step-by-step.
  • Ultra-close-up full-colour photos with relevant loops/stitches highlighted so you can really see exactly what you’re looking at.
  • Arrows that show exactly where to put your hook and point out any features to watch out for.
  • Extra tips and tricks to make your crocheting life easier.

In short, I made this experience as close to one of my video tutorials as I could manage in book form, so you can see exactly what my hook is doing at every stage of each stitch.

Idiot's Guides: Crochet by June Gilbank - sample tutorial page

My instructions are detailed and complete, and the hundreds of photos are in full colour, clear and close-up, so a beginner with no prior crochet knowledge can watch my fingers and replicate my movements as I walk you, step-by-step, through every stage of learning to crochet.

I’ve covered everything from the very basics that most books gloss over in a sentence (e.g. How exactly do you ‘yarn over’? What does ‘draw up a loop’ really mean?) in a series of chapters that build your skills gradually until you’re ready to learn a variety of more advanced stitches and techniques to help you perfect your work (e.g. How do you ‘weave in ends’? What is ‘blocking’ and how and when should you do it?).

Practice Projects

Throughout the chapters I’ve included a selection of practice projects – original patterns that let you try out your new skills and make something pretty in the process. Your first projects shouldn’t have to be embarrassing or dull!

Idiot's Guides: Crochet by June Gilbank - Practice Project 1: Three Simple WashclothsIdiot's Guides: Crochet by June Gilbank - Practice Project 2: Colorblock Potholder
Three Simple Washcloths – a perfect first project for the novice crocheter.
Colorblock Potholder – get to grips with colour changes and basic edgings.

Idiot's Guides: Crochet by June Gilbank - Practice Project 3: Triangle BuntingIdiot's Guides: Crochet by June Gilbank - Practice Project 4: Circular Coasters
Triangle Bunting – make top-down and bottom-up triangles that form exactly the same final shape, so you can practice both increases and decreases and make a pretty decoration in the process.
Circular Coasters – try out working in the round and using a combination of different basic crochet stitches in the same pattern.

Idiot's Guides: Crochet by June Gilbank - Practice Project 5: Pretty HeadbandIdiot's Guides: Crochet by June Gilbank - Practice Project 6: Puff Stitch Scarf
Pretty Headband – make a chainless foundation and try your hand at reading a charted stitch diagram.
Puff Stitch Scarf – an introduction to combination stitches, and perfecting those tricky puffs!

Of course, even if you’re not a crochet newbie, these beginner-friendly projects are also pretty enough to be given as gifts, or just to make for yourself 😉

Tip: If you’re beyond absolute beginner level, I’d recommend you add a little more pizzazz to the most basic project – the washcloths – by adding my Basic Edging (p50-51), or any of the other edgings from Edgings & Adornments (Chapter 14).


I’m only just getting started with showing you what I’ve included in this book – I told you it was epic! In tomorrow’s post, we’ll look at the Stitch Galleries and Motifs chapters, and then on Thursday and Friday I’ll finally get to show you my patterns…

Note: all images reprinted with permission, Alpha Books, a member of DK.

Comments (6)

IG Crochet 1: About the Book

This is Day 1 of my week of posts telling you all about my new book, Idiot’s Guides: Crochet, which will be released in 8 days, on 5th August. For my main intro to the book, how to order your copy, and the other posts in this series, please see my main IG: Crochet info page.

Overview

Idiot’s Guides: Crochet was an ambitious project, as I had so much valuable content to include. The end result is 264 pages and 750g (that’s over 1.5lbs!) of crochet techniques and beautiful patterns. To start this week, I thought I’d give you a taster of why this book is unique and special…

Idiot's Guides: Crochet by June Gilbank

Tutorials

If you’ve bought my Complete Idiot’s Guide to Amigurumi, you’ll know I like to cover every detail in my books, so you’ll have a valuable reference source you’ll consult over and over again as you want to learn about new techniques or refresh your memory on something you haven’t done for a while. But, in this book, I’ve been able to go into much more detail, starting from the very basics of crocheting, and creating a clear, easy-to-follow, comprehensive guidebook, with hundreds of full-colour close-up photos.

I’ll share more about the tutorials in tomorrow’s post.

Tips and Tricks

If you’re already an intermediate or advanced-level crocheter, please don’t think there’s nothing in this book for you! I’ve included all my helpful tips and tricks throughout the book – I bet you’ll find at least something you didn’t already know in there…

Patterns

And my patterns are definitely not only for beginners. Although they are all easy to intermediate level, I didn’t let that stop me from creating beautiful, elegant designs for every project. You’ll also find all the pattern extras that I always include in PlanetJune Accessories designs: full text instructions, charted stitch diagrams, schematics, and helpful resizing tips so you can customise your project with my guidance.

I’ll reveal details of all my patterns on Thursday and Friday.

Modifications

a variety of yarns by planetjune

I strongly feel that crochet patterns are not just there to be followed to the letter: a good pattern should be a jumping-off point, and crocheters should be emboldened to change colours, finished size, yarn type and thickness, and know you can still end up with beautiful results and have created something uniquely your own, using a yarn you really love.

I’ve seen the lovely results of this time and again with the projects people have made from my PJ Accessories designs, and yet most patterns are written so rigidly, without inviting the possibility of making your own tweaks. In IG: Crochet I encourage this kind of customisation, and include tips with every pattern as starting points for making your own modifications.

(Next week, I’ll be showing you some projects I’ve made by modifying the book patterns, so you can see what I mean!)

Photography

This book was a whole new experience for me, as it had 2 photographers: I photographed my hands and my test samples for all the tutorials and technical photos, but all the stylish photos of my finished projects and the appealing photos on each chapter opener page were taken by the talented photographer Becky Batchelor (who also did the graphic design and layout).

This means you get the best of both worlds: my clear, close-up detailed photos wherever I’m teaching you something, and Becky’s gorgeous eye-candy photos everywhere else. They show off my designs beautifully and make the book a pleasure to flip through and enjoy visually.

Idiot's Guides: Crochet by June Gilbank


Spot the difference? The top spread has my close-up technical photos and the bottom spread includes one of Becky’s lovely photos.


Throughout the rest of this week, as a countdown to the release date of August 5th, I’ll be giving you more detail about the different aspects of IG: Crochet:

  • Tuesday: Tutorials & Practice Projects
  • Wednesday: Stitch Galleries & Motifs
  • Thursday: Patterns (part 1)
  • Friday: Patterns (part 2)

Stay tuned!

Note: cover images reprinted with permission, Alpha Books, a member of DK.

Comments (3)

Aliens crochet pattern

In a happy coincidence, what day could be more appropriate to begin my planned alien invasion than today, Independence Day?!

PlanetJune Aliens give a nod to the classic Roswell grey aliens, but with a cute PlanetJune twist:

Aliens amigurumi crochet pattern by PlanetJune

Of course my aliens required the classic huge eyes, oversized heads, and enigmatic expressions, but I also had some fun adding my own personal touches. Aliens like these are usually depicted as very slender and elongated, but the friendly aliens who live on PlanetJune are carefully shaped to have tubby little tummies and bums, and are completely benign and non-threatening 🙂

Aliens amigurumi crochet pattern by PlanetJune
PlanetJune aliens are cute from all angles

Aliens has a few rounds of detailed colourwork to make the beautifully-shaped eyes, but after that it’s fast and easy all the way. The body and limbs work up extremely quickly, and this pattern has almost no sewing, so, once you get past the eyes, you can finish an alien in no time! If I didn’t have other commitments, I’d be tempted to whip up a much larger family of aliens, all in different colours….

My Aliens pattern includes 2 options: a fun poseable version with wired limbs (my green alien, below), and a more child-friendly version (my blue alien, below) with either thread-jointed arms that can swing at the shoulder or firmly attached arms (probably a safer choice for teething babies and kids who are a bit rough with their toys!). The pattern includes full instructions for all the options.

Aliens amigurumi crochet pattern by PlanetJune
As you can see, even the most enigmatic aliens can develop their own distinct personalities

Aliens is a new addition to the small PlanetJune Mythical pattern range, so I designed them to perfectly match the scale of my Yeti & Bigfoot pattern:

Aliens and Yeti & Bigfoot amigurumi crochet patterns by PlanetJune
It’s a mythical meet-up! Green likes to be the star of the show, and Bigfoot looks as camera-shy as always…

If you can’t resist the lure of these enigmatic aliens, you’ll find my Aliens pattern as a new addition to the Prehistoric & Mythical category of the PlanetJune shop. (And then you can make and share your mythical creatures as part of this month’s PJ Fiction & Fantasy CAL!)

Or, if you’re not ready to buy just yet, add Aliens to your queue or favourites on Ravelry, so you don’t forget about them:

Unlike in the movie, today we – together with our new alien friends – can celebrate our Independence Day. 😉 Don’t you know someone who’d appreciate having a cute alien or two in their life? Just looking at these aliens makes me smile, which is exactly what I need right now. I hope they have the same effect on you: let the alien invasion commence!

Comments (4)

Guinea Fowl crochet pattern

This is one of those ideas that came to me on a whim and then I couldn’t possibly not make it! There are flocks of wild guinea fowl around Cape Town, and I see, or at least hear, them several times a week. It’s hilarious to watch a group of empty-headed guinea fowl following each other around, especially when one starts to run and they all follow, bobbing along at surprising speed!

Guinea fowl have beautiful spotted feathers, a plump, shapely body, and a colourful featherless face – the perfect combination of eye-catching colouring and exaggerated appearance to form a bold, stylized design:

Guinea Fowl amigurumi crochet pattern by PlanetJune
Colour! Shape! Isn’t it fun?

Inspiration

I didn’t think a bird with such detailed markings would be something I could reproduce for a crochet pattern, but then I saw the colourful, stylized guinea fowl designs on ceramics by local artist Dragana Jevtovic. It suddenly occurred to me that I could use a similar concept in my own work, by also representing the tiny guinea fowl spots on a larger scale. With that thought, an impossibly detailed surface pattern became perfect for amigurumi. This could be the start of new explorations of colour and pattern for me; I’m so happy with the eye-catching result of this first design!

amigurumi guinea fowl and real feathers
I like to pick up guinea fowl feathers when I see nice ones like these; they’re too pretty to leave on the ground.

Guinea Fowl fun facts

  • Guinea fowl (aka guineafowl or guineahens) are found in the wild throughout Africa south of the Sahara desert, but they have also been domesticated.
  • There are several species of guinea fowl, but the most recognisable (and the one on which I based my design) is the helmeted guinea fowl.
  • Guinea fowl make excellent farm ‘watchdogs’, as they squawk loudly whenever potential danger approaches, sending all the chickens running to safety!
  • They eat insects and ticks as well as seed, so domestic guinea fowl are handy to keep around the garden for pest control.
  • Guinea fowl can fly, but prefer to run from danger. At night, they fly up into a tree to roost.

Guinea Fowl amigurumi crochet pattern by PlanetJune

About this pattern

As well as a lovely ornamental amigurumi, a guinea fowl would make a perfect toy, with its large cuddly body, and bright colours and patterning. Don’t be intimidated by the combination of shaping and frequent colour changes – I carefully designed this pattern to have separate shaping rounds and colour changing rounds, so you never have to worry about both at once! And, when you’re making the spots, the other yarn is always carried, so there are no knots to tie and no ends to weave in. It’s surprisingly simple, and very satisfying to see the beautiful body shape come together.

Guinea Fowl amigurumi crochet pattern by PlanetJune

If you’d like to make a guinea fowl (or a whole flock!), you’ll find my Guinea Fowl pattern in the new Birds category of the PlanetJune shop.

Or, if you’re not ready to buy just yet, add Guinea Fowl to your queue or favourites on Ravelry, so you don’t forget about it:

I hope you’ll enjoy this design as much as I enjoyed creating it! Please let me know what you think in the comments 🙂

Comments (12)

Meerkat crochet pattern

It’s taken a while to get to this point, but my Meerkat crochet pattern is finally ready to release!

Meerkat Fun Facts

  • Meerkats live in southern Africa and are related to mongooses.
  • They live in clans of about 20 in large underground burrows.
  • They primarily eat insects but also munch on scorpions (they bite off the poisonous sting first).
  • One meerkat always stands guard to look for danger such as eagles and jackals while the others forage for food.
  • Their dark eye patches act like sunglasses to protect their eyes from the strong desert sun!

meerkat amigurumi crochet pattern by planetjune
Amigurumi meerkat reporting for guard duty!

What Makes a Good Cover Photo?

As I’ve been talking about my process with this design (see the Design Reports #1, #2, #3 and #4), I thought I’d give you one last glimpse into what goes into a PlanetJune pattern: the cover photography.

My pattern was ready before the end of April, and all that was left was to take the cover photos. I had a great plan to take them while my Mum was visiting: we’d be passing through all sorts of natural African landscapes, so I’d take my camera and meerkat with me and take his photos on location in his natural environment!

We picked a day forecast for intermittent clouds and set out, only to find non-stop brilliant sunshine all day, which was great for Mum on her holiday – we had a lovely day relaxing in the sunshine and admiring the views – but not quite right for my cover shoot:

meerkat amigurumi crochet pattern by planetjune

Full sun means deep shadows, and that’s not what you need for cover photos! Although appealing photos play a critical part in selling a design, it’s very important that you, the potential customer, can clearly see exactly what you’re trying to make. A set of dull studio photos where you can look at the meerkat from every angle is more useful than a stunningly artistic nature photoshoot where you can’t really see the meerkat well. In these photos, the eye patches are overshadowed by actual shadow, the arms cast distracting dark shadows on the body, and the tail is all but invisible in deep shade.

I tried again in a different spot, but the sun was unrelenting (although I still think this photo is really cute!):

meerkat amigurumi crochet pattern by planetjune

So my pattern was stalled until Mum had gone back home and I could head back to my studio to recreate the Meerkat’s natural environment, PlanetJune-style.

I’m so glad I gave myself permission to drop the deadlines with my pattern commissions – I really wouldn’t have been happy to release the pattern with unhelpful cover photos, and I think taking the extra time at every stage of this design and pattern-creation process has really paid off. The final photos may not have the realism of the location shoot, but you can appreciate the meerkat’s cuteness much more with this set of photos, don’t you think?

meerkat amigurumi crochet pattern by planetjune

If you were one of my patient patrons who commissioned this pattern, the pattern is, at last, ready for you to download from your PlanetJune account – thank you!

For everyone else, don’t you think you need a meerkat to watch over you while you work? Buy the Meerkat pattern from the PlanetJune shop and you can crochet your very own meerkat sentry!

Or, if you’re not ready to buy just yet, add Meerkat to your queue or favourites on Ravelry, so you don’t forget about it:

I hope you like my Meerkat – getting to this point has been quite a journey, hasn’t it?!


I’ll be taking a short break before I begin my next commission. Life keeps throwing unexpected challenges at me, and illness and worry make everything a struggle. As I said in my Year in Review plan, I need some time with absolutely no commitments to escape this whirlpool of stress and ill-health, then I’ll have the energy to do justice to my Camel commission! I’ve been looking forward to making my camel for a very long time, and I still am – I just need a little space to breathe first 🙂

Comments (19)

Meerkat Design Report #4

I’ve been sharing my process as I design my amigurumi Meerkat crochet pattern – hope you find this behind-the-scenes journey through what goes into a PlanetJune design interesting! To catch up, see:
Part 1: Research, Shape, Colour and Sketch
Part 2: Construction Decisions
Part 3: Making The Head

Last time, I’d figured out the perfect colour changes for the head, and was ready for the final stage: finishing the rest of the head and designing the body, limbs and tail…

Part 4: Making the Body

I’m not sure if it’s because of the psychological aspect of showing you my progress as I go, or just something about the meerkat itself, but this design is proving to be really slow going. I’ve been struggling with proportion and had to draw myself a life-size reference sketch – I think it’s because meerkats are so long and thin, I kept underestimating how tall it should be!

planetjune meerkat proportions: full-size sketch
Full-size sketch for proportion reference

I typically have several designs on the go at once, and if I get stuck on one, I set it aside and work on something else for a while. The solution usually pops into my head a few days later, while I’m doing something completely different. Trying to force it doesn’t seem to make my brain come up with the best solution any more quickly – I’ll come up with something if I force myself, but I’ll usually end up redoing that part later when I think of a better-looking or simpler solution, so it’s best for me to just let it sit and wait for inspiration to strike.

That’s what happened here: it took me 3 attempts to get the arms right, not because the shape was wrong, but to improve my technique so I could simplify the pattern while keeping that unmistakable shape – meerkats have very unusual arms! There’s always a trade-off between making a design more realistic and making it easier to crochet, and, in my opinion, the best pattern will give a good balance: a recognisable result combined with an enjoyable crocheting experience.

Before I release a design into the world, I always take the time to stand back and consider if I’ve really done my best or if anything could be improved. If I’m not satisfied, it goes on pause for a while until I figure out how to improve it. That’s the stage I’m at right now – I’ve roughly pinned all the pieces together so I can get a better idea of what else needs to be changed:

planetjune meerkat design in progress
Almost there…

This isn’t the final design, but it’s pretty close! (I’ll save the full reveal for the finished design.) I have a little more work to do on the leg area, and some placements need adjusting, but next time you see my meerkat, he’ll be finished 🙂


So that’s really it for the design process – my next steps will be to make the final tweaks to the design and then, when I’m happy with all the pieces, to photograph the assembly process. I’ll write up my notes into proper crochet instructions, then edit my photos and describe the assembly process carefully so you’ll be able to easily understand how to turn the crocheted pieces of your meerkat into a close copy of my completed design.

After this, I have to set the pattern aside for a while so I can approach it with fresh eyes for technical editing and proofreading. During this break, I’ll be figuring out how to best photograph my meerkat so he’ll look at his most appealing, then take him into the studio (or out on location) for his cover photoshoot. I’ll select the best photos, edit them, and then add them to the pattern.

Once the pattern is complete, it’ll be time to do a final check for accuracy and clarity, then the pattern will – finally – be finished! Everyone who commissioned it will receive their copy, and then I’ll then publish it in my shop, so you’ll be able to buy my Meerkat crochet pattern if you aren’t among the commissioners.

UPDATE: See the finished Meerkat pattern here!


I hope this insight into what goes into making a PlanetJune design has been eye-opening for you. Some of my designs come together more quickly and easily than this, but there’s always a lot that goes on behind the scenes to create my deceptively simple-looking shapes and designs, and I don’t regret a second of that time – it’s always worth it 🙂

Comments (9)

finger protector for crocheters (or knitters)

When I was writing my new book, I had a lot of project samples to crochet in a short period of time, and that’s pretty hard on the hands.

my crocheting style
This is how I crochet (and this is my meerkat amigurumi, not a book project!)

When I’ve been crocheting for a while, the yarn starts to wear a groove in my forefinger as it rubs over it, and, if I keep going, my finger gets red and sore, and my skin condition gets aggravated. A chafed finger really isn’t something you want to see in close-up book tutorial photos, so I needed a solution to protect my finger.

chafed finger
Groovy (and not in a good way) – this is after just a few minutes of fast amigurumi crocheting

First I tried crocheting a finger sleeve, which worked really well for comfort and maintaining tension, but it looked clunky, and after a few minutes of use it began to spin around on my finger and wouldn’t hold in place. I also tried using plastic and metal yarn guides (meant for stranding multiple colours of yarn) which stopped the rubbing, but I found they messed with my tension.

Other suggestions from my ever-helpful Ravelry group members included finger cots, taping the finger, or wrapping paper towel around the finger and then taping over that.

In the end I found a very simple solution that works for me: I sewed a very basic finger sleeve from a smooth, stretchy, spandex-blend fabric. This fabric doesn’t fray, so all I needed was one row of stitching to turn a small rectangle of fabric into a tube that fits tightly over my finger.

finger sleeve
It’s not pretty, but it works

When I wear it, my yarn runs smoothly over the fabric and it doesn’t affect my crocheting tension. The tube did stretch a bit after a few days of hard use and became too loose to be effective, but I just stitched another seam slightly further in (thanks to Kris for that suggestion) and it hasn’t stretched further since. The best part is it only takes a tiny scrap of a smooth stretch fabric, and you can customise it to exactly fit whichever part of your finger gets rubbed or irritated by your yarn.

I keep the seam on the outside so it doesn’t dig into my finger, but rotate the sleeve on my finger so the seam doesn’t touch the yarn. Sometimes a simple solution is best: this little tube took mere minutes to make but has already saved me a lot of discomfort as I worked on all my book projects.

I still use my finger sleeve when I have a heavy crocheting session or use yarn that chafes, and I think I’ll whip up another half dozen or so – the biggest problem with finger sleeves is that they seem as prone as yarn needles to being mislaid! If I have a few handy, I’ll be able to keep one in every project bag.

finger sleeve
Problem solved!

If you’d like to try making a finger sleeve, look for a smooth fabric with spandex/lycra so it’s nice and stretchy. Or, if you don’t want to spend money when you only need a tiny scrap of fabric, I bet a piece snipped from an old swimsuit would work perfectly…

My starting fabric rectangle was 4cm long by 6cm around (about 1½ by 2⅜”) but I have small fingers, so you may want a longer and/or wider tube. Just measure your finger and remember to add a little extra width for the seam allowance (but not too much, as you need a tight fit so it won’t slip). If it’s too loose, just sew another seam to make the tube slightly narrower, as I did.

Do you have problems with yarn chafing your finger when you crochet or knit? Please share what works for you in the comments!

Comments (41)

free pattern: Tiny Eggs (in a Nest)

Today I have a new fast and easy donationware pattern for you: Tiny Eggs!

Make miniature (1″/2.5cm) crocheted eggs that are still egg-shaped despite their diminutive size. Decorate for Easter with a bowl of calorie-free ‘chocolate’ eggs (just don’t eat them!) or make them as realistic-sized songbird eggs.

tiny eggs by planetjune

Tiny Eggs is a free pattern, but I decided to go a step further with the donationware PDF version this time, so it gets its own name:

tiny eggs in a nest crochet pattern

Tiny Eggs in a Nest is the PDF version, available for any size donation, and it includes a bonus pattern for a tiny textured bird’s nest (3″/7.5cm diameter) which I designed especially for these eggs.

The beautiful nest is smooth on the inside and textured on the outside, just like a real bird’s nest, so you can make a nestful of Tiny Eggs as a lovely decoration to celebrate spring, or as the perfect accompaniment to an amigurumi bird.

I really appreciate those of you who choose to donate for my donationware patterns (whether it’s a $1 or $20+ donation – every dollar counts). I’d have stopped creating ‘free’ patterns long before this point if not for your generous donations that support the creation of future donationware patterns and make it worth my while to keep creating them!

So, to show my appreciation, I give added value to the PDF version wherever I can, and in this case, it means the very special textured nest pattern, available exclusively in the Tiny Eggs in a Nest PDF pattern. With the bonus nest pattern, Tiny Eggs can do double duty as both a mini Easter Egg pattern and a sweet bird’s nest pattern.

tiny eggs in a nest by planetjune

I hope you enjoy making the teeniest tiniest crocheted eggs, with or without the nest!

Go to the free Tiny Eggs pattern >>

Or jump straight to donate:

Order the Tiny Eggs in a Nest pattern >>

Not ready to make it yet? Add it to your Ravelry queue:

PS – Don’t forget to share your eggs and/or nests in the PlanetJune Spring/Easter CAL on Ravelry 🙂

Comments (2)

Next entries » · « Previous entries
  • Quick Links: Crochet

    navigation: arrow

    buy crochet patterns and accessories from my online store

    'Everyday Crochet' and 'The Essential Guide to Amigurumi' crochet books by June Gilbank

    Crochet video tutorials and step-by-step photo tutorials

    Free PlanetJune crochet patterns

    Frequently Asked Questions

    Quick Links: Crafts

    navigation: arrow

    Punchneedle Embroidery information, ebook & patterns

    Papercraft ebook & tutorials

    Free PlanetJune craft projects & tutorials

  • Blog Post Categories

  • Blog Archives

  • CAL Galleries

    Ravellenic Games: Team PlanetJune
    PlanetJune Reindeer Games
    PlanetJune Temperature Snake CAL

  • Welcome to PlanetJune!

    June Gilbank

    Hi, I'm June. Welcome to my world of nature-inspired crochet and crafting. I hope you enjoy your visit!

    If you'd like to get in touch, you can contact me here.
    crocheted Canadian flag by PlanetJune
  • A fanned-out pile of the books Everyday Crochet and The Essential Guide to Amigurumi, with text 'The answers to all your crochet questions at your fingertips - find out more'
  • Support PlanetJune!

    Want to say thanks? You can send me money in seconds at paypal.me/planetjune (over $20) or paypal.me/planetjune2 (under $20) or send me a donation through my shop.

    Or simply click through from my links before you shop at Amazon, Etsy, KnitPicks, LoveCrafts or Crochet.com, and I'll make a small commission on your purchase, at no cost to you! Start here:

    ♥ Support PlanetJune ♥

    Tip: This link is also in the footer of every page!

    Thank you so much for your support!