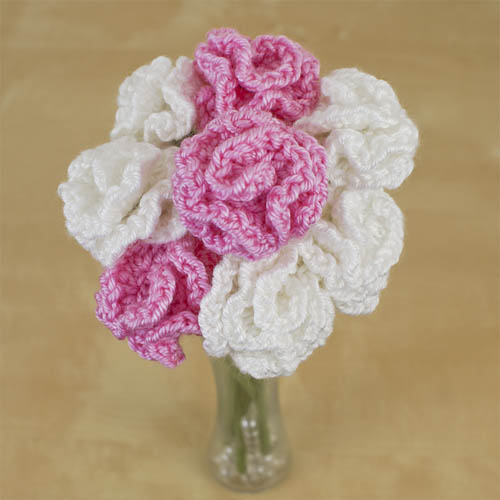
PlanetJune Craft Blog

Latest news and updates from June

Archive for Crochet

a new Chunky Moebius Cowl

Trendgarne kindly sent me some of their ONline Linie 346 Arona yarn, and I decided to try it out with my free Chunky Moebius Cowl pattern. Isn’t it lovely?

PlanetJune Chunky Moebius Cowl

Arona is a 100% cotton ribbon yarn that comes in a 100g ball, which provides a generous 230m of (roughly) worsted weight yarn.

Linie 346 Arona yarn

As you can see, it comes in a beautiful range of variegated shades with slowly-changing colours. I really love all these colourways – aren’t they gorgeous?

Linie 346 Arona yarn

This yarn has an unusual flat ribbon construction, and there’s no recommended crochet hook size given on the ball band, but the recommended knitting needle size is 5-5.5mm. (A good rule of thumb in these cases is to go up a couple of hook sizes from the recommended needle size, as crochet tends to need a larger size so the piece drapes nicely and isn’t too stiff.)

Linie 346 Arona yarn

I swatched with a few different hooks and decided I like the fabric I got with a K (6.5mm) hook. As this yarn is finer than my pattern calls for, I started with a 76 stitch foundation to make a 22″ circumference cowl.

The moebius construction means that the cowl is worked outwards from the middle, and I enjoyed watching the colours change as my cowl grew, from the blue-purple foundation, through light purple and then on to pink and beyond…

Linie 346 Arona yarn

The yarn is easy to work with and the stitch definition is amazing. Even a simple stitch pattern like this stands out clearly and looks so good with the colour-changing yarn.

I worked 10 rows of my pattern until my cowl was 5″ tall. It was finished in no time, and took less than half a ball of yarn (making it a real bargain!)

Planetune Chunky Moebius Cowl

The finished cowl is smooth and cool in the cotton yarn. It feels lovely against my skin and would be perfect for the first chill of breezy autumn days.

As you can see from my selfie at the top of the page, my new worsted weight yarn cowl looks just as good as the chunkier versions, and it sits beautifully against my neck under a light jacket without excess bulk while still keeping my neck warm (useful now I have such short hair…)


chunky moebius cowl crochet pattern by planetjune

If you’d like to make a Chunky Moebius Cowl too, my pattern is free here – it’s a fast and fun stashbusting pattern, and a great choice if you’re making a start on your Christmas gifts!

As this is a donationware pattern, if you donate a dollar or more you can get the PDF version, which includes bonus content, including a fully illustrated explanation of how the Moebius construction works, standard measurements for man, woman, and child, and additional step by step photos.


I’m looking forward to coming up with the perfect pattern to use my other balls of the Arona yarn! I really enjoyed its smoothness, stitch definition, and, of course, the wonderful colourways. If you’d like to try this yarn too, here’s the Arona Ravelry listing (it includes some links to online stockists, in case you can’t find it locally).

Comments (1)

Mushroom Collection & Variations crochet patterns

I have two new Fall-themed patterns to launch today: my new Mushroom Collection, and an Expansion Pack so you can crochet even more types of mushrooms!

Mushroom Collection crochet pattern

The Mushroom Collection includes 6 different realistic mushroom designs (3 domed and 3 flat, each in small, medium and large sizes). All the mushrooms in this collection are perfectly shaped, with gills hidden under the caps and a crisp colour change between cap and gills. They all use the same techniques, so once you’ve learnt them with your first mushroom, you’ll be able to whip up more in no time!

Mushroom Collection crochet pattern by PlanetJune

Choose the shapes and sizes you prefer, or create a mixed arrangement in a variety of shades of white and brown. Pile them in a bowl, arrange them on a window ledge, or add them to a seasonal centrepiece or wreath.

Mushroom Collection crochet pattern by PlanetJune

I’ve shown my mushrooms with either a dark cap and pale base, or a neutral cap and stem with dark gills, but you could also make a single-coloured mushroom, or one with different colours for the cap, gills and stem, giving 4 different colour options for each style of mushroom.

Mushroom Collection crochet pattern by PlanetJune

The mushrooms don’t use much yarn (15-35m each, depending on size/style) and look good in all sorts of colours, so they make great stashbusters! And you can stick with my neutral shades or get more whimsical with brightly-coloured caps – it’s completely up to you.

Mushroom Variations Expansion Pack

This Expansion Pack includes all the modifications required to crochet each of the mushrooms in the Mushroom Collection with any/all of these variations:

Mushroom Variations Expansion Pack crochet pattern by PlanetJune

  1. Red and White (top left): This colour scheme makes beautiful decorative mushrooms (perfect for Christmas!)
  2. Short Stem (top right): Especially good for play food – these mushrooms look good enough to eat.
  3. No-Sew (bottom left): A speedy crocheted alternative to the standard needle-stitched finish.
  4. No Gills (bottom right): A quick and easy option – great if you want to whip up a large batch of mushrooms in a hurry.

What is an Expansion Pack?

Expansion Packs by PlanetJune

  • An Expansion Pack is an add-on to an existing PlanetJune pattern.
  • The Expansion Pack lets you modify or add to the original pattern to create something else.
  • You cannot use the Expansion Pack alone – you must also purchase the original pattern in order to be able to complete the pictured items in the Expansion Pack pattern.

You can pick and choose to apply any or all of the modifications to any of the six mushroom sizes and styles from the Mushroom Collection, making 96 distinct mushroom possibilities (or 384 if you include the different colour options!)

All the variations (apart from the Red and White) make the mushrooms faster to crochet/assemble.

Red and White - Mushroom Variations Expansion Pack crochet pattern by PlanetJune

The spots on the Red and White mushroom obviously take a little more time (especially for the large one!), but the result is so cute, and they’d make gorgeous Christmas decorations as well as Fall decor, so you can repurpose them and keep them on display for months 😉

Fall CAL

We’d love to see the mushrooms you’re making in the PlanetJune group on Ravelry – you can make mushrooms galore (or any other fall-themed PlanetJune designs) as part of the current crochet-along. The CAL runs through till the end of November, so there’s time to crochet a whole variety of different mushrooms…

I hope you’ll join us – I can’t wait to see all the combinations that sprout up!

Links to Buy & Launch Discount

As with all my Expansion Packs, you can buy the patterns separately (although please note that you do need the base Mushroom Collection pattern to be able to make any of the Mushroom Variations), or there’s a discount when you buy both together.

But to sweeten this deal even more and give you an incentive to join the CAL right away, I’m offering an additional discount on the Multipack Set (Mushroom Collection & Variations) if you buy within the next 7 days, so you can get endless mushroom options for only $7.00!

So, here are your options:

Or, if you’re not ready to buy yet, click through to Ravelry and favourite/queue them so you won’t forget about them!

Mushroom Collection & Variations crochet patterns by PlanetJune

I didn’t think I’d ever be tempted to call mushrooms gorgeous, but these designs look so decorative, I think I might change my mind on that front: they’re both realistic and stylised, and the more you make, the better they look together…

What do you think? I hope you’ll have as much fun choosing colours and crocheting mushrooms as I did while designing them 🙂

Comments (5)

Review: Fauxchet

I’m always interested to see and try new innovations in yarncrafting, so when I heard about Fauxchet, I was intrigued. Billed as ‘a new way to crochet’, fauxcheting uses a special tool in place of a crochet hook. Just as knooking is the process of forming actual knit stitches with a modified crochet hook (see my review of The Knook here), the Fauxchet easyloop tool forms actual crochet stitches using a completely different method.

Fauxchet Easyloop Yarn Tool review
(If you have a knitting machine you may recognise the special tool as a stitch transfer tool for making cables etc, but this is a clever repurposing.)

Now, as a crocheter, you may be wondering why on earth you’d want to do this! I wondered the same, which is why I was eager to test out this tool for myself and see if it offers anything new and different from standard crochet.

After trying it out, the main benefits I see are that:

  1. It’s very easy to learn, as there’s just one movement: pushing the tool into the work, grabbing the loop with your other hand, then pulling the tool back out. I think this would make it a fun entry into yarncrafting for children and non-crocheters.
  2. It uses completely different muscles and movements from crochet. If you have problems with mobility or pain in your hands or wrists, Fauxchet could be a good solution. You don’t need to tension the yarn, as the stitch size is controlled by the size of the loops you form by pushing the tool into the fabric – the further you push the tool, the larger your stitch. You don’t need to rotate the tool at all, and the only motions are pushing/pulling with your dominant hand, and pinching/releasing with the thumb and forefinger of your other hand.
  3. As you’ll see below, I love the fabric that it forms!

My Experience

I started out by trying all the basic stitches (chain, slip stitch in back and both loops, single crochet in back and both loops). Although there is a slight learning curve, I found that I could form nice even stitches within a couple of rows of my sample:

Fauxchet Easyloop Yarn Tool review

Prior crochet experience is not at all necessary, as Fauxchet is worked completely differently. The back of the fabric faces you while you crochet, and you work left-to-right across your fabric (right-to-left for left-handers!), so it doesn’t feel at all like crocheting.

You thread the end of the yarn through the eye at the front of the tool before you begin:

Fauxchet Easyloop Yarn Tool review

Then, instead of building up loops on your hook as you form each stitch, you grip the loops with the thumb and forefinger of your non-dominant hand. This sounds like it may be a bit tricky, but is very simple once you’ve practiced for a few minutes.

The basic Fauxchet motion is very simple: your dominant hand pushes the tip of the tool into a stitch, then pulls it back out again, while your other hand pinches the loop that’s formed between thumb and forefinger. Those are the only motions involved! Take a look:

Insert the tool into a stitch:
Fauxchet Easyloop Yarn Tool review

Grip the loop with your other hand, then withdraw the tool:
Fauxchet Easyloop Yarn Tool review

Note: I’m left-handed, and these photos are not intended as a tutorial – just to give you a basic idea of the very simple technique.

I highly recommend you watch the video demos on the Fauxchet site to see how easy the stitches are in practice, with the instruction book to hand as well. Although the instruction book does explain the stitches step-by-step, it makes them sound more complicated than they actually are (e.g. inserting your hook into the next stitch and through the loop you’re holding is accomplished in one easy movement, but it’s split into two steps in the instructions).

My experience was also complicated by the fact that there are no left-handed instructions (in the books or the videos) so I had to constantly reverse all the directions. But as the stitches are so simple – as you’ll see if you watch the videos – it wasn’t too difficult to swap every ‘left’ and ‘right’ in the instructions.

My Fauxchet tip is to make the starting chain extremely loosely. In fact, if you’re fairly new to fauxchet, I recommend you make the first few rows (or a swatch) to get your tension even, then unravel it all and start again with the same yarn once you’ve got into the rhythm.

I found the process of ‘fauxcheting’ very soothing once I got into the rhythm. It made a nice change from crocheting and knitting, and the fabric formed is so loose and drapey that it looks very pretty, even with using only the simplest crochet stitches.

Fauxchet vs Crochet

Although Fauxchet does produce actual crochet stitches, it’s far more limited than a crochet hook. As there’s no mechanism for a yarn over, you can only use it to make short stitches: chain, slip stitch, single crochet, and loop stitch (although, by working into back, front or both loops, that still allows for a range of results). And, just as with crochet, you can make combination stitches from the basic stitches (sc clusters, picots, etc).

I compared a swatch of normal crochet with my Fauxcheted swatch and learnt a few things:

  1. Working with worsted weight yarn, the Fauxchet tool gave me the same gauge as crocheting with a size M (9mm) crochet hook. That’s a lot larger than you’d usually use with ww yarn!
  2. The fauxchet stitches are twisted compared with standard single crochet stitches (see photo comparison, below) – possibly why the stitch is called ‘single Fauxchet’ instead of ‘single crochet’ in the instructions, as they aren’t exactly the same stitch.
  3. Fauxcheted fabric is both drapier and less gappy than the equivalent crocheted fabric made with the same yarn to the same gauge. With my M hook, the crochet feels more like knots and spaces, while Fauxchet stitches feel looser and give more even coverage. I have a theory for this: I suspect that using an extra-large hook forces big holes into your fabric, thus pulling the previous stitches into knots, whereas the slim Fauxchet needle doesn’t disturb the previous stitches, keeping the fabric more regular.

Fauxchet Easyloop Yarn Tool review
Fauxchet vs crochet – look at the blue ‘V’ shapes and you’ll see the fauxchet Vs are twisted at the bottom compared with the crochet Vs.

While the large size of the Fauxchet stitches means that it’s unsuitable for making amigurumi (where the whole point is to make small stitches so you produce a stiff, well-shaped fabric), it is ideally suited for making wearable accessories, as the gauge is so loose that your stitches will have beautiful drape with no effort on your part!

Fauxchet In Practice

My favourite stitch from my swatch was the ‘ridged single Fauxchet’, which is the equivalent of front loop only twisted single crochet (but much easier than that name makes it sound!)

I love the look of the fabric this stitch makes, so I thought I’d try making a quick ridged single Fauxchet scarf in a bulky chainette bamboo yarn I had in my stash. The yarn is lovely and soft, but although it’s labelled DK it’s on the heavy end of bulky, and it’s been too heavy for me to crochet with (giant chunky stitches aren’t my style). Here’s the resulting scarf:

Fauxchet Easyloop Yarn Tool review

The fabric is even and not at all stiff. I’m very impressed with how it looks:

Fauxchet Easyloop Yarn Tool review

Fauxchet on Canvas

I was excited to see that you can also use Fauxchet to make rugs. It’s much faster than latch hooking, because you make loop stitches into the rug canvas directly from the ball of yarn, instead of tying on individual strands of yarn. The end result is a loopy rug, or you can cut the loops if you’d like a more conventional shag rug.

I did have a little play with the loop stitches, but I didn’t quite get the hang of it – I won’t even show you my swatch, because it’s too embarrassing. Every time I pulled a knot tight to lock a loop in place, I shrank the loop at the same time… I think my problem is that the motion uses your non-dominant hand, and I’m not very skilled with my right hand!

I can see from the videos that it’s possible to do it correctly and consistently, so I’d just need some more practice before attempting a rug. While there definitely is a learning curve to this technique, if you persevered and got the hang of it, it’d be a lot faster and less fiddly than conventional latch hooking.

Fauxchet: My Verdict

Pros:

  • Easy to learn
  • Different (and small) movements may be useful for those suffering from hand and wrist problems
  • Makes fabric with beautiful drape

Cons:

  • Limited range of stitches (chain, slip stitch, twisted single crochet, loop stitch)
  • The Fauxchet tool is only intended for use with worsted and bulky weight yarn
  • As the yarn is threaded through the tool, the tool is locked into the project until you finish an entire ball of yarn or cut the yarn
  • Working backwards and using such a different gauge means you can’t easily follow a standard crochet pattern

So, is Fauxchet a replacement for crochet? No, definitely not – and nobody is claiming that it is. But it does have its own advantages, and I’ll definitely be keeping my Fauxchet tool in my craft collection.

I think that making a fauxcheted blanket would be a good relaxing long-term project that’d give me a nice soothing break from the other crafts I enjoy. From my experience with my swatches and scarf, I already know that the end result will have beautiful drape and no excess bulk or holes, which are perfect properties for a blanket, so I’m looking forward to the slow meditative process of push/pull, grip/release and watching the rows slowly grow.

Where to Buy

If you’d like to try the Fauxchet tool, you can buy it from Amazon (it’s very inexpensive!), and I recommend you watch the free videos and try some of the free patterns from the Fauxchet site. If you enjoy fauxcheting, you can buy downloadable patterns and ebooks from Amazon (or direct from LeisureArts).

Comments (9)

Summer Days Sunhat crochet pattern

I designed this hat last Christmas (i.e. my southern hemisphere summer) to meet a specific need: to keep the sun out of my eyes while I’m out walking without worrying that my hat would blow off my head! And so, after several refinements, the Summer Days Sunhat was born:

Summer Days Sunhat crochet pattern by PlanetJune

This hat is a cross between a practical bucket hat and a stylish cloche. Well-fitting sides mean the hat won’t blow off your head in windy weather, and the brim has a solid stitch pattern that will keep the sun out of your eyes.

This is an easy-care, easy-wear hat: it doesn’t need blocking and doesn’t have a starched brim, so it’s easy to throw in a bag when you aren’t wearing it without needing to worry about crushing it!

I designed the no-gauge pattern to work for any size head (from a small child to a large adult) and any size yarn (although I like it best in fingering/sport weight so it’s light and elegant). Just measure your head and then follow the simple instructions. You’ll need a calculator to do a single sum to get started, then all you need is a measuring tape so you’ll know when you’ve reached the right size.

Summer Days Sunhat crochet pattern by PlanetJune

The brim has two options – the floppier, all-yarn version (pictured above), and a version that incorporates fishing line to add a little stiffness while leaving the hat foldable but not crushable (pictured below).

Summer Days Sunhat crochet pattern by PlanetJune

My sample hats have already seen me through a South African summer and a Hawaiian vacation, without once blowing away in the wind, and they still look as good as new!

I made the pink and natural coloured ones from a local 4-ply (fingering weight) mercerized cotton yarn – Elle Premier – but I wanted to show a sample made in a more readily-available yarn. I used Patons Grace to make my purple hat, and, although it’s called sport weight, it has exactly the same weight and yardage per ball, so it’s a pretty good match.

Links and Launch Discount

If you’re ready to try crocheting your own Summer Days Sunhat, you can buy it individually from my shop, or as part of a Custom Set of any 3 PlanetJune Accessories patterns of your choice.

PlanetJune Accessories crochet patterns by PlanetJune

And, for this week only, save 50c on the Summer Days Sunhat pattern by using discount code SUMMER at checkout. (Valid until Sunday 17th July 2016.)

Tip: The discount is valid on the Sunhat alone and the Custom Set including the Sunhat – so you can save even more by buying the multipack deal with the discount!

Or, if you’re not ready to buy just yet, please heart or queue it on Ravelry so you don’t forget about it:

I hope you’ll enjoy this pattern! If you make one, please take a photo of you wearing it, and share it in the PJ ravelry group or on my Facebook page, or tag me on Twitter or Instagram (@PlanetJune) so I can see it 🙂

Comments (3)

A Colour Changing Crochet Investigation

managing yarns when changing colours tutorial

Spoiler alert: in doing this colour changing investigation, I’ve come up with recommendations for how best to manage your yarns when you make multiple-colour amigurumi.

If you’re not interested in my experiments and how I reached my conclusions, you can skip the rest of this post, and jump straight to the Changing Colour: Managing the Yarns tutorial 🙂


I’m often asked how to deal with the other yarn when changing colour in my amigurumi patterns. If there’s a specific technique I recommend for a specific pattern – one that makes the colour changes much neater or faster than any alternative – I give you that information in the pattern itself.

But, in general, I don’t give specific details within a pattern for every colour change, because a) there’s no one ‘right’ way to deal with yarn ends and carrying colours, and b) it’s up to you which method(s) you find to be the best combination of fast, easy, and with a good end result.

In fact, I tend to intuitively use a combination of several options, but how do you know what to use when? Time for another crochet experiment, so we can see the the advantages and disadvantages of each technique, and I can give you a better recommendation…

Note: Not interested in the investigation and just want my recommendations for how to deal with the other yarn when you’re changing colours? Go straight to my page Changing Colour: Managing the Yarns!

Method

I crocheted the same amigurumi-style sample piece 4 times, using the same pattern each time but changing the method for dealing with the other yarn in each sample, as a basis for comparison.

colour_changing_investigation

The pattern was a two-colour cylinder worked in a continuous spiral in the round, changing colour every five stitches on one side and every two stitches on the other side, so we can see any differences between short and long blocks of stitches between colour changes.

The techniques I used were:

  • 1. Cut-and-tie: Cut the yarn at every colour change and tie each resulting pair of ends together.
  • 2. Stranding: Carry a float of yarn behind the work, and pick it back up when you resume crocheting with that colour.
  • 3. Tapestry crochet (yarn on top): Lay the unused yarn across the top of the stitches, and crochet around it with every stitch.
  • 4. Tapestry crochet (yarn behind): I don’t think there’s a real name for this technique: crocheting around the other yarn with each stitch, but holding it behind the back loop, instead of across the top, of the stitch below. (But does that really make a difference? Let’s find out…)

Results

The overview picture below shows the results of the four different methods.
L-R for each method:

  • Wide blocks of colour, right side
  • Wide blocks of colour, wrong side
  • Narrow blocks of colour, right side
  • Narrow blocks of colour, wrong side

colour changing experiment by PlanetJune - 4 methods to deal with yarn ends when changing colour in amigurumi

(You may be wondering why I’m looking at the wrong sides too, when the inside will never be seen in an amigurumi piece. It’s important for the experiment to see what’s going on behind the scenes as well as comparing the look of the finished outside.)

By comparing each of these samples, I could see the advantages and disadvantages of each method, which will let me figure out which is best to use when, and why…

Cut-and-tie vs Stranding

Stranding is much faster than stopping to cut the yarn and tie knots at every colour change, but the quality of the stranded result depends on the width of the yarn that’s floated on the back of the piece:

colour changing experiment by PlanetJune - cutting vs stranding

For long stretches between colour changes, the floated yarn on the back of the piece can distort the shape of your work (if too tight), or cause the stitch before and after to work loose (if too loose). Cut-and-tie leaves yarn ends, but gives a consistent result.

However, for frequent colour changes of only a stitch or two, cut-and-tie is fiddly and leaves a big mess of ends on the inside of the piece. Stranding works very well for these shorter colour changes, provided you tension the stranded yarn so it sits snugly along the inside of the piece.

Conclusion: Stranding the yarn behind your stitches saves time and yarn vs cutting and tying at each colour change, but it works best when you’re only carrying the yarn for a short length before swapping back.

Tapestry crochet vs Normal crochet (cut or stranded)

There’s a big problem with using tapestry crochet for amigurumi – unless, of course, the pattern was designed to be worked this way! Let’s compare the stitches formed with standard crochet vs those with tapestry crochet:

colour changing experiment by PlanetJune - stitch bias difference between normal and tapestry crochet

Working in the round without turning always introduces a bias to your stitches – a stacked colour change will travel by approximately 1 stitch per 5 rounds (above, right). But with tapestry crochet (above, left), that bias is intensified, so a stacked colour changed will travel by approximately 1 stitch per 2 rounds. So, if you use the tapestry technique where it’s not intended (or, use non-tapestry for a pattern designed for tapestry), the colour pattern will become skewed.

The tapestry stitches are also slightly taller than standard stitches, but I’m not sure there’s enough of a difference there to skew the overall shaping significantly on the scale of an amigurumi piece. The colour shifting is a much more obvious problem, and a good enough reason to abandon this method for amigurumi colour changes without further investigation.

Conclusion: Don’t use tapestry crochet (working over the carried yarn with every stitch) for amigurumi with colour changes, unless the pattern specifies it.

Tapestry crochet (yarn on top vs yarn behind)

The modified tapestry crochet technique, where you carry the yarn just behind the back loop of the stitch instead of across the top, does make a difference: looking at the green stitches in the samples below, you can see that the carried (pink) yarn is less visible on the front of the piece, and more visible on the back (where it doesn’t matter for amigurumi).

colour changing experiment by PlanetJune - comparison of tapestry crochet with the yarn held on top or behind the stitches

Conclusion: If you’re going to work over yarn (to carry a yarn, to catch a floated yarn, or to work over a yarn end), for amigurumi it’s better to hold the yarn behind the back loop of your stitch instead of across the top of the stitch.

(This modification doesn’t help with the bias effect, so I still wouldn’t use it for amigurumi colourwork, unless the pattern was designed to be worked in tapestry crochet. But I have incorporated this technique into my recommendations in a specific scenario, as you’ll see…)

Verdict & Recommendations

managing yarns when changing colours tutorial

Putting it all together, we can see which techniques may be most effective when a pattern has frequent/infrequent colour changes that span few/many stitches, and I now have solid reasons for recommending different yarn-wrangling methods in different situations.

You always have a choice of how to deal with the other yarn(s) when you change colour, but I’ll give you my recommendations – together with some case studies so you can see how these methods work in practice for amigurumi – in my tutorial page:

Continue to ‘Changing Colour: Managing the Yarns’ >>

Comments (5)

Tropical Fish crochet patterns

I first started sketching ideas for a bright and colourful tropical fish collection over 2 years ago, and I’m thrilled to finally bring my concept to life. These Tropical Fish may be the most varied and visually interesting group of related patterns I’ve tackled to date!

Although it’s easy to recognise each as a fish, the colours, shapes, patterning, and even the number and shape of the fins vary hugely between species, and I couldn’t stop myself from designing more and more different types…

AquaAmi Tropical Fish crochet pattern collection by PlanetJune

Meet the Fish

Each of the 8 fish in my Tropical Fish collection is based on a real-life species of tropical reef fish.

Set 1: Ocellaris Clownfish & Yellow Tang

Aquaami Tropical Fish crochet patterns by PlanetJune. Set 1: Ocellaris Clownfish and Yellow Tang
Ocellaris Clownfish (Amphiprion ocellaris), above left. Instantly recognisable as Nemo from the Disney films, Ocellaris Clownfish form a symbiotic relationship with a sea anemone: the fish cleans and defends the anemone, while the anemone gives the fish a safe place to hide from predators.

Yellow Tang (Zebrasoma flavescens), above right. A very popular aquarium fish, the Yellow Tang is found throughout the Indo-Pacific region, but especially in reefs around the Hawaiian Islands.

Set 2: Royal Blue Tang & Amethyst Anthias

Aquaami Tropical Fish crochet patterns by PlanetJune. Set 2: Royal Blue Tang and Amethyst Anthias
Royal Blue Tang (Paracanthurus hepatus), above left. The fish you’ll recognise as Dory also goes by many other names, including Regal Blue Tang, Hippo Tang and Palette Surgeonfish. These fish are almost impossible to breed in captivity, so fish for sale are harvested from the wild, which endangers their wild populations and reef habitats – far better to crochet one instead…

Amethyst Anthias (Pseudanthias pascalus), above right. With over 60 different species, the colourful anthias family hail from the Indo-Pacific region and are found in lots of different colours, so you can make one in yellow, orange, pink, purple or red and it’ll still be realistic!

Set 3: Copperband Butterflyfish & Royal Gramma

Aquaami Tropical Fish crochet patterns by PlanetJune. Set 3: Copperband Butterflyfish and Royal Gramma

Copperband Butterflyfish (Chelmon rostratus), above left. Butterflyfishes’ deep, narrow bodies and long fins give them a flat triangular appearance that’s fun to crochet! The Copperband Butterflyfish is also commonly called the Beaked Coralfish.

Royal Gramma (Gramma loreto), above right. With its distinctive half-purple and half-yellow appearance, the Royal Gramma comes from the Caribbean and is also known as the Fairy Basslet.

Set 4: Pajama Cardinalfish & Flame Angelfish

Aquaami Tropical Fish crochet patterns by PlanetJune. Set 4: Pajama Cardinalfish and Flame Angelfish
Pajama Cardinalfish (Sphaeramia nematoptera), above left. This strikingly-coloured spotted fish is popular in aquariums. The Pajama Cardinalfish hides a special secret to ensure the survival of its young – the male incubates the eggs in his mouth until they hatch!

Flame Angelfish (Centropyge loricula), above right. A beautifully coloured dwarf angelfish, the Flame Angelfish has a bright red, black-striped body and electric blue patches at the back of its fins.


About the Patterns

  • These mini amigurumi offer a variety of shapes and crochet techniques (shaping, colour changes, spots and stripes, assembly and finishing). All techniques include tips, step-by-step photos, and/or links to my online tutorials, so you’ll be able to learn or practise a range of amigurumi styles and techniques with these patterns.
  • You’ll love their mini size (they’re all between 4.5 and 5.5″ long), so even the most complex fish won’t take forever to finish, and you can whip out the simpler ones very quickly!
  • All the fins (the pieces that aren’t worked in the traditional amigurumi single-crochet-in-the-round technique) include charted stitch diagrams in addition to full written instructions, so you can follow the patterns in the way you find easiest.
  • Each of the 4 pattern sets includes 3 pages of helpful instructions and finishing tips that apply to all the Tropical Fish (including a basic illustrated guide to fish anatomy so you’ll learn the right names for the fins!)

Tip: If you’re printing all the patterns, you can save paper and ink by printing those 3 pages (Instructions for All Tropical Fish, p2-4 in each pattern) just once.


Links to Buy & Launch Discount

You can buy each set individually from my shop, but I highly recommend you pick up the multipack of all 8 fish instead! I’ve priced it at less than the cost of buying 3 sets, so that’s a great deal for you, and it’ll save you from having to try to pick your favourites from such a variety of different fish 🙂

Let’s make that deal even better: for one week only, you can buy the complete Tropical Fish collection (Sets 1-4, which includes all 8 fish patterns) for the extra-special low price of $15. To take advantage of this deal, add Tropical Fish Sets 1-4 to your shopping cart, and enter the discount code DORY at checkout! (Offer ends Friday 24 June, 2016.)

Or, if you’re not ready to buy them just yet, please remember to heart and queue them on Ravelry!

Set 1 (Ocellaris Clownfish & Yellow Tang):
Set 2 (Royal Blue Tang & Amethyst Anthias):
Set 3 (Copperband Butterflyfish & Royal Gramma):
Set 4 (Pajama Cardinalfish & Flame Angelfish):


Under The Sea Crochet-Along

And, from today until the end of August, join us in the PlanetJune Ravelry group, where we’ll all be making fish (and their other aquatic friends – I have lots of other AquaAmi designs to choose from too…)

I can’t wait to see all the colourful fish popping up from all over the world! Please join us, and share pics of your fishies 🙂


I hope you enjoy my cheerful new Tropical Fish collection, and you’ll have fun trying out all the different patterns. So now for the big question: which fish will you try first..?

AquaAmi Tropical Fish crochet patterns by PlanetJune

Comments (10)

Horse, Unicorn & Pegasus crochet patterns

Don’t miss the launch discount, at the end of this post!

I’m not even sure where to begin this post, as I have so much I’m excited to show you… I’ll just dive straight in:

Horse crochet pattern

First, the pattern that started it all – my latest commissioned design, for a Horse, is now complete:

horse

My horse has a sweet face, a realistic shape and bay colouring. In addition to detailed assembly instructions, this pattern includes two amazing new techniques to make a really special mane and tail:

  • The mane is thick and full, and the strands are attached neatly and firmly.
  • The tail hangs beautifully with no knots or visible attachment points.

Both techniques require no additional materials and are explained in full in the pattern, with lots of step-by-step photos so you can make a perfect horse!

Unicorn and Pegasus Expansion Pack

And, of course, having a horse design opens up a whole world of possibilities for other designs, and I couldn’t wait to add a Unicorn and Pegasus Expansion Pack for the Horse. And I’m so thrilled with the result – I hope you agree!

unicorn_pegasus

What is an Expansion Pack?

Expansion Packs by PlanetJune

  • An Expansion Pack is an add-on to an existing PlanetJune pattern.
  • The Expansion Pack lets you modify or add to the original pattern to create something else.
  • You cannot use the Expansion Pack alone – you must also purchase the original pattern in order to be able to complete the pictured items in the Expansion Pack pattern.

This Expansion Pack lets you convert my Horse into a Unicorn, a Pegasus, and/or an Alicorn (that’s a winged Unicorn – or a horned Pegasus if you prefer!) – so you actually get three options in one Expansion Pack:

unicorn_pegasus_alicorn

I’m especially pleased with the elegant wings – they’re a combination of sturdy and decorative, as they’re stiff enough to stand up by themselves, while still looking delicate with the feathered edge.

Hoofing It CAL

In honour of the new patterns, we’re starting a new crochet-along in the PlanetJune group on Ravelry – you can make any of the new designs, or any other PlanetJune designs with hooves (see the CAL thread for the full list). The CAL runs right through till the end of July, so you have time to make one of each if you want 😉

I hope you’ll join us – I can’t wait to see everyone’s horses, unicorns etc!

Links to Buy & Launch Discount

As with all my Expansion Packs, you can buy the patterns separately (although please note that you do need the base Horse pattern to be able to make a Unicorn or Pegasus), or there’s a discount when you buy both together.

But to sweeten this deal even more and give you an incentive to join the CAL right away, I’m offering an additional discount on the Multipack Set (Horse, Unicorn & Pegasus) if you buy within the next 7 days, so you can get all three for only $7.50 – that’s only $2.50 per pattern!

So, here are your options:

Or, if you’re not ready to buy yet, click through to Ravelry and favourite/queue them so you won’t forget about them!

Horse:

Unicorn & Pegasus:

horse_unicorn_pegasus

Can you resist these sweet faces? I hope you love these designs as much as I do – please leave me a comment if you do! Which will you be making first?

Comments (15)

tutorial: better BLO stitches for amigurumi

Link easily to this tutorial in your patterns: www.planetjune.com/blo

I always like to experiment and see if there are ways to improve amigurumi techniques to give better results, and today I have a new one to share with you.

Back loop only (BLO) stitches are often used to add detail in amigurumi designs, particularly for turning sharp corners. For example, look at the bottom of a crocheted plant pot (where you turn a sharp corner from the base of the pot to begin the sides) or the bottom of a foot (where you turn from the flat base to the side of the foot).

better BLO tutorial - examples of uses of back loops only at the edge of the base of feet or plant pots
Stegosaurus and Succulent plants both have a round of BLO around the bottom edge (of their feet and pot, respectively)

But BLO stitches are looser and more open than standard stitches worked in both loops, so the corner round will lose the solid, firm fabric of the rest of your amigurumi. My new modified BLO technique solves this problem!

better BLO tutorial - the holes above the unworked front loops are eliminated with my technique
The holes above the unworked front loops are eliminated with my technique

Now, before we get started, I should explain what this technique is not: this is not a new method for patterns that are worked in BLO throughout. Using it in that way would change the shape of the finished pieces (more about that later).

This technique is best used to replace occasional BLO details in a piece worked in both loops, e.g. the round of BLO stitches used for turning sharp corners in amigurumi patterns. Just as you can replace a “ch 2” start with a magic ring, and an “sc2tog” with an invisible decrease, you can replace that round of BLO with my modified BLO (in any amigurumi pattern) and it’ll give your amigurumi a much nicer result.

What’s wrong with BLO?

The problem with BLO stitches compared with stitches worked in both loops is that they can easily stretch open. When you’re making amigurumi, where the stitches are stretched by the stuffing, this results in taller stitches with larger gaps between each round.

better BLO tutorial - comparison of samples worked in normal sc and sc in back loops only
L-R: sc worked in both loops, sc in back loops only

(I discussed this in more detail in my tutorial Front Loops, Back Loops, Both Loops.)

Why Use BLO?

But BLO has several uses as an accent in amigurumi designs, for example:

  • to add textural detail with the unworked front loops
  • to add anchor points for additional stitches worked back into in the unworked front loops
  • to turn sharper corners than you can achieve with regular single crochet stitches

This last one is the main use of BLO in amigurumi, and the situation that you can most improve with my new technique! Although BLO makes a nice corner, it does leave the fabric looser and more floppy around that round, because the stitches can stretch open.

A Better BLO

When you look at a single crochet stitch, you usually work into both the front loop and the back loop at the top of the stitch:

better BLO tutorial - step 1

But, if you rotate your work forwards a bit, you can see that there’s another horizontal bar just beneath the back loop, at the back of the stitch (below, left).

To improve the appearance of your BLO, work each stitch into both the back loop and this back bar (below, right).

better BLO tutorial - step 2

Are you left-handed? Here’s how it’ll look for you:

better BLO tutorial - step 2 (left-handed)

You can see the stitch in action in the videos below:

Video Tutorial (right-handed)

Video Tutorial (left-handed)

Note: The videos may look a little small embedded in the blog: if so, you can fullscreen them or click through to YouTube (links: right-handed; left-handed) to watch them full-sized 🙂

Stitch Comparison

So you can see the difference this technique makes, let’s compare the modified BLO stitch with a standard single crochet (worked in both loops) and a standard BLO single crochet.

I’ve crocheted the same sample 3 times, once using each stitch.

better BLO tutorial - comparison of samples worked in normal sc, modified scBL, and standard scBL
#1: single crochet in both loops
#2: modified BLO single crochet
#3: BLO single crochet

As you can see, the modified BLO does not stretch out like a BLO stitch; the stitches are much closer in size to a standard single crochet (although very slightly smaller still, as the stitches are tighter).

Comparing the BLO and modified BLO in close-up:

better BLO tutorial - comparison of stitches worked in standard scBL and modified scBL
Left: BLO; right: modified BLO

You can see that the gaps that result from standard BLO stitches are eliminated with this technique, and the stuffing doesn’t show through between the stitches.

So this modified stitch is a much better match for a standard single crochet, as it keeps the tight, solid appearance of a regular amigurumi, and doesn’t leave any unwanted gaps.

Caveats

  • Do not use this technique for a piece designed to be worked in back loops only. As you can see, using the modified BLO stitch with a pattern designed to be worked entirely in BLO would give the same problem as working the pattern in both loops – the shape would be compressed vertically.
  • I recommend you use this technique only as an accent stitch for pieces crocheted predominantly in both loops. (The only reason I crocheted the above sample piece entirely in modified BLO is to give you a clear way to compare the differences between the size and shape of the stitches.) This stitch is more difficult to work than either standard or BLO single crochet, because the back bar is tighter, so I don’t suggest you ever crochet an entire piece using this technique!

In Practice

better BLO tutorial - sample piece with sharp corner made by modified BLO round at edge of base

I crocheted this little amigurumi-style pot as a sample to demonstrate this technique. The corner formed by the modified BLO round is neat and firm, and it’s actually a little sharper than the corner you get from a standard BLO stitch.

Conclusion

You can safely use the modified BLO to replace a single round of stitches (or any number of individual stitches) worked in back loops only in any amigurumi pattern.

It prevents the gap from forming below each BLO stitch as the fabric stretches, and it maintains the firm solidity of the amigurumi fabric throughout your piece.

While this isn’t an essential technique, it’s another ‘upgrade’ you can use with any pattern (like my invisible increase) to improve the look of your amigurumi.

I know I’ll be using it for all my BLO details in future, and I hope you’ll enjoy it too!


The Essential Guide to Amigurumi book by June Gilbank

Loved this tutorial? I have so many more amigurumi tips and tricks to share with you!

Boost your amigurumi skills with my latest book, The Essential Guide to Amigurumi, your comprehensive guide to amigurumi techniques and tips.


Do you find my tutorials helpful? If so, please consider making a contribution towards my time so I can continue to create clear and concise tutorials for you:

Thank you so much for your support! Now click below for loads more crochet video and photo tutorials (and do let me know what else you’d like me to cover in future tutorials…)

See more helpful PlanetJune crochet tips and technique tutorials

Comments (13)

Next entries » · « Previous entries
  • Quick Links: Crochet

    navigation: arrow

    buy crochet patterns and accessories from my online store

    'Everyday Crochet' and 'The Essential Guide to Amigurumi' crochet books by June Gilbank

    Crochet video tutorials and step-by-step photo tutorials

    Free PlanetJune crochet patterns

    Frequently Asked Questions

    Quick Links: Crafts

    navigation: arrow

    Punchneedle Embroidery information, ebook & patterns

    Papercraft ebook & tutorials

    Free PlanetJune craft projects & tutorials

  • Blog Post Categories

  • Blog Archives

  • CAL Galleries

    Ravellenic Games: Team PlanetJune
    PlanetJune Reindeer Games
    PlanetJune Temperature Snake CAL

  • Welcome to PlanetJune!

    June Gilbank

    Hi, I'm June. Welcome to my world of nature-inspired crochet and crafting. I hope you enjoy your visit!

    If you'd like to get in touch, you can contact me here.
    crocheted Canadian flag by PlanetJune
  • A fanned-out pile of the books Everyday Crochet and The Essential Guide to Amigurumi, with text 'The answers to all your crochet questions at your fingertips - find out more'
  • Support PlanetJune!

    Want to say thanks? You can send me money in seconds at paypal.me/planetjune (over $20) or paypal.me/planetjune2 (under $20) or send me a donation through my shop.

    Or simply click through from my links before you shop at Amazon, Etsy, KnitPicks, LoveCrafts or Crochet.com, and I'll make a small commission on your purchase, at no cost to you! Start here:

    ♥ Support PlanetJune ♥

    Tip: This link is also in the footer of every page!

    Thank you so much for your support!