book review: Making Pipe Cleaner Pets
As always, I was not compensated for this review, and the following is based on my honest opinions!
Overview
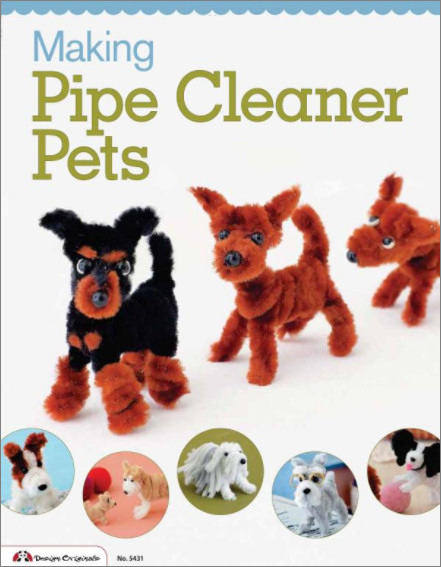
Making Pipe Cleaner Pets by Takashi Morito was originally published in Japanese, and has now been translated into English.

I’ve previously reviewed another translated-from-Japanese craft book (Crafting with Cat Hair) and, like that book, this is another book of adorable crafts you’d probably never think of making until you see the book!

Throughout, this book has a very Japanese aesthetic. On the photo pages, the dogs are posed in cute tableaus with a variety of unrelated props – books, craft supplies, crackers – and a haiku-esque poem to introduce each dog, for example:
The morning air feels good
Now, we’ll all play ball
And bathe in the morning sun
The overall effect is charming in that bizarre Japanese craft book kind of way.
(I should mention that ‘Making Pipe Cleaner Pets‘ is a bit of a misnomer if you’re looking for a variety of pets – this is a book of dogs. It has designs for 23 different dog breeds, plus puppy-sized miniature versions of several of the breeds.)

A few more of the included dog breeds.
After the cute photo gallery of all the dogs, we get to the tutorials for how to make them. The first three dogs (Toy Poodle, Pug, Boston Terrier) have detailed step-by-step instructions, including both a diagram of each step and a photo of the result.

Those three designs teach you the basic techniques you’ll need to make all the dogs. The other 20 dog breeds have text and diagrams only, but the basic idea is the same for all the dogs, so you’ll rarely need to look back once you’ve tackled a couple of the easier dogs.

My Experience
I found the perfect pack of pipe cleaner colours (two browns, grey, white and black) and got started! I planned to make 2 or 3 dogs, to give myself a chance to get the hang of the technique.
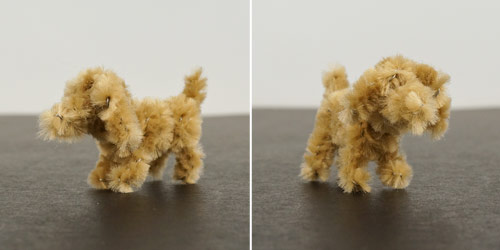
First up, I tried the Toy Poodle, the first and apparently easiest dog in the book:

My completed effort definitely looked like a dog, but nothing like a poodle! The legs were too short, so I decided to embrace that: I shortened them further by folding over the ends, and reshaped the face a bit (by squashing it around), and now it’s a dachshund puppy. 🙂
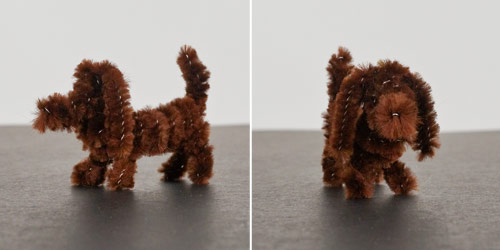
For my next attempt, I thought I’d try the actual Dachshund model:

I felt like the proportions in the instructions weren’t quite right, so I lengthened the body and shortened the legs as I made my initial bends in the pipe cleaner, and I think it looks pretty good!
Okay, I’m getting the hang of this now; time to step it up a notch with a multi-colored dog. I tried the Jack Russell Terrier:

I like the result – the head colours are good – but I somehow made it all a bit skinny (my fault, not the book’s). I think mine has a bit of greyhound in him 😉
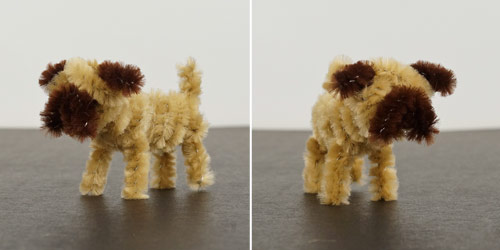
And then the Pug:

I learnt from my mistakes and used the basic method from the book, but tweaked all the proportions to be more suited to how I think a pug should look. I ended up with lots of the dark brown showing on the back of the head, so I wove a bit more of the light-coloured pipe cleaner over to hide that. What a cute pug face!
After making a few dogs, you get a feel for what you’re doing, as the basic concept is very similar for all the dogs. I decided to make some modifications for my last two dogs…

The Miniature Schnauzer model seemed like a bit of a cheat to me – the white beard and eyebrows were formed separately and glued into place! Instead, I used what I’d learned from the Pug and built the beard into the face.

And finally, the Corgi. I used the book for the face colours, but built the body myself, plumping it up and omitting the tail completely.
The advantage of this book is that, as all the dogs are constructed along the same principles, once you’ve made a few, you should be able to get a bit more creative and extend the same principles to different animals. I thought I’d test my theory by trying – what else – a grey cat!

I basically made another dog, but tweaked all the proportions as I went (shorter muzzle and ears, wider face, longer neck, etc) to make it more feline. The great thing about pipe cleaner models is they are completely poseable, so it’s easy to adjust the leg positions, add a curve to the back, or reposition the tail, if you decide it doesn’t look quite right.
The book suggests some finishing touches – glued-on plastic eyes and noses, trimming some of the pipe cleaner fuzz to make e.g. pointier ears, and an occasional glued-on mouth or tongue. Even my smallest (4.5mm) animal eyes are too large for my dogs, so I decided to keep my dogs (and cat) as pure pipe cleaners. I’m sure they’d look even cuter with faces, but I like them as they are, and I like that there aren’t any glued-on parts this way – they are simply twisted pipe cleaners and nothing more.
Top Tips
- The first stumbling block is that all the designs in this book use 1m (40 inch) long pipe cleaners, which may be common in Japan, but I’ve never seen in all my years and countries of craft shopping! The book instructs that you can instead twist multiple regular-length pipe cleaners together to make a long one, but I’d recommend you use one at a time, and twist on a new one as you reach the end of the old one – it’s a lot more manageable that way. I used 3 or 4 pipe cleaners for the main colour of each dog (and 1 or 2 of any secondary colour).
- All the dogs’ muzzles are made by coiling the pipe cleaner and then feeding the remaining end through the middle of the coil. I found this to be impossibly difficult to do neatly, until I coiled the pipe cleaner around a narrow tube (I used a small knitting needle), which gave perfectly round coils, and a nice space in the middle for feeding the end through.
Verdict
I found the concept of pipe cleaner dog models to be fun, but it was more challenging than I’d expected. Although it looks like a kid’s craft, I definitely wouldn’t recommend it for young children – it’s not easy to make a dog that looks like the photos! Teens with good dexterity and patience may enjoy making dogs, and it’s great for crafty adults like me.
The dogs are very cute and fun to pose, but there’s a bit of a learning curve, and every dog will end up with its own personality, no matter how closely you follow the directions. But that variation is part of the enjoyment of making things by hand: I feel it adds to the charm – just like a litter of real puppies, you never know exactly how each one will look until you see it!
If you persevere through a couple of practice runs, you’ll be able to make cute pipe cleaner pups too, and, once you’ve made a few dogs, you’ll see how the general idea works, and be able to try designing your own animals, if you want.

If you’re looking for an unusual craft to try, I can recommend Making Pipe Cleaner Pets as a fun diversion, and a great introduction to sculpting pipe cleaner animals!


Alissa said
I’m purchasing the book in the supplies as a gift… What do you get for the eyeballs? Are they beads? Thanks
June said
I got the book from the library, so I can’t consult it to check from you, but in my review I said it uses “glued-on plastic eyes and noses” and that my smallest (4.5mm) eyes were too big, so I think it’d be tiny toy eyes (maybe 3mm). You could use beads instead, provided you use enough glue to get them to stick to the pipe cleaner fuzz!
Raphy said
i love making these pets!my kitten is obsessed with the cat i made! 🙂
Sarina said
So cute! Can you also use Alpacawolle for that?
June said
No, you need to use pipe cleaners (they have wire inside which makes them stiff and poseable) – you can’t make these models with any kind of yarn!
Erica said
This looks like such a cute book! I babysit a girl who is 9 years old. Do you think this book’s required skill level is appropriate for her age?
June said
Hmm, I always struggle with questions about suitability for children – I don’t have much experience with kids, and, of course, different kids naturally have different strengths and develop at different rates… I’d suggest you check the amazon reviews and see what people who bought it for their kids made of it – I wouldn’t want to steer you wrong!
Olivia said
Hi! Just asking can you show me how to make them?:hamster:
June said
Olivia, I recommend you pick up the book (or see if you can find it at your local library) if you want to learn this craft 🙂
MotherOwl (Charlotte) said
They look cute. I don’t know if i’d ever try this, but maybe when my dog loving friend has a birthday 😉
I can buy 100 cm long pipe cleaners in my craft shop (Denmark). But I agree with you, they are quite unwieldy. I’d prefer twisting in new short ones too.
June said
Oh, that’s interesting, Charlotte – I had no idea they were available anywhere outside Japan! I’d definitely try the 100cm ones if I found some (it was the points where I’d twisted two pipe cleaners together that caused me problems as I tried to pull the joined part through the rest of the model, so using one long one would negate that difficulty).
Patricia said
Thank you for the review and the try-out… I tried once too and foundit quite difficult!
Have a nice evening!
Patricia
June said
It definitely takes a few attempts to get it figured out properly, but I think you can see how my skill level improved as I worked through the dogs – it was quite rewarding to see the cute dogs emerge in the end 🙂