Resizing Amigurumi
One of the nice things about amigurumi is that the exact size is rarely important, so you don’t need to worry about matching the designer’s gauge. Provided your stitches are compact enough that they won’t gape open to leave large holes between them when you add the stuffing, you have the freedom to experiment with different yarns and hooks to give you a different-sized result.
So, if you’d like your amigurumi to be larger (or smaller) than the sample pictured in the pattern, how can you do that? You have several options, and I’ll go over them all for you in this article.
Note: You can also use the techniques described below to make a set of parent and baby animals! For more details, see my article ‘How to make ‘baby’ amigurumi animals‘.
Method 1. Change the Yarn Size
To make a larger amigurumi, use a heavier (thicker) yarn than that recommended in the pattern; to make a smaller amigurumi, use a lighter (thinner yarn). You’ll also need to change your hook size accordingly (see Choosing a Hook Size, below).
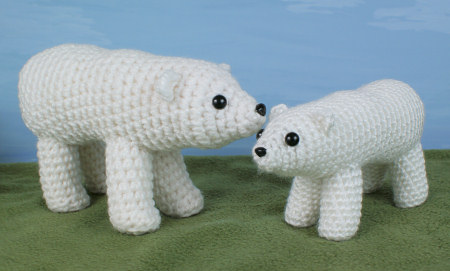
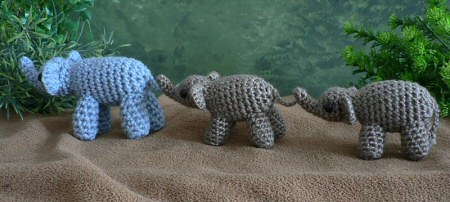
The photo above shows my AquaAmi Polar Bear pattern worked in bulky weight yarn with a G7 US/4.5mm hook (left) and worsted weight yarn with an E US/3.5mm hook (right). You can see that the worsted weight option is about 3/4 of the size of the bulky weight option. In the photo below, the same applies – the blue elephant is made with the bulky option, and the grey elephants with the worsted option.
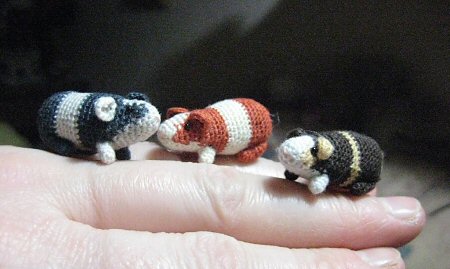
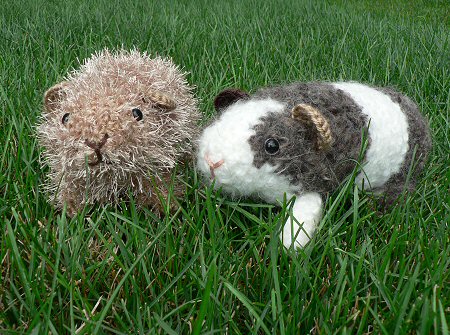
You can increase the size difference even more by using much lighter (or heavier) yarn and a correspondingly much smaller (or larger) hook, for example you can go right down to crochet thread and a steel hook, as shown by bettika67, who turned my life sized Fuzzy Guinea Pigs:
into the most adorable 1-inch piggies, just by using very fine thread and a tiny hook:
And, if you want to scale your amigurumi to a specific size, I’ve calculated the numbers for you so you know which yarn and hook combo you’d need to scale an amigurumi. See my Scaling Amigurumi to Any Size tutorial for the results!
Method 2. Hold Multiple Strands Together
To save buying extra-thick yarn when increasing the size of an amigurumi, you can use a standard yarn, but hold two (or more) strands together as you crochet, together with a larger hook (see below). You can see the effect of this here:
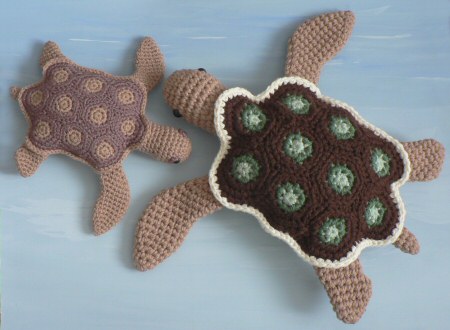
Both these turtles were made using my AquaAmi Sea Turtle pattern and the same yarn (bulky weight, in this case, but the same applies for any yarn weight). The turtle on the left is the one shown in the pattern, but for the giant turtle on the right, I doubled the yarn by holding two strands together and used a correspondingly larger hook (L US/8mm instead of G7 US/4.5mm). The result is a turtle that’s about 1.5 times the size.
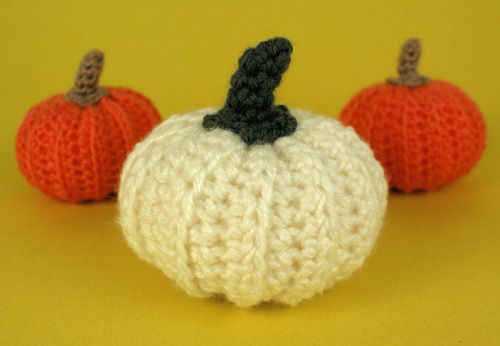
The giant Pumpkin uses 2 strands of worsted weight yarn (instead of 1) and an I US/5.5mm hook (instead of E US/3.5mm) to super-size it to about 1.5 times the size of the normal pumpkins.
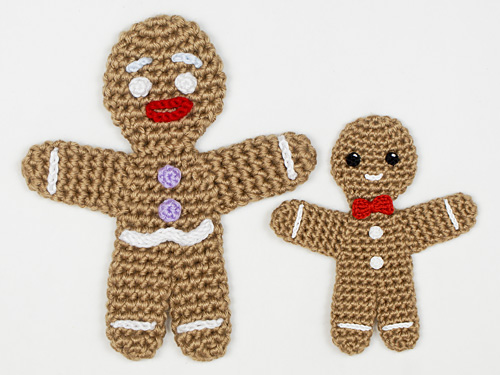
My big Gingy uses 2 strands of worsted weight yarn (instead of 1) and an I US/5.5mm hook (instead of E US/3.5mm). The finished piece was 44% larger, and took 2.7x more yarn, than the standard Gingerbread Man.
(Although I can’t give you an exact formula – because it depends on how tightly you crochet at each size, and how big your larger hook is compared with your smaller hook – you can use my numbers above as a good rule-of-thumb indication for the increase in yarn quantity when you hold the yarn doubled.)
Hook size for multiple yarn strands
Using multiple strands of yarn has its own challenges – you need to use a hook that’s large enough to catch all the yarn strands with every stitch. For two strands of yarn held together, you’ll probably need a hook at least 1.7x the size (in mm) that you’d use with a single strand.
For example, I use an E US/3.5mm hook with worsted weight yarn. To hold 2 strands together, I’d calculate:1.7 x 3.5 = 5.95. The closest hook size to 5.95 is 6mm, so, for my first attempt, I’d try using a J US/6mm hook with two strands of worsted weight yarn.
For three or more strands held together, take your yarn and all your hooks and experiment until you find the smallest hook size that lets you easily grab all your strands with every stitch.
Method 3: Supersize by Combining Methods 1 & 2
To increase the size of your amigurumi still further, you can combine methods 1 and 2 to make an ami that’s up to about twice the size of the original, by using 2 strands of a bulkier weight yarn (than the pattern calls for) held together, and a much larger hook (see Choosing a Hook Size, below).
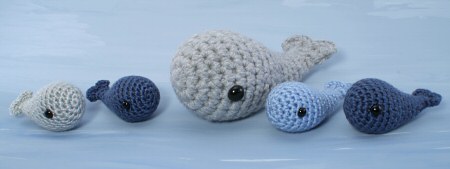
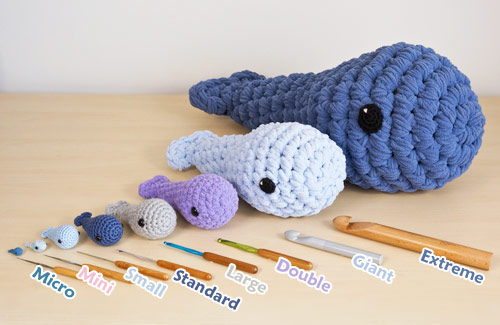
My Mega Whale, above, is made following my Tiny Whale pattern exactly, but instead of using worsted weight yarn and an E US/3.5mm hook, I used two strands of a bulky weight yarn and an L US/8mm hook. And, as Mega Whale is twice the size of a standard Tiny Whale, I also doubled the eye size, from 8mm to 15mm.
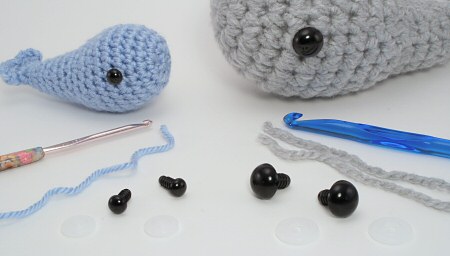
While you can go still larger with this technique by using multiple strands of thicker yarn, there’s a trade-off: as you increase the size of each stitch, the space between the stitches also becomes more noticeable, because it’s correspondingly larger. The stitches are also chunkier, so it doesn’t give as smooth a finish as using a finer yarn and smaller hook.
It’s up to you how large you’re willing to go – you can always try crocheting the first few rounds of the pattern and see if you like the fabric that you’re creating or if the stitches are just too chunky or gappy for your taste. (For completeness, I’ll include the way to avoid this – Method 4, below – although it’s much more advanced and not something I’d recommend!)
Method 4: Rewrite the Pattern(!)
Note: I’m just including this for completeness! I don’t recommend you try this method unless you’re keen on developing your design skills.
As single crochet stitches are square, in theory you can double the size of an amigurumi pattern without changing the yarn or hook by doubling both the number of stitches in each round and the number of rounds, so each stitch of the pattern is turned into a 2×2 square of stitches (2 stitches wide and 2 rounds tall).
For example, every time the pattern calls for 1 stitch, you make 2 (so e.g. if Rnd 1 is 6 sc, you’ll make 12 sc) and you repeat every round (so you’d repeat your new Rnd 1 with a second round of 12 sc).
But this is a very simplistic method, and far from perfect. You’ll end up with stitch counts like this at the end of the rounds: 12 st, 12 st, 24 st, 24 st, 36 st, 36 st. If I were designing a double-sized animal I’d then refine this new pattern by spreading the increases out, to something like 6 st, 12 st, 18 st, 24 st, 30 st, 36 st over those same 6 rounds, so the increases are made evenly and not stepped every 2 rounds.
It’d be hard to keep track of your rounds and stitch counts when you’re turning each stitch into four stitches, for even a basic amigurumi pattern. More complex patterns that include precise shaping and/or colour changes would be even more challenging.
So I wouldn’t really recommend this method at all – by the time you’ve done all the work in doubling the stitches and the rounds, smoothing out the increases and decreases, and tidying up any shaping and colour-changing, it’d probably be easier to start from scratch and design a new pattern!
Method 5: Go Giant!
With my Giant Amigurumi method, you can resize a pattern from twice the size (with the double-size technique):
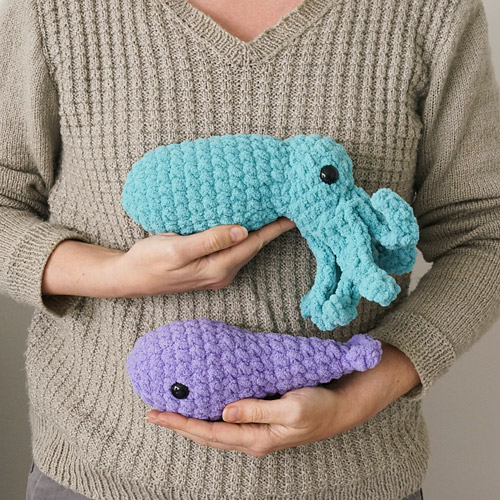
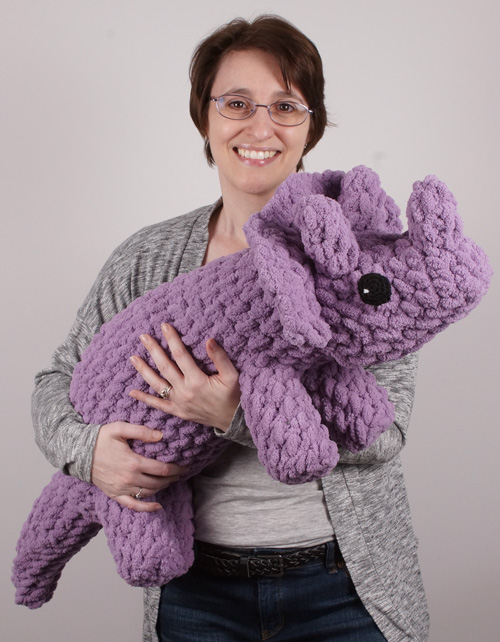
…to 3-4 times the size of the original, like my giant dinosaur:
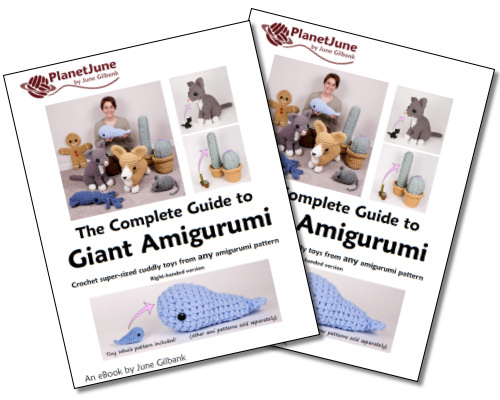
Learn all my upsizing tips and techniques (including patterns for the giant eyes!) in my ebook The Complete Guide to Giant Amigurumi:
Choosing a hook size
When you’re changing the weight of the yarn used in the pattern (whether by using a different yarn weight and/or holding multiple strands together), you’ll also need to change your hook size by a corresponding amount.
For amigurumi, I usually recommend the following hook sizes as a starting point:
- DK weight (#3) yarn: C US/2.75mm hook
- worsted weight (#4) yarn: E US/3.5mm hook
- bulky weight (#5) yarn: G7 US/4.5mm hook
But the best hook size for your yarn also depends on how tightly you crochet, and the specific yarn you choose – there’s a lot of variability between yarns, even if they are marked as the same weight (see my Worsted Weight Yarn Comparison for more details on this)!
My advice is always to crochet the first few rounds of the pattern using your best-guess hook size, then push some fibrefill stuffing behind your work to open up the stitches and see how it looks:
- If the stitches stretch open too much and the fibrefill is clearly visible, reduce your hook size and try again.
- If you cannot easily insert the hook into the previous stitches, increase your hook size and try again.
Summary
- To make an amigurumi design larger, you can use heavier yarn and/or multiple strands of yarn, together with a larger hook.
- To make an amigurumi design smaller, you can use lighter yarn, together with a smaller hook.
- Choose a hook size that gives you a nice firm fabric without large gaps between stitches – as you do with all amigurumi patterns.
- Don’t forget to increase or decrease the eye size appropriately, to keep the eyes in proportion to the size of your amigurumi.
I hope this article will give you more confidence to attempt some resizing of your own!
Loved this tutorial? I have so many more amigurumi tips and tricks to share with you!
Boost your amigurumi skills with my latest book, The Essential Guide to Amigurumi, your comprehensive guide to amigurumi techniques and tips.
Do you find my tutorials helpful? If so, please consider making a contribution towards my time so I can continue to create clear and concise tutorials for you:
Thank you so much for your support! Now click below for loads more crochet video and photo tutorials (and do let me know what else you’d like me to cover in future tutorials…)



Nen said
Hello June, thank you for the information in a friendly format. I was wondering if there is a serious ‘rethinking’ needed if one wants to crochet a pattern that states ‘any yarn with matching hook’. The author uses super chunky (7mm hook) but I would like to really ‘go big’ and use my Big yarn (18-20mm hook). If I follow their pattern exactly, will it just be scaled up? Thank you.
June said
Take a look at my article Scaling Amigurumi to Any Size – in your example, you’ll be going roughly from my ‘Double’ scale to my ‘Giant’ scale – it should be totally doable!
Bertha Panama said
I noticed that there wasn’t much on downsizing amigurumi besides different yarn and hook. Is it much more complicated to try and downsize? Does it make sense to just rewrite the pattern instead?Google does not help much either.
For reference I am trying to make a watering can that uses worsted yarn with a 4mm hook and has 31 rounds.
June said
Downsizing with a smaller yarn and hook is really the only practical way to do it. Halving the number of rounds and number of stitches is likely to leave you with ‘half a round’ or ‘half a stitch’ – and of course neither of those is possible, so you’d have to fudge a lot more numbers to make a pattern that makes sense!
If you want to downsize by rewriting the pattern with fewer stitches and fewer rounds, the basic method is to reproduce the shape of each piece in the pattern at a smaller scale – you’re pretty much starting from scratch at that point. If you’re comfortable enough with amigurumi design to do that, there’s nothing else I can say that will help you – you already know everything you need! But moving to a smaller hook and finer yarn is a much simpler and more straightforward way to do it, with a guaranteed excellent result at any scale. That’s the reason why it’s the only recommendation I give for reducing the size.
(And you can use the scale factor in my Scaling Amigurumi article to give you a good idea of which yarn and hook size you need to create the size you’re looking for!)
Jennifer McCutcheon said
I don’t think my previous attempt to comment worked. Any idea how to figure out how many balls of a bigger yarn to buy when sizing up by just using bigger wool and hook? Is it possible to predict from weight/length?
June said
I hadn’t responded yet because there isn’t an easy answer to this, I’m afraid. You can use the scale factor in my Scaling Amigurumi article to give you a very rough estimate, but it won’t be very accurate, especially at the larger end, where it will tend to overestimate.
Assuming you know the yardage of the original pattern, the most accurate way is to crochet a few sc stitches with the original yarn weight and hook, then unravel them and measure the length of yarn those stitches used. Then crochet the same number of stitches with your new yarn and hook, unravel them and measure the length of yarn those stitches used. You can use the ratio of the length of yarn in your new sample vs the length in the original to calculate the yardage, e.g. if your larger sample took 3x as much yardage as your smaller sample for the same number of stitches, your amigurumi will also take approx 3x the yardage overall!
(See, I told you it wasn’t a simple answer – sorry! But that’s how I do it and it always works pretty accurately.)
Jennifer McCutcheon said
Thank you! It’s a shame it’s not easier but that’s helpful.
Mia said
Hi, I am using your blog as a source for my project for school and I was wondering if you happened to have a specific date of when you published this post? It would be of great help! Thanks.
June said
Sure! I first published this page on Dec 3, 2015, revised from my previous post (here) from Dec 8, 2008. I’ve since updated the page further by adding the links to my more recent Scaling Amigurumi investigation and Giant Amigurumi ebook. I hope that helps!
Jennifer McCutcheon said
How do you know how much yarn to buy when sizing up the yarn? I’m going from a dk to jumbo….for a bear pattern. Any ideas?
Sara said
I’m trying to use a pattern that calls for a 4mm hook with x stitches (yarn under,yarn under vs yarn over, yarn over) and a size 6 yarn. I want to use size 7 (jumbo) yarn and a size 6 hook. I know my finished result will be bigger, but will upsizing the yarn to jumbo and the hook make the pattern not work/look like intended? Or will this be okay? Or do I have to add stitches and basically rewrite the pattern? Thanks!
June said
If you choose an appropriate hook size for your yarn, it should work out! See my Scaling Amigurumi article for examples and a table of hook sizes that are a good starting point for each yarn weight 🙂
明輝子 said
Why does this always happen with things from other cultures? Amigurumi is specific, it’s not the word for just any crocheted stuffed item. Americans, heck anyone outside of Japan never used the term Amigurumi, didn’t even know what it was before the internet, but now everything, no matter the method, that is stuffed is now Amigurumi because of how simplistically languages like Japanese are translated into English. Japanese actually can’t be translated into English, all you get is a rough translation of a language that works on ideas rather than phrases and words as English speakers recognize words. So now, everyone but Japanese are calling any stuffed crocheted or even knitted thing Amigurumi when it’s not. That’s like using scissors and calling it origami. If you introduce scissors at all, no longer can it be called origami. If you understand Japanese culture, and the perfectionism behind it, you’ll understand why. Next people will be calling any “potted plant” bonsai. Because the rough translation of bonsai is “potted plant”, which is just the shortening of the literal translation “planted in a container”, our words describe ideas and visualizations of things, they’re not single words, and when you use anything other than worsted weight, anything other than a 2.5mm hook it is no longer Amigurumi, it’s just a plush or a stuffie or whatever else Westerns called it before doing what they always do, redefine words from different languages. It’s just another form of colonization.
But, I’m sure people are either going to argue with me about this (I’m a Japanese, born and raised in Kyoto, so this is part of my culture.) or the post won’t even be posted.
June said
Ooh, interesting! It’s very true that words and ideas are spreading and changing much more rapidly in the internet age. I’m sorry if you feel there’s an element of appropriation in calling my work amigurumi (or maybe you’re just talking about the act of resizing them that makes them no longer amigurumi – I’m not quite sure?) – that has certainly never been my intention.
I have my own definition of an amigurumi design (worsted weight yarn, small hook as required to make a firm fabric, primarily single crocheted in the round) but that’s just what I’ve based my own designs and books around. I’m sure I’ve deviated further from the original Japanese meaning in my own work as my style and techniques have developed over the past 17 years.
I’d be very interested to hear a fuller definition of what exactly does or doesn’t constitute real amigurumi from you, as someone with an authentically Japanese perspective, which I certainly don’t have! PlanetJune is not a place for arguments – we can all learn when we take time to listen to other perspectives 🙂
Shelby Nykamp said
Hello June,
I recently made a set of polyhedral game dice for one of my friends using your polyhedral shape pattern and they turned out great! Now I’m curious if I could turn them into pillows or larger plushies by doubling the pattern. I was wondering if you had any tips/tricks for how to double odd shapes like the triangles and pentagons of that pattern?
June said
Not really, Shelby – doubling a pattern is only an effective technique for a simple pattern without any specific shaping. Once you get into detailed shaping, you can’t just follow a formula to increase the size, as you’d also have to take into account the way the stitches interact with each other, and compensate for the backward drift that occurs with each round. The pattern would need to be completely redesigned in order to double the number of rounds successfully.
But, all is not lost – it would be very easy to scale them up using my Giant Amigurumi techniques! I’d definitely recommend going down that route if you want to make larger squishy dice 🙂
Sam said
Hi, I have a question I am Trying to make my project bigger and not sure if I should use a bigger hook or change the height of my stitches. If I change the hook size idk which hook size to use 8, 9, 10 or 12 hook size. If I change the height of my stitches does that mean I have to change the whole pattern. The pattern calls for mostly single crochet. The pattern I am following calls for a 6 weight yarn bulky and 6 crochet hook.
June said
To increase the size you’ll need to use both a bigger hook and thicker yarn than the pattern recommends.
Sam said
So I would have to either double the yarn or just go
Up to jumbo yarn is the correct.
Sam said
I bought all this size 6 chunky yarn. If I double the strand of yarn it will be bulky and I just want it bigger
amy said
hi! i’m really new to crocheting and am trying amigurumi for the first time. just to clarify.. if the original pattern calls for 3.5mm and i want to use 9mm, do i need to add stitches at all? or can i just use the same pattern, but with the different yarn? i don’t mind that it’ll be bigger, i’m just not sure how to rewrite everything. thank you!!
June said
That’s right, you can use the same pattern provided you use the appropriate yarn weight to match your hook size. See my article on Scaling Amigurumi for more details on which yarn to use with which hook 🙂
Geena said
Thank you so much for this excellent post! I often find it challenging to either find the type of yarn I want to use in the weight that I need, or I want my amigurumi pal to be a different size than the original pattern. This post helps with both! 🙂
Gray said
Hey there, sorry to bother but I am struggling lol. I’m trying to create a giant amigurumi cow that is very similarly sized to your triceratops, but have had no luck with simply increasing the sizes of both my yarn and hook on a pattern that is meant to be approximately 20 cm. tall. I really enjoy the pattern and am reluctant to change it, is there anything else I can do from this point? I’m not experienced enough to rewrite the pattern either…
June said
Hi Gray, my ebook The Complete Guide to Giant Amigurumi should answer all your questions! If you’ve already bought it and are still struggling, all PlanetJune patterns and ebooks include customer service from me by email (you’ll find my email address in the ebook), so please feel free to email me with a photo of your work so far and a description of what’s going wrong, and I’d be happy to help troubleshoot 🙂
Victoria Hope said
Help! I understand the increasing / decreasing yarn weights and hook sizes BUT… if my pattern calls for 120m of dk, will I need the same meterage Aran or more?
Thank you ??
June said
When you move to a heavier yarn and correspondingly larger hook, the size of each stitch will also be larger, so it’ll take a longer length of yarn to form each stitch. So yes, you’ll need more yardage/meterage to make the same thing with an Aran yarn than you would with a DK.
Courtney said
Absolutely awesome post! I knew about changing the size with based on the hook & yarn size but have looked FOR YEARS for someone to explain, pattern wise how to resize. Thank you ❤☺
Stefanie said
This is just what I needed! A friend has asked me to make an amigurumi. I know she wants it to be larger than the finished size, but I am not skilled enough to rewrite the pattern. I am going to try the double strand and larger hook method. Thanks again! Love your work and YouTube tutorials.
Julia Gehrckens said
Thank you very much for this blog entry! Your tips gave me a new perspective and option to make an amigurumi pattern I have with the (sadly) wrong wool size I bought into the size I want the amigurumi!!! Much love from Germany!! xx
Jayne said
hello June
just wondering as i need to size down a rabbit from a size 5 hook with chunky wool too a size 4 hook with chunky wool.
Would this work so the Rabbit would be smaller xx
June said
With the same yarn size, you will get a slight size difference by changing the hook size – see my Stitch Tension investigation for an example of that. For a more pronounced size difference, you’d need to change the weight (thickness) of the yarn as well as the hook size, as I describe in the post above.
Sylvia said
Thank you for posting this. You have precisely answered my question – which was “Can I size up an amigurumi pattern by changing the weight of the yarn and size of the hook without changing the pattern?” I’m delighted that I can, and will start experimenting with some of my patterns right away!
Thanks again.
Savine D. said
Hi June,
Thanks a lot for all you tutorials : you are the one who taught me amigurumi crochet (and by extension, crochet itself !).
How do you make extra large amigurumis (I mean about 30 cm high or something like that), but using normal size yarn (I think big yarn doesn’t make beautiful finish – I tried once with the Hooked ribbon wool but it’s not smooth and the amigurumi is all tense and hard…) ?
Rewriting the amigurumi would be the better method I guess ?
Thank you very much !
June said
Savine, yes, there aren’t any other options that I can think of. If you don’t want to use thicker yarn (or multiple strands) with a larger hook, the only remaining option is to rewrite the pattern (or find a different one!), using more stitches and rows to give a larger result.
Kelly said
When using 2 strands to increase size would you use both strands when sewing pieces together or just one? I would think you
June said
There’s no rule to it, Kelly – the yarn you use and how tightly you crochet it will affect the end result. In my experience, firmer or more tightly crocheted yarns may be easier to stitch together using one strand, whereas a softer yarn may look better using two strands to more closely match your crocheted stitches. My best advice would be to try a few stitches each way and see which look you prefer, or which is easier for you to do.
DebbieJ said
Hi June, appreciate the reply. The book looks fab, will put it on my Christmas wish list for sure. I was wanting to make a crochet biker jacket for a punk rock figure I’m making for my husband but just couldnt find anything suitable in amigurumi size. I’d found some gorgeous adult patterns but no toy sized ones. Loved this one and wondered if the stitches could be multiplied down to fit. It may just be too difficult to work out though. knitted-patterns.com/knitting-for-women/crochet/jackets/4077-crochet-biker-jacket-free-pattern
Debbie J said
Hi June,
I was wondering how difficult you think it might be to scale down adult clothing patterns to fit amigurumi dolls? Many thanks. Debbie x
June said
That’s not something I have any experience with, Debbie, but I can recommend the book ‘Crochet for Bears to Wear’ if you’re looking to make clothing to fit any shape or size of amigurumi bear/doll – see my review here for more info 🙂
Cass said
Do you have any suggestions on how to make a 9.5 inch long amigurami pattern to a 1.9 foot long amigurami pattern?
Cass said
I am trying to make a red panda, any suggestions?
Cass said
Real adult pandas are 1.9 ft long fully grown. I wanted to make a project for one of my family members any help?(I wonder why I am talking to myself) 😛
Cass said
Like do I have to remodel it? Or go under the size?
Otherwise it would be 19 inches long. Not 21 inches like I wanted to.
June said
I think you’ve taken my “about twice the size” comment a little too literally, Cass – I don’t suggest that combining my tips would be guaranteed to turn a 9.5″ amigurumi into one exactly twice the length at 19″. The specific yarn and hook combination you choose, and how tightly you crochet, always plays a part in the exact size you end up with.
Without testing (by crocheting something with your proposed yarn and hook), there’s no way to calculate in advance the exact size you’ll create. But using a thicker yarn and a larger hook is a general principle for increasing the size, so, if you want to make your amigurumi larger still, you can use an even thicker yarn and an even larger hook!
Modifying a pattern in any way requires a little experimentation if you’re looking for a specific result – good luck!
Amy said
Hello! I’ve been a fan of your works for a while, and this is really helpful! I do have a question though. The pattern calls for Worsted yarn with a 3.5 mm hook, and if I were to double up on yarn, what hook size should I use?
Thanks!
June said
Amy, please see the section titled ‘Hook size for multiple yarn strands’ (part of Method 2, above) for my advice on this 🙂
Jamie A said
I have a pattern that specifies using fingering yarn and a 1.25mm hook. the end result is 10cm. If I use worsted weight it will be much bigger than the recommended. How would you reccommend converting this in to worsted weight? I don’t want it to be as big as it would be using the pattern with worsted?
June said
Jamie, this article explains how changing the yarn weight will automatically alter the size, so what you’re actually asking is how to avoid that effect. I’m afraid the answer is that there’s no way to do this without drafting a new pattern from scratch. You’d have to reduce the number of stitches in each round and the number of rounds in each piece, so you’d lose a lot of detail in the pattern and you probably wouldn’t be happy with the result. My suggestion would be to either use a yarn closer to the size the pattern is designed for, accept that your piece will end up larger than you’d like, or find a different pattern that meets your requirements!
Jamie A said
Thank you,
I was actually trying to figure out if there was a way possible to make it a little bigger. While I’m crocheting it now it seems as though it will be really tiny. When I was using worsted it was coming out to be really big. I was just wondering if you had any suggestions on how to make it somewhere in the middle of teeny and huge. Do you think using a crochet hook a size like 2.25 would work? Would the holes be too big that the stuffing would show?
June said
For an intermediate size, use an intermediate yarn weight and an appropriate hook for that yarn – see my Yarn for Amigurumi article for further information.
Jamie A said
I will do that right now! Thank you!
Jackie M. said
Hi June! I’m using method 4 (re-writing the pattern) for an amigurumi pattern that is NOT in a continuous spiral – it is worked with joined rounds, turning after each round. How should I approach this? Should I only turn after every-other-round? I don’t want to risk goofing up the shaping of the animal.
Thank you!! 🙂
June said
I’m not sure I can answer this one, Jackie – it really depends on the pattern, and on why it was written in this unusual way. It’s beyond the scope of this tutorial to advise further on a pattern that’s not written as a standard amigurumi. It depends largely on how simple/basic the pattern you’re trying to resize is, but here are a few hints to get you started:
I really can’t advise further, as I can’t provide pattern-specific support for non-PlanetJune patterns. You’d have to start with a best guess and go from there – it’d be a case of experimenting with your pattern and seeing what looks good. (You may need to bring a bit of artistic judgement into it!)
Good luck 🙂
Carol W said
Thank you for writing all this up and including the helpful photos! The little details and rules of thumb you mention make all the difference.
Gloria Hopkins said
Thank you so much for these instructions