Invisible Decrease
If you’ve been making amigurumi, you may be lamenting the gap or bump that forms when you decrease. The standard methods of decreasing are to sc2tog, which can leave a bit of a bump and a small gap, or to skip a stitch, which leaves an obvious gap. There has to be a better way… and there is! The invisible decrease really is as good as its name claims – it’s almost impossible to see, even if you know what you’re looking for. (See my blog post for a comparison of these three methods.)
The invisible decrease method will probably take a few attempts to master, but, just like the magic ring, it’s one of those techniques that’s so good, you’ll wonder how you ever crocheted without it!
How do I make an Invisible Decrease?
Choose your preferred learning method! I have video and step-by-step photo tutorials, all for right- and left-handers. Continue to:
- Invisible decrease video tutorial (right- and left-handed versions)
- Tips for perfecting your invdec stitches
- Invisible Decrease for right-handers (photo tutorial)
- Invisible Decrease for left-handers (photo tutorial)
Invisible Decrease for right-handers
Before we begin:
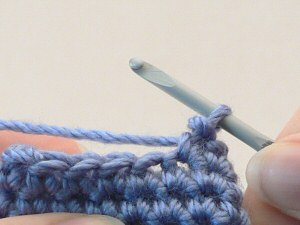
Insert the hook into the front loop of the first stitch (2 loops on hook). DO NOT YARN OVER:
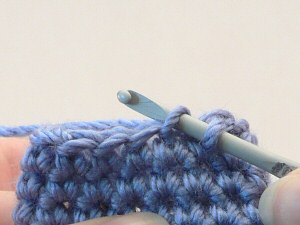
Insert the hook into the front loop of the next stitch. To do this, you’ll need to swing the hook down first so you can insert the hook under the front loop. (3 loops on hook):
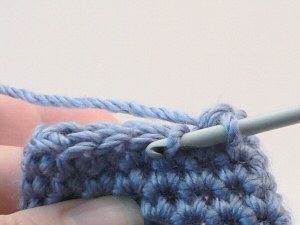
Swing hook down…
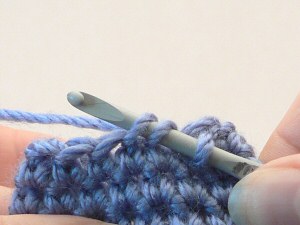
…then up through the front loop of the next stitch
Yarn over and draw through the first two loops on the hook. (2 loops on hook):
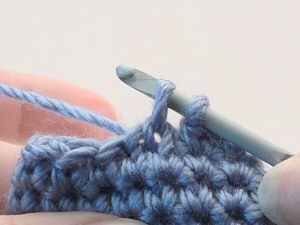
Yarn over and draw through both loops on the hook. Invisible decrease completed:
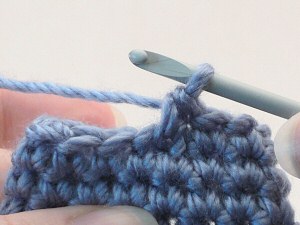
Now let’s play a game: spot the decrease…
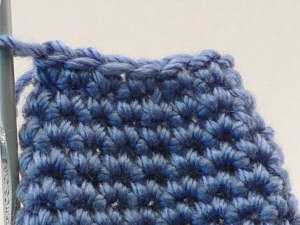
Good, huh? Give it a go with your next ami – I promise you won’t regret it…
Invisible Decrease for left-handers
Before we begin:
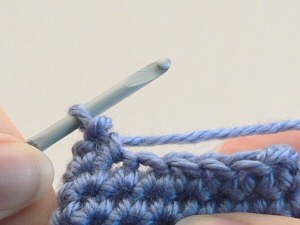
Insert the hook into the front loop of the first stitch (2 loops on hook). DO NOT YARN OVER:
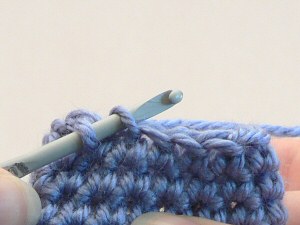
Insert the hook into the front loop of the next stitch. To do this, you’ll need to swing the hook down first so you can insert the hook under the front loop. (3 loops on hook):
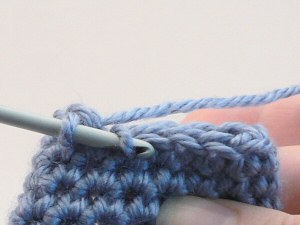
Swing hook down…
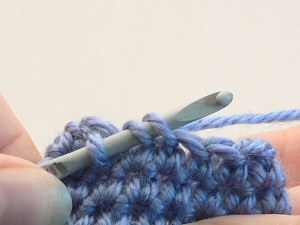
…then up through the front loop of the next stitch
Yarn over and draw through the first two loops on the hook. (2 loops on hook):
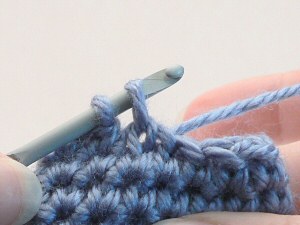
Yarn over and draw through both loops on the hook. Invisible decrease completed:
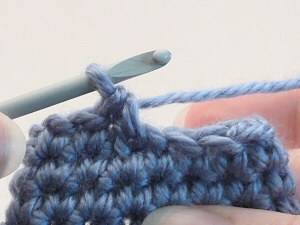
Now let’s play a game: spot the decrease…
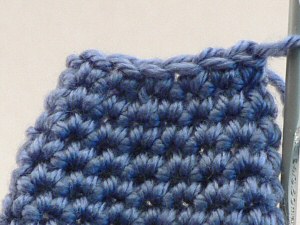
Good, huh? Give it a go with your next ami – I promise you won’t regret it…
Loved this tutorial? I have so many more amigurumi tips and tricks to share with you!
Boost your amigurumi skills with my latest book, The Essential Guide to Amigurumi, your comprehensive guide to amigurumi techniques and tips.
Do you find my tutorials helpful? If so, please consider making a contribution towards my time so I can continue to create clear and concise tutorials for you:
Thank you so much for your support! Now click below for loads more crochet video and photo tutorials (and do let me know what else you’d like me to cover in future tutorials…)


Tootsie said
2024 readiness
Starting with the head the instructions indicate “invdec” ! In preparing I found lots of help here and community.
That said, sure enough, I didn’t even need to ask, just search within!
Thankful for the left handed instruction!!
Tootsie is a lefty
Meral Maria Gokcen said
What a lovely way to do a sc decrease! Is it possible to decrease hdc in a similar way? Because hdc2tog looks so bulky & ungainly at the fronts of booties!
Di said
Excellent instructions. It works beautifully.
James Craw said
I use this technique often with amigurumi it
Kristy said
Wow! I just stumbled across this tonight. I wish I had known about it about 4 snowmen and 15 angels ago! I am doing another angel tonight and will try it!
Thank you!
Patsy said
Thanks so much for generously sharing how tos and tips on techniques you
Laura Paul said
Thank you for the great tips. You are an angel. I’m left handed and have learned to read patterns backwards but always have trouble with the pictures and video instructions. Thanks again for the lefty version. They are great tips. Love the invdec.
Anna said
This is a great tip you’ve shared and even though I am new to crocheting, I can definitely see the advantage to this method of decreasing. Glad you’ve kept the post up all these years.
Dorothy Stuhr said
Thanks so much June. I was doing it wrong, I would yarn over to soon and then again! I am making a doll and the decreases looked awful. So I went back to your tutorial and it’s perfect. Thanks, you are an valuable asset to the crochet community.
MindeeK said
This is absolutely fantastic. THANK YOU!
Sandy said
I tried your decrease for the snowballs and I
June said
It sounds like you have your work inside out! Please see www.planetjune.com/rightside to check and get instructions for how to correct this in future 🙂
Lily said
Oh My Gosh! This is fantastic! I
bonnie greenhoe said
thank you so much for your free patterns . I love them all. I want to make the booties and a blanket for my 2 grandbabies that were born in june.
Nicole T Permenter said
Purchasing one of your patterns was well worth it, just to find out about this stitch. Lol
Hillary said
Oh my gosh! How. Fabulous! Thanks so much for this!
Naomi said
Oh. MY. GAWD. This is exactly what I was lamenting about with my last amigurumi piece and you have answered it so clearly and easily. I will try this for the next one. Thank you!!!
Kerry said
Thanks so much for this. As I’ve done the standard decrease before it’s often been in my head to wonder if exactly what this tutorial shows would work … and it does. So maybe I should listen to my inner voice more often – which is what you obviously did.
I love your tutorials which are so easy to follow – and so very helpful. Thanks again.
Danielle said
Hi June! I’ve always found your website so helpful. But I’m currently struggling to find an answer to this reacurring problem I have. I’m making an animal head, the pattern calls for one row of 4sc, Dec., next row 3sc, Dec., next 2sc, Dec., next 1, dec, then dec around. Ive used the invisible decrease. But when I close up the hole, it pulls all the stitches wide open.
Do you think the decrease in the pattern is just too fast? Is this a tension issue? I reached out to the person who wrote it but all they said was they never had a problem with the decrease. So I don’t know how to fix it!!!
I hope you can help!
June said
Without seeing the pattern, I can’t tell if it’s a pattern issue or an issue with your hook/yarn combination or stitching. I’d suggest that you try following one of my PlanetJune amigurumi patterns (if you don’t want to buy one, you can just pick something simple from my free patterns – an apple or pear would be a good test) and see if you find you have the same problem with your decreases:
I hope that helps! (If not, see my Perfect your Invisible Decreases tutorial for further assistance on avoiding gaps.)
Amanda Watson said
I really would have been glad if I had known about your invisible decrease, when I was working on a “Crochet Yoda” from my sister’s Star Wars Crochet book.
Jo Ann McNeil said
Thank you so much, going right now to try this on my next project. I don’t know if it would ever be called for but is there a way to do this with double crochet?
June said
Hi Jo Ann, yes there is! I’ve already given details in a previous comment, here 🙂
Elaine said
Thank you for providing instructions for left handers too!! It has been difficult for me to find any instructions for left handers. Everything I make comes out backwards because what is the right side for right handers is the wrong side for left handers. I try to refigure everything so that it comes out right, but am not always successful.
AT said
Hi, many thanks for your tutorials. 🙂
I have a question about the invdec. I get how it works, you have to use the front loop when decreasing. However, is this before or after turning the amigurumi the ‘right’ way? Do I have to use the back loop if I decrease before turning?
Thanks in advance for your response. 🙂
June said
If you watch my ‘Which is the Right Side?‘ video, you’ll notice that the front sides of the stitches always face you while you’re crocheting, whether you’ve flipped your piece inside out yet, or not. So you should always invdec using the front loops (i.e. the loops closest to you while you crochet), as the unworked back loops will all end up hidden on the inside once the piece is right side out.
If that doesn’t seem to make sense, just try making a couple of decreases and then flipping your piece inside out and back again, and you’ll see how it works in practice 🙂
Sarah Lewis said
Greetings from Portsmouth, England. Excellent tutorials. I wanted to thank you not only for being so generous with your skill and time but for including us left handers. Off to try an amigurumi Unicorn.
Rita Silveira said
Thanks for sharing. God bless you.
irina dalah said
hi june,
thank you so much for sharing this method!! I did use it on an amirugumi owl (this is how I first got to your blog) but I have tried it with vests and tops!
it really works wonders!! and the more I use it the easier and more instinctive it becomes!!
thank you again!!
and keep up the good work 😉
Dianne U said
June, your way of making amigurumi is amazing and outstanding! I only wish I had found you much sooner. I’ve made several items over the past few years, but now – with your methods to help me improve – they look awful to me. Your tips and tricks make the world of difference in the quality of my pieces and I’m forever grateful and thankful for your expertise! Bless you and thanks again.
Debbie said
I’ve never made anything amigurumi. The Crochet ball that you showed us how to make will be my first. I am so excited. I will make so for my cat. i am also going to try and make ninja turtles in memory of our son who passed away. He collected the old Ninja Turtles. I still have them.
Tesia said
This works so well, I had to start using markers during the decreasing rows in my work. I can’t tell where my decreases are anymore. Love it. Thanks!
Jo Schreibeis said
Hi! I love your tutorial for this invisible decrease! I’m inquiring if you would allow me to link to this in a pattern I am writing for a bear pattern? I will give you credit in the pattern (obviously since it’s going to your blog!).
Thank you for your consideration!!
June said
Absolutely! You’re very welcome to link to any of my tutorials in any of your patterns – please see my linking policy in my FAQ for the best way to do this.
Tania Oliveira said
Thanks for sharing your knowledge so clearly.
I am now starting with amigurumis, and your tutorials are wonderful.
Thank you, God bless you greatly
Lois said
Can you please tell me what size safety eyes I need to use?
Thank you.
June said
Lois, that depends on what you’re making! Most of my patterns use 8, 9 or 10mm eyes, but there are some that use 6mm or 12mm. All PlanetJune patterns list the recommended eye sizes in their description in my shop (and on page 1 of the pattern itself, if you’ve already bought it).
Donna said
Hi June,
My hat is off to you. You do beautiful work. You’re an inspiration to all crocheters. Thanks so much for sharing your amazing work. You are a true artist.
Kathy said
My pattern calls for a Double decrease (using 3 stitches). Can this be accomplished using your invisible method? Thanks 🙂
June said
Kathy, you can use this method for a decrease over more stitches, but it won’t be invisible: changing 3 (or more) stitches to 1 is always going to leave a bump and/or gap, however you do it – it’s the nature of such a large decrease. I suggest you try it in your pattern, compare it with a standard sc3tog, and see which result you prefer.
Rachel said
Thank you so much for this! I love doing amigurumi and didn’t realise there was such thing as an invisible decrease! I hated having the bumpy side showing on some of my creations. I’m getting out of bed just to try this out now!
Leelou de France said
Hi ! I like your patterns and purchase several. They are clear and, MORE in these patterns they are links to all your technical explanations. And these explanations are also so clear !! You are really a MASTER, “the” TEACHER !! THANKS, THANKS, so thank for sharing all your knowledges !!!! Leelou
(I hope that you understand my approximate english 😉 …..)
June said
Thank you, Leelou! I’m so happy you find my patterns and tutorials to be clear and helpful – that’s what I aim for 🙂
Debby said
THANK you !! I was making little crocheted toy balls for my grandson, and did not care for the little holes where the stuffing could come out – your version is perfect !!
Pat Reynolds said
This is a great tutorial ty for sharing
g
Lynsi said
AMAZING. Mind blown. I’m never doing another type of decrease again!
robin quade said
Thank you for explaining this method, but do you need to go in the front loop for the rest of the stitches in the row?
June said
Definitely not, Robin – changing to front loops only would change the look and shape of your stitches. Invdec is only used as a direct substitute for sc2tog decreases; all the other stitches in the pattern remain unchanged.
Habiba said
Hey June! I really dont get the invisible dec method
I have a round that says
[ inv dec , sc 4] around { 36}
How do i do it??
June said
The ‘invdec’ in your pattern is just the invisible decrease I show above – an invisible way of turning 2 stitches of the round below into 1. If you don’t understand the way your pattern is written, you should contact the designer for assistance 🙂
Stacey said
I LOVE you! lol Thank you so much this is amazing! I definitely do not regret learning this ;)! and I am sorry I haven’t found this sooner!! But, oh well, from now on, no more visible decs!!
Thanks again!
Cheers! xo
Perrie said
Thank you for the tutorial. I’ve been crocheting for a long time and I never heard of this stitch. It’s so invisible that I’m amazed at how I can now hide my decreases. Very cool. JAH BLESS AND ONE LOVE! !
Nicole H said
Thanks so much for sharing your knowledge and creativity with the rest of us! Special kudos for including left-handed instructions! Now to go try to master the MC. It’s usually hit-or-miss whether or not I get it right.
Celine said
Thank you so much for your tutorial! My decreases looked horrible before. I tried your method and it works like magic : no visible decreases anymore! Thanks again!
Jessica said
I am 18 and I just started to crochet recently, I love it. The only problem I had was the way my decreases looked, this is great. Thanks a lot.
Irene Foss said
Thank you very much for the lesson on invisible decrease. I had never heard of it before. But then when I started crocheting again this spring it had about 35 years since I had done any crochet.
This will be so nice to use in the 2 crochet sweaters I’m making for 2 great grand daughters. The pattern has a pretty yoke and lots of decreases. I was so glad to see the post by Sam Said asking if the invisible decrease could be done in dc. The yoke of the sweater is made in dc. I am just getting to the point where I will be starting the decreases and will use the invisible technique
SallyStrawberry said
Hi June,
Thanks so much for this tutorial. I have used the invisible when making some toadstools and the comparison between the ones I made before I learned this method of decrease and the one I have made after are tremendous! A pic can be seen in my latest post at sallystrawberrycrochetandknitting.blogspot.co.uk/
Thanks again for such a brilliant tutorial!
Sally x
Gardenchef's Needle and Pen said
Great tutorial! Thank you for this!
t.hoang said
I don’t get how this is different than single crocheting two together other than going only through the front loop…? or is that the magic difference?? 😮
t.hoang said
wait, nvm. i see the difference :]
Less bulky? said
Does the invisible decrease work because it is less bulky?
June said
Yes, and the invdec essentially pulls the stitches below together with a sc stitch, instead of a sc2tog which is formed from the bottom half of two sc stitches joined together at the top. Removing that extra half stitch does makes the decrease stitch less bulky, and the resulting stitch also looks the same as all the surrounding sc stitches, so it’s harder to spot.