PlanetJune Craft Blog

Latest news and updates from June

Amigurumi Clean Edge Join (right-handed)

Link easily to this tutorial in your patterns: www.planetjune.com/cleanjoin

Looking for the left-handed version? If not, read on:

Usually in amigurumi, the goal is to join pieces with an invisible, seamless join, so you can barely tell where one part ends and the next begins. But sometimes, especially with a piece of a different colour, you can get a neater finish by not smoothing the join, and instead making invisible stitches so it looks like the pieces are magically holding themselves together without any stitching at all:
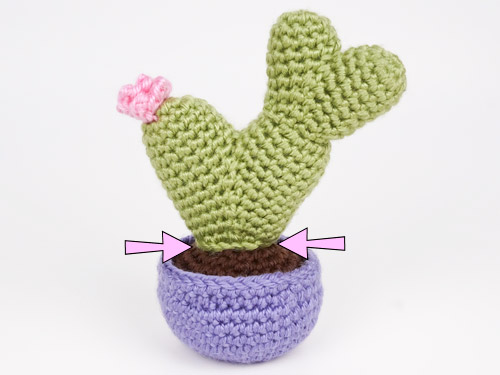
Amigurumi Clean Edge Join crochet tutorial by PlanetJune

You can use this technique to attach something where you want there to be a clear defined edge between pieces, for example, attaching a beak to a face, or (as I’ll show in this demo) attaching a cactus to the soil of its pot.

Tip: Don’t use this joining technique where you want an invisible join; instead use my Amigurumi Seamless Join to blend the pieces together smoothly.

For a Clean Edge Join, you’ll need two pieces to join together:

  • Piece A (below, left): An open-ended piece like this cactus, with the ‘V’ shapes of the stitches visible around the open edge of the piece.
  • Piece B (below, right): A closed piece to attach it to (in this case, the pot with soil).
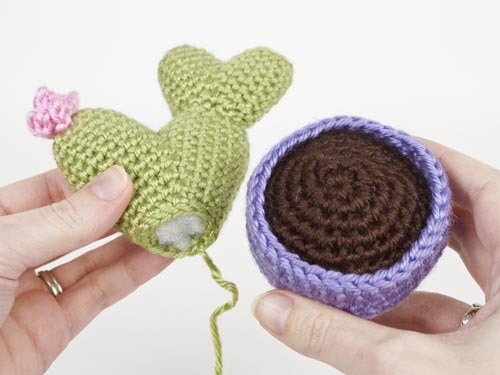
Amigurumi Clean Edge Join crochet tutorial by PlanetJune

If you left a long yarn end on A, thread it onto a yarn needle, or cut a length of A‘s yarn to use for the stitching and thread that onto the needle.

Place A in position against B and make your first stitch down into B and then up again at the next gap between stitches:
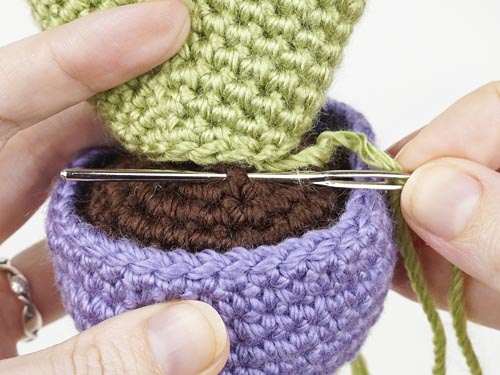
Amigurumi Clean Edge Join crochet tutorial by PlanetJune

Pull through, then insert the needle up from inside to outside under both loops at the edge of the next stitch of A:
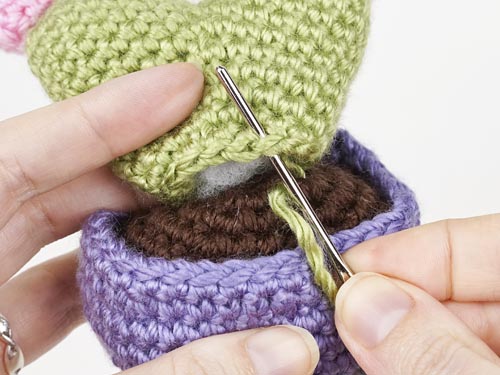
Amigurumi Clean Edge Join crochet tutorial by PlanetJune

…then insert the needle down from outside to inside under both edge loops of the following stitch:
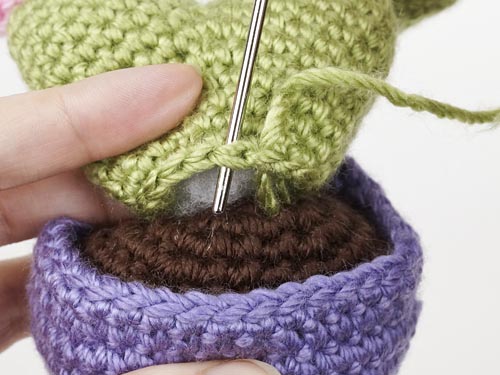
Amigurumi Clean Edge Join crochet tutorial by PlanetJune

Insert the needle into the next gap between B stitches below your needle, emerging at the following gap:
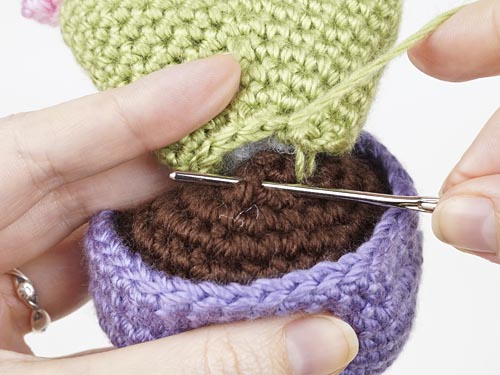
Amigurumi Clean Edge Join crochet tutorial by PlanetJune

Here’s how the stitches will look before you pull them tight:
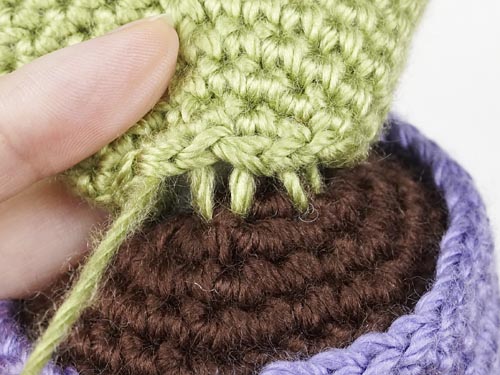
Amigurumi Clean Edge Join crochet tutorial by PlanetJune

Pull the yarn to draw the stitches tight and you’ll see the pieces are drawn together and the stitches are perfectly invisible!
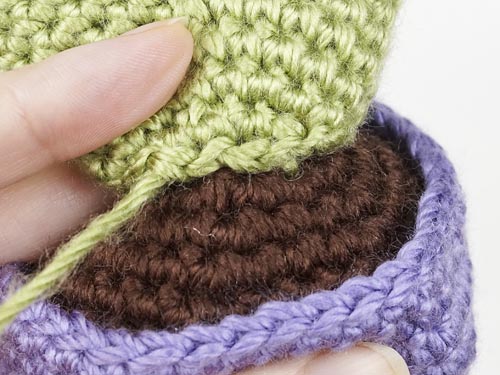
Amigurumi Clean Edge Join crochet tutorial by PlanetJune

Repeat all the way around the open edge.

If you’re doing it correctly, your stitches should never draw the loops at the open end of A down to the surface of B, as normal seaming stitches do. Here’s a normal seam, so you can see the difference this technique makes:
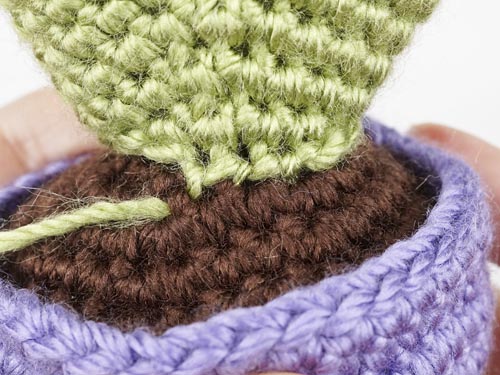
Amigurumi Clean Edge Join crochet tutorial by PlanetJune

With this Clean Edge Join, all the seaming stitches are hidden just above those loops on A, so they leave a much neater edge formed by the ‘V’s all around the open edge of A:
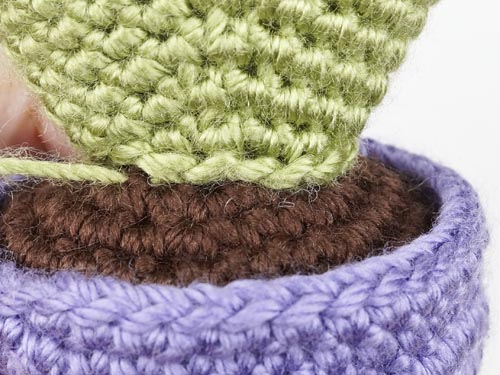
Amigurumi Clean Edge Join crochet tutorial by PlanetJune

Once you’ve stitched all the way around and fastened off, you’ll have a neat join with a straight, clearly defined edge between the two pieces. When you want a straight, clean edge, the Clean Edge Join is a big improvement over a standard join!
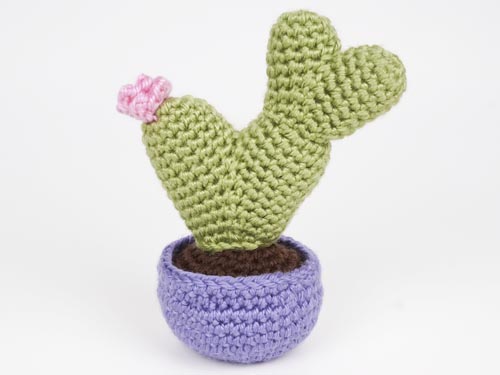
Amigurumi Clean Edge Join crochet tutorial by PlanetJune

(Want to give it a try? The cactus featured in this tutorial is part of my Heart Cactus Collection crochet pattern 🙂 )


The Essential Guide to Amigurumi book by June Gilbank

Loved this tutorial? I have so many more amigurumi tips and tricks to share with you!

Boost your amigurumi skills with my latest book, The Essential Guide to Amigurumi, your comprehensive guide to amigurumi techniques and tips.


Do you find my tutorials helpful? If so, please consider making a contribution towards my time so I can continue to create clear and concise tutorials for you:

Thank you so much for your support! Now click below for loads more crochet video and photo tutorials (and do let me know what else you’d like me to cover in future tutorials…)

See more helpful PlanetJune crochet tips and technique tutorials

1 Comment »

  1. Laurel Abraham said

    Thank you for all the great tutorials!

RSS feed for comments on this post

Leave a Reply

Thank you so much for taking the time to leave a comment here! I read and appreciate every comment. I only respond to questions here on the blog, so please return to this page to see my reply, or check the box below to subscribe to new comments by email.

Please note that I can only answer questions related to PlanetJune patterns and tutorials (see details), and I can only respond to questions or comments written in English. Thank you :) - June

Your email address will not be published. Required fields are marked *

  • Quick Links: Crochet

    navigation: arrow

    buy crochet patterns and accessories from my online store

    'Everyday Crochet' and 'The Essential Guide to Amigurumi' crochet books by June Gilbank

    Crochet video tutorials and step-by-step photo tutorials

    Free PlanetJune crochet patterns

    Frequently Asked Questions

    Quick Links: Crafts

    navigation: arrow

    Punchneedle Embroidery information, ebook & patterns

    Papercraft ebook & tutorials

    Free PlanetJune craft projects & tutorials

  • Blog Post Categories

  • Blog Archives

  • CAL Galleries

    Ravellenic Games: Team PlanetJune
    PlanetJune Reindeer Games
    PlanetJune Temperature Snake CAL

  • Welcome to PlanetJune!

    June Gilbank

    Hi, I'm June. Welcome to my world of nature-inspired crochet and crafting. I hope you enjoy your visit!

    If you'd like to get in touch, you can contact me here.
    crocheted Canadian flag by PlanetJune
  • June’s Crochet Books

    A fanned-out pile of the books Everyday Crochet and The Essential Guide to Amigurumi, with text 'The answers to all your crochet questions at your fingertips - find out more'
  • Support PlanetJune!

    Want to say thanks? You can send me money in seconds at paypal.me/planetjune (over $20) or paypal.me/planetjune2 (under $20) or send me a donation through my shop.

    Or simply click through from my links before you shop at Amazon, Etsy, KnitPicks, LoveCrafts and more, and I'll make a small commission on your purchase, at no cost to you! Start here:

    ♥ Support PlanetJune ♥

    Tip: This link is also in the footer of every page!

    Thank you so much for your support!