Amigurumi Santa Hat crochet pattern
© June Gilbank 2018
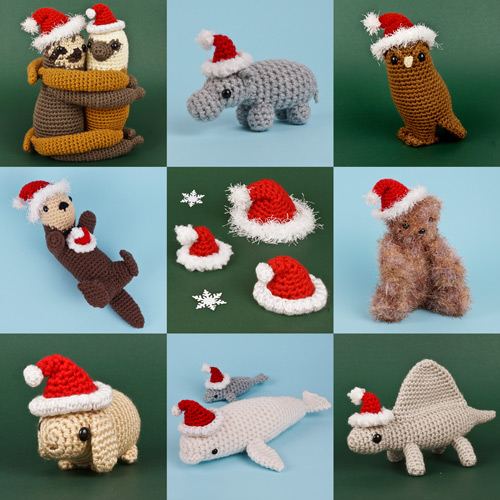
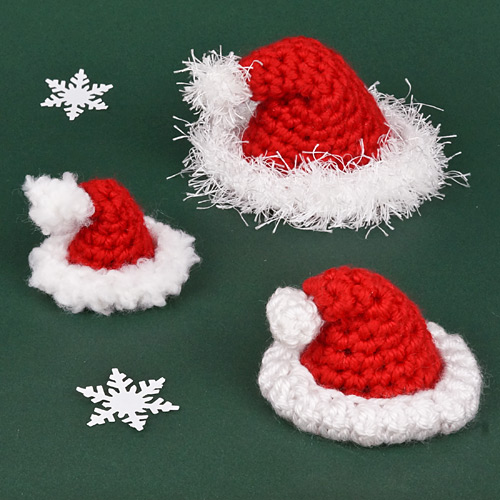
Dress your amigurumi for the holidays with this easy Santa Hat pattern! This customizable pattern can be used to make a festive hat for almost any size of amigurumi.
This pattern is Donationware – the pattern is available for free, but if you like it please consider sending me a donation to show your appreciation:
Send me a donation and receive the easy-to-print PDF version of the pattern as a thank you! It includes some additional info that you’ll only find in the PDF version:
– Specifics for making the other sizes of hat
– Additional photos
– Alternate patterns for the trim/bobble that are optimised for regular yarn and bouclé/textured yarns
Donations of any size are much appreciated. Just add the amount you wish to donate, and, once you have checked out and paid, your pattern will instantly be available to download from your PlanetJune account.
The complete pattern and instructions for the hat (with eyelash trim) are available below, regardless of whether or not you choose to pay for them 🙂
This is a PlanetJune original crochet pattern. Feel free to use items made from this pattern however you wish, but I’d appreciate credit as the pattern designer. Please do not reproduce the pattern anywhere else; instead post a link to www.planetjune.com/santahat
Not ready to make it yet? Add it to your Ravelry queue:
Terminology
| ch | chain |
| dc | double crochet (treble crochet for UK/Aus) |
| sc | single crochet (double crochet for UK/Aus) |
| sl st | slip stitch |
| st | stitch |
Notes
- Do not join at the end of each round; rounds are worked in continuous spirals.
- Use a stitch marker to mark the beginning of each round. Move the marker up each time you start a new round.
- Working with fuzzy (eyelash or novelty) yarn can be a challenge until you get the hang of it. See my advice here.
You will need…
- H US/5mm crochet hook
- Small quantity of worsted weight yarn in red
- Small quantity of fuzzy/eyelash yarn in white
- Yarn needle to weave in ends
- Stitch marker
Size
Approx 3″ (8cm) diameter. (Your gauge and yarn choice will affect the finished size slightly.)
Gauge
Gauge is unimportant for this pattern – use any hook size that gives you a fabric you like! If you want your hats to look slightly floppy, as pictured, don’t use the small hook you usually use for amigurumi. (I usually use an E US/3.5mm hook, and I used an H US/5mm hook for my hats.)
Special Stitch: 3-dc Cluster
A 3-dc cluster stitch is formed from 3 incomplete double crochet stitches joined together to make a rounded stitch that pops out of the surrounding fabric.
To make a cluster stitch:
*Yarn over, insert hook into stitch and draw up a loop. Yarn over, draw through 2 loops on hook.*
Repeat * two more times, working into the same stitch each time. Completing each repeat will leave one more loop on your hook; after the last repeat you should have 4 loops remaining on your hook.
Yarn over and draw through all 4 loops on hook.
Hat Body
worked from the top down
Note: You can stop crocheting and jump to the Trim instructions as soon as the hat reaches the diameter or length you’d like – try it on your amigurumi and see when it looks good!
With red yarn, make a magic ring, ch 1.
Rnd 1: 4 sc in magic ring. (4 st)
Rnd 2: (2 sc in next st, sc in next st) twice. (6 st)
Rnd 3: sc in each st around. (6 st)
Rnd 4: (sc in next st, 2 sc in next st, sc in next st) twice. (8 st)
Rnd 5: sc in each st around. (8 st)
Rnd 6: (2 sc in next st, sc in next 3 st) twice. (10 st)
Rnd 7: (sc in next 2 st, 2 sc in next st, sc in next 2 st) twice. (12 st)
Rnd 8: (2 sc in next st, sc in next 5 st) twice. (14 st)
Rnd 9: (sc in next 3 st, 2 sc in next st, sc in next 3 st) twice. (16 st)
Rnd 10: (2 sc in next st, sc in next 7 st) twice. (18 st)
Rnd 11: (sc in next 4 st, 2 sc in next st, sc in next 4 st) twice. (20 st)
Rnd 12: (2 sc in next st, sc in next 9 st) twice. (22 st)
Rnd 13: (sc in next 5 st, 2 sc in next st, sc in next 5 st) twice. (24 st)
Rnd 14: (2 sc in next st, sc in next 11 st) twice. (26 st)
Rnd 15: (sc in next 6 st, 2 sc in next st, sc in next 6 st) twice. (28 st)
Join with sl st to next st, and fasten off.
Trim
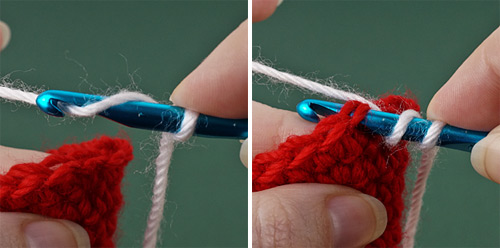
With white eyelash yarn, make a slip knot on the hook. Hold the slip knot in place against your hook with your finger (below, left) so your first yarn over doesn’t unwind itself as you crochet the first stitch (below, right).
Rnd 1: starting with any stitch around the edge of the hat, 3-dc cluster in each st around.
Join with sl st to first st. Fasten off and weave in all yarn ends.
Bobble
With white eyelash yarn, ch 2.
Rnd 1: 6 sc in 2nd chain from hook. (6 st)
Rnd 2: sc in back loop of each st around. (6 st)
Make sure the bobble is turned so the fluffiest side is on the outside.
Note: The bobble is so tiny that there’s no need to stuff it.
Fasten off, leaving a long yarn end to attach bobble to hat, and stitch the remaining hole closed.
Finishing
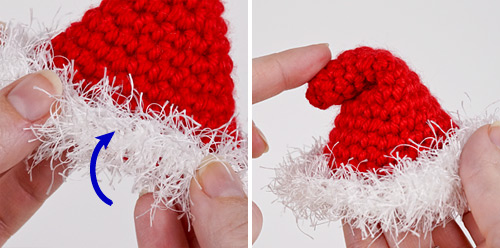
Flip up the Trim so it covers the last red row of the hat (below, left).
Fold the top of the hat down to one side (below right, and see the other photos for reference, or decide for yourself how much to fold it by), and use a yarn needle and a length of red yarn to secure the underside of the folded part to the hat below, to keep the fold in place.
Using a yarn needle and the long yarn end from the bobble, stitch the bobble to the tip of the hat. Weave in all remaining yarn ends.
Fluff out any clumps of lashes that are trapped by the stitches by raking over the eyelash stitches a few times with the yarn needle.
Optional: Use a pair of small, sharp scissors to trim all the lashes so they don’t look too long and straggly. I trimmed the lashes in my sample hat to about half their original length, but depending on the brand of yarn you use and the size of hat you make, you may prefer longer or shorter lashes.
I hope you enjoy this pattern. Please leave me a comment below if you do, and consider leaving me a donation. Thanks!


Ben Johnson said
Do you sale christmas hat if yes email me with the models for me to select one and proceed.
Linda said
Was making an amigurumi & couldn’t get the hat just right. Your pattern was a great help. Thank you.
Angie said
thank you so much for this! making a christmas Looney Tunes ornament for my little sister, and this is the perfect size!!! thank you thank you thank you!!!!!
Deborah said
thank you so mich for this pattern.
i am making a doll and thought to look for a santa hat pattern without much hope but there it was…..perfect ❤
DianeDavis said
love your santa hats thank you