PlanetJune Craft Blog

Latest news and updates from June

Archive for January, 2018

Stitch Tension in Amigurumi: an investigation

Link easily to this page in your patterns: www.planetjune.com/stitchtension

Today, I’d like to dispel a common amigurumi myth…

In amigurumi, as with all crochet, you should always be keeping tension on the yarn to keep your stitches compact and regular. But I often hear misinformation that you should be ‘crocheting tightly’ to make amigurumi, and that’s not true at all!

The tightness of amigurumi stitches refers to the tension of the small stiff stitches of the fabric you produce, not to the tension in your hands while you crochet.

Showing is better than telling, so allow me to demonstrate, via a new crochet investigation, how to make perfect amigurumi stitches without hurting your hands!

Experiment 1: Effect of Hook Size

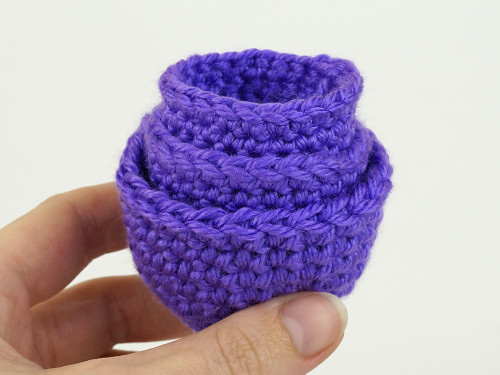
I crocheted the same sample amigurumi cup shape 3 times with different sized hooks and the same worsted weight yarn each time. I crocheted the same way as I would when making a scarf or anything else – I kept my tension even, but didn’t try to pull my stitches tightly or pull back on the yarn after pulling up each loop.

I used my standard amigurumi E hook (3.5mm), and, to show the effects of changing hook sizes, I tried a larger H hook (5mm) and a smaller C hook (2.75mm).

stitch tension in amigurumi: a PlanetJune investigation

You can see that the stitches are neat and even in all three samples and, as you may expect, using a larger hook results in a larger finished piece that’s both taller and wider than the same piece crocheted with a smaller hook.

See how the smaller hook samples can stack inside the larger ones? There’s quite a size difference!

stitch tension in amigurumi: a PlanetJune investigation

What you can’t tell from a photo is how stiff the fabric of each sample is. With the H hook, the fabric is too floppy to hold its shape well. With the E hook, the fabric is much firmer and holds its shape much better. With the C hook, the piece is even firmer and feels very solid.

I simulated the effect of adding stuffing by gently stretching out each piece between my fingers, so you can see the gaps between the stitches:

stitch tension in amigurumi: a PlanetJune investigation

As you can see, the H hook fabric is far too open for an amigurumi; the gaps between the stitches are very noticeable. With the E hook, the stitches have smaller holes between them, so the stuffing would be far less visible. And, with the C hook, the gaps between stitches are almost invisible.

So here’s the result of changing hook size: a smaller hook gives a smaller and firmer crocheted piece, with tighter stitches and smaller gaps between the stitches.

These are the properties we want for amigurumi fabric! A stiff, sturdy fabric that holds its shape and has tiny gaps between the stitches is exactly what we need for crocheting a 3-dimensional sculpture.

Choosing the Right Hook Size
The C hook was the smallest hook I could manage with this specific yarn (Caron Simply Soft, a light worsted weight yarn), and I had to stop and undo a stitch a few times, when my hook hadn’t grabbed all the plies of the yarn. I wouldn’t recommend using a hook quite this small, as it’s annoying to have to undo your work whenever you realise you have a snag in your stitches from splitting the yarn with the small hook.

My Recommendation: In practice, with a light worsted weight yarn like this, I might go down to a D hook for the best balance of small, tight stitches and not splitting the yarn as I crochet. For the heavier worsted weight yarns, I still recommend an E hook for most amigurumi.

(See my Worsted Weight Yarn Comparison for more about the differences between different yarns that are all labelled as worsted weight!)

Experiment 2: Effect of ‘Crocheting Tightly’

Now, part two of this investigation. I returned to my standard E hook and tried crocheting the same sample piece yet again, but this time I followed the misunderstood advice of ‘crocheting tightly’. I held the yarn tightly and pulled back on it against my hook each time I formed a loop, so each loop was tight around the hook and as small as possible.

stitch tension in amigurumi: a PlanetJune investigation

Both these samples were crocheted with the same hook. As you can see, the ‘tight’ piece is smaller and firmer than the normally-tensioned piece, but at what cost?

When you crochet with too-tight tension, your stitches are so small that it’s hard to work back into them, and that’s what happened in this case: it was an effort to force my hook into each stitch. My yarn-holding hand began to cramp from pulling the yarn so tightly, and I didn’t enjoy the process of crocheting at all. Even finishing this small piece was very hard work.

stitch tension in amigurumi: a PlanetJune investigation

Yes, the tight piece is definitely smaller (and therefore ‘better’ for amigurumi) but crocheting it was a horrible experience!

The Tension Exception
In amigurumi, chains and slip stitches should not be crocheted with your usual tension. These stitches need to be crocheted with an extra-relaxed tension (or a larger hook), or they’ll be too small to work back into.

See my tutorial Chains and Slip Stitches in Amigurumi for more on this.

Experiment 3: Comparing Smaller Hook and Tighter Tension

Now, let’s compare the small (C hook) sample from Experiment 1 with the extra tight tension sample (E hook) from Experiment 2:

stitch tension in amigurumi: a PlanetJune investigation

Can this be right? They look almost identical!

stitch tension in amigurumi: a PlanetJune investigation

Yes, comparing the two pieces, they look and feel almost exactly the same – the size and shape are the same, the stiffness of the fabric is the same, the gaps between stitches are the same.

The only difference? The sample on the left was crocheted comfortably with a small hook, and the sample on the right was crocheted extra-tightly, at great discomfort, with a larger hook.

Conclusions

As these experiments have shown, there’s absolutely no advantage to changing the way you crochet when you make amigurumi by working extra-tightly (and you may actually hurt your hands, wrists and arms by doing so!)

The goal with amigurumi is to maintain tension (down and backwards) on the yarn that’s balanced by your hook pulling up and forwards. This control allows you to form neat, consistent stitches.

You should never feel you have to force your hook into every stitch and/or pull your stitches as tightly as possible. This not only distorts your fabric but can also lead to hand and wrist fatigue and repetitive stress disorders.

The secret to making good-looking amigurumi without making your hands hurt is simple:

  • Select an appropriately small hook and crochet the same way as you usually do.
  • The perfect hook for your yarn is the smallest size you can manage without starting to have problems from splitting your yarn because the hook is too small to consistently grab all the plies.

The result: neat tight stitches, with no pain!

If you ever experience discomfort when making amigurumi, I encourage you to relax that death grip on your hook and yarn, and try crocheting with a slightly smaller hook instead. Your hands will love the difference and, I hope, you’ll enjoy the amigurumi-making process more.


Have you fallen for the amigurumi myth of ‘crocheting tightly’? Please leave a message in the comments and share your experiences…


The Essential Guide to Amigurumi book by June Gilbank

Loved this tutorial? I have so many more amigurumi tips and tricks to share with you!

Boost your amigurumi skills with my latest book, The Essential Guide to Amigurumi, your comprehensive guide to amigurumi techniques and tips.


Do you find my tutorials helpful? If so, please consider making a contribution towards my time so I can continue to create clear and concise tutorials for you:

Thank you so much for your support! Now click below for loads more crochet video and photo tutorials (and do let me know what else you’d like me to cover in future tutorials…)

See more helpful PlanetJune crochet tips and technique tutorials

Comments (27)

attempting advanced origami

Last year didn’t leave me with much time for ‘fun’ crafts, so I’m trying to pick that up again this year, and make time to make things just for the fun of it!

I received a pack of origami papers for Christmas, so I thought I’d try to learn more origami skills by picking a far more challenging pattern than I’ve attempted before. I chose to try a Cape Dwarf Chameleon (now I won’t be able to see real chameleons in my garden any more!) using a pattern by Quentin Trollip that’s rated as 4 out of 6 (advanced intermediate) on the origami difficulty scale.

Advanced intermediate is far beyond how I’d rate my origami skills, but there’s only one way to improve, and that’s to try something that’s out of your comfort zone! Although I’ve made lots of origami before, I usually stick to basic models with folds that you can understand with only wordless diagrams, so I was really jumping in at the deep end here.

At almost every step, I had to stop and google what each fold and instruction meant. Swivel fold? Inside reverse fold? Rabbit ear?! All new to me.

I found it difficult to understand all the new folds and spent ages staring at diagrams to try to see how one step could possibly lead to the next. But, finally, I figured out all the folds and, after a few hours, I had a finished model. It’s far from perfect, but if you squint you can just about recognise it as a chameleon!

origami chameleon

For comparison, here’s the perfect original from Quentin Origami:

Chameleon 2
Haha, my attempt doesn’t look much like this!

Still, this is not a failure. I’ve learnt a lot from this project – persevering through learning so many new folds, and ending up with something close to what I was trying to make (although clearly a beginner-level attempt, with many mistakes).

So I thought I’d share it with you as an example of how there’s a learning process with every craft, and your first attempts may not look anywhere near perfect, but they’re a necessary step on the road to mastery, and nothing to be ashamed of.

I’ve also discovered that I prefer to make modular origami – simple folded units that combine to form a more complex result – vs trying to achieve the entire shape with a single sheet of paper. There’s a lot of dexterity and artistry needed to make advanced origami look good, but I prefer to keep my paper folding at an easy relaxing level. You don’t need to aim for mastery in order to enjoy a craft!

If you’d like to try some origami or paper-folding too, I have a few designs you may enjoy, such as these:

PlanetJune Papercraft: paper folding projects

See all my papercraft tutorials at PlanetJune Papercraft – I can promise they are far more beginner-friendly than an origami chameleon!

Comments (4)

knit camel vest

This is sweater #12 of my ‘learn to knit by making a dozen self-designed sweaters’ project. (Here are links to #1, #2, #3, #4, #5, #6, #7 #8, #9, #10, and #11, if you’d like to see my progress.)

What could I do for my 12th sweater project that I haven’t already done?! I started thinking this would have to be a spectacular finale to the project, and that put so much pressure on me, I couldn’t get started! So I decided to step back and just make something I wanted to make, as I did for all the others.

camel vest

Now, you could argue that a vest is not really a sweater, but all it’s missing is the sleeves (and I definitely know how to knit sleeves by now) so I don’t think this is cheating – I could have added sleeves if I had more yarn, and I had plenty to learn from designing and knitting this vest, which was really the point of my whole project.

I had about 500m of deliciously soft baby camel yarn left over from my amigurumi Camel (I’d bought 5 hanks to take advantage of a wholesale discount price – it was far too expensive to justify buying 100% baby camel yarn for a toy at retail price). I’d hoped to think of some way to use this extremely warm yarn to make something useful, but the low yardage was going to be a challenge, so I decided it’d have to be a fairly close-fitting vest, and I’d do some calculations on the fly to make sure I could use as much of the yarn as possible without running out.

To keep it interesting and build my skills, I chose an all-over textured stitch pattern instead of plain stockinette.

camel vest

Instead of joining a new ball of yarn at the end of a row, I used the Russian join to minimise wasted yarn (and had to consult my own book for the instructions – it’s been a long time since I’ve used this join and I couldn’t quite remember how to do it!)

And my plan worked, eventually! It took some re-knitting: I started my textured stitch pattern in a way that caused the whole bottom border to flip up (a fact that didn’t reveal itself in my swatch or until I was way past the point of wanting to unravel it all and restart). I kept going and then unravelled from the bottom cast-on edge up until the point where I could fix the problem (and also to recover some yarn to use for a more substantial neckband than I’d budgeted for – I didn’t like the look of the narrow one I tried first), then I reknitted the bottom border and added the neckband.

camel vest

I added a new tool to my knitting toolkit: an interchangeable crochet hook (size E/3.5mm) for picking up stitches. Being a left-hander, but a right-handed knitter, I’ve found that picking up stitches along an edge (as a way to start e.g. a button band or armhole edging) with a needle is too challenging for me. Until now, I’d been picking up a few stitches at a time with a normal crochet hook, then dropping them off the hook and picking them up on the needle, but this was slow and fiddly.

Now, I can just unscrew the needle tip from the cable, screw on the hook, pick up all the stitches with ease and slide them onto the cable as I go, and then switch back to the needle tip to begin knitting! The interchangeable hook has been a brilliant addition to my interchangeable needle collection.

In the end, I used 99% of my yarn (woohoo!) to complete the vest, and I’m happy with the result – it’s extremely soft and very warm without being bulky. It isn’t the sort of thing I’d usually wear – either in style or colour – but this extra-warm layer is turning out to be very useful, and it’s the natural colour of the baby camels who donated their yarn so that I could knit this vest, so that’s pretty cool!

camel vest

Skills I learnt in this project:

  • Working an all-over texture throughout a piece (I really like the result of the stitch pattern I used – I think it looks like a yummy waffle).
  • Garter stitch… I know, it’s the most basic stitch, and yet I’ve actually never knitted anything in garter stitch until I decided to use garter edgings on this vest. I haven’t been a big fan of the look of garter, although I’m willing to change my mind on that point, because I love how flat my edgings are compared with stockinette! There are definite benefits to not being an anti-garter stitch snob.
  • Decreasing in pattern for the V-neck (note to self: if I was doing it again, I’d have left two stitches of stockinette at the edge instead of one: one for the selvedge and one to make a neat border at the base of the edging).
  • Weighing the work so far and adapting the design on the fly to account for the lack of yarn.
  • Picking up stitches around an armhole.
  • Making an armhole edging.
  • Making a buttonhole in garter stitch.

camel vest

I was hoping to find some colourful buttons (maybe turquoise or dark purple) to contrast with the yarn colour, but there wasn’t anything in the right size and colour in the button shop, so I went with this dusty pink. I think it looks okay, although I may make some polymer clay buttons and swap them at some point. But, for now, it’s finished.

camel vest

And, with that, my 12 sweater project is complete. Isn’t that amazing?!

I have a lot to say about the experience of the project and where I’ll go from here, but I’ll save those thoughts for a wrap-up post…

Comments (3)

Lion Cub and Family crochet patterns

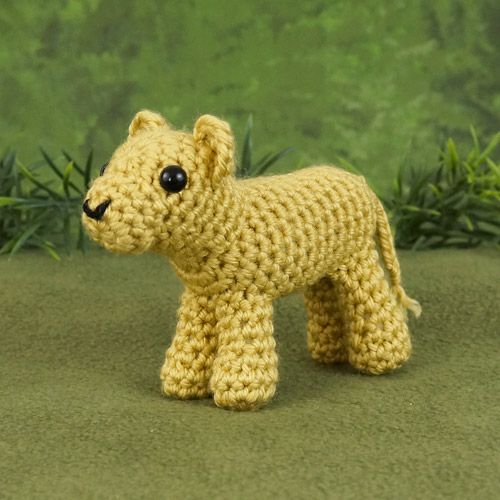
After having the privilege of watching packs of lions in the wild at Kruger Park, I thought my Lion and Lioness pattern would be adorable with a little Lion Cub pattern to complete the family. And after making the cubs, I think I was right…

Lion Family crochet patterns by PlanetJune

What do you think?

My new Lion Cub pattern complements my existing Lion & Lioness pattern perfectly, and is also a sweet standalone pattern in its own right.

Lion Cub crochet pattern by PlanetJune

Lion Cub is very fast to crochet, at only 5″ long, so you can whip up a few realistic baby lions in no time! They’re sure to charm with their big cub paws and cute little faces.

You can buy the adorable Lion Cub pattern alone, or get a great deal when you buy the whole Lion Family multipack together!

Note: If you’ve already bought the Lion and Lioness pattern, you don’t have to miss out on this deal! Just buy the Lion Cub, then email me with 1) your Lion Cub order number and 2) the order number (or date) from when you bought Lion & Lioness, and I’ll send you a coupon for $2 off your next order of $5 or more. (The coupon will remain valid for a whole year, so don’t worry if there’s nothing else you want to buy right now!)

Lion Family crochet patterns by PlanetJune

Handy Links:

Comments

2017: year in review

2017 has been very far from the year I was expecting; when I started another year in South Africa, I didn’t dare to dream that I’d be back home in Canada by the end of the year. And yet, here I am – yay! ♥

An Unexpected Turn of Events

Things seem to have a habit of going in different directions than I’d anticipated, but at least the advantage of keeping my business small is that, without anyone else on the PlanetJune team, I can easily change plans and switch directions on the fly, to adapt to circumstances.

  • I invested a big chunk of time towards the end of 2016 in updating my Commissions system, but then decided that it was time for it to be retired (and, a few months later, I don’t regret that decision at all).
  • With a goal to concentrate on my YouTube channel in 2017, I invested financially in new video recording equipment and editing software, but a minor-but-ugly thumb injury that’s only just healing now has meant I haven’t been able to make even one new crochet video all year. (I’ve managed to keep making patterns through a combination of careful hand positioning and photoshopping, but neither of those are practical for videos!)
  • And, of course, the big one: I didn’t start the year expecting I’d be planning and coordinating another move halfway around the world, and have to simultaneously plan how to bolster my business to weather the storm of having no office/studio or equipment for 3 months, so no way to produce new patterns…

2017 Achievements

Wearing my web developer hat, I’ve completed some dull-but-necessary tech projects:

  • Added a privacy policy page to comply with privacy and disclosure requirements.
  • Converted PlanetJune to HTTPS (so you can tell I’m 100% trustworthy by the green padlock in your browser’s address bar).
  • Added credit card processing in my shop (finally!) so you aren’t required to use PayPal any more.
  • Updated my shop to also allow payment in Canadian dollars, and to prepare for the sales taxes I’m going to need to start collecting from Canadians from today onwards.

Wearing my designer hat, I’ve been splitting myself in two this year, and squirrelling away half my new designs so I’ll have some new releases to get PlanetJune through the lean winter months while I can’t create new patterns! Despite that, I’ve had some strong pattern releases this year and made some good decisions that have helped PlanetJune to keep growing.

2017 PlanetJune crochet patterns

I’ve always said that quality is more important than quantity, so I’m not disappointed in my 10 new patterns (plus one re-release) this year – especially as so many of my latest patterns include multiple designs. Count up all the different options here and you’ll see I actually have 25 new pieces you can crochet – that’s not a bad number at all!

And, despite my thumb injury, I added a few new helpful crochet tutorials:

2017 PlanetJune tutorials

Planning for the move hasn’t left much time for creative pursuits this year, but I always try to keep some time free for crafting and personal development:

2017 PlanetJune crafting

I’m still knitting sweaters, I’ve played around a bit with needlefelting, and I’ve also started to teach myself Japanese (although I’ve let that slide a bit over the last couple of months – my brain has been fully occupied with more pressing matters!)

Lessons Learnt

Although this year has been anything but easy, I got through it and now I’m at the point where I’ve accomplished the move, and have the next 3 months of PlanetJune designs ready to publish! All this has proved to me that I can still be strong when I need to be, and that simplifying things is the key to dealing with major challenges. I’ll try to remember these lessons when things get overwhelming in future:

  • Don’t be afraid to make big decisions if they’ll bring you closer to your dream job/life/situation.
  • Know that even the best plans need to adapt to changing circumstances.
  • Keep moving forwards, even if you’re sometimes moving at a crawl.

I think these wise words can apply to anything you’re trying to do – especially a goal that feels like it may be a bit too ambitious or unattainable.

Looking Forward

It’s tempting to think that, now my move home is complete, I should be able to plunge right back into working hard for PlanetJune, to make up for lost time and get business booming, but the reality of a sustainable one-person business is that you have to balance building the business with caring for the person behind the business.

Although I haven’t talked much about this since it happened, I’ve struggled with my health for the past 3.5 years since the trauma of my home invasion experience. It profoundly affected me, and the PTSD hasn’t gone away.

I hope that now I’m back in Canada, my life will start to stabilise and I can concentrate on rebuilding myself. I think the distance will help me to finally recover from the mental trauma and give me enough energy to also start to rebuild my physical strength after being a virtual prisoner in my own home for years. It’s only been a few weeks and I’m already feeling much better, so I’m confident I can achieve this in the coming year.

You may have also noticed the absence of local wildlife posts since my bad experience – I couldn’t even find the courage to go into my garden alone without bringing on panic attacks, so sitting peacefully in nature with my camera is something I’ve sorely missed, apart from on our occasional holidays to safer places. But now (and especially once winter is over) I’ll be able to get back outside and enjoy nature again!

As for PlanetJune, I still absolutely love what I do here – designing new patterns, developing new techniques, and teaching people how to make beautiful things. I’m very motivated to keep doing all that, and I don’t need to set any specific goals to know that’s how I want to spend my time and earn my living.

I don’t know what the coming year will hold and how much time and energy I’ll have available for all the ideas I have for PlanetJune. As I can’t predict the shape of my life this year, I’m going to keep my business plans very simple and free from anything even remotely resembling a deadline. My overall goal is to work to the best of my ability with the time available to me, to explore, design and create new patterns and supporting tutorials.

For 2018, I want to dial way back on the excitement and build a strong foundation for the future, both personally and professionally. My wishes for this year are for peace, calm, and quiet strength. I wish those things for you too, and a very Happy New Year!

Comments (7)

  • Quick Links: Crochet

    navigation: arrow

    buy crochet patterns and accessories from my online store

    'Everyday Crochet' and 'The Essential Guide to Amigurumi' crochet books by June Gilbank

    Crochet video tutorials and step-by-step photo tutorials

    Free PlanetJune crochet patterns

    Frequently Asked Questions

    Quick Links: Crafts

    navigation: arrow

    Punchneedle Embroidery information, ebook & patterns

    Papercraft ebook & tutorials

    Free PlanetJune craft projects & tutorials

  • Blog Post Categories

  • Blog Archives

  • CAL Galleries

    Ravellenic Games: Team PlanetJune
    PlanetJune Reindeer Games
    PlanetJune Temperature Snake CAL

  • Welcome to PlanetJune!

    June Gilbank

    Hi, I'm June. Welcome to my world of nature-inspired crochet and crafting. I hope you enjoy your visit!

    If you'd like to get in touch, you can contact me here.
    crocheted Canadian flag by PlanetJune
  • June’s Crochet Books

    A fanned-out pile of the books Everyday Crochet and The Essential Guide to Amigurumi, with text 'The answers to all your crochet questions at your fingertips - find out more'
  • Support PlanetJune!

    Want to say thanks? You can send me money in seconds at paypal.me/planetjune (over $20) or paypal.me/planetjune2 (under $20) or send me a donation through my shop.

    Or simply click through from my links before you shop at Amazon, Etsy, KnitPicks, LoveCrafts and more, and I'll make a small commission on your purchase, at no cost to you! Start here:

    ♥ Support PlanetJune ♥

    Tip: This link is also in the footer of every page!

    Thank you so much for your support!