PlanetJune Craft Blog

Latest news and updates from June

Archive for December, 2015

classic Tetris in cross stitch

tetris cross stitch embroideries

I like to have a relaxing craft project to work on over the holidays, to give me a complete break from work and designing. In December 2011, I’d hoped to do some knitting, but you have to learn to keep plans flexible when you live in Africa: the knitting needles I ordered from my local shop in November didn’t arrive until the following March(!), so I had to change my plans. Instead, I returned to one of my oldest crafty pleasures: cross stitch.

Long before I taught myself to crochet, my crafts of choice were polymer clay, candlemaking, and counted cross-stitch. I used to buy cross stitch kits, and then, later, bought software that let me design my own charts. Now I know my way around Illustrator, I can design my own charts, from scratch – much more satisfying 🙂

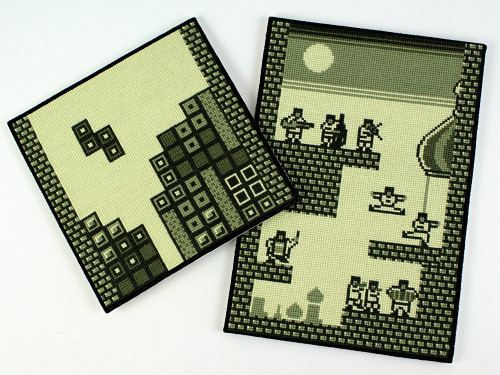
I like the idea of 8-bit art – basing a design on pixelated video game graphics makes it so easy to replicate the original – but I wanted to give it my own twist. So, I came up with a Tetris design to stitch in 4 shades of green to mimic the original classic 2-bit black and white (actually light green and dark green – or ‘pea soup’ colours according to Wikipedia!) Game Boy version.

And here’s the result: 10,000 perfect little stitches of geeky relaxation.

tetris cross stitch embroidery

To give this design a very small amount of meaning, the falling block has a little built-in life metaphor: do you take the easy road by dropping the block straight down and completing two lines, or do you hold out for the big rewards by shifting it one space to the left first, and hoping a straight piece comes along soon so you can complete a tetris? (I’d hold out for the tetris every time!)

The original Game Boy Tetris is still the best version of the game (although I may be biased – it was my only game for months, until I could afford to buy Super Mario Land too – and I’ve probably logged hundreds of hours of gameplay on it). I have a Tetris game for my DS, but it doesn’t hold a candle to the classic music and Russian dancing men from the original.

I considered making a companion piece showing the full band and all the dancing men, but that would need the full height of the Game Boy screen (144 pixels) – almost half as many stitches again as the first piece! I decided that’d be too much work, but, when the holidays next rolled around, guess what I started designing..?

tetris cross stitch embroidery
Can you hear the music?

I’d figured out how to draw symbol-coded cross-stitch charts in Illustrator and charted each piece fully before I started to work on it:

tetris cross stitch chart (partial) by June Gilbank

Doesn’t my chart look great? I’d hoped to eventually release both patterns as Donationware, but the issues of trademark infringement and unlicensed patterns made that idea too difficult to pursue further, so I guess my charts will never see the light of day. But at least I know how to create perfect professional-quality cross stitch charts now – you never know when that’ll come in handy!

This turned into a really long-term project. During my second Christmas of working on the second piece, I posted this wip photo (rotated so as not to give the game away):

tetris cross stitch work in progress

I was still working on it last Christmas, and it’s taken until now to complete, wash, press and mount both pieces.

tetris cross stitch - back
The back of the second piece – I love how the back of cross stitch embroideries look almost as good as the front, and have their own patterns that you don’t see from the front.

And finally, 4 years of holiday crafting and 24,800 stitches after I embarked on this project, they’re ready to hang in my office/studio! It took a lot of patience to reach this point, but I think it was worth it:

tetris cross stitch embroideries

They’re a perfect fit for the narrow wall space to the right of the window. The only question left is which should hang above the other: like this…

tetris cross stitch embroideries

…or like this…

tetris cross stitch embroideries

I really can’t decide! Which do you prefer?

Either way, I love them. And now I’ll get to see my Tetris wall hangings every day, and have a moment of happy nostalgia every time I look at them. 🙂

Comments (9)

Punchneedle Butterfly 3: Rajah Brooke’s Birdwing

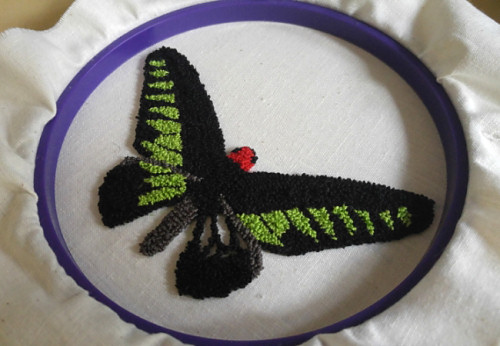
I’ve started an ongoing long term craft project to make a group of different butterflies using Punchneedle embroidery – all different colours and shapes but all based on my interpretation of real species – and mount each one individually on a wall so they all ‘fly’ together in a colourful cloud.

It took me the best part of a year to sketch up the design for my next Punchneedle butterfly, and only a few pleasurable hours to transfer my design, punch it, wire the wings, back it with felt, and trim it… You may have seen my in-progress shot a couple of weeks ago on Twitter:

punchneedle butterfly: rajah brooke's birdwing by planetjune

Rajah Brooke’s Birdwing is the national butterfly of Malaysia, and all our attempts to spot one during our trip to Borneo last year were in vain. I decided to make up for that disappointment by creating my own in punchneedle – the bold electric green on black makes for a spectacular design…

punchneedle butterfly: rajah brooke's birdwing by planetjune

Each of my punchneedle butterflies is designed to fit inside a 6″ embroidery hoop, so my collection is definitely not to scale. While my Peacock and Sea Green Swallowtail are both much larger than their real-life counterparts, birdwing butterflies are huge, and my ‘Brooke Butterfly’ (as they called it in Borneo) is actually just about life-sized!

punchneedle butterfly: rajah brooke's birdwing by planetjune

This brings my little collection to three, and I think my butterflies are almost ready to leave the safety of my shelves and migrate to their eventual wall display. I’ll probably get started on that when I’ve completed one more design…

punchneedle butterfly: rajah brooke's birdwing by planetjune

This is a very long-term project for me, but I’m so enjoying seeing my small collection slowly grow with each new butterfly. I think I’ll try to make a Monarch next, although it’ll be fiddly to make: punchneedle is best suited for bold shapes, not fine lines. But the Monarch is my favourite butterfly from my time in Canada, so it wouldn’t feel right to omit it just because it’ll be a challenge.

While it’s a shame that my punchneedle patterns don’t really sell well enough to justify making any more, there’s a silver lining to that too: it gives me the freedom to call this project pure art, with no constraints for making the butterfly designs easy to replicate by others. If that changes at some point in the future, I’d publish all my butterfly patterns as an ebook and grade the designs by difficulty, so it’s still not a bad idea to make my Monarch. And, if not, I’m enjoying making my butterfly collection, and I hope you’re enjoying seeing them!

If this post has piqued your interest in Punchneedle embroidery, take a look at my Punchneedle intro page for information on this craft and how to get started.

Comments (9)

Origami Poinsettia papercraft tutorial

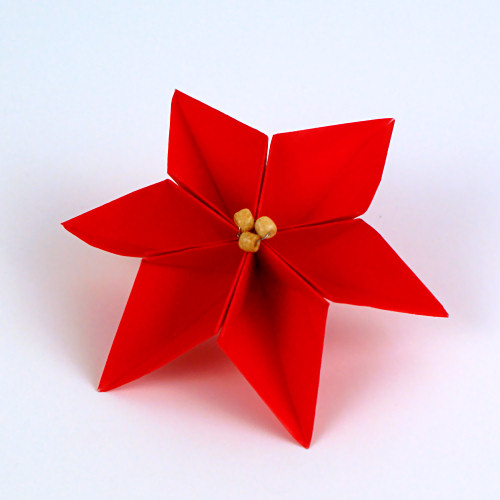
In celebration of my new PlanetJune Papercraft ebook and donationware tutorials, I decided to design a papercraft poinsettia to add to my collection…

origami poinsettia by planetjune

The ‘petals’ of this Poinsettia are made with origami techniques, and the ‘flower’ is assembled with wire (with an option for sewing thread) – that can also be used to create a stem or hanging loop – and beads for the centre.

Did you know that the red ‘petals’ of a poinsettia are actually bracts – modified leaves – and only the central yellow parts are the flowers? So, while this isn’t actually a ‘flower’ in the case of a poinsettia, you can also make this design as a pretty flower at any time of year!

If you don’t have origami paper, inexpensive gift wrapping paper is the perfect thickness for paper folding. You only need to cut 3 squares to make a flower, and you’re bound to have some leftover wrapping paper before Christmas, so don’t throw it away! My origami poinsettia measures 3″ (7.5cm) in diameter, but it can be easily scaled to any size by starting with larger or smaller squares of paper. Beads or a button add the finishing touch to this lovely easy decoration.

The origami techniques in this design are very simple – this would be a fun introduction to paper folding if you haven’t tried it before – and once you’ve learnt how to fold a leaf you’ll be able to whip up a poinsettia (or several!) very quickly. If you’d like to give it a go, the link to the free tutorial is below, and, as always, if you choose to thank me with a donation, you’ll get the handy printable PDF version 🙂

Go to the Origami Poinsettia tutorial >>

The Poinsettia Collection

I only had one year off before I felt compelled to return to my tradition of crafting a new Poinsettia ornament every year. This new design brings the total up to 9! Here are all the previous PlanetJune Poinsettias:

tsumami kanzashi poinsettia by planetjunecrocheted poinsettia by planetjune
polymer clay poinsettia by planetjunepunchneedle poinsettia by planetjune
felt poinsettia by planetjunebeaded poinsettia by planetjune
thread crochet poinsettia by planetjuneknitted poinsettia by planetjune

Top (L-R): 2006 kanzashi poinsettia (no tutorial); 2007 crocheted poinsettia
2nd Row (L-R): 2008 polymer clay poinsettia; 2009 punchneedle poinsettia
3rd Row (L-R): 2010 felt poinsettia; 2011 beaded poinsettia
Bottom Row: 2012 thread crochet poinsettia; 2013 knitted poinsettia

(You can find all my Poinsettia designs as PDFs in my shop, or use the links above for the free online versions.)

Happy seasonal crafting!

Comments (5)

basic knitted v-neck pullover

This is sweater #8 of my ‘learn to knit by making a dozen self-designed sweaters’ project. (Here are links to #1, #2, #3, #4, #5, #6 and #7, if you’d like to see my progress.)

basic brown knitter pullover by planetjune

After the fine yarn and lace of my last cardigan, I wanted a more relaxing knit for my next project. I decided to go for a really basic V-neck pullover, not too fitted so I can wear layers and long-sleeves underneath when it’s cold, but with some shaping so it fits over my hips but isn’t too boxy.

Even though the end result is simple – plain stockinette throughout with 2×2 rib for the collar, hem and cuffs – I still got to try some new techniques and expand my skills. I’d just bought Sally Melville’s Craftsy class ‘Essential Techniques Every Knitter Should Know‘ (and, as an aside, I loved this class – highly recommended, particularly if you’re interested in knitting sweaters).

Some of Sally’s recommendations made me feel less like I’m muddling through my knitting journey, as I’d reached the same conclusions as her (so I must be doing something right!), while other tips were new to me, and I tried a few in this sweater.

(In fact, Sally’s thinking on knitwear design decisions seems like such a good match for mine that I’ve since also bought her book, Knitting Pattern Essentials: Adapting and Drafting Knitting Patterns for Great Knitwear – I can recommend that too!)

basic brown knitter pullover by planetjune

My new techniques with this sweater:

  • I used lifted increases for the first time, on Sally’s recommendation, and tried her shortcut for simplifying them. Thumbs up to that.
  • I also tried her technique for faster mattress stitch seaming (although I love seaming my knits – it’s like magic! – so I’ll probably stick with my usual slower method, going through every row, in most cases).
  • I refined the cuffs and hem I used for my shawl-collar pullover by switching to smaller needles to reduce the bulk. Definitely an improvement.
  • I did my first pick-up-and-knit for the neckband (I usually knit it as a strip then sew it on) and that worked fine – I even managed a sort of mitered corner at the point of the V.
  • And I decided to weave in the ends as I finished each part of the sweater. Although that’s a bit scary because you have to trust you won’t want to change anything later, it worked well for a simple sweater like this, and made the finishing process at the end much easier!

basic brown knitter pullover by planetjune

I feel like this one came together in no time (making it in worsted weight yarn didn’t hurt) and the finished sweater is warm, cosy, and snuggly – just what I was hoping for.

Of course, it’s now summer in South Africa, and far too hot to be wearing something like this! So please excuse me if I look less than comfortable in these photos (especially the one above – the sun came out and I was roasting!) but I’ll be very happy to wear this properly once the weather cools down again here – my house is freezing in winter and this will be just what I need to keep warm.

The confidence I got from making this simple design quickly and well made me think I was ready to take a bit of a leap for my next design and try something completely different. It’s not finished yet, but I’ll show you how that turned out, soon…

I can hardly believe I’m two-thirds through this project now! I’ve knitted 8 wearable sweaters for myself in just over 3 years – when I started, I didn’t seriously think I’d ever get this far – and I’m enjoying every minute of this learning experience.

Comments (4)

  • Quick Links: Crochet

    navigation: arrow

    buy crochet patterns and accessories from my online store

    'Everyday Crochet' and 'The Essential Guide to Amigurumi' crochet books by June Gilbank

    Crochet video tutorials and step-by-step photo tutorials

    Free PlanetJune crochet patterns

    Frequently Asked Questions

    Quick Links: Crafts

    navigation: arrow

    Punchneedle Embroidery information, ebook & patterns

    Papercraft ebook & tutorials

    Free PlanetJune craft projects & tutorials

  • Blog Post Categories

  • Blog Archives

  • CAL Galleries

    Ravellenic Games: Team PlanetJune
    PlanetJune Reindeer Games
    PlanetJune Temperature Snake CAL

  • Welcome to PlanetJune!

    June Gilbank

    Hi, I'm June. Welcome to my world of nature-inspired crochet and crafting. I hope you enjoy your visit!

    If you'd like to get in touch, you can contact me here.
    crocheted Canadian flag by PlanetJune
  • June’s Crochet Books

    A fanned-out pile of the books Everyday Crochet and The Essential Guide to Amigurumi, with text 'The answers to all your crochet questions at your fingertips - find out more'
  • Support PlanetJune!

    Want to say thanks? You can send me money in seconds at paypal.me/planetjune (over $20) or paypal.me/planetjune2 (under $20) or send me a donation through my shop.

    Or simply click through from my links before you shop at Amazon, Etsy, KnitPicks, LoveCrafts and more, and I'll make a small commission on your purchase, at no cost to you! Start here:

    ♥ Support PlanetJune ♥

    Tip: This link is also in the footer of every page!

    Thank you so much for your support!