PlanetJune Craft Blog

Latest news and updates from June

Archive for March, 2012

knitted wristwarmers

Yes, you read it right, this is a post about knitting – who’d have guessed!

I’ve tried, and failed, to enjoy knitting before. I bought straight needles and hated them. I bought dpns and hated them. It always seemed like such a struggle to wrangle the yarn without a handy hook with which to grab it. But, thanks to my practice with knooking, I now understand the shape of knitted (and purled) stitches, and how they fit together. I’ve done a lot of theoretical learning – reading books, watching videos – and I finally hit on a way to make it all work for me! Here’s the June magic formula:

Circular needles: so much easier to keep hold of than those long pointy sticks. I took a chance and ordered some from KnitPicks before I moved out of shipping range, but didn’t have a chance to play with them for many months after that.

circular knitting needle

Knitting right-handed: I’m left-handed, and I crochet left-handed. But you knit with both your hands, so why shouldn’t I learn the ‘standard’ right-handed way and save having to reverse instructions later so they work for a leftie?

English (throwing) style: this is the magic part for me, as a crocheter. Because I’m left-handed, I hold my crochet hook in my left hand, and tension my yarn with my right hand. By knitting right-handed, English style, I can still tension my yarn with my right hand – something I have years of experience with!

Magic loop: This technique makes so much sense to me. Working on one circular needle with a flexible cable instead of constantly switching between DPNs: yes. This is good.

So, with my strategy in place, I tried putting the theory into practice. I don’t like making test pieces, so I decided to make my knitting practice piece into something useful: wristwarmers. Even if they looked awful, they’d come in handy in my unheated house once summer ends.

I made up my own pattern, because that’s just how I like to work. Long tail CO 34, knit in the round with magic loop until the thumb, bind off 6 for the thumbhole, next round backwards loop CO 6 to go over the top of the thumb, continue working until long enough, stretchy bind-off. Easy.

(Don’t I sound like I’ve been doing this for years?! Never underestimate the power of research.)

knitted wristwarmers by planetjune

I love how they turned out! My tension is pretty even for a first attempt, and that’s thanks to using the same hand I always use for tensioning. There are slight ladders at the bottom of the first wristwarmer, before I figured out how to keep the tension even when switching the needles for the magic loop, but I love that too – every time I wear these wristwarmers it’ll show me ‘this is when I learnt to knit’.

knitted wristwarmers by planetjune

I used 4.5mm KnitPicks nickel needle tips with a 32″ cable. The yarn is Bernat Satin in the gorgeous Plum Mist Heather colourway – a very dark purple tinged with red, and pretty much impossible to photograph – if my skin tone looks off here, that’s why! (Indoors, they photographed as almost black.)

I can already tell I’m going to get a lot of use out of these. There’s no central heating in our house and my hands get very cold when I’m working. These will be perfect to wear while I work – I’m wearing them as I type this and they aren’t impeding me at all: success!

knitted wristwarmers by planetjune

I was all fired up after finishing these, and decided to order some larger needle tips so I could try something a little more ambitious. My LYS actually carries the same brand of needles (although outside N America they are known as KnitPro, not KnitPicks – isn’t that strange?!), and told me he could probably get them within 1-3 weeks. That was in November, and they just came in last week; I can confirm that the concept of ‘Africa time’ is no myth – it’s taken 3.5 months for my needle tips to arrive!

I haven’t picked up the needles in the meantime, so I expect I’ve now forgotten everything I briefly knew about knitting and will have to re-learn it all again before I attempt progressing to anything more complicated. It may be a while before you see another knitted project from me…

Comments (16)

PlanetJune Stories: Monica Ballinger

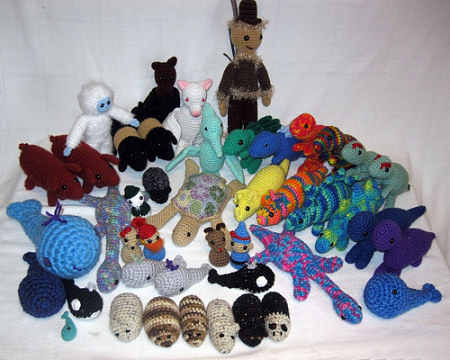
Today’s PlanetJune Story is from Monica Ballinger of Greencastle, IN, whose work you’ll probably recognise if you follow my crochetalong roundups (and maybe more so if I mention her ravelry username, theMarkofSMB). Here’s a little sampling of some of Monica’s PlanetJune-designed creations:

PlanetJune stories
How many PlanetJune designs can you spot? (The scarecrow is based on the ‘Boy’ pattern from my book!)

Monica writes:

I first learned about PlanetJune when I received The Complete Idiot’s Guide to Amigurumi as a gift. After reading it a couple times, I started my first amigurumi, the Hamster. The first one was a bit off, due to my own fault in miscounting (he’s much fatter than the others but still cute); however, the second one was much better! I made several for my children to play with and they loved them; they even ask me to make more whenever I get a new shade of brown yarn. Having June’s book has broadened my knowledge in amigurumi and crochet techniques that I use for any project I start. I am always going back thru her book to refresh my memory and find new ideas for specific items; it’s a great book to have for any crochet toy or project!

A few months later I started searching for dinosaur patterns because my children thought they didn’t have enough dinosaur toys. As I only crochet and don’t knit, I was starting to feel sad at not being able to find a crochet dinosaur pattern, but I finally found the perfect one, PlanetJune’s Stegosaurus. I bought all 6 patterns (at that time) and started working right away, and I fell in love with June’s patterns instantly! June’s clearly written, easy to follow instructions with detailed tips and pictures make her patterns worth every cent. June even offers assistance for any part of the pattern that may be confusing, by email or with her Ravelry group. The finished products turned out amazing; the dinosaurs were all so very realistic that I was HOOKED on PlanetJune. I plan to have all of June’s patterns one day, but at the moment my sons get to pick their favorites, which become my favorites as well! My three favorite patterns are Yeti/Bigfoot, Sea Turtle and Stegosaurus, but I love them all.

I’m an artist: drawings, photography, crafts, crochet accessories (hats, scarves, blankets) and amigurumi. I have participated in a few craft fairs over the years, and my husband suggested that I sell some of my amigurumi toys as well. After reading June’s policy on selling finished objects from her patterns, I fell in love with her work all over again: extremely wonderful patterns, beautiful finished items and I could sell them! I even made some business cards to attach to the toys giving June credit as the designer. While making a few extra amigurumi of June’s designs I opened up an Etsy shop, Magical Amigurumi, in the hopes of sharing the joy of the toys and making a little extra pattern funding 🙂

I enjoy crocheting because it’s relaxing and I love the joy it brings to children (including my own) when they get their new toy! I have even seen adults thrilled to have their very own toy (or collectible): I made a Realistic Pig for one of my uncles, as he and his daughters raise pigs for 4H, and he loved it so much; my other uncle received a Fruit Bat because he goes caving a lot and has been helping researchers with the white-nose syndrome that the bats have contracted; and I made a Bigfoot and added a bag for a wookie for my Father-in-law and it stands on his computer! I’ve made Apples and Tiny Whales for my son’s preschool class, and the teacher enjoyed receiving them as much as the children enjoyed playing with them.

Thank you June for designing such wonderful realistic amigurumi. They have brought a ton of joy to my house!

And thank you for sharing your story, Monica! I often wonder what happens to amigurumi that have been crocheted from my patterns, so it’s lovely to hear this story of patterns thoughtfully selected to be meaningful to each recipient, and to know the finished amigurumi are appreciated and treasured by their new owners. Monica has kindly shared photos of all the amigurumi she mentioned:

PlanetJune stories
The first amigurumi Hamsters (from my book)

PlanetJune stories PlanetJune stories
Monica’s favourites: Stegosaurus and Sea Turtle

PlanetJune stories PlanetJune stories
Gifts for uncles: Farmyard Pig and Fruit Bat

PlanetJune stories PlanetJune stories
Apples and a set of Tiny Whales for preschoolers

PlanetJune stories PlanetJune stories
Yeti and Bigfoot (aka Wookie!)

Aren’t they all wonderful? Please leave Monica a comment if you’ve enjoyed this post, or visit Magical Amigurumi if you’re tempted to pick up an amigurumi for a special gift, or as a treat for yourself!

Do you have a PlanetJune Story you’d like to share? I’d love to hear it! Please email your story to june@planetjune.com, together with one or more high quality photos showing what you’ve made from PlanetJune patterns. If I choose your story to feature here on the blog, I’ll send you your choice of pattern from my shop to say thank you!

Comments (8)

how to make a magic ring in crochet [video]

Link easily to this tutorial in your patterns: www.planetjune.com/magicring

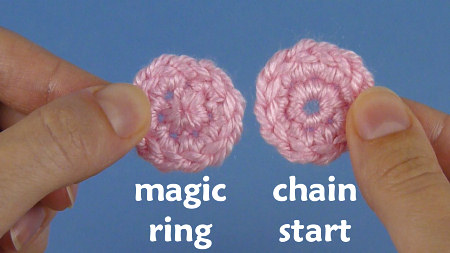
My magic ring tutorial seems to have become pretty much the definitive photo guide that people link to in their crochet patterns, but it’s not enough for everyone. It’s taken a while, but the much-requested magic ring video tutorial is finally ready.

Now, I know that 99% of my regular readers probably already know how to make a magic ring, but it may be worth your time to watch my video anyway – I have a special little tip that makes the technique much easier!

magic ring for crochet video tutorial, by planetjune

If you’re new to crochet, let me explain that the magic ring (also known as an adjustable ring) is an essential technique for crocheting in the round when you want to avoid the hole in the middle that you see when you start with a slip knot and chain and work into the chain. If you make, or want to make, amigurumi, you need this technique!

And now to the video tutorial (in right- and left-handed versions, of course):

Magic Ring for Crochet (right-handed)

Magic Ring for Crochet (left-handed)

Note: The videos may look a little small embedded in the blog: if so, you can fullscreen them or click through to YouTube (links: right-handed; left-handed) to watch them full-sized 🙂

Magic Ring Tips

  • You can use magic ring in any amigurumi pattern – if it starts with a chain, just replace the starting ‘Ch 2, X sc in 2nd chain from hook’ with ‘Make a magic ring, ch 1, X sc in magic ring’.
  • To work in joined rounds instead of the spiral I demonstrate, simply sl st into the first st at the end of Rnd 1, then ch 1 to begin the next round.
  • Magic ring is also pretty handy for other crochet patterns worked in the round, too. For taller stitches, instead of the ch 1, you would ch 2 (for hdc), 3 (for dc), or more for even taller stitches, then work Rnd 1 of your stitches into the magic ring. Note that, with taller stitches, the turning (or non-turning, if you’re working without turning) chain typically does count as a stitch, so where I say to ignore the ch 1 in the video, you’d instead count that chain as the first stitch of Rnd 1, and sl st into the top of the chain before beginning Rnd 2.

If you enjoy my crochet tutorial videos, please help to spread the word about them, and/or subscribe to the PlanetJune YouTube channel.


The Essential Guide to Amigurumi book by June Gilbank

Loved this tutorial? I have so many more amigurumi tips and tricks to share with you!

Boost your amigurumi skills with my latest book, The Essential Guide to Amigurumi, your comprehensive guide to amigurumi techniques and tips.


Do you find my tutorials helpful? If so, please consider making a contribution towards my time so I can continue to create clear and concise tutorials for you:

Thank you so much for your support! Now click below for loads more crochet video and photo tutorials (and do let me know what else you’d like me to cover in future tutorials…)

See more helpful PlanetJune crochet tips and technique tutorials

Comments (43)

Cape Town wildlife X

This is the tenth post in my monthly series on the fascinating nature I encounter here in South Africa.

Today I’m going to show you a very special type of bird, and one with a crafty connection! Weaver birds are found throughout Africa, and what makes them special is that the males weave an intricate nest to impress the females. Each species of weaver has different colouring and also builds a differently-shaped nest – isn’t that cool? In my area, we can see two types of weaver (Cape and Southern Masked).

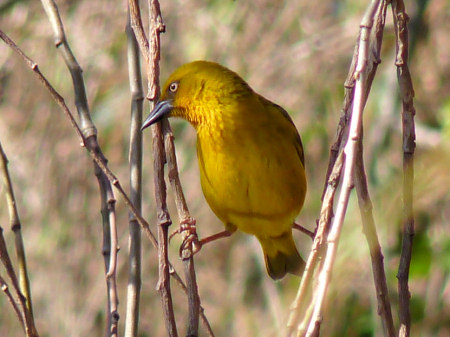
This is a male Cape Weaver (Ploceus capensis). He’s in breeding plumage, with a reddish cast around his face:
weaver bird

The male weaver picks grasses and begins to weave them together around a hanging tree branch, usually over water:
weaver bird

He continues until he completes a beautifully-woven nest, with the opening at the bottom for security:
weaver bird

If a female is impressed with his nest-building skills, she moves in and lines the nest with softer grasses and feathers:
weaver bird

After a couple of days, the grasses turn brown and, if the nest is still empty, the poor male has to start building another nest to try again. But don’t feel too sorry for him – he’ll build more nests either way, and can have several breeding females in his flock!

These Cape Weaver nests were high in a tree, and not over water, so I could get a shot from below. From this angle, you can see the beautiful shape of the nest, with a short off-centre entrance tunnel:
weaver bird

This is a male Southern Masked Weaver (Ploceus velatus):
weaver bird

Their nest shape is different – more pointed at the top and with just a hole at the bottom (no entrance tunnel):
weaver bird

Here’s a fallen nest so you can see the inside and the beautiful craftsmanship!
weaver bird

As the weavers usually like to nest over water, we see them by the river near our house, and near ponds and lakes when we’re out adventuring. But I didn’t realise that weavers eat seed, so, when I put up a seed feeder at Christmas (in the hope of seeing a canary or other type of wild finch), we got a lovely surprise – weavers in our own garden!

Male Cape weaver:
weaver bird

I thought this was a pair of Southern Masked Weavers, but, looking closely, I see the female is actually a Cape Weaver. (The females look quite similar, but the Cape has a longer, pointier beak and the Masked has a whiter tummy and red eyes):
weaver bird

And, best of all, fledged babies in our garden! I’m reasonably sure these are a pair of baby Southern Masked Weavers:
weaver bird

(By the way, I’ve just discovered that the tree with the wicked-looking thorns the babies are sitting on here is a Bougainvillea. I’ll have to remember to take a photo when it’s in full bloom – it’s stunning!)

Aren’t the weavers amazing? It was hard narrowing down my pics to just these few – weavers are so interesting, I seem to have taken a couple of hundred photos of them, but I think these selections have captured the essence of weaver-ness for you 🙂

I hope you’ve enjoyed this month’s photos – I know I’ve enjoyed sharing them with you! Please leave me a comment if you liked them.

Comments (13)

interview with June, part 1

As I’m a 99% self-published designer, I don’t often get profiled in crochet magazines etc, so my Ravelry group decided to interview me to find out a little more about who I am and what I do – my own PlanetJune Story, if you like! I’ll be posting the answers to some of their questions every now and again, and grouping them by theme if they fit together nicely. Here are the first three:

How did you learn to crochet? (from Sandy G, via the blog)
Who taught you to crochet? (from Monica, theMarkofSMB)
What was the first thing you ever crocheted? (from Linda, Fatals-attraction)

In 2003, my husband and I moved from the UK to Canada, and I had time on my hands while I looked for a job. I’d always liked making things and I’d dabbled in various crafts in the past: polymer clay, cross stitch, candlemaking, sewing, and others. At the time, there was a big craft shop in the middle of Toronto (Lewiscraft – the chain closed years ago, sadly) and I spent a lot of time in there, looking for things to try out that wouldn’t cost much money. I tried teaching myself to knit, but didn’t really enjoy it. Then I picked up a crochet hook and a ‘learn to crochet’ book, and fell in love.

Did you notice I avoided the obvious “I was hooked!” pun there? I hope you’re proud of me!

(I’ve just remembered, this wasn’t actually my very first experience with crochet: my aunt apparently taught me the basics when I was tiny, but I don’t remember that at all, although I do still have my old hook – I always wondered why I had a crochet hook in my childhood sewing box!)

I’ve never been much of a pattern follower – I like to make up my own things (a precursor of things to come…). I also don’t like to start with really basic projects. So I decided I’d learn as I go by making an afghan to use against the cold Canadian winter, using squares of single crochet, and that’s what I did.

Here’s the thing: I didn’t really know how to crochet at the time, and this was an ambitiously large project for a total beginner! I made that basic rookie mistake of thinking you should insert your hook into the back loop (instead of both) to begin each single crochet stitch. I’d never heard of gauge, or blocking. I slip stitched my pile of squares together, but sadly didn’t know about leaving a long tail to weave in securely when you finish off, so my poor yarn tails are only about an inch long. I’d also never heard of edging, which would have given my afghan a nicer finish…


My first afghan (made in 2003-2004, photo from 2006). One of these squares is the first thing I ever crocheted!

It’s not perfect, but that’s okay. I still use it all the time; I keep it draped over a folding chair in my office so I can sit comfortably when I’m making videos and tutorials. The BLO single crochet doesn’t look like a mistake, unless you know it’s not what I intended! And I love being able to see the first thing I ever crocheted and know how far I’ve come.

After that, I decided to learn all the crochet stitches by making a sampler afghan – and yes, I did need a pattern for that! I used the 63 Easy-to-Crochet Pattern Stitches booklet (highly recommended if you’d like to crochet a stunning heirloom afghan, or to practice a large variety of crochet techniques and stitches).

Puzzling through the instructions for the trickier squares was what made me finally realise my mistake with the back loops, and ending up with squares of vastly different sizes is how I learnt about the importance of gauge. It took almost 3 years, but I finished it (with a sneaky extra round of sc around the edges of the tinier squares to even the sizes up a bit!) and it looks pretty impressive, even if it’s not quite perfect:


My second afghan (started Feb 2004, finished Nov 2006, photo from 2006)

The moral of the story is that, clearly, nobody starts out as an expert! These two afghans show my crochet learning experience in every stitch, and I love them both for that. It was a self-taught struggle – especially with no Ravelry or YouTube videos to consult as you can now – but, by the time I’d finished the sampler afghan, I really understood crochet. I could have made a 2nd, perfect, sampler afghan, but it was time for me to try something different…

I think this post is long enough now – I’ll save the story of how I got into amigurumi, and the rest of the interview questions, for another day. 😉

I hope you’ve enjoyed hearing a bit about my crochet background. If you have any questions you’d like to add to the interview pool, please submit them on Ravelry or in the comments of this post – I’ll do another interview post in a little while!

Comments (15)

Commissions: moving the goalposts

When I launched my pattern commissions page on Friday, I wasn’t sure which of these scenarios to expect:

  • I might get no interest at all – I didn’t think that would happen, but as a worst case scenario I’d have lost nothing more than the time taken to set up the database and code the page.
  • I might get a few nibbles, and a pattern commission every couple of months – this was my predicted outcome.
  • I may get 2 pattern commissions at once – I didn’t think this was likely, but, just in case, I built in a clause that, should 2 patterns get funded within a month, I’d only collect the pledges for the second pattern after completing the first.

Well, I underestimated – in a big way. (I told you I was bad at making calculated business decisions!)

planetjune crochet pattern commissions
Eek – it’s going too well!

It’s been less than 4 days and I have one design fully pledged and several others getting close. I haven’t even notified my mailing list yet, so there could be a huge rush of pledges at that point. At this rate, my business could turn into full-time commissioned designs, which, while very flattering, isn’t something I can actually do – I still have all my other hats to wear, and a commitment to continue to make crochet videos and tutorials. I cannot possibly commit to creating more than one commissioned design per month – I can’t work more quickly without the quality of my designs suffering, and that’s not something I’m prepared to sacrifice (and, I’m sure, not something you’d want to pay for).

Plus, the commissions are only for basic animal designs. Anything complicated, or unusual, or something I’d be taking a gamble on in trying to create a design for it, is not going to appear on that commissions list – I have to wait for inspiration to strike before I can design things like that, and I need to leave myself time to let that inspiration happen.

planetjune crochet patterns
There’d be no dinosaurs or succulents if I only made commissioned designs!

So, here’s my solution: I’m moving the goalposts by raising the total commission amount from $60 to $90. Minimum pledges will still be $6. For the koala (which is already fully pledged at $60) there’ll be no change – I’ve already committed to designing that.

planetjune crochet pattern commissions
The updated system

If you’ve already pledged:

  • Your pledge stands at the dollar amount you originally agreed to.
  • The change shouldn’t make any practical difference to you – by the time my koala design is finished, I’m sure the pledges will be back up to the level they were when you pledged, or higher.
  • As before, you won’t have to pay for your pledge until I’m ready to begin the design.
  • If, however, you feel hard-done-by, just email me if you’d like to cancel your pledge. I’m not trying to con anyone – just to set up a system that will work in the long term.

I’m going with full transparency here and I hope you’ll understand my reasons for this – the whole point of the commissions system is to gauge which design ideas may be most popular, but without making a change to the system, all the options will soon look equally popular! It’s an entirely new system, and the challenge (and also the potential reward) of innovating is that you just can’t know in advance how successful an idea may prove to be.

I expect the pledging frequency will drop after the initial flurry, but I may need to tweak the system a little more in the coming weeks/months, and I may, at some point, have to shift the totals again. If I do have to, my rules will remain the same:

  • Any design that is already fully pledged will remain so.
  • Whichever design is fully pledged first will be created first.
  • The dollar amount of your pledge(s) will remain unchanged.
  • If you really need to cancel a pledge, you may do so by emailing me before the design is fully pledged.

The first two points mean there’s still value in pledging early if you’d like to see your favourite design(s) made more quickly, so please don’t see this as a sign to stop pledging!

I think this is the fairest way of doing things, but if you have any suggestions, please feel free to share them in the comments or by email – your opinion counts too!

Comments (7)

commission a PlanetJune pattern

I have a lot of design ideas – too many, in fact. We live in an amazing world, and there are just too many wonderful animals and plants for me to be able to recreate them all in crochet. To help me decide which to make next, and see which would be popular choices, I’ve launched a new pattern commission model, so now you can help me make my design choices!

The way it works is like a mini Kickstarter, but exclusively for PlanetJune designs. If you’d like me to design a new crochet pattern, instead of commissioning me outright to design it for you, now you’ll be able to make a pledge towards the design commission.

If you love the idea and want to get the pattern as soon as possible, you can pledge the entire commission amount; if you’re happy to wait a while for some other people to come in with you to make the total amount, you can pledge as little as $6 towards the commission, or anything in between.

There’s nothing to pay at the time you make a pledge; the pledges stay active until a design is fully funded, and, at that point, I’ll collect the pledged monies and start designing. Once the design is complete, I’ll email a copy of the pattern to each of the pledgers.

On the Commissions page, you’ll see a graph showing the design ideas currently available for commission, and their current pledge states. As soon as you make a pledge, the graph will update to reflect it:

commission a crochet pattern design from PlanetJune
These are just test pledges so you can see what the graph will look like when I have some real pledges – I’ve reset them all to $0 now.

You can also suggest new ideas to me; I’ll add each to the Commissions list if a) I’d be happy to make a design for it and b) I’m confident I’ll be able to design it in the designated timeframe. More complicated or unusual requests may take longer to get right, so, if I like them, I’ll either design them anyway, just because I want to, or they’ll be available for private commission, with deadlines and pricing dependent on the design itself.

If you click through to the Commissions page, you’ll also get a first glimpse of my new logo in action! Refresh the page and you’ll see the photo in the header changes, so (in future, once the rest of the site has been updated) you’ll see a different photo there each time you go to a new page on my site:

new header
Ooh, new logo alert!

It’s a really exciting time for me at the moment: I finally have the time to make progress on projects that have been in the works since long before I left Canada – everything got indefinitely postponed when things got too hectic… It was exactly a year and a day ago that I first started planning this new Commissions model, so it’s extra-nice to have it finally coded up and ready to go!

Site navigation will improve once I have the new blog design finished, but for now, there’s a text link to the Commissions page at the top of the right sidebar. —>

*click* – that’s the sound of another piece of my grand plan slotting into place 🙂

Comments (8)

a logo for PlanetJune!

I thought I was being pretty clever when I designed my blog header in 2007: 7 pictures, to give an idea of the variety of crafts I do (crochet, polymer clay, sewing, sketching) and tied together into a ‘patchwork’ using the same zig-zag ‘stitches’ I used to make my Japanese-inspired patchwork lunch bag.

PlanetJune old blog header

When I designed the shop, I used the same header, but swapped the non-crocheted items for more crochet patterns you can find in the shop.

PlanetJune old shop header

It was all very clear and self-explanatory, in theory, but it didn’t quite work out that way. Over the years, I’ve had several enquiries about each of the crochet patterns in my blog header that aren’t available in my shop, and I’ve had to explain over and over again that the donkeys are pencil sketches, the tiny flowers and avocados are polymer clay, and the poinsettia is sewn from fabric – they clearly aren’t as obviously non-crocheted as I had thought…

The obvious solution to replace the old design was to design a real logo for PlanetJune: a symbol to represent me and to use throughout my website. I started the process in 2009. I read books and articles on good logo design and I knew exactly what I wanted, but I had problems drawing it without adding too much detail.

I’m too stubborn/controlling to ask for outside help: PlanetJune is my baby and it just wouldn’t feel right for the symbol that represents me to be created by somebody else. Then life got in the way, and it wasn’t until I was forced by circumstance (I discovered that my old zig-zag template is no longer on my computer!) that I thought much about the logo again.

Long story short: I drew 2 pages of sketches, made 15 digital prototypes, and now, 3 years later, it’s finally ready. So here it is: the PlanetJune logo…

PlanetJune logo

I hope it’s obvious what it represents!

As you can see below, I’ll be changing the text for the various parts of the site; I have a square version for avatars and anywhere I need a smaller logo; and I even have two teeny tiny ones for my favicon (the tiny square image you see next to a website’s name in your browser):

PlanetJune logo

I was planning to wait until the whole site was ready to relaunch before announcing the logo, but I have some new web projects that I want to launch in the next couple of weeks, and I can’t use the old design now I’ve lost the zig-zag source file. Redesigning the blog and shop while putting my new projects together and running the rest of my business would be a huge job, and I don’t want to delay the exciting new projects until I can redesign everything.

So: a compromise. The new pieces will have the new design, and the homepage, blog, shop, mailing list, and everything else will get their redesign when I have time. (Although the whole site looks the same, each of those things is built with a different structure going on behind the scenes, so updating each one will be a large individual project.)

I do care about looking professional, but at the end of the day, I am a one-person business, and maybe the rules of professionalism that apply to a larger business should be a little more relaxed for an indie business. Until the day I can clone myself so I have a web designer/developer, a customer service rep, and a creative director, I still have to wear all those hats, and, as my business grows, it’s becoming more difficult to fit everything into my day and still have some sort of a life! I’ve realised it’s compromise or collapse at this point, and so I choose to compromise – the world won’t end if my logo takes a while to spread throughout my website!

PlanetJune logo

I’m so excited to finally have a logo for PlanetJune! I hope you like it too. (And, just in case it wasn’t immediately obvious to you, it’s a yarn planet – what else would PlanetJune be made from?!)

Comments (33)

« Previous entries
  • Quick Links: Crochet

    navigation: arrow

    buy crochet patterns and accessories from my online store

    'Everyday Crochet' and 'The Essential Guide to Amigurumi' crochet books by June Gilbank

    Crochet video tutorials and step-by-step photo tutorials

    Free PlanetJune crochet patterns

    Frequently Asked Questions

    Quick Links: Crafts

    navigation: arrow

    Punchneedle Embroidery information, ebook & patterns

    Papercraft ebook & tutorials

    Free PlanetJune craft projects & tutorials

  • Blog Post Categories

  • Blog Archives

  • CAL Galleries

    Ravellenic Games: Team PlanetJune
    PlanetJune Reindeer Games
    PlanetJune Temperature Snake CAL

  • Welcome to PlanetJune!

    June Gilbank

    Hi, I'm June. Welcome to my world of nature-inspired crochet and crafting. I hope you enjoy your visit!

    If you'd like to get in touch, you can contact me here.
    crocheted Canadian flag by PlanetJune
  • June’s Crochet Books

    A fanned-out pile of the books Everyday Crochet and The Essential Guide to Amigurumi, with text 'The answers to all your crochet questions at your fingertips - find out more'
  • Support PlanetJune!

    Want to say thanks? You can send me money in seconds at paypal.me/planetjune (over $20) or paypal.me/planetjune2 (under $20) or send me a donation through my shop.

    Or simply click through from my links before you shop at Amazon, Etsy, KnitPicks, LoveCrafts and more, and I'll make a small commission on your purchase, at no cost to you! Start here:

    ♥ Support PlanetJune ♥

    Tip: This link is also in the footer of every page!

    Thank you so much for your support!