PlanetJune Craft Blog

Latest news and updates from June

Archive for 2011

free pattern: Lip Balm Holder

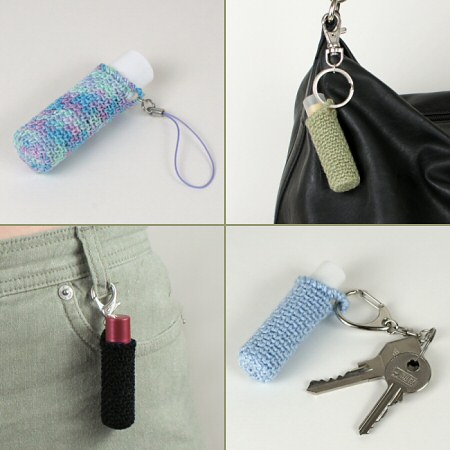
Never lose your lip balm again (or have it melt in your pocket) with this stylish holder! Clip it to your keyring, to your bag, or even to your belt loop and you’ll always have lip balm at hand when you need it. Quick and easy to crochet, just pop a lip balm inside and you have a perfect little gift!

lip balm holder crochet pattern by planetjune

You’ve probably seen simple lip balm holder patterns before, but not like this one! Why?

  • It’s worked in a fine yarn/thread with a small hook, so it looks subtle and elegant, not bulky and only appropriate for kids (although it’s great for kids too!)
  • Don’t be put off by the tiny size: this pattern is designed to be easy on the hands! Only the base is worked in single crochet; the sides are worked into chain-spaces, so it’s much easier to insert your hook to begin each stitch.
  • The sturdy hanging loop will keep your holder safe*.

*In case you’re wondering about that ‘sturdy hanging loop’ part, I know what I’m talking about! I first made myself lip balm holders from crochet thread in 2006. They lasted well, but I’d attached each to a metal ring by crocheting the ring to the top of the holder:
broken lip balm holder
After prolonged use, the strands of thread attached to the ring frayed through, as you can see, so I determined to give my new design a sturdy loop so the thread isn’t stressed at any one point.

lip balm holder crochet pattern by planetjune

I tested this pattern using 4 different thicknesses of thread and yarn, so you can see how versatile it is. L-R: size 5 crochet thread, size 8 pearl cotton, size 10 crochet thread, fingering weight yarn (Bernat Baby).

It works up very quickly, and if you add a yummy flavoured lip balm inside, it’ll make a perfect stocking stuffer gift!

This is a donationware pattern, and I’ve changed things slightly this time by adding some additional info that you’ll only find in the PDF version (which you’ll receive as a thank you for your donation):

  • A modification to make the holder slightly wider (in case you crochet tightly or have a non-standard-width lip balm tube)
  • A simpler edging (in case you don’t get along with reverse single crochet)
  • Tips for attaching the various types of hardware that you see in my photos

But, as always, the pattern is free for your use and donations are entirely optional πŸ™‚

Enjoy!

Go to Lip Balm Holder pattern >>

Comments (7)

how to reverse single crochet

Link easily to this tutorial in your patterns: www.planetjune.com/rsc

Today I’d like to show you my favourite technique for making a decorative crocheted edging. Reverse single crochet (also known as crab stitch) makes a twisted cord edging, and it’s very easy to achieve – it’s no more than a single crochet stitch, but you work in the opposite direction to usual (left to right for right-handers; right to left for left-handers). Provided you don’t work too fast and tangle up your stitches (which is easy to do when you’re working backwards) it’s an easy technique to master.

reverse single crochet (crab stitch) video tutorial

As it’s easier to show than to tell, I’ve put together a new video to demonstrate. I hope you’ll find it useful, if you haven’t already mastered this stitch.

(If you want to practice the technique, it’ll be featured in both of my next two patterns, and you’ll get a peek at one of them in the video – another new donationware pattern to be released later this week!)

Reverse Single Crochet (right-handed)

Click to watch this video on YouTube.

Reverse Single Crochet (left-handed)

Click to watch this video on YouTube.

Note: The videos may look a little small embedded in the blog: if so, you can fullscreen them or click through to YouTube to watch them in full HD resolution πŸ™‚

I’ve been compiling a list of crochet technique videos that I plan to create over the coming months. If you have any suggestions you’d like me to add to my list, please let me know.

If you enjoy my crochet tutorial videos, please help to spread the word about them, and/or subscribe to the PlanetJune YouTube channel.


The Essential Guide to Amigurumi book by June Gilbank

Loved this tutorial? I have so many more amigurumi tips and tricks to share with you!

Boost your amigurumi skills with my latest book, The Essential Guide to Amigurumi, your comprehensive guide to amigurumi techniques and tips.


Do you find my tutorials helpful? If so, please consider making a contribution towards my time so I can continue to create clear and concise tutorials for you:

Thank you so much for your support! Now click below for loads more crochet video and photo tutorials (and do let me know what else you’d like me to cover in future tutorials…)

See more helpful PlanetJune crochet tips and technique tutorials

Comments (29)

Cape Town wildlife VI

This is the sixth post in my monthly series on the fascinating nature I encounter here in South Africa. I’ll be back with another crochet post tomorrow!

How could I possibly top last month’s wildlife post? Short of going on a safari, I don’t think it’s going to get much more impressive than penguins and whales and lizards and dassies, all in one day! So I’m narrowing my focus a bit and I’m going to show you something much closer to home (my own back garden, in fact) that’s an absolute miracle of nature.

As you may remember, a few months back, we noticed some weird blobs on the wall of our house, that turned out to be Garden Acraea butterfly cocoons. It turns out that we have a perfect butterfly ecosystem in our garden: we have a Wild Peach (kiggelaria africana) tree (unfortunately no relation to an edible peach) where the butterflies lay their eggs.

garden
The wild peach is the larger, darker tree at the back. The butterfly wall (left of photo) faces the tree.

As winter ended and spring began (I’m in the southern hemisphere, remember), the cycle started up, and I’ve been able to observe the whole fascinating process just by stepping out into my garden!

butterfly eggs
Butterfly eggs

After hatching, the little caterpillars feast on the wild peach leaves (which grow back quickly – don’t worry about the tree). Apparently cuckoos eat the caterpillars, although I’ve yet to spot one on our tree. And when the wild peach fruits ripen (from February) they apparently attract a whole host of different birds, so I’ll report back if we see anything interesting πŸ™‚

caterpillars
Baby caterpillars and munched leaf

When the caterpillars are fully grown, they find a convenient sunny wall to attach themselves to before pupating. They spin a silk mat and grip onto it with proleg hooks called crochets (of course, crochet means hook in French, so that’s not really a huge coincidence, but it still made me smile!)

caterpillar silk mat
You can see the silk mat clearly when the caterpillars form their chrysalises on a window instead of the wall. (This butterfly had just emerged from his chrysalis.)

So here’s the puzzle: how does that butterfly, with those big wings, come from that skinny little chrysalis?

Like this! As the butterflies emerge, the wings are curled and crumpled. They straighten and unfurl, in the slowest of slow motion. Here’s a sequence of photos to demonstrate:

butterfly emerging from cocoon

butterfly emerging from cocoon

butterfly emerging from cocoon

butterfly emerging from cocoon

butterfly emerging from cocoon

butterfly emerging from cocoon

This takes about an hour. At the end of this the wings are really frail and floppy – the slightest breeze makes them flap all over the place and almost pulls the butterfly from the wall! The butterfly rests with all her wings held together so the wind doesn’t catch them and waits for another hour or so while her wings strengthen. Then she abandons the cocoon and climbs slowly up the wall, flapping her wings to test them:

butterfly emerging from cocoon

And then she’s off!

butterfly
Flying back to the wild peach tree

Nature is pretty amazing, don’t you think?

Whatever else is going on, there’s magic everywhere in the world if you just slow down and look for it. Today I’m sharing mine with you – I hope you enjoyed it!

Comments (12)

eyelet ripple crochet pattern

Update: The Scarf Sweater instructions, together with my Eyelet Ripple stitch pattern, are now available as a printable Donationware pattern. They are still available for free, but if you like them please consider sending me a donation to show your appreciation:

eyelet ripple scarf sweater crochet pattern

Send me a donation and receive the easy-to-print PDF version of the instructions and stitch pattern (with bonus assembly photos and instructions on how to wear it) as a thank you!

click here to make a donation

Donations of any size are much appreciated. Just add the amount you wish to donate, and, once you have checked out and paid, your pattern will instantly be available to download from your PlanetJune account.

The complete pattern and instructions are available below, regardless of whether or not you choose to pay for them πŸ™‚

This is a PlanetJune original crochet pattern. Feel free to use items made from this pattern however you wish, but I’d appreciate credit as the pattern designer. Please do not reproduce the pattern anywhere else; instead post a link to www.planetjune.com/scarfsweater

Not ready to make it yet? Add it to your Ravelry queue:

***

Wow, I really didn’t expect such a great response to my Scarf Sweater – I linked it up on Ravelry and over 60 people have queued it already! Of course, you can use any stitch pattern to make a scarf sweater, but I’ve been getting questions about the eyelet ripple stitch pattern I used, so I thought I’d share some info about ripples and the pattern for my eyelet ripple.

crocheted hug scarf sweater by planetjune crocheted hug scarf sweater by planetjune

Ripple Basics

Ripple (aka chevron) patterns in crochet take 2 basic forms:

  • Solid Ripple: the peaks and valleys are formed by increases and decreases, giving a solid fabric with no holes
  • Eyelet Ripple: the peaks and valleys are formed by chains and skipped stitches, leaving a hole (an eyelet) at the point of each direction change

Note: these are my names for them; other people may call them by other names or not distinguish between the two types at all!

All ripples are formed by a section of straight stitches, a peak to change direction, another section of straight stitches, and then a valley to change direction again. This forms a zig-zag pattern. The number of stitches in the straight sections determines the width of the ripple, and the number of increases/decreases or chains/skipped stitches determines the angle of the ripple.

June’s Eyelet Ripple Pattern

eyelet ripple crochet pattern by planetjune

You can use this pattern to make a scarf, a blanket, or a scarf sweater like mine! This is a generic pattern, so you can make it any width you like. N is the number of repeats, not including the half repeat at each edge. So in the stitch diagram below, N=1 and the ripple has 2 complete zig-zags. (For my Scarf Sweater, I used N=3, so I had 4 zig-zags.)

Terminology

ch chain
ch-sp chain space
dc double crochet (treble crochet for UK/Aus)
st stitch

Pattern

Ch 12xN + 15.

Row 1: dc in 4th ch from hook (unworked chains count as dc), dc in next 4 ch, skip next 2 ch, (dc in next 5 ch, ch 2, dc in next 5 ch, skip next 2 ch) N times, dc in next 4 ch, 2 dc in last ch.

Row 2: ch 3 (counts as dc), dc in same st, dc in next 4 st, skip next 2 st, (dc in next 4 st, [dc, ch 2, dc] in next ch2-sp, dc in next 4 st, skip next 2 st) N times, dc in next 4 st, 2 dc in last st.

Repeat Row 2 until your piece is as long as you want.

Stitch Diagram

eyelet ripple crochet stitch diagram by planetjune

Scarf Sweater Joining

If you’re making this into a scarf sweater, when you come to seam the two short ends together, you won’t be stitching two straight lines; you’ll be matching up the zig-zag shapes at the ends of the scarf, as shown below. If you stitch neatly, the zig-zag disguises the seam very nicely – I tried to find my seam so I could take a photo of it for you, and I can’t actually find it!

eyelet ripple crochet stitch diagram by planetjune

When you join the two layers across the back, do take a moment to make sure you continue the zig-zag pattern across both layers, to make the seam less visible. You won’t get the eyelets along the seam, but at least the zig-zags can flow down across both layers.

crocheted hug scarf sweater by planetjune

I hope you enjoy this pattern. Please leave me a comment below if you do, and consider leaving me a donation. Thanks!

click here to make a donation

More PlanetJune Accessories patterns

If you’ve enjoyed this post, you might also like my PlanetJune Accessories crochet patterns: they all include stitch diagrams and clear written explanations so you can easily crochet elegant wearable accessories for yourself and to give as beautiful gifts. Here’s a taster of the range:

PlanetJune Accessories crochet patterns

We’re also having a PlanetJune Accessory CAL on Ravelry throughout November, and you’re very welcome to join in!

Comments (12)

a crocheted hug: scarf sweater

Update: The Scarf Sweater instructions, together with my Eyelet Ripple stitch pattern, are now available as a printable Donationware pattern. They are still available for free, but if you like them please consider sending me a donation to show your appreciation:

eyelet ripple scarf sweater crochet pattern

Send me a donation and receive the easy-to-print PDF version of the instructions and stitch pattern (with bonus assembly photos and instructions on how to wear it) as a thank you!

Donations of any size are much appreciated. Just add the amount you wish to donate, and, once you have checked out and paid, your pattern will instantly be available to download from your PlanetJune account.

The complete pattern and instructions are available below, regardless of whether or not you choose to pay for them πŸ™‚

This is a PlanetJune original crochet pattern. Feel free to use items made from this pattern however you wish, but I’d appreciate credit as the pattern designer. Please do not reproduce the pattern anywhere else; instead post a link to www.planetjune.com/scarfsweater

Not ready to make it yet? Add it to your Ravelry queue:

***

I saw an intriguing knitwear idea on Pinterest a few weeks ago, and had one of those ‘I could make that’ moments. Here are some examples I found on Etsy (the first picture is the one I first found – uncredited – on Pinterest, and used my Google Search by Image trick to track down):

inspiration for cross wrap sweater (see text below for credits)
Photo (and inspiration) credit L-R: Max & Melody, Pilland, Rumina

I just wanted to test the basic concept to see how it worked – it’s essentially just a scarf turned into a sweater by wrapping and stitching it together. It’s very simple, so while I won’t be creating a full pattern, I’ll share the basic method (below), in case you’d like to make one too! I crocheted mine, but you could easily knit one if you prefer.

crocheted hug scarf sweater by planetjune

My version is very simple – I just crocheted a long rectangle like a scarf, wrapped it around myself, seamed the two short edges, and seamed across the back. I used worsted weight yarn for speed and crocheted a basic eyelet ripple to add a subtle chevron pattern. I also made it a bit wider than knitted ones, as an experiment to see if that would make it more snuggly.

Update: I’ve published free instructions for my eyelet ripple stitch pattern, in case you’d like to use it to make your own Scarf Sweater, or to make a scarf or ripple blanket πŸ™‚

crocheted hug scarf sweater by planetjune

I think it’s pretty cute, although a little chunky on my short figure. The nature of the design makes it a bit of a challenge to get into, and the shoulders are a bit constrictive – I won’t be raising my arms above my head while wearing this! But the best thing about it is that wearing it feels like a warm, soft hug; despite having no sleeves, it’s really warm and cosy.

If I planned to take this further, I’d refine the concept to make a more elegant, less bulky version. But I think this is the end of the line for my experiment – it was fun, it worked, my curiosity is satisfied, and I have a new handmade garment to keep me warm.

If you want to try making one of your own, here’s a mini tutorial to get you started. You can knit or crochet this, in any stitch pattern you like – all you’re doing is making a long narrow rectangle, just like a scarf:

Basic Scarf Sweater Instructions

  1. Measure your back from where you want the bottom of the sweater to sit, up to your neckline (add an inch or two if you want to make a little fold-over collar like mine has or keep it shorter to be more fitted). Divide by two to get your width measurement.
  2. Pick a stitch pattern and start crocheting (or knitting) a rectangle with the width you determined in Step 1.
  3. You’ll be making a very long rectangular scarf, but the length depends very much on your figure! The easiest way to figure out how long you need it is to wrap it around yourself: it should go across the back of your shoulders, cross over down your front, around your back above the waist, and cross over again up your front to meet the starting edge. It’d be easiest to get someone else to arrange it on you and make sure the two wraps meet across the middle of your back, or you can do it yourself in front of a mirror and expect to wriggle a lot to get it into position (guess which I did!)
  4. When it’s long enough, pin the two short ends together while it’s on your body, then seam together (or make a double twist and then seam the two short ends together).
  5. Arrange it nicely with the seam in an inconspicuous place – mine lies on the lower wrap so it’s hidden. Ask your helper to pin the top and bottom wraps together across your back (or figure out where to stitch by yourself – it’s possible; I managed!), then seam them across the back, stopping just before each underarm.

Update: It just occurred to me that although you can use any yarn (and a suitably sized hook), it may be helpful for you to know the details of what I used for mine, as a starting point for yours: I used an H (5mm) hook and worsted weight yarn (Bernat Satin, in Denim Mist Heather). I used 2.7 skeins and I wear a size XS-S top.

This is probably the simplest ‘pattern’ there could be for making a sort of sweater, don’t you think?

I hope you enjoy this pattern. Please leave me a comment below if you do, and consider leaving me a donation. Thanks!

Comments (51)

how to track down creditless photo sources

There’s been much talk lately about how to share on Pinterest properly: giving credit to the source of your image, and making sure the pin actually links back to the source correctly before you re-pin it. I have an excellent example of why this is so important. Yesterday, I suddenly got a massive traffic spike on my blog and lots of new comments on my shrinkydinks ring tutorial.

shrinky dinks rings by planetjune

When I investigated the source, they were all coming from Pinterest and Tumblr – nothing weird about that. But then I clicked through to see the source, and here’s what I found:

pinterest mis-attribution

Lovely! Except… not only is this not one of my shrinky rings, but a quick glance made me seriously doubt that it was a shrinky ring at all – there’s no way to make a seamless join with a shrink plastic ring, and this looked smooth and perfect. So why is it being linked to my tutorial?

I clicked through from Pinterest to see the source, and found this:

pinterest mis-attribution

A tumblr site, with no attribution for the image at all. This is very common with tumblr – people ‘blog’ photos they’ve found online and there’s no link back to where they found the photo, or any information about it. This is why I avoid tumblr: it’s too frustrating to not be given any information about what you’re looking at.

But all is not lost! Thanks to Google’s new Search by Image function, you can enter the URL of a photo and it’ll show you where else that picture appears online. (It’s very useful if you want to see if anyone has been stealing your photos, as well as letting you track down the source for a creditless photo.)

To use the Search by Image feature, go to Google Images and click the little camera icon at the right of the search box:

pinterest mis-attribution

Go back to your source picture* and grab its URL (right click on the picture; the exact wording of the option varies between browsers but in Chrome it says ‘Copy image URL’), then paste it into the search box:

* Edited to add: you can do this directly from its Pinterest page: don’t click the pin to go to the (supposed) source, just right click the image in Pinterest to get its URL.

pinterest mis-attribution

After you click ‘Search’, you’ll see links from all over the internet, wherever a webpage uses the same photo. In this case, there are lots of results, and almost all of them are social bookmarking sites:

pinterest mis-attribution

I ignored all those and looked through until I found one that sounded like it may be the original:

pinterest mis-attribution

Bingo! And clicking through to Keri’s Autumn Bangle page informs me that this image is, in fact, nothing to do with either shrinky dinks or rings: it’s a bangle, “Designed as a one complete vector image then screened onto thin acetate. Next step, encase in resin for eternity. Sand, buff, wear. This bangle is for sale. If you’d like one, just ask!”

Now, just think how much business Keri may have received as a result of all this exposure, if only the first person to share her photo on Tumblr had credited this page, or her Etsy shop, as the source.

But instead, the anonymous image propagated, and, at some point, someone added the ‘information’ that it was a shrinkydinks ring, and someone else added the link to my tutorial… And, while I’m very happy to see my tutorial reach more eyes, I can’t and won’t take the credit for Keri’s lovely resin bangles! (If you’d like to order a bangle from Keri, her Etsy shop is Par Amour Design her web store is Omnia Oddities.)

A side note: in case you’re thinking of giving up on Pinterest as a source of inspiration, here’s an encouraging sign. Plenty of people are doing it right: a search for “shrinky ring” brings this:

pinterest mis-attribution

Yep, 14 of those first 15 results are links to my tutorial – and there are many, many more if you scroll down.

So, three points to take away from this:

  • Don’t believe everything you read online without question.
  • Think before you share a link (whether on your blog, pinterest, twitter, facebook, or anywhere else) and make sure you’re actually linking to the most useful page for your readers!
  • If a link doesn’t lead where you expect, a little sleuthing with Google can often turn up what you’re looking for.

Happy browsing… πŸ™‚

Comments (44)

November update

A quick newsy post today, with a new winner, a new name, and a new deal:

Review and Win contest

October’s ‘Review and Win’ winner is Holly M, with her Detail Stuffing Tool review:

Detail Stuffing Tool by planetjune

I make a lot of stuffed toys (some crochet, some sewn) and this is the only stuffing tool I’ve ever tried that helps me get stuffing into those really small tubes/arms/legs/etc. A chore that used to take literally hours sometimes, now takes minutes with this little tool! I really can’t say enough about it – love love love it! Makes stuffing small limbs a breeze!

Congrats Holly! I’ll email you to find out which pattern you’d like as your prize πŸ™‚

To be entered into this month’s draw for a free pattern of your choice, just write a review of any product in my shop – thank you!

* * *

Renamed: Amigurumi Essentials Kit

I realised months ago that having a line of patterns called PlanetJune Accessories and a kit called Amigurumi Accessory Kit was potentially confusing, but it took a suggestion from the ever-helpful ladies (and gents?) in my Ravelry group to make me do something about it. We didn’t have much luck coming up for a replacement name for the PlanetJune Accessories line (as I didn’t want the name to limit the scope of future designs – I think accessories is a good catch-all for everything except graded garments and toys), so we voted on a new name for the Accessory Kit instead.

So, as from today, the item formerly know as Amigurumi Accessory Kit is reborn as the Amigurumi Essentials Kit!

Amigurumi Essentials Kit (eyes, stitch markers, stuffing tool) by PlanetJune

The contents is unchanged; you’ll still get:

  • 1 Detail Stuffing Tool
  • 5 Stitch Markers
  • 2 pairs black 6mm safety eyes with washers
  • 2 pairs clear 8mm safety eyes with washers
  • 2 pairs black 9mm safety eyes with washers
  • 2 pairs clear 10mm safety eyes with washers
  • 2 pairs black 12mm safety eyes with washers
  • 2 pairs clear 15mm safety eyes with washers

If you do want to order one (or more) as Christmas gifts, please be aware that mail from South Africa takes about 2 weeks at the best of times, and I imagine it’ll get slower as we approach the holidays, so please don’t wait too long if you want to make sure you’ll receive your package in time for the big day.

* * *

PlanetJune Accessories Custom Set of 3 Patterns

I launched this a few weeks ago, but just realised that I forgot to announce it! Thanks to another suggestion from my amazing Ravelry group, I’ve launched a PlanetJune Accessories Custom Set multipack (following the successful model of my AmiDogs Custom Set): any 3 patterns of your choice from the PlanetJune Accessories line for a special price.

PlanetJune Accessories custom set of any 3 crochet patterns

If you’re considering joining the November Accessories CAL, maybe this is the incentive you need to get started..?

Comments

Halloween CAL roundup

PlanetJune Halloween CrochetAlong

The Halloween CAL was the first crochet-along organised entirely by PlanetJune ravelry group members, and wow, what a success: page after page of projects, creative photography, fun modifications to the patterns… I can see why people enjoy CALs so much.

Don’t be shy – please join the group and participate in future CALs! November’s CAL topic will be Accessories – that’s everything in the PlanetJune Accessories range, and you can also use any of my other patterns to create accessories (e.g. a flower pin or bag embellishment, a fruit necklace). Look for the new CAL thread from tomorrow…

And now see the results of the Halloween CAL! (As usual, I’m crediting the participants by their Ravelry usernames, so you can look them up on Ravelry if you want more details.) You’re going to love these pics!

__(‘Read the rest of this entry »’)

Comments (8)

Next entries » · « Previous entries
  • Quick Links: Crochet

    navigation: arrow

    buy crochet patterns and accessories from my online store

    'Everyday Crochet' and 'The Essential Guide to Amigurumi' crochet books by June Gilbank

    Crochet video tutorials and step-by-step photo tutorials

    Free PlanetJune crochet patterns

    Frequently Asked Questions

    Quick Links: Crafts

    navigation: arrow

    Punchneedle Embroidery information, ebook & patterns

    Papercraft ebook & tutorials

    Free PlanetJune craft projects & tutorials

  • Blog Post Categories

  • Blog Archives

  • CAL Galleries

    Ravellenic Games: Team PlanetJune
    PlanetJune Reindeer Games
    PlanetJune Temperature Snake CAL

  • Welcome to PlanetJune!

    June Gilbank

    Hi, I'm June. Welcome to my world of nature-inspired crochet and crafting. I hope you enjoy your visit!

    If you'd like to get in touch, you can contact me here.
    crocheted Canadian flag by PlanetJune
  • A fanned-out pile of the books Everyday Crochet and The Essential Guide to Amigurumi, with text 'The answers to all your crochet questions at your fingertips - find out more'
  • Support PlanetJune!

    Want to say thanks? You can send me money in seconds at paypal.me/planetjune (over $20) or paypal.me/planetjune2 (under $20) or send me a donation through my shop.

    Or simply click through from my links before you shop at Amazon, Etsy, KnitPicks, LoveCrafts or Crochet.com, and I'll make a small commission on your purchase, at no cost to you! Start here:

    ♥ Support PlanetJune ♥

    Tip: This link is also in the footer of every page!

    Thank you so much for your support!