PlanetJune Craft Blog

Latest news and updates from June

Archive for October, 2011

Halloween CAL roundup

PlanetJune Halloween CrochetAlong

The Halloween CAL was the first crochet-along organised entirely by PlanetJune ravelry group members, and wow, what a success: page after page of projects, creative photography, fun modifications to the patterns… I can see why people enjoy CALs so much.

Don’t be shy – please join the group and participate in future CALs! November’s CAL topic will be Accessories – that’s everything in the PlanetJune Accessories range, and you can also use any of my other patterns to create accessories (e.g. a flower pin or bag embellishment, a fruit necklace). Look for the new CAL thread from tomorrow…

And now see the results of the Halloween CAL! (As usual, I’m crediting the participants by their Ravelry usernames, so you can look them up on Ravelry if you want more details.) You’re going to love these pics!

__(‘Read the rest of this entry »’)

Comments (8)

Emperor Penguin Family crochet patterns

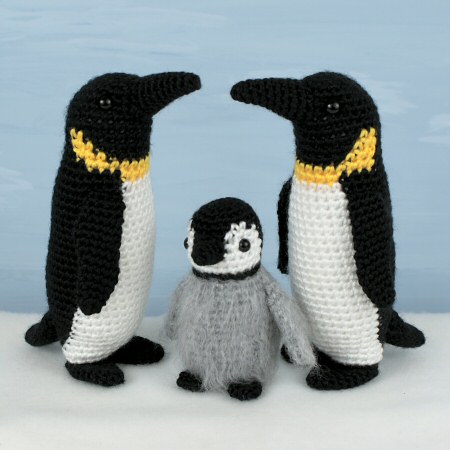
I’ve been planning this ambitious design for a couple of months, and it’s finally ready: a family of Emperor Penguins!

emperor penguin family crochet patterns by planetjune

Emperors are the largest of the penguin breeds, and probably what most people think of when they hear the word penguin. They’ve seen some extra popularity in recent years as they feature in the cute animated movie Happy Feet and the stunning documentary movie March of the Penguins.

I’ve been wanting to make a proper, amigurumi-style penguin for years, but until recently, colour-changing tehcniques weren’t up to what I had in mind. If you look at other penguin designs, they either have a white back, or a white oval (crocheted or felt) stitched onto their tummy, and neither of those options appealed to me. I’ve pioneered a new technique for creating smooth colour changes between a tummy and back (debuted with my Kingfisher pattern) and the beauty of this technique is that all the magic is in the actual pattern – you don’t need to learn any new stitches or methods to be able to follow it! I love innovating 🙂

emperor penguin crochet pattern by planetjune

So now I have a clever emperor penguin design, but I couldn’t resist making a little fluffy baby penguin too. I love how they look so different to the adults, but equally distinctive. And, of course, brushed crochet is the perfect technique to bring this little one to life.

baby emperor penguin crochet pattern by planetjune

If you’d like to make your own sweet pengys, you can buy the Emperor Penguin and Baby Emperor Penguin crochet patterns from my shop, and I’ve also put them together as an Emperor Penguin Family multipack for a special price.

I hope you like my penguins!

Comments (31)

Cape Town Wildlife V

This is the fifth post in my monthly series on the fascinating nature I encounter here in South Africa.

In our mission to look for more whales (you may remember we spotted a whale’s tail last month!), we decided to take a day trip to Hermanus, a small coastal town 120km east of Cape Town, and supposedly the best place for land-based whale-watching in the world.

En route, we stopped at Stony Point, which is home to one of the only three land-based penguin colonies in South Africa. It’s a natural colony of wild penguins, but it has been fenced in to protect the penguins from leopard attacks, and there’s a boardwalk so that the clumsy humans don’t stomp on the penguin nests.

Stony Point, South Africa

(I’ll put a jump in here – this is a long post so feel free to skip the rest if you’ve just come for the crafts and don’t like nature!)

__(‘Read the rest of this entry »’)

Comments (31)

book review: Crafting With Cat Hair

Let’s get this out of the way first: I was given a copy of this book to review. But I’m not being compensated for this review in any other way, and the following is based on my honest opinions!

Overview

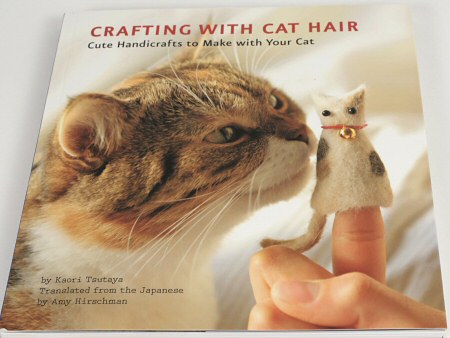
Crafting With Cat Hair: Cute Handicrafts to Make with Your Cat by Kaori Tsutaya was originally published in Japanese, and has now been translated into English by Amy Hirschman. When they say “…to make with your cat” they really mean it, as all the projects in this book are designed to be created from the excess fur that’s removed when you brush your cat.

Crafting With Cat Hair review by PlanetJune
Cover, showing cat hair finger puppet

The included projects are:

  • Finger puppets
  • Book covers
  • Cat portraits
  • Tote bags
  • Coin purses
  • Knickknack boxes
  • Pincushions
  • Badges
  • Mittens & gloves
  • Hats & scarves

Note: the amazon description also mentions cat toys and photo frames, but this is incorrect.

Crafting With Cat Hair review by PlanetJune
My favourite project: pretty pincushions

Aside from the finger puppets, which are made by wet-felting, each project includes patterns to needle-felt the cat shapes onto the finished item, and some also include embellishments (eyes, collars, bells, etc).

Between each project, there’s an information spread. These cover the benefits of brushing your cat, a comparison of cat hair and sheep’s wool, seasonal shedding variations, and more. The info sections are brief and easy to read, and include lots of cat photos to enjoy.

Crafting With Cat Hair review by PlanetJune
Cat-embellished mini tote bags

Note: the publisher’s blurb says “All the projects are cat-friendly, eco-friendly, and require no special equipment or training”. But, for any of these projects apart from the finger puppets, you will need what I consider to be specialized equipment: a felting needle and some kind of foam or sponge to stab it into.

My Experience

Before I start, I should introduce you to the real star of this review, my handsome boy Maui:

Maui cat in the sunshine
Maui enjoying the South African sunshine – it’s a hard life…

I’d been collecting Maui’s fur for a couple of years, in case I thought of something to do with it, but then I moved abroad and decided to throw it all away before moving. Of course, now there’s something I could have done with it! Luckily Maui is a fur generator, and graciously consented to being brushed every day for a week so I could save his fur to test-drive this book for you. He’s a short-haired cat, so if his fur will work for these projects, I’m pretty sure that it’ll work for any cat hair.

From looking through the book, I got the impression that creating a clear outline for your needle-felted silhouette seems to be the hardest part, so I picked one of the largest patterns to give me the best chance of making it look good (the cat pattern that goes with the Coin Purse, p51). It’s nice that several cat shapes are provided for most of the projects, so you can choose a pose that looks like your own cat – the one I chose was very Maui-ish. I used a sheet of acrylic felt as my base, as I’m sensitive to wool. I gathered up my small pile of Maui’s fur, and I got to work.

I do have a little experience with needlefelting (I made a mini guinea pig), so I can tell you that needle-felting with cat hair is definitely much slower than with wool. The claim of “quick and quirky” projects is a little overly optimistic, in my opinion. Cat hair doesn’t really want to be felted; it takes more stabbing to get the strands to mesh together. But it does work, eventually!

I felt that the needlefelting instructions were a little brief – if I didn’t already know better I’d have assumed from reading the instructions that I’d stab the needle in a few times to anchor the fur, and that would be it. (If you don’t already know, you have to stab over and over again, all over the surface, to mesh all the strands together into a solid fabric.) There’s also no safety warning in the book, which I think is an oversight – this is a sharp serrated needle you’re stabbing very close to your fingers, and you do need to be vigilant. (Ask me how I know this…)

cat hair needlefelted silhouette by planetjune
Pretty kitty silhouette (with the dreaded stabbing device)

It took me about an hour of stabbing to make my small cat silhouette (just over 2″ long), and it’s not perfect – it’s very tricky to make the edges neat, and perfectionism has no place here. You can see stray hairs around the edges and they really don’t like to be tamed; I may have been able to improve it further, but I took my stabbed finger as a sign to stop. Even so, it is adorable: it’s a sweet little silhouette of my Maui, made from his own fur! This is very special and I will treasure it.

cat hair needlefelted silhouette by planetjune (back)
The back looks similar, but more fluffy and less defined

The back (above) looks almost as good as the front! I’m not convinced that the cat hairs have matted together at all; it seems more like stabbing them through to the back of the felt has pinned the hairs into place. (FYI, the cheap acrylic craft felt stood up to all the stabbing with no problems, so don’t be afraid to use it as a base to needlefelt onto.)

I haven’t decided how to finish my piece: I may add a felt border and some simple embroidery, inspired by the Badges project (p66), or make or find a frame for it, à la Portraits (p36), or maybe a combination of the two. I also considered adding eyes and a tiny embroidered nose, but I think I’ll leave it as is; simple is sometimes better. If I change my mind, I’ll flip through the book again to give me ideas!

Peeves

Although there are 10 projects in this book, 1 involves wet-felting and the other 9 are all needle-felting projects. Yes, there are directions for making a pincushion, bag, coin purse, felt pin, etc, but the actual cat hair part of each of these projects is exactly the same: needle-felt a cat silhouette to the project you’ve made, or to a bought garment. This may be an inbuilt limitation of trying to craft with cat hair, as opposed to any lack of imagination on the part of the author: cat hair is too short to spin into yarn (unless you have a long-haired cat) and, as the book explains, it doesn’t felt as firmly as wool, so it may be that these limited projects are really all you can do with it. (I previously tried to make a felt ball with some of Maui’s fur, and, although it looked like it had felted firmly while it was wet, once it had dried some hairs popped out around the edges, and it really wasn’t pretty enough to do anything with.) Still, I had been hoping for a little more variety with what to do with the cat hair.

If you’ve never needle-felted before, I’d suggest you look up instructions online before you begin, and please, please be careful with the sharp needle!

After seeing how fluffy the finished piece is compared with felted wool, I’m also not entirely convinced how well the cat hair felt would hold up on any kind of garment or item that gets heavy use – I suspect you may end up shedding cat hair wherever you go..! But the ideas and the silhouettes are all very cute, so here’s my suggestion to get more mileage from the book: you could always use the provided cat silhouettes and instructions to needle-felt wool roving to your hat and mittens instead of the cat hair, to get a sturdier result, and maybe save the cat hair for the more ornamental projects.

Final Thoughts

I see one huge reason to buy this book: cat owners will go crazy for a little felted something made with their own sweet kitty’s fur! I love the little silhouette I made with Maui’s fur, and I’m sure that your non-crafty cat-mad friends and relatives would be equally delighted with a little replica ornament of their beloved feline companions – it would make a great Christmas gift (although maybe not a surprise, as you’ll need to gather a few days’ worth of cat fur brushings in advance)!

Crafting With Cat Hair is definitely a specialised book, and one that only cat-lovers will appreciate. But it’s fun to read for the cat info and photos, and the projects, while a little limited in scope, are very cute. If you like needlefelting, or want to try it for the first time, and you, or someone you know, loves cats, you’ll probably enjoy this book 🙂

Comments (13)

a special crocheted pumpkin!

The Halloween CAL in my Ravelry group is in full swing – I’ve never seen such a variety of pumpkins, and we’re only halfway through the month! This is going to make for a really fun roundup post 😀

PlanetJune Halloween CrochetAlong

I decided to join in with the CAL this time, because I’ve been meaning to try something unusual for a long time, and this is the perfect opportunity…. Meet my darling blue pumpkin (we’ll come back to the unusual colouring a bit later):

blue crocheted pumpkin by planetjune

As a designer, you don’t often get to experience your own designs in the same way as anyone else does: you remember most of the pattern and how the construction works, and don’t have to follow many of the instructions to make another one. I made my Pumpkin pattern in 2008 and haven’t made one in 3 years, so it was like a completely new pattern to me; I’d completely forgotten it. To my surprise, I discovered it’s actually a really good pattern, simple but very clever – no wonder it’s so popular 😉

Anyway, back to my pumpkin: I didn’t think a spooky face would really fit his baby blue colouring, so I tried for a cute pumpkin face (I think it ended up looking a bit like a Pokemon, but I like it!)

cute crocheted blue pumpkin by planetjune

Now, why would I make such a silly-coloured pumpkin? Because this is no ordinary yarn: it’s glow in the dark yarn!

(Bernat Glow In The Dark was unfortunately discontinued a couple of years ago, and I can’t imagine why they don’t re-release it every Halloween; it’s perfect for Halloween decorations and trick or treating costumes! I was lucky enough to recognise it in the unlabelled bin at the factory outlet sale before I left Canada, and grabbed all I could find. Sadly, there was nothing in yellow, orange or green, hence the baby blue and white pumpkin.)

But this makes it totally worth the unusual daytime colouring:

glow in the dark crocheted pumpkin by planetjune

GLOWY! How cool is that?!

An aside: it’s actually very difficult to get a photo of anything glowing in the dark! I managed it in the end by setting up the camera on the tripod, focussing manually on the pumpkin, then draping blackout fabric over both the pumpkin (inside my old light box frame) and the camera before I took the shot. Before I quite perfected this technique, I ended up with this ‘ghost pumpkin’ photo:

glow in the dark ghost pumpkin by planetjune

…which I think is pretty cool too!

If you’d like to join in with the Halloween CAL, it’s going strong on Ravelry and we’d all be happy to see you there! 2.5 weeks of seasonal fun to go…

PlanetJune Halloween CrochetAlong

Comments (16)

book review: Microcrafts

Let’s get this out of the way first: I was given a copy of this book to review. But I’m not being compensated for this review in any other way, and the following is based on my honest opinions!

Overview

Microcrafts: Tiny Treasures to Make and Share, compiled by Margaret McGuire, Alicia Kachmar, and Katie Hatz, is a craft project book that includes 25 miniature craft projects that use a variety of different methods and materials – and each project is no larger than a spool of thread!

Microcrafts: Tiny Treasures to Make and Share

I love tiny craft projects – they can be fast to make, use hardly any supplies, take up no space to display, and have a huge cuteness factor just from their size alone! So I really looked forward to seeing this book, and I wasn’t disappointed.

It’s a hardcover book, with very nice, understated styling. It’s fun just to flip through – the photos are large and clear (larger than life-size!) and the projects are well-displayed. Project instructions are broken down into numbered steps, with illustrations, templates, and tips. It’s all well laid out and easy to follow.

Microcrafts: Tiny Treasures to Make and Share
Embroidered felt pendant and a felted planets mobile

The included projects cover a range of styles and difficulties, from the very basic (nutshell boats, miniature paper bunting) to more technically demanding (tiny books, miniature macrame), and a range of materials including paper, felt, fabric, polymer clay, and more. Every project is very different, and there are some original concepts that I haven’t seen anywhere else before, so you really get your money’s worth, and plenty of scope to spark your imagination.

Microcrafts: Tiny Treasures to Make and Share
Miniature books

My Experience

I fell in love with the miniature houseplants and macrame hanger but, not having a mini plant pot or access to any live plants, I decided to make all the components myself. I followed the Macrame Hanger (p44) instructions (see below). I also liked the Wire Plant Stand (p45) idea, but not the look of the finished stand, so I came up with my own very simple version. And this is the real beauty of the Microcrafts projects – they are based on such simple concepts that they lend themselves to customizing.

Microcrafts: Tiny Treasures to Make and Share

If you’re not already familiar with macrame, the Macrame Hanger is one of the most advanced projects in the book. I’ve never tried macrame before, or any knotting craft other than basic friendship bracelets, so I really put the instructions to the test. Each knot had an illustration that, after a few seconds of study, allowed me to complete it successfully. The concise instructions did leave me puzzled at a couple of places: how thin exactly is “thin cord or embroidery thread or string” and how do I “hide the ends of the knot”, for example, but I think I was overthinking it: I used size 20 crochet thread, as I had it on hand; it looks a little finer than the example, but it still looks great – the exact thread thickness obviously doesn’t matter.

I only found one mistake in the directions: the instruction for the 4 cords that hold the plant hanger says to make them 1/4″ long – that’s far too short. From the picture I assume that should actually be either 1″ or 1 1/4″, but the exact length is something you can decide to look good with your pot, so it doesn’t really matter; I just continued until mine looked long enough.

As for the macrame, it might have been easier to practice the knots at full scale before going micro, but it worked! My plant hanger looks exactly like the picture (above), so I must have followed the instructions correctly:

mini macrame planter by planetjune

Genius idea – as you can see, any kitschiness you may associate with macrame totally vanishes on this scale. Isn’t it adorable? Oh, hang on, maybe you don’t appreciate the scale without anything for reference… Here you go:

miniature polymer clay succulent garden by planetjune
This is a super-sized pic – in reality the entire pot is less than 1 inch (2.5cm) diameter!

I was inspired by the polymer clay projects in the book to create my plant pot and a tiny succulent garden from FIMO. I love how this project turned out, and I had a lot of fun making it 🙂

Peeves

I’m happy to report that I don’t have any major gripes about this book!

The introduction to Microcrafts says that microcrafting is “all about putting odds and ends to good use”, however, a few of the projects are a bit limiting because they rely on specific products in order to make them. For example, the fabric buttons project requires a fabric button covering kit; and I was very intrigued by the temporary tattoos project but was disappointed to find that it requires “clear temporary tattoo inkjet waterslide-decal paper” – you can’t get much more specific than that, and I didn’t feel it really fit with the “odds and ends” claim.

This only applies to a couple of the projects though: the bulk of the Microcrafts projects use basic craft supplies (paper, felt, yarn, glue, string, etc) that you probably already have in your craft stash, or could easily buy from any craft supply store.

And I was surprised to see a book about tiny crafts that doesn’t include a shrinkydinks project – such a missed opportunity! Note to the authors: that’s my suggestion for Microcrafts 2, ladies 😉

Final Thoughts

Microcrafts: Tiny Treasures to Make and Share is a great concept, and well-executed. There’s a wide range of projects ranging from very simple (fun to make for or with kids) to more advanced projects that any crafter will appreciate. The various contributors provide a variety of styles and materials used in the projects, so you’ll definitely find at least a few that appeal to you, and the others may just provide a spark of inspiration to create your own original microcrafts!

If you appreciate cute and tiny, and enjoy crafting, you’ll love Microcrafts. It’s a must-keep addition to my craft book reference shelf!

Comments (8)

reviews & affiliates

Today is my first Thanksgiving as a Canadian, and I’m not there to celebrate it… But I am thankful that I’m a Canadian citizen and I’ll always have that, wherever in the world I may be. As it’s not a holiday here, I’ll catch up on some PlanetJune admin instead, and give away some free stuff – yay!

Review and Win contest

September’s ‘Review and Win’ winner is Judy C, with her Kingfisher review:

kingfisher crochet pattern by planetjune kingfisher crochet pattern by planetjune

I LOVE the kingfisher that I made from this pattern and am getting a lot of compliments on it. I followed all instructions for the neatest color changes and now I do have a self-standing, perfect kingfisher of my own! All instructions are clear and easy to follow. I highly recommend this pattern-especially for bird lovers like me!

Congrats Judy! I’ll email you to find out which pattern you’d like as your prize 🙂

To be entered into this month’s draw for a free pattern of your choice, just write a review of any product in my shop.

* * *

PlanetJune Affiliate payments

The end of September also marked my first quarterly payments to my affiliates: you’ll all have received your earnings in your PlanetJune account by now, and thank you for referring new customers to my shop!

If you’d like to join the PlanetJune Affiliate program too, you can earn 5% of the value of any orders that are placed using your unique ID code.

Some of my affiliates have yet to generate any sales through their links, so I thought I’d offer some advice in case you’ve done something wrong and are missing out on your commissions:

  • You can link to any page in my shop (not the blog)
  • Don’t forget to generate your own unique URL for your links from the Affiliate Marketing Tools page (you can find it under My Account when you’re logged in)
  • If you’ve put a banner on your site, remember to use your link to my shop

All your links should look like this (except not split onto 2 lines): planetjune.com/shop/index.php?main_page=index&referrer=PJ_1234567890

1. They link to a page in my shop
2. They include your unique referrer code (in this case, PJ_1234567890 – yours will be different!)

And a little tip: a lot of people ignore adverts, so you’ll probably have more luck if you e.g. post about something you’ve made from one of my patterns (with a photo), and link to that pattern using your unique link – that’s what my most successful affiliates have been doing, anyway!

If you have any questions about the Affiliate program (or anything else), please feel free to email me.

Comments (1)

life as a fashion model…

Although it may not look like it from the new PlanetJune Accessories collection cover pictures, I had a really hard time getting those photos – it actually took 6 photoshoots to get enough decent photos to release the collection. That’s 6 sessions of dressing up nicely and doing my hair and makeup, and 6 sessions of getting strange looks as I posed, feeling like an idiot, in various locations near the river…

PlanetJune Accessories Fall 2011 Collection of crochet patterns

It’s spring here, not autumn, and if you look carefully you can see huge palms, giant cacti, and other unusual foliage in the background of my photos, which doesn’t exactly set the autumnal scene I had in mind… Plus my two winters in a row this year, together with months of being stuck in the house with my busted rib, has left me with an even paler than usual complexion (if that’s possible).

It’s a world away from the carefully controlled lighting and scenery I use for my amigurumi photos! For the whole time I was trying to get these pics, I was blessed with bright endless sunshine every day, which meant I was often either squinting in the sunlight, or hidden in deep shadow. When there were a few clouds, by the time I got dressed up and on location, the clouds had all mysteriously vanished. And the wind! The wind here is so strong that it has its own name (‘The Cape Doctor’, as it supposedly blows away all the pollution). My lacy scarves and shawls would not stay put, and my carefully-styled hair whipped across my face and into a mess within seconds.

I was about to throw out all the rejected photos (500+!), but I thought these few were a good demonstration of a tiny fraction of what I went through, so I made them into a little animation for you:

planetjune shawl blowing in the wind
Hahaha! It’s a miracle I ever got any half-decent photos, with winds like this!

And by the way, for anyone who thinks you can’t block acrylic yarn, look at the drape of my shawl! Blocking works miracles on ALL yarn.

Don’t forget you only have until this Sunday to take advantage of the launch week discounts on the new PlanetJune Accessories collection (details in the previous post) – and thank you so much to everyone who’s already bought some (or all) of my new designs! I hope you’ll enjoy crocheting them as much as I enjoyed designing them, and a lot more than I enjoyed modelling for them 😉

Comments (18)

« Previous entries
  • Quick Links: Crochet

    navigation: arrow

    buy crochet patterns and accessories from my online store

    'Everyday Crochet' and 'The Essential Guide to Amigurumi' crochet books by June Gilbank

    Crochet video tutorials and step-by-step photo tutorials

    Free PlanetJune crochet patterns

    Frequently Asked Questions

    Quick Links: Crafts

    navigation: arrow

    Punchneedle Embroidery information, ebook & patterns

    Papercraft ebook & tutorials

    Free PlanetJune craft projects & tutorials

  • Blog Post Categories

  • Blog Archives

  • CAL Galleries

    Ravellenic Games: Team PlanetJune
    PlanetJune Reindeer Games
    PlanetJune Temperature Snake CAL

  • Welcome to PlanetJune!

    June Gilbank

    Hi, I'm June. Welcome to my world of nature-inspired crochet and crafting. I hope you enjoy your visit!

    If you'd like to get in touch, you can contact me here.
    crocheted Canadian flag by PlanetJune
  • A fanned-out pile of the books Everyday Crochet and The Essential Guide to Amigurumi, with text 'The answers to all your crochet questions at your fingertips - find out more'
  • Support PlanetJune!

    Want to say thanks? You can send me money in seconds at paypal.me/planetjune (over $20) or paypal.me/planetjune2 (under $20) or send me a donation through my shop.

    Or simply click through from my links before you shop at Amazon, Etsy, KnitPicks, LoveCrafts or Crochet.com, and I'll make a small commission on your purchase, at no cost to you! Start here:

    ♥ Support PlanetJune ♥

    Tip: This link is also in the footer of every page!

    Thank you so much for your support!