punchneedle globe revealed!
Ah, this post has been a long time coming… (Previous update posts are here: 1, 2, 3, 4, 5.)
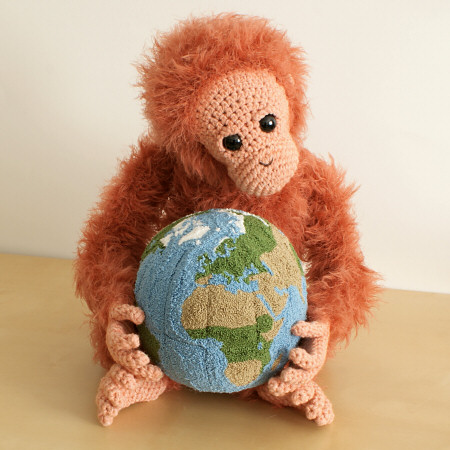
I’m not quite sure when I embarked on this project as I didn’t keep any notes; all I know for sure is that my Illustrator design file was last modified in December 2009, so it’s taken over a year to take this project from a 2D pattern to a 3D completed piece. But here, finally, it is: the Punchneedle Embroidery Globe! Click the pic for the larger version:
Hey – it’s PlanetJune personified! Maybe this should be my logo 🙂
Thank you to my orangutan for posing with the globe for these photos 😉
Stitching the two halves together was quite a challenge. I used a curved upholstery needle but it was still really tricky. When I’d stitched 11 of the 12 segments together, I started stuffing. And stuffing, and stuffing, and then stuffing some more. In the end it took about half a standard bag of fiberfill to keep the globe in shape. And I was very glad to have my Detail Stuffing Tool for the final stuffing additions as I stitched the opening closed.
But finally, it was finished! Here are some more views (again, click for the larger version):
Asia and Australia, Europe and Africa, N and S America…
You can see from the above pictures that my globe isn’t a perfect sphere – it looks slightly narrower in the middle picture than in the 2 outer pics. There’s a reason for that: although I did account for the fact that my base fabric (weaver’s cloth) has stretch in only one direction, which changes the aspect ratio of the finished piece, I didn’t realise that by punching so much more densely than usual, I’d change the amount of stretch significantly, so I didn’t distort my pattern enough to compensate for that before I transferred it to my fabric. My finished globe has a circumference of 18″ at the widest point and 17″ at the narrowest. Not perfect, but considering I had no idea if my idea of a 3D punchneedled piece would even work at all, I can live with it.
I’m a geek…
I decided to put on my science geek hat and come up with some estimates of how many stitches went into this project. I came up with two methods for the estimation; both are very rough, but taken together they at least give us some idea.
Method 1: floss length. I counted how many stitches I made with a known length of floss. I kept track of how many skeins of floss I used (28) and the length of each skein, to extrapolate the number of stitches in the whole globe. Result: 55,000 stitches.
Method 2: surface area. I counted how many stitches I’d made in a typical square centimetre on the back of the embroidery, and then used the average circumference of the finished globe to calculate its radius (C=2πr), subtract the stitch loop length (to give the size of the backing fabric) and then its surface area (SA=4πr²). Result: 63,000 stitches.
So I feel fairly confident in saying that there’s somewhere in the region of 60,000 stitches in my globe – and even at punchneedle speed, that’s a lot of stitches!
2011 is almost here
The coming year is going to bring some big changes for me (and Dave and Maui). I still can’t really get my head around this idea of moving, especially to the southern hemisphere – what a change that’ll be! But now, at least I have a way to visualize it:
Canada to Cape Town… it’s even further away than I’d realised!
Thanks for accompanying me on my journey to complete this globe! I hope you like the result. It’s funny that I had no idea how relevant it would be to me when I embarked on this project…