Amigurumi Citrus Collection crochet pattern
© June Gilbank 2013
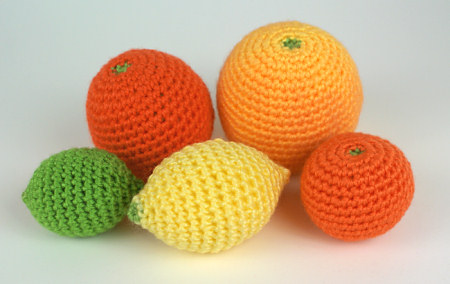
Make your own amigurumi fruit bowl with an entire collection of citrus fruits: life-sized and realistically shaped orange, lemon, grapefruit, lime and clementine patterns. Crochet a realistic fruit selection, or make a cute fruit family by giving each fruit a face – the choice is yours.
This pattern is Donationware – the pattern is available for free, but if you like it please consider sending me a donation to show your appreciation:
Send me a donation and receive the easy-to-print PDF version of the pattern as a thank you! It includes some additional info that you’ll only find in the PDF version: a citrus leaf pattern, in both written and stitch diagram versions, with full instructions on how to add a crocheted leaf to any of your citrus fruits!
Donations of any size are much appreciated. Just add the amount you wish to donate, and, once you have checked out and paid, your pattern will instantly be available to download from your PlanetJune account.
The complete pattern and instructions are available below, regardless of whether or not you choose to pay for them 🙂
This is a free PlanetJune original crochet pattern. Feel free to use items made from this pattern however you wish, but I’d appreciate credit as the pattern designer. Please do not reproduce the pattern anywhere else; instead post a link to www.planetjune.com/citrus
Not ready to make it yet? Add it to your Ravelry queue:
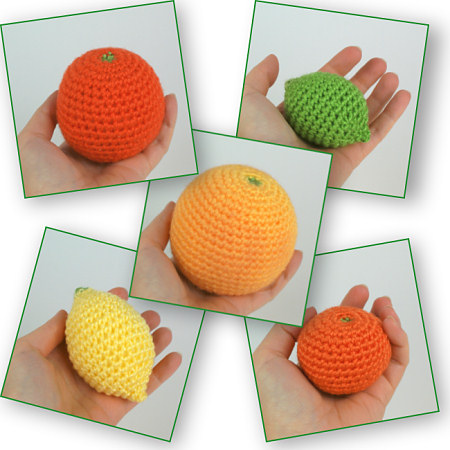
Each amigurumi citrus fruit is the size and shape of its real counterpart!
Terminology
| ch | chain |
| invdec | invisible decrease Note: If you prefer, you may use a standard sc2tog decrease in place of each invdec. |
| sc | single crochet (double crochet for UK/Aus) |
| sl st | slip stitch |
| st | stitch |
Notes
- Do not join at the end of each round; rounds are worked in continuous spirals.
- Use a stitch marker to mark the beginning of each round. Move the marker up each time you start a new round.
- All the citrus fruit are worked from the top down.
You will need…
- E US/3.5mm crochet hook
- Small amount of worsted weight yarn in citrus colours with an optional contrast colour
- Polyester fibrefill stuffing
- Yarn needle to weave in ends
- Stitch marker

Size
Approx 2 – 3.5″ (5 – 9cm) diameter. (Your gauge and yarn choice will affect the finished size slightly.)
Colour code
| MC | main colour yarn (orange, yellow, green) |
| CC | contrast colour yarn (e.g. green) – optional |
Note: If you prefer, you may ignore the contrast colour that creates the stem ‘button’ and work the entire fruit in the main colour.

Orange
With CC, make a magic ring, ch 1.
Rnd 1: 6 sc in magic ring. (6 st)
With MC:
Rnd 2: in front loops only, sc in each st around. (6 st)
Rnd 3: in both loops from now on, 2 sc in each st around. (12 st)
Rnd 4: (2 sc in next st, sc in next st) six times. (18 st)
Rnd 5: (sc in next st, 2 sc in next st, sc in next st) six times. (24 st)
Rnd 6: (2 sc in next st, sc in next 3 st) six times. (30 st)
Rnd 7: sc in each st around. (30 st)
Rnd 8: (sc in next 2 st, 2 sc in next st, sc in next 2 st) six times. (36 st)
Rnds 9-10: sc in each st around. (36 st)
Rnd 11: (2 sc in next st, sc in next 5 st) six times. (42 st)
Rnds 12-13: sc in each st around. (42 st)
Rnd 14: (invdec, sc in next 5 st) six times. (36 st)
Rnd 15: sc in each st around. (36 st)
Rnd 16: (sc in next 2 st, invdec, sc in next 2 st) six times. (30 st)
Rnd 17: sc in each st around. (30 st)
Rnd 18: (invdec, sc in next 3 st) six times. (24 st)
Rnd 19: (sc in next st, invdec, sc in next st) six times. (18 st)
Rnd 20: (invdec, sc in next st) six times. (12 st). Stuff orange through hole.
Rnd 21: invdec six times. (6 st)
Fasten off, stitch the remaining hole closed and weave in the end.

Lemon
With CC, make a magic ring, ch 1.
Rnd 1: 4 sc in magic ring. (4 st)
With MC:
Rnd 2: (2 sc in next st, sc in next st) twice. (6 st)
Rnd 3: (2 sc in next st, sc in next st) three times. (9 st)
Rnd 4: (sc in next st, 2 sc in next st, sc in next st) three times. (12 st)
Rnd 5: (2 sc in next st, sc in next st) six times. (18 st)
Rnd 6: (sc in next st, 2 sc in next st, sc in next st) six times. (24 st)
Rnds 7-8: sc in each st around. (24 st)
Rnd 9: (2 sc in next st, sc in next 3 st) six times. (30 st)
Rnds 10-12: sc in each st around. (30 st)
Rnd 13: (invdec, sc in next 3 st) six times. (24 st)
Rnds 14-15: sc in each st around. (24 st)
Rnd 16: (sc in next st, invdec, sc in next st) six times. (18 st)
Rnd 17: (invdec, sc in next st) six times. (12 st). Stuff lemon through hole.
Rnd 18: (invdec, sc in next st) four times. (8 st)
Rnd 19: invdec four times. (4 st)
Fasten off, stitch the remaining hole closed and weave in the end.
Grapefruit
With CC, make a magic ring, ch 1.
Rnd 1: 6 sc in magic ring. (6 st)
With MC:
Rnd 2: in front loops only, sc in each st around. (6 st)
Rnd 3: in both loops from now on, 2 sc in each st around. (12 st)
Rnd 4: (2 sc in next st, sc in next st) six times. (18 st)
Rnd 5: (sc in next st, 2 sc in next st, sc in next st) six times. (24 st)
Rnd 6: (2 sc in next st, sc in next 3 st) six times. (30 st)
Rnd 7: (sc in next 2 st, 2 sc in next st, sc in next 2 st) six times. (36 st)
Rnd 8: sc in each st around. (36 st)
Rnd 9: (2 sc in next st, sc in next 5 st) six times. (42 st)
Rnd 10: sc in each st around. (42 st)
Rnd 11: (sc in next 3 st, 2 sc in next st, sc in next 3 st) six times. (48 st)
Rnd 12: sc in each st around. (48 st)
Rnd 13: (2 sc in next st, sc in next 7 st) six times. (54 st)
Rnd 14: sc in each st around. (54 st)
Rnd 15: (invdec, sc in next 7 st) six times. (48 st)
Rnd 16-17: sc in each st around. (48 st)
Rnd 18: (sc in next 3 st, invdec, sc in next 3 st) six times. (42 st)
Rnd 19: sc in each st around. (42 st)
Rnd 20: (invdec, sc in next 5 st) six times. (36 st)
Rnd 21: (sc in next 2 st, invdec, sc in next 2 st) six times. (30 st)
Rnd 22: (invdec, sc in next 3 st) six times. (24 st)
Rnd 23: (sc in next st, invdec, sc in next st) six times. (18 st)
Rnd 24: (invdec, sc in next st) six times. (12 st). Stuff grapefruit through hole.
Rnd 25: invdec six times. (6 st)
Fasten off, stitch the remaining hole closed and weave in the end.
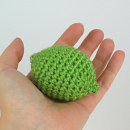
Lime
With CC, make a magic ring, ch 1.
Rnd 1: 4 sc in magic ring. (4 st)
With MC:
Rnd 2: (2 sc in next st, sc in next st) twice. (6 st)
Rnd 3: 2 sc in each st around. (12 st)
Rnd 4: (2 sc in next st, sc in next st) six times. (18 st)
Rnd 5: (sc in next st, 2 sc in next st, sc in next st) six times. (24 st)
Rnd 6: sc in each st around. (24 st)
Rnd 7: (2 sc in next st, sc in next 7 st) three times. (27 st)
Rnds 8-10: sc in each st around. (27 st)
Rnd 11: (invdec, sc in next 7 st) three times. (24 st)
Rnd 12: sc in each st around. (24 st)
Rnd 13: (sc in next st, invdec, sc in next st) six times. (18 st)
Rnd 14: (invdec, sc in next st) six times. (12 st). Stuff lime through hole.
Rnd 15: invdec six times. (6 st)
Rnd 16: invdec twice. (2 st, plus 2 unworked)
Fasten off, stitch the remaining hole closed and weave in the end.
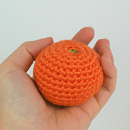
Clementine
With CC, make a magic ring, ch 1.
Rnd 1: 5 sc in magic ring. (5 st)
With MC:
Rnd 2: in front loops only, sc in each st around. (5 st)
Rnd 3: in both loops from now on, 2 sc in each st around. (10 st)
Rnd 4: (2 sc in next 4 st, sc in next st) twice. (18 st)
Rnd 5: (sc in next st, 2 sc in next st, sc in next st) six times. (24 st)
Rnd 6: (2 sc in next st, sc in next 3 st) six times. (30 st)
Rnd 7: sc in each st around. (30 st)
Rnd 8: (sc in next 2 st, 2 sc in next st, sc in next 2 st) six times. (36 st)
Rnds 9-11: sc in each st around. (36 st)
Rnd 12: (sc in next 2 st, invdec, sc in next 2 st) six times. (30 st)
Rnd 13: sc in each st around. (30 st)
Rnd 14: (invdec, sc in next 3 st) six times. (24 st)
Rnd 15: (sc in next st, invdec, sc in next st) six times. (18 st)
Rnd 16: (invdec, sc in next st) six times. (12 st). Stuff clementine through hole.
Rnd 17: invdec six times. (6 st)
Fasten off, stitch the remaining hole closed and weave in the end.
Finishing: Orange, Grapefruit & Clementine
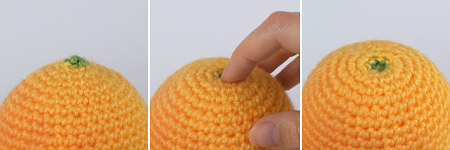
The three round citrus fruit have all been designed to have an indented top, but this shape won’t be obvious when you stuff the fruit. To restore the shape, use the tip of your fingernail to push down all around the edge of Rnd 1 to indent the contrast-coloured round. Once formed, this lip will hold its shape. (Alternatively, leave Rnd 1 sticking up so the contrast colour represents an attached stem ‘button’.)
Optional: blushed effect [Orange & Grapefruit]
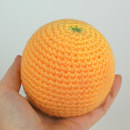
To make a realistic blood orange or pink grapefruit, load up a large makeup brush with blush makeup, and pounce the colour onto random areas of the fruit. Keep it as a subtle shading as shown on this grapefruit (below) or build up the colour with additional blush.
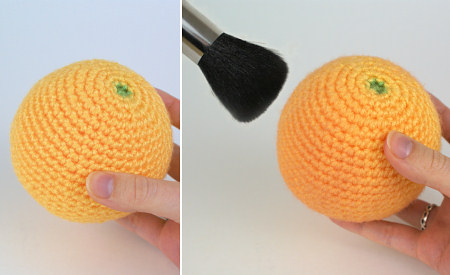
Note: The blush colour obviously won’t stand up to a lot of playing, or washing, so keep this addition for a purely ornamental fruit, not a toy!

I hope you enjoy this pattern. Please leave me a comment below if you do, and consider leaving me a donation. Thanks!


Beth said
Thanks for sharing these cute patterns! I bought a cute bowl at a yard sale that I’m going to fill with these fruits!
Judith said
Honestly, irritating how it came with everything but the leaf pattern and you had to make a donation
June said
I’m sorry you feel that way! I always like to add bonuses if I can, to thank people who choose to support me in my career and pay me for my work. But if you’re not in a position to donate a couple of dollars for the nicely-formatted printable PDF version that includes the bonus content, you’re very welcome to use this online version for free 🙂
Khat said
This is a really great set of patterns. I have a Chevy Aveo I like to call ‘The Lemon’ as a joke because of the amount of parts I’ve put into it, (I bought it cheap because it had a blown head gasket, and my brother, a mechanic, put a complete new engine in it and replaced a swollen rubber seal that caused the blown gasket, and then the ignition coil when that went. It’ll need rust repair done sooner rather than later, (yay, Canadian winters…) I bought a new battery a couple weeks ago after the old one froze, (again, yay winter,) and now the driver’s side mirror has mysteriously cracked. On top of all this, the check engine light comes on and goes out at random, (I figure it’s the gas cap, it’s been bratty about that before,) and it takes an unusually long time to start up, (everyone tells me the starter’s going, but again, just bratty, Aveos have attitude problems,)) and I thought it would be funny to make lemon keychain charms for the keys and a matching rearview mirror charm. Your pattern worked up in embroidery floss with a 2mm makes a perfectly sized keychain charm.
June said
Love it!
Sabrina said
SC no entiendo que significa
June said
Sabrina, please look for the ‘Terminology’ section at the top of each of my patterns – it explains all the abbreviations I use in that pattern, in both US and UK terminology 🙂
Marie said
Dear June,
I love your citrus fruit. Every one of them is so adorable! I’d like to make a lemon first – but with a leaf attached. Do you by any chance have a leaf tutorial?
Thanks in advance!
June said
I don’t have a citrus leaf pattern, but if you just want a small leaf, you could try the leaf from my Posy Blossoms pattern 🙂
Harriet Russell said
Hello;
I love the fruit idea. I’m a crochet novice who fell in love with Amigurumi animals. But I can’t decide if there’s a book easy enough for me with critters I like. I’m thinking the fruit would be a good way to learn some of the basics without spending a lot on something that I might not use.
I would appreciate some guidance. … Hope you’re still monitoring this page.
Thank you!
Harriet
June said
Yes, this is a good idea, Harriet! I also recommend you see my beginner’s advice at www.planetjune.com/beginner 🙂
Anne said
Gracias, muy bueno.
Meghan Bowman said
Hi,
Can you possibly tell,e what color and brand of yarn you used for the grapefruit?
Thanks
June said
Yep, I used Lion Brand Vanna’s Choice Baby in ‘Duckie’. (As that’s a heavy worsted yarn, so a bit thicker than the yarns I used for the rest of the citrus collection, I also had to drop a hook size to keep my grapefruit to scale with the other fruit.)
Meghan E Bowman said
Thank you so much. Love your patterns by the way!!
Meghan said
The grapefruit looks orangish but the duckie yarn is yellow. Am I missing something?
June said
Yes, the ‘blushed effect’ instructions (to make it into a pink grapefruit) are given at the end of the pattern.
Sandra Barton said
Your fruit are so beautiful I love am so happy I found u are my Inspiration love the thing you do.
Chloe said
Many thanks for your very concise direction. I am a complete beginner and need the slowness and clear visuals. You are so very helpful with your tutorials. Also, thanks for offering these free, this is very kind of you.
Ruchi said
Thanks for the patterns. Just finished a lemon. Will certainly make the other fruits as well.
Jody said
Why isn’t my orange or lemon coming out right? I have a stitch marker in place and my counted single crochets are not at the accurate place ending way before stitch marker. I am frustrated seeing I have taken them both apart several time trying to straitening out.
June said
It’s hard to tell what you’re doing wrong without seeing your work, Jody, but it sounds like you must have misunderstood the pattern, as you should always have worked back around to the stitch marker at the end of every round – that’s the clue to know if you’ve followed the pattern correctly for that round. I suggest you pay close attention to the brackets (…) and make sure you work every stitch contained within them before you move on to the next repeat of those stitches, and then make sure you’ve worked the repeat the correct number of times by the end of the round. You should never move onto the next round if you haven’t reached the stitch marker in the previous round: the error will just get worse and worse with each round, and you might end up with a banana shape instead of a lemon!
For further assistance, see the answer to How can I tell if I
Sharen said
My granddaughter now has a baby and she asked me if I could crochet “food” for play – she wants to avoid plastic toys as much as possible. I stumbled onto your site and will add you to my favorites. These look EASY and I hope my great-granddaughter Saige will enjoy them for years to come. Now, ALL I have to do is actually make them ;,) – I tend to collect patterns and yarn in my “I will do this some day” pile. Thank you for sharing your free pattern.
Kathy said
hi, your patterns are great. so is the usa single crochet the same as the uk double crochet ? and do your patterns say if there is a difference? thanku. x
June said
Yes, Kathy, and just check the ‘Terminology’ section at the top of every PlanetJune pattern – I always give the UK equivalent for every crochet stitch that’s differently named 🙂
NERI said
HELLO! Thank you for these patterns!
I CAN NOT DO IT BECAUSE I DON’T UNDERSTAND; PLEASE I CAN EXPLAIN THIS? AS I DO THIS?
Rnd 1 to indent the contrast-coloured round. Once formed, this lip will hold its shape. (Alternatively, leave Rnd 1 sticking up so the contrast colour represents an attached stem
June said
Just look at the 3 pictures below that paragraph, Neri: the left picture shows Rnd 1 sticking up, and the right picture shows it after you’ve pushed it in. You don’t even need the words, really – just follow the pictures (or leave it sticking up if you prefer) 🙂
Valia said
Thank you for the patterns. They are perfect! I
Riana said
Hi June!
The fruits turn out to be really lovely, especially the ‘blushing’ one =D
I’d really like to crochet them, but I’m having a hard time following the pattern instruction. Do you by any chance have the diagram-type pattern instead of the written instruction one?
Thanks
Aran said
Thank you for these patterns!
DIMITRA MAKROPOULOU said
The shapes are perfect, you have a gift!
The Cogaroo said
One of our chickens is named Clementine, so I will of course have to crochet her one! 😉 Thank you for the adorable free pattern!
Lindy said
Brilliant – they look so real and good enough to eat!
Love, Lindy xx
Simone said
What a great summer pattern! They all look delicious! When are we going to make a fruit along on Ravelry? 🙂
.: petrOlly :. said
What a surprise 🙂 A very clever and summer-like idea. I especially like how you made the green stems – really very ingenious 🙂