If you crochet, the humble yarn over (YO, or ‘yarn over hook’, YOH, in UK terminology) is a vital part of every single crochet stitch. But are you doing it correctly? There’s actually a right and a wrong way to wrap the yarn over your hook in crochet, and it’s such a basic move that you may have been doing it wrongly for years without realising!
Let’s look at the difference:
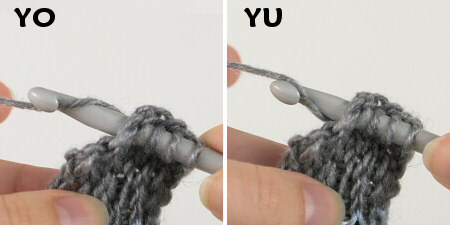
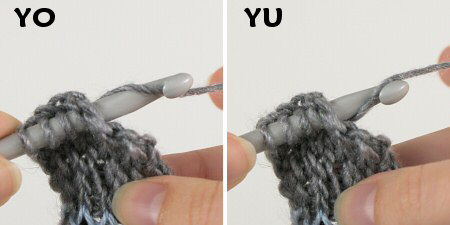
- With a normal crochet YO, you place the hook underneath the yarn strand and then hook the yarn from below.
- With a yarn under (YU), you put the hook over the yarn strand and then hook the yarn from above.
Here’s how they look, if you’re right-handed:
And if you’re left-handed:
I think the confusion may lie in the name yarn over. In crochet, you don’t really wrap the yarn over your hook at all: you use the hook to catch the yarn, so the phrase “yarn over (hook)” would be more accurately named “hook under (yarn)”…
I’ve put together a video to help clarify this – the first in my new Crochet Quickies series of short (around 1 minute) videos to explain very basic or brief crochet techniques. (I’ll still be making longer videos too, for techniques that would benefit from a little more explanation.)
Crochet Quickie: Yarn Over (right-handed)
Click to watch this video on YouTube.
Crochet Quickie: Yarn Over (left-handed)
Click to watch this video on YouTube.
Note: The videos may look a little small embedded in the blog: if so, you can fullscreen them or click through to YouTube to watch them in full HD resolution 🙂
If you are crocheting – and this applies to all standard and Tunisian crochet stitches – passing the yarn over the hook is always the correct way to do a YO.
If you’re not sure which way you do it, grab some yarn and a hook. Pause when you’ve hooked a loop of yarn, just before you draw it up through the stitch, and see which way the yarn lies across your hook, using the photos or videos above for reference – you may discover you’ve been crocheting incorrectly! To try to tell if you’re doing it right in future, remember it’s called yarn over, so the yarn goes over the hook, i.e. the hook should pass under the yarn before you hook the yarn.
Exception
Now here’s the exception, and one I’ve experienced first-hand: this does not necessarily apply for knooking (knitting with a special crochet hook – see my review of The Knook for more information). With knooking, the way that you position the yarn across your hook varies depending on whether you’re knitting or purling. When I first tried knooking, I used a standard YO for all my stitches and they ended up twisted. Why this difference? Because knooking, despite using a crochet hook, is not crochet, it’s knitting with an unusual technique.
There may be other exceptions that require you to wrap the yarn in a different way, but the stitch instructions should always inform you if that’s the case. If all you see is “yarn over” or “YO”, the standard way is the correct way.
Does it really matter?
Yes and no! The difference is more visible with some crochet stitches than with others. For knooking and Tunisian knit stitch, it’s extremely important to use the intended YO/YU. For other crochet stitches, there is a difference in the finished appearance, but it may be much less obvious.
Simone from my Ravelry group worked up a test swatch in rows of sc, which shows a clear difference between the rows of YO and the rows of YU:
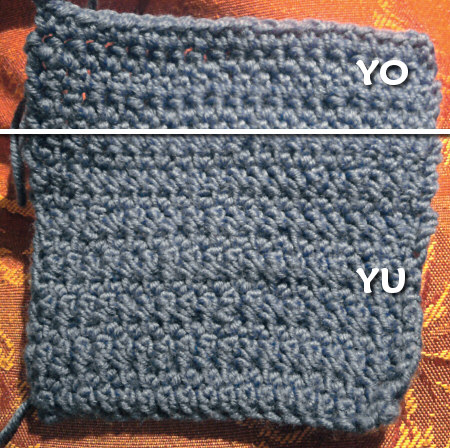
Rows of YO and YU (swatch and photo by Simone, used with permission)
You can see that there’s a definite slant/twist to the YU stitches compared with the YO stitches, and each YO stitch is more clearly defined – the YU stitches seem to blend more into a flatter finished surface. They both look attractive, but they are clearly not the same.
YU in amigurumi
I thought it’d be interesting to see what, if any, difference you’d see if you worked amigurumi (single crochet, worked in the round without turning) with YU, so I made two small amigurumi balls, worked identically except for the YOs or YUs throughout.
Almost immediately, I noticed something unexpected: a flat circle is actually flatter when worked in YU! Normally, the backs of all the stitches are larger than the fronts (because we aren’t turning the work between rounds), which makes a flat circle want to curl up slightly into a bowl shape, with the right side on the inside of the bowl. You can see that slight curling at the edge of my YO sample, but it’s missing from the YU sample! Very interesting…
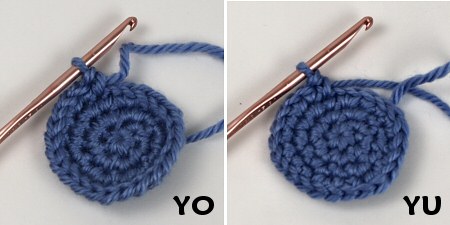
Left: YO edges are curved up (the ‘v’s around the edge face upwards)
Right: YU edges are perfectly flat (the ‘v’s around the edge face outwards)
I found YO and YU equally easy to work, although of course I had to concentrate on every stitch with the YU sample to make sure I didn’t slip back into my usual automatic YO method. And now let’s look at the finished samples:
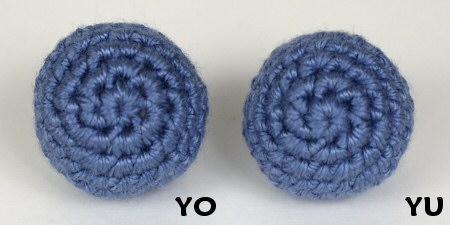
From the top (magic ring visible)
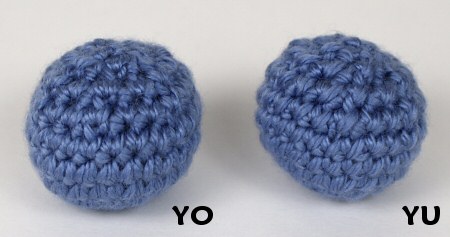
From the side (there are 2 rounds with no increases/decreases around the middle of each ball)
- YO has more obvious texture, whereas YU is flatter. The twisting of the YU stitches seems to actually fill the gaps between the stitches better and each stitch is less clearly defined.
- The twisting of the stitches is very subtle, but I can definitely see a diagonal slant visible within each YU stitch. The slant is more pronounced on the decreases – invisible decreases aren’t so invisible if you YU!
- My YU sample is noticeably smaller. Although this could be a tension issue because of the unfamiliar YU hand movements, it could also contribute to the smaller gaps between stitches.
If your amigurumi stitches don’t look like other people’s, and you’re definitely not working inside out, this could be the reason!
Conclusion
The difference between YO and YU if you’re making amigurumi is slight, but it is noticeable if you’re looking for it. The difference can be more apparent with crochet stitches other than single crochet.
If you’ve just discovered that you’ve always worked in YU, I don’t think you necessarily need to change if you’re happy with the way you’ve been working. There’s no law that says you have to crochet in the same way as everyone else. You’re free to crochet in a non-standard fashion (unless you’re teaching crochet, or creating patterns, tutorials, or crocheted samples for patterns/books) – if you like the finished result, that’s all that matters.
I can confirm (from trying it in reverse) that it’s not easy to make the change, and you’ll probably need at least a few hours of heavy concentration before the different hand movements become natural, or maybe longer if you’ve been crocheting for many years. I would advise that you at least try working a small piece in YO, to try it out, and see how it feels and how the finished piece looks – you may find that you prefer it.
Whichever method you choose, the most important thing is to be consistent, and not switch between the two methods. It’ll only look like you’ve made a mistake if you suddenly switch from one to the other within a piece, which will make some of your stitches look different from others. But if you’d like your stitches to look like everyone else’s, YO is the way to go!
Loved this tutorial? I have so many more amigurumi tips and tricks to share with you!
Boost your amigurumi skills with my latest book, The Essential Guide to Amigurumi, your comprehensive guide to amigurumi techniques and tips.
Do you find my tutorials helpful? If so, please consider making a contribution towards my time so I can continue to create clear and concise tutorials for you:
Thank you so much for your support! Now click below for loads more crochet video and photo tutorials (and do let me know what else you’d like me to cover in future tutorials…)


Barbara Farrell said
Thank you for this tutorial. I had always been taught to stick with YObecause it’s “cleaner.”
I keep coming back to your site for tips because you explain things so well. Your patterns are also well worth purchase for the teaching alone.
June said
Thank you so much, Barbara – I’m so glad you’re finding my tips helpful!
Sherin Christina said
Hi June!!
I’m new to crochet but I love making amigurumis better with Y/u technique..but it makes my toys look thin I want it look chubby can you help me pls?
June said
To get the expected result from a pattern, you should use the same stitch that the pattern uses – changing the stitch will always affect the end result! If you want to use YU sc, you should look for patterns written specifically for that stitch.
Jan Cornelius said
What’s the best way to look for, or find, patterns written for YO or YU? Also, what’s your thought on a combination stitch for amigurumi? Yu, finish with YO?
Thank you.
June said
I can’t help with that, I’m afraid – all my patterns use standard single crochet! Any designer who uses YU or a hybrid (YO/YU or YU/YO) should make that clear in their pattern listings so you can crochet the same way as them and get the same result, but I don’t know if they do.
And, as for the combination YU/YO stitch, I’d personally find it incredibly difficult to remember to switch from YU to YO within each stitch, so I’m sticking with the standard stitches (which I could make in my sleep)! I don’t have an opinion beyond that, except that you should always make the stitch your pattern was written for, if you want to achieve the same result.
Patti said
I bought some amigurumi doll patterns from an Etsy designer. She tells you to YU so I asked her why. She swears it is better, saves yarn, is sturdier etc. I tried a sample and it is so slow going. I have huge problems getting the stitch pulled through the 2 loops to complete the stitch. What are your thoughts on this? Maybe it is just how she learned? Thank you.
June said
Oh no, I’m sorry about that, Patti! I’d take any justifications like that with a pinch of salt: no method is objectively ‘better’ than any other. There may be advantages of one over another in certain situations, e.g. making YU/YO stitches would give you squarer X-shaped stitches instead of the standard V-shaped stitches (because the first loop of each stitch is twisted) which may be useful for certain designs.
Unfortunately, if a designer used a variant of the standard stitches and you don’t follow their lead, you will get a different result – your stitches may have a slightly different shape, skew or thickness to theirs, which will affect the shape, structure and/or appearance of the finished piece. As a designer, I always use the conventional standard way to form my stitches for exactly the reason you’ve found: it’s very difficult to change the way you crochet, and I want my customers to have an enjoyable experience following my patterns.
Emma said
Now everything makes sense. Listen, if you’re a knitter just starting to crochet (like me!) You’re probably doing it wrong!! The knitting YO is just the other way around (“YU”), so it feels very unnatural to do it the crochet way.
The more you know.
Okay, back to practicing for me.
Arnay said
Hi June
Thankyou so very much for this article & images 🙏
I’ve been a YO since my teens, I only noticed this YU since watching utube tutorials. I’ve pondered at length, is it lazy or simply convenience to pull yarn through? I often see the two styles combined in one stitch 🤨. Nice to now know the difference.
Think I shall give the YU a go for edges that often curl forward just to see if it makes a difference for a more flat finish, or actually tightens an edge too much, the latter unlikely based on your findings.
Thanks again to you and ladies for informative comments.
You’ve cleared up my questions beautifully 🌹
Marilynp said
Hi. I taught myself how to crochet 50 years ago when I was a kid and have always used the ‘yarn under’ (YU) technique. Everything turns out beautiful and I haven’t had any problems.
However, I’m working on a project using crochet thread and 1000’s of treble crochets. It’s very difficult to get the tiny hook pulled thru that first wrap of the stitch.
I couldn’t figure out how so many people have made this pattern and not one person complained about this. I noticed if I twist the needle in my fingers to pick up that wrap from the back side it was easier to do, which prompted me to wonder if there is a right/wrong direction to wrap the yarn around the hook. A quick internet search showed me that the proper way is YO, and I found this blog conversation.
So, in my opinion, YO or YU has very similar end results and both create beautiful things. BUT, if you’re working treble crochets with thread, you’ll be able to pick up all the parts of that stitch much easier. Maybe my comment will save someone some headache. Enjoy!!
Sarah Turnbull said
I’ve been “yarn undering” on a splitty s-twist yarn (Drops Safran). It does help, although I would still rather use a different yarn. (Couldn’t find the colour I wanted in any other yarn.)
Tabby said
I’ve had 2 sudden run-ins with yarn under hook method. First was Yan Schenkel’s Animal Friends of Pica Pau amigurumi book. It upset me, because i didn’t know she uses this method beforehand. And now a pattern i bought online, which didn’t specify the method used and i wasted an afternoon trying to figure out why my piece wasn’t turning out the right shape. yo and yu may not matter in very simple shapes, but more detailed patterns won’t turn out the same. I don’t care for the texture created by yu method, so that was my money wasted.
I actually also crocheted yu for years (self-tought) and only realized something was wrong until i moved onto more complicated designs a few years ago. Then i found your article and it was an helpful eye opener 🙂
Rafi Edwards said
Hi June,
I was looking for a video on different crochet textures for amigurumis and came across your article. I’m sorry I do not agree when you say the yarn under is incorrect. I have recently learned a way of making my sc stitches look more consistent and that is made by doing a yarn under the first time you catch the yarn, then a yarn over the second time you catch the yarn. Jo Handmade on Instagram has some videos with basic crochet technique, and she happens to crochet that way. I learned this tip from her patterns and in my opinion it’s changed the way my amigurumis look. The stitches have a “y” look instrad of a “v” look, if you know what I mean. The resulting fabric is a bit thicker too. I always crochet very tightly, but before I still could see stitch inconsistencies and little “holes”, things that have massively improved since I started making my sc stitches first with a yarn under, then with a yarn over.
June said
Rafi, my point in saying that yarn unders are incorrect applies to how standard crochet stitches are intended to be worked. If a pattern says to ‘single crochet’, for example, and doesn’t specify anything else about the stitch, the designer intends the pattern to be worked with standard single crochet stitches (formed with yarn overs, not yarn unders). That doesn’t mean you aren’t free to alter the pattern by working the stitches however you wish, or to create your own patterns with any stitch you can imagine or invent! As I say in the post above:
Your opinion is entirely valid, and I’m definitely not trying to say that you’re crocheting ‘wrongly’ if you prefer to work yarn-under single crochet stitches instead of standard ones – it’s just worth being aware that you’re doing something different from the norm, as it may make more of a difference in certain patterns than others (e.g. if there are taller stitches, combinations of stitches, colour patterns, complex shaping, etc, your result may not look as expected if you don’t form the stitches as the designer intended).
Mona said
Hello June
Thank you for this great clarification and your experiments. After checking how I do it, which was initially not easy I realized that I do both. I yarn over on the first pull through and then I yarn under on the second pull (sc) this seems to kept it tighter (good for amigurami). It doesn’t seem to twist…. Anyone else do it this way?
Jessica Calisher said
I think I only yarn under!! It just feels and seems more natural to me, I get confused trying to do it the way I see in videos and such!! having the yarn behind the hook and wrapping it over is just odd to me. I always seem to have the hook behind the yarn. And the yarn goes over the hook (on top), if that makes any sense!! Except when I chain, then I do yarn over! It
Charlotte Kidwell said
I was watching another instructor’s video a few days ago and I noticed that she was using the incorrect “yarn under” method instead of the correct “yarn over” method of catching the yarn on her hook. I was so surprised to see this that I kept watching the video, with my mouth hanging open, I’m sure! It looked so “alien”! Lol Like it would be hard to do. I was so surprised to see this.
Collette said
I think maybe that it depends on how you hold your hook, too. I hold mine like a pencil. It seems that if you hold your hook like a knife, it would feel easier to yarn UNDER. Hmmmmm?????
Ame said
Never considered the twisting of the yarn in making a yarn under. I see and difference clearly now. This is why finished projects do not appear as neat and smooth. Thank you so much.
Pat said
I know this is an old thread but the question of yarn over or under has been raised lately by people making the octopuses for premature babies. They need to be crocheted fairly tightly so that the stuffing isn’t visible and the yarn under method is the preferred one.
I found it not to bad to make the switch but it does take some getting used to! My octopus was much smaller using the same hook and yarn when I used yarn under. It seems to be because when drawn through the loop, the yarn lies naturally closer to the last stitch and therefore makes a tighter mesh.
Sheri said
I never knew there was a wrong way to wrap the yarn! No wonder I have always had problems counting my rows and working some patterns. I bet working a triple will be easier too.
Joy Franklin said
I discovered that I use a mixed method; YU when I first insert the hook to pull the yarn through, then YO to finish the stitch. My sc look like yours, though, so I guess it works.
My amigurumi are looking so much better since I’ve been using your methods for invisible decrease, closing the ending circles up, and the invisible join for attaching different parts. Thank you for all your great tutorials with the pictures and videos!
CP said
I usually YO, but for splitty S plied yarns, I YU. YU wraps the yarn like western knitting, which is what the S plied yarns are designed for. Also, if you do any inverse crochet stitches (approaching the work like a purl stitch) YU makes the inverse stitches look better. It’s a useful thing to know!
Stephanie said
Oh my GOSH!! Thank you so much for this post!! I’ve always had problems pulling through the second loop in my treble stitches, tried experimenting with different yo techniques, found something that worked better, googled it, and found your post! I’ve been doing it wrong forever!!! Love the way you explained it and gave fabric samples. I wish I had seen something like this when I started crocheting! Also glad I found this now since I’m planning on tackling Tunisian in my next project. Thank you!!!
Rhondda Mol said
Hi June, Thank you. I was watching You Tube today and saw the mixed yarn-over technique being used (consistently) and thought I was perhaps crocheting incorrectly! Your article cleared that up for me and I have shared with my FB page – I wonder what the difference would be if you YO, insert hook YU to pull up the loop and then YO for the remainder of the stitch…did anyone in your Ravelry group try that? Just me being super curious! Thanks again, Rhondda
Sarah said
I think I did that when I first started crocheting. My DC stitches didn’t twist. They were poofy instead.
Jane Rimmer said
I’ve seen crocheters who use a “mixed yarnover” combination when doing double crochets. They yarn over (back to front) insert hook through the stitch, then place the hook over the yarn to grab and pull through, then the yarn over (back to front) before pulling through 2 loops.
Try some swatches of using a yarn over each time for a row of doubles, and then the “mixed yarnover combo”. Now try some of each kind within a row. Compare the thickness of the post of the stitchs, and how the “feet” of the stitch sit on the row below.
Haley Miller said
I just realized I’ve been doing more of the “mixed yarnover” approach that you’re talking about. I’ve been doing it for so many years, I never realized it was wrong until I looked up how to do some more complicating stitches. I noticed they were all putting the yarn over the opposite way to what I learned.
Tya TK@Craftrunwag said
Thanks for the great tip. I never thought about YO vs. YU before.
N said
0.0 !!! Ok… I’m just one of those who just found out that all their crochet experience has been YU… Will try to change it, though, to YO! Thanks for the advice and the videos!
Meredith said
Hmm…I think I do YU most of the time, actually! But I am a big believer in consistency…as long as the project is uniform, that’s what counts to me. I might try doing my next project YO, but we’ll see.
Regina said
I am feeling the same. I started crocheting when the only way to learn was through a book and it never specified. I picked the most comfortable to me, which is YU. I keep trying to change my ways but it feels so awkward and my consistency is way off. My practice swatches look very uniform and clean with YU. However, I did notice there was a little more space between double crocheting, so I may use it more when I want a denser look.
renee said
Thanx so much for your tutes this makes my learning posible as i am beginer friend of mine helps doing it on my own makes me so pleased love the site a senior will try do not have facebook or ipod or camera who knows maybe someday can send ya a pic of my work by Renee
Yarnitect said
Thanks for the awesome tutorial. It really is fascinating to see how one element changes the look and feel of a project. Loved all the details and photos.
Lisa said
Thanks for clearing that up! It was one of the first questions I asked when I was learning and my teacher (who has been crocheting many years) said it made no difference!! Thankfully I’ve been doing the YO way, but its good to know there is a right and wrong.
jamie said
It’s funny that I came across a related blog entry a few hours after reading your post: www.tapestrycrochet.com/blog/?paged=2. How I came to this is still a question to me since I was looking for crochet turtle afghans (??). At any rate, what really struck me about the utility of YU was the picture comparing the color changes with YU vs. YO for the tapestry crochet method (3rd pic down). The distinction between the colors with YU, compared to YO, really is noticeable, and more desirable, imo!
Barbara Mann said
YU great for crab stitch!
June said
Thanks for the tip!
Jeannine said
I have noticed this, also. Thanks for the thorough discussion!
mags said
Well – I had never even thought about whether I was using the correct technique – thank you. I’ll have a look and make sure my beginners aren’t doing it the wrong way …
June said
It never occurred to me either, until a couple of months ago when one of my customers was doing Tunisian crochet for the first time (for my Tunisian Stripe Purse) and her stitches looked twisted. After some playing about and swatching I managed to replicate the problem (it was, of course, YU instead of YO) and when I posted the solution to my Ravelry group, other people suddenly realised they’d been doing YU for as long as they’d been crocheting! That was quite an eye-opener, but it made me realise there should really be more detailed instructions available for some of these ‘basics’ that we take for granted.
Silverlotus said
Very interesting, June. Thanks for sharing.
Stocki said
Well fancy that! Thank goodness I have been doing it right all these but it is something so simple and something I never even thought about.. Thanks Janet…great tutorial:)x