Crocheted Embellishments Tutorial
Crocheting little shapes is a great way to make your own custom accessories – brooches and pins, hair decorations, and even jewellery. The best embellishments are tiny pieces (so you can use multiple pieces without looking over the top) – such as my Posy Blossoms, Love Hearts, or Basic Rose (especially in a finer yarn so it comes out smaller and daintier).
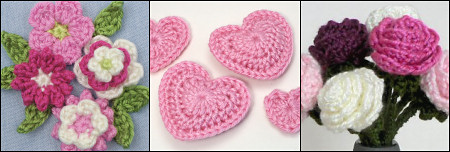
These patterns all make beautiful crocheted embellishments
A little prep work is invaluable for attaching embellishments securely, especially if you need to attach them to something hard, like a hair barrette, brooch/pin back, etc, or make an appliqué or brooch from several crocheted pieces. There’s no one ‘right’ answer for how to tackle this, but I’ll cover some options and general tips in this tutorial.
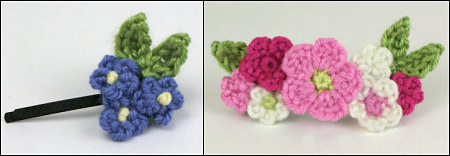
And, because it’s easier to learn by example, I’ll also give you a couple of walk-throughs so you can see exactly how I made these pretty hair accessories – a forget-me-not hair clip and a posy barrette:
This tutorial is Donationware – the instructions are available for free, but if you like it please consider sending me a donation to show your appreciation:
Send me a donation and receive the easy-to-print PDF version of the tutorial as a thank you!
Donations of any size are much appreciated. Just add the amount you wish to donate, and, once you have checked out and paid, your PDF will instantly be available to download from your PlanetJune account.
The complete instructions are available below, regardless of whether or not you choose to pay for them 🙂
This is a PlanetJune original tutorial. Please do not share or reproduce this tutorial; instead post a link to www.planetjune.com/embellish
General Tips
A couple of definitions for the purpose of this tutorial:
- an appliqué is a crocheted object you’ll add to the surface of something else as embellishment or decoration
- appliquéing is the act of attaching the appliqué to the surface
There are two main ways to attach appliqués: sewing or glueing. Attaching embellishments with adhesive is simple and fast, but sewing gives a more secure finish. I always sew my embellishments, but the choice is yours! Here are a few pointers for each:
Adhesives
- Fabric glue is the best choice for glueing yarn – it dries clear, is washable, and makes a supple, secure bond between porous materials such as yarn, felt, and fabric.
- Craft glue (white glue) isn’t as secure as fabric glue and will dry stiff, not flexible. It also may not dry completely clear and won’t stand up to being washed, but if you won’t need to wash or bend your piece, it may be an acceptable alternative to fabric glue.
- Hot glue is messy and it’s easy to get burnt when placing your elements – I don’t recommend it unless you’re a hot glue expert!
Note: Most glues aren’t designed to glue a porous object (yarn, felt, etc) to a non-porous object (plastic, metal, etc) so I always recommend you stitch appliqués to hair clips, hairbands, pin backs, etc, to make sure they stay securely fastened and that you don’t get any unfortunate surprises (like the glue seeping through to the front and leaving a visible mess…)
For any adhesive, read the packaging for usage and drying times, and make sure it has fully dried before you use or wear your embellished item!
Sewing
- Using a yarn needle and the yarn tails to sew your appliqués down is generally only practical if you’re stitching them to a project with a hidden reverse side (e.g. a toy or a lined bag). With anything else, it would be difficult to hide your yarn stitches.
- Embroidery floss or crochet cottons are thicker and make a secure attachment with fewer stitches. Embroidery floss can also be easily colour-matched to your yarn or your backing piece.
- For the most invisible result, use sewing thread and a sharp needle to stitch the appliqués to the backing fabric.
Note: You’ll want to use a sharp needle to make it easy to stitch through felt or multiple layers of yarn with sewing thread or embroidery floss. Choose a small diameter needle with an eye size that will accommodate your thread.
Soft Surfaces
Attaching your crocheted embellishments to a soft surface is very easy: if you’re appliquéing onto fabric or another crocheted surface, such as embellishing clothing, bags, or amigurumi, you can stitch or glue your pieces down directly.
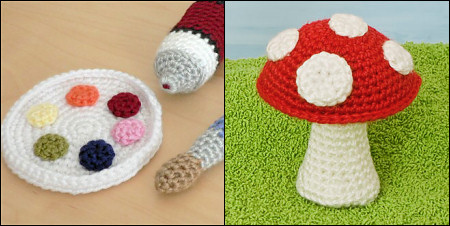
The blobs of paint and toadstool spots are stitched-down round appliqués.
(Pattern sources: Ami Paint Set pattern; Toadstool from my book, CIG to Amigurumi)
Hard Surfaces
By ‘hard surfaces’, I mean metal or plastic, which you’ll encounter when you want to attach an appliqué to hair accessories, pin backs, etc. As I said in the Adhesives discussion, above, I do recommend stitching these pieces together rather than glueing them, to make a more secure long-lasting join.
To stitch an appliqué onto the hardware, turn the appliqué face down, and place the hardware down on top. Make a series of parallel stitches, with each stitch passing over the hardware, down into the appliqué, and up again on the other side of the hardware. (See the examples below for clarification.) To make the most secure join, stitch along the whole length where the two pieces touch.
Clustered Embellishments
If you’re making an appliqué from more than one component and stitching it to a hard surface, it’s best to attach the pieces together first, so they’ll stay in the desired arrangement. To do this, you’ll need a backing fabric, which you can make from felt, or by crocheting a backing piece. Felt is easy to cut into any shape and doesn’t add much bulk to the piece; a crocheted backing will be more sturdy and longer-lasting, but thicker and more noticeable.
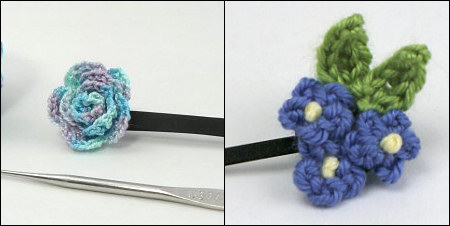
Left: a single component (Basic Rose made in crochet thread)
Right: a clustered group (Posy Blossoms in blue as forget-me-nots)
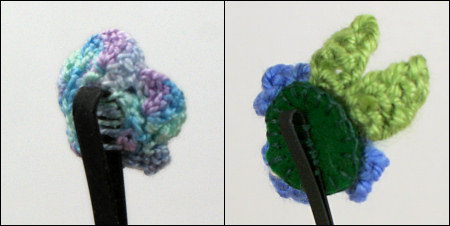
The backs of the above hair clips – as you can see, the cluster takes a little more work to create, but that’s all invisible from the front!
I’m going to show you two examples below – I suggest you read through both, as I give different tips in each! Between the two, they should give you a clear idea of how to make and use clustered embellishments.
Example 1: Forget-Me-Not Hair Clip
This method gives the best possible finish, even on the reverse side. If you want to sell embellished hair accessories, this is the kind of professional-looking finish you’ll be aiming for. (For beginners, or crafters in a hurry, see Example 2, below, for the simpler method.)
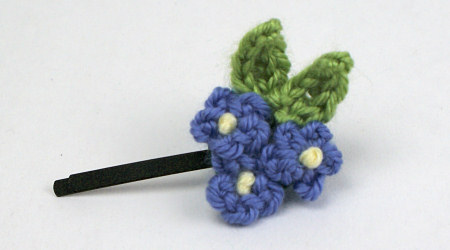
I’ll walk you through how I made the forget-me-not hair clip pictured above, to give you a general idea of how to create a multiple-piece appliqué. I’ll also give some alternate options (ALT) in italics throughout my instructions.
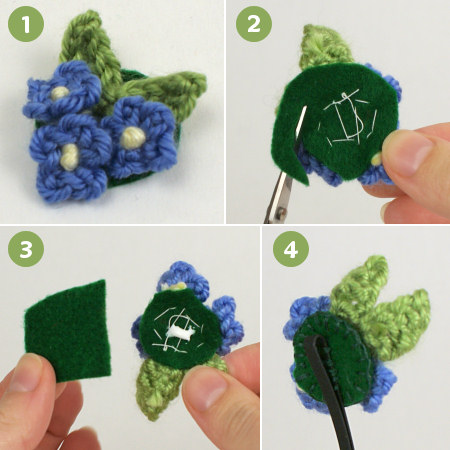
- Arrange your pieces into the desired layout. Cut a piece of felt (ALT: crochet a backing piece) large enough to attach all the components to. The felt can be oversized at this stage (ALT: keep the crocheted backing as small as possible so it won’t be visible from the front of the finished piece).
If your components are layered on top of each other, start with the components at the back (the leaves in my example above). Remove all but one of the components from the backing (you may wish to sketch the general arrangement first, so you don’t forget it) and use a needle and sewing thread to make a couple of stitches through the crochet and into the backing fabric (ALT: use fabric glue to stick the piece to the backing). If you keep the stitches very tiny on the front, they won’t show in the finished piece, or you can just stitch through the back of the crochet if you can’t make your stitches small enough.
Add another component and stitch (ALT: glue) it down in the same way. Continue until all the pieces have been attached.
- As you can see, the stitches look very messy on the back. This is actually an advantage, as you can easily see where your stitches are, so you won’t snip through them in the next step! Trim the felt to just outside the edge of your stitches so the felt will be less visible from the front of the piece.
- Optional: To cover the messy stitches and strengthen the backing piece, add a second piece of felt on the back of the first. (I glued the centre of the two pieces together to make it easier to trim the second felt piece to the same size and shape as the first. Use the glue sparingly as it’ll be difficult to stitch the cluster down later if the felt has been stiffened by the glue.)
To secure the felt pieces together and make them longer-lasting, I blanket-stitched them together all around the edge with a matching shade of embroidery floss. (ALT: just glue them together, all the way to the edges.)
- I then positioned the hair clip and stitched the felt to the clip with the embroidery floss. Use multiple stitches so it’s attached securely. (ALT: You could instead glue it to the clip with an appropriate adhesive, but I feel that stitching is much stronger, and although the stitches do show on the back of the clip and look a bit untidy, they aren’t at all visible when the clip is in use.)
Example 2: Posy Barrette
In case that all looks like far too much work, here’s the faster method, without the 2nd layer of felt and the blanket stitching. This gives a slightly messier reverse side – you wouldn’t want to sell anything made this way – but looks just as good from the front!
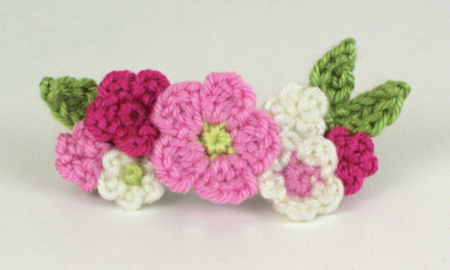
I won’t repeat the parts that are the same as Example 1, but I’ll go into a bit more detail on the sewing here, in case you need a little extra assistance with that part.
To start, I cut my felt backing to be slightly larger than the top of the barrette, and decided on arrangement of blossoms that would completely cover the barrette. Tip: to make your arrangement look natural, don’t arrange your pieces so they are completely symmetrical – it will look more stylish if the two sides are balanced but not identical.
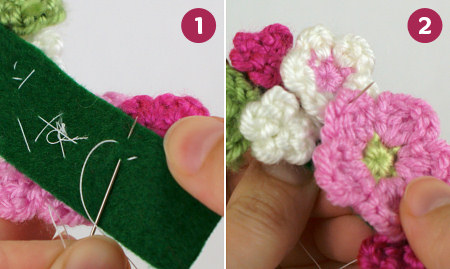
- Take small stitches through the felt and catch a small amount of the back of the appliqué with each stitch. For a flat result, stitch the entire appliqué to the backing; for a more dimensional result, only make stitches near the middle of each blossom, and near the base of each leaf – you’ll probably want at least 3 stitches per piece, or more if you use larger appliqués.
- If you left the edges of the appliqués free to move, they may move too much and expose the backing felt. At any point where the gaps look too big, stitch right through to the front, through the edge of the overlapping appliqués, then pass the needle back down through the crochet, inserting your needle very close to where your thread emerged and bringing it out at the back. The tiny stitch you formed won’t be visible from the front, and the pieces will stay together. Don’t go overboard with this – small gaps are okay, and the result will look better if the pieces still have some movement and dimensionality.
Trim the felt, if required, as in Example 1.
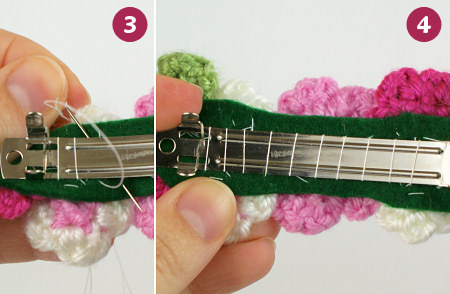
(If you’re using a barrette like mine, pull out the spring clip from the middle as I’ve done here to make the sewing easier.)
- Knot the thread onto the backing fabric underneath where it will be covered by the barrette. Hold the barrette in place and begin to stitch from one end of the barrette, passing the thread over the barrette. Pass the needle through the backing fabric so it enters the fabric close to the barrette on one side, and exits close to the barrette, a little further along, on the other side. Pull each stitch taut to secure the barrette firmly against the felt.
- Continue to stitch in this way until you have a ‘ladder’ of stitches all along the length of the barrette. Check your stitches are tight enough – if the barrette can wiggle under the stitches, tighten them until it’s held firmly in place. Fasten off securely and hide the thread end under the barrette.
(Don’t forget to fit the spring clip back into place!)
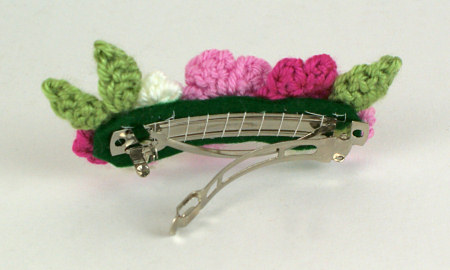
As you can see, a few of my stitches show on the exposed felt. I recommend that you match your thread colour to your felt, so the end result will look tidier. (Obviously I wanted you to be able to see my stitches for the purpose of this tutorial!) But, from the front, it’s absolutely perfect:

I hope these examples give you a general idea for how to make crocheted accessories using clustered embellishments. Part of the appeal is that this is all very flexible – there’s no right or wrong way to do it – and you can choose your method depending on the size and shape of your pieces, how sturdy you want it to be, and how neat you want the reverse side to look.
One last tip: it’s best to look for hardware (hairband, barrette, pin back, etc) that’s wide enough to securely stitch your appliqué around the top of the hardware without it swinging down to either side. For narrower hardware, you can also support a more dimensional item (e.g. my Basic Rose) with a stitched-on felt backing, which gives it a flatter base that’s easier to attach.
* * *

Crocheted embellishments can be a fast, easy way to customize an outfit, cover a stain, or make accessories. With a little more effort, you could use my clustered embellishment technique to create a complex, unique, show-stopping piece! I hope you’ll be inspired to get creative and add a little something extra to just about anything with crocheted appliqués…
I hope you enjoyed this tutorial! Please leave me a comment if you did, and consider leaving me a donation. Thanks!
Loved this tutorial? I have so many more amigurumi tips and tricks to share with you!
Boost your amigurumi skills with my latest book, The Essential Guide to Amigurumi, your comprehensive guide to amigurumi techniques and tips.
Do you find my tutorials helpful? If so, please consider making a contribution towards my time so I can continue to create clear and concise tutorials for you:
Thank you so much for your support! Now click below for loads more crochet video and photo tutorials (and do let me know what else you’d like me to cover in future tutorials…)


Bobbie navarro said
I would like to know how to make the embellishments themselves. Ie the posy and forget me knot
Thank you for sharing
June said
No problem, Bobbie! They are all part of my Posy Blossoms pattern 🙂
Myra Lewis said
This blog is wonderful. I hope I can receive more of what you do
Amiguruthi said
This is exactly why I read your blog June – tips for things I’d never really considered trying which are presented in such a simple but very informative way. Same goes for all your crochet science experiments – I love reading those and seeing how they apply to things I’ve made or will make 🙂
Thanks for this – it makes appliqu
Sara said
Hi June!
Thank you so much for this wonderful tutorial. I have wanted to do embellishments on things like hair clips but was always very intimidated by how to attach everything in a way that is secure without looking sloppy. You did a fabulous job of combining ease with finesse, and the results are gorgeous! Thank you for sharing your wisdom!